
Subscribe to Our Youtube Channel
Related Manuals for Avery Dennison 9486


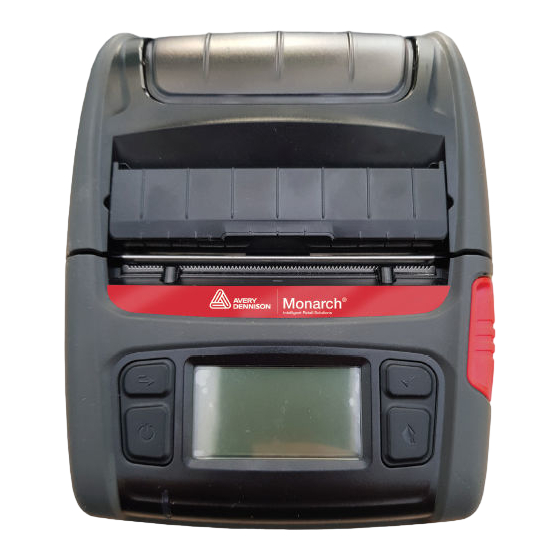
Summary of Contents for Avery Dennison 9486
- Page 1 Avery Dennison® 9486 User’s Manual Classification: Avery Dennison – Public Avery Dennison is a registered trademark of Avery Dennison Corporation. TC9486UM Rev. AA 2/22 ©2021 Avery Dennison Corporation. All rights reserved.
- Page 2 Each product and program carries a respective written warranty, the only warranty on which the customer can rely. Avery Dennison Corp. reserves the right to make changes in the product, the programs, and their availability at any time and without notice. Although Avery Dennison Corp. has made every effort to provide complete and accurate information in this manual, Avery Dennison Corp.
-
Page 3: Table Of Contents
Table of Contents Getting Started ....................................5 Printer Features ....................................5 Package Contents ....................................5 Optional items ....................................5 About the Printer ....................................6 Connecting Cables....................................7 Communication Cable ................................... 7 Fixed Communication Cable ............................... 7 Using the Battery .................................... 9 Battery Installation ..................................... - Page 4 Cleaning the Printer ..................................23 Cleaning the Exterior ..................................23 Cleaning the Interior ..................................23 Using Accessories ..................................25 Using the Optional Belt Strap ............................... 25 Using the Optional Shoulder Strap ............................. 25 Classification: Avery Dennison – Public...
-
Page 5: Getting Started
1 Getting Started The Avery Dennison® 9486 printer is a 3-inch thermal printer which simultaneously connects with Bluetooth and WLAN. It is Ideal for smart mobility labelling due to its compact, lightweight design with an easy-to-open peeler and LCD. Find additional manuals on our Website (www.identificationsolutions.averydennison.com). -
Page 6: About The Printer
About the Printer Classification: Avery Dennison - Public... -
Page 7: Connecting Cables
3. Fix the cable by turning the screw as shown. 4. Connect the cable to the USB port of the device (PDAs, PCs, etc.). The optional fixed interface cable that can be connected to the printer is Serial/USB cable provided by Avery Dennison. Classification: Avery Dennison – Public... - Page 8 Classification: Avery Dennison - Public...
-
Page 9: Using The Battery
2 Using the Battery Use only the provided battery and AC/DC adapter; voltage and electrical current specifications of the printer and battery charger must match or damage may occur. Battery Installation 1. Insert the battery in the bottom of the printer, and ensure that you align the battery hook properly. -
Page 10: Using The Single Battery Charger (Optional)
2. Plug the power cord into a power Outlet. Input power is 100 ~ 240VAC, 50/60Hz, 1.0A. 3. When the power is supplied, the yellow, green and red LEDs are on for three seconds and do the self-test. Use only designated AC/DC Adapter. (12VDC, 3A Warning Classification: Avery Dennison - Public... -
Page 11: Charging Battery
Warning - If the red LED continues to blink despite several attempts (4 ~ 5 times) to install the battery, contact Service - The charging time may vary depending on the type of the charger Classification: Avery Dennison – Public... - Page 12 Classification: Avery Dennison - Public...
-
Page 13: Loading Supply
3 Loading Supply Supplies can be loaded for non-peel or peel mode. Loading for Non-Peel Mode 1. Press the Open button to open the paper cover. Remove the empty core if needed. 2. Insert the supply. 3. Pull out the paper and close the paper cover. The specification of the paper inner diameter of the standard paper disks are 19 mm. -
Page 14: Loading Fan-Fold Supply
Slide the peel bar back then pull the paper. Loading Fan-Fold Supply 1. Hold the paper guides all the way open. 2. Lift the left guide holder. 3. Separate the fan fold cover by pushing as shown in the figure. Classification: Avery Dennison - Public... -
Page 15: Loading Wide (3 Inch) Supply
Loading Wide (3 Inch) Supply 1. Hold the paper guides all the way open. 2. Lift the right guide holder. 3. Load the supply. Use only when you are using 3 inch (80mm) paper. Classification: Avery Dennison – Public... - Page 16 Classification: Avery Dennison - Public...
-
Page 17: Using The Control Panel
4 Using the Control Panel Power Button Turns the printer on/off and move to main menu or executes an action. • When the printer is off, press this button for approximately 2 seconds to turn on the power. • When the printer is on, press this button for approximately 2 seconds to turn off the power. •... -
Page 18: Lcd Menu
Bluetooth is enabled and connected to the host device. Display signal strength of wireless LAN. Failed to find the registered AP Password incorrect Receiving data, printing or paper feed Paper empty Cover open TPH overheating Battery level Classification: Avery Dennison - Public... - Page 19 2) Print the setting information Set Backlight, Sleep and Auto Power Off Time 1) Backlight On / Off 2) Backlight Auto Off time setting 3) Power save and Power off function On / Off Set hex dump mode Classification: Avery Dennison – Public...
- Page 20 Classification: Avery Dennison - Public...
-
Page 21: Using Bluetooth
Tap the host device to logo on the left side of the printer. Follow the Bluetooth pairing instructions for your smart device to connect to the 9486 Printer. When connecting with the 9486 Printer via Bluetooth your smart device should list:... - Page 22 Classification: Avery Dennison - Public...
- Page 23 6 Cleaning the Printer Use caution when cleaning the printer. • Turn the printer off before cleaning. • Wait 2-3 minutes after power-off to allow the printer to cool. • Do not to touch the heating region of the printhead with your hand while cleaning. •...
- Page 24 Classification: Avery Dennison - Public...
- Page 25 7 Using Accessories Using the Optional Belt Strap 1. Insert the belt strap screw into the belt strap hole. 2. Use a coin to tighten the belt strap screw as shown in the image. 3. Unfasten the belt strap Velcro. 4.
Need help?
Do you have a question about the 9486 and is the answer not in the manual?
Questions and answers