JVC KD-NX5000 Instructions Manual
Hdd navigation/dvd receiver
Hide thumbs
Also See for KD-NX5000:
- Instructions manual (357 pages) ,
- Installation and connection manual (6 pages) ,
- Brochure (8 pages)
Table of Contents
Advertisement
Quick Links
Download this manual
See also:
Instruction Manual
,....,~
~
ail
@I~
ULT~t=4
?,O'q
~dh
I)[]IDOLBVI
2VE
(illD~i
2.0+0igital Out
DIGITAL
ODD
AUDIO/VIDEO
IOIGITAL VIOEol
QuO
~
NAVTEQ
-.
RADIO
READY
TRAFFIC
-.M
Microsoftill>
Windowsill>
Powered
HDD NAVIGATION/DVD RECEIVER
NAVEGACION HDD/RECEPTOR DVD
SYSTEME DE NAVIGATION
A
DISQUE DUR/RECEPTEUR DVD
KD-NX5000
JVC
For installation and connections,_ refer to the separate manual.
Para la instalacion
y
las conexiones, refierase al manual separado.
Pour l'installation et les raccordements, se referer au manuel separe.
INSTRUCTIONS
MANUAL DE INSTRUCCIONES
MANUEL D'INSTRUCTIONS
For customer Use:
Enter below the Model
No. and Serial No. which
are located on the top or
bottom of the cabinet.
Retain this information
for future reference.
Model No.
Serial No.
LVT1627-001A
[J]
Advertisement
Chapters
Table of Contents

Related Manuals for JVC KD-NX5000


Summary of Contents for JVC KD-NX5000
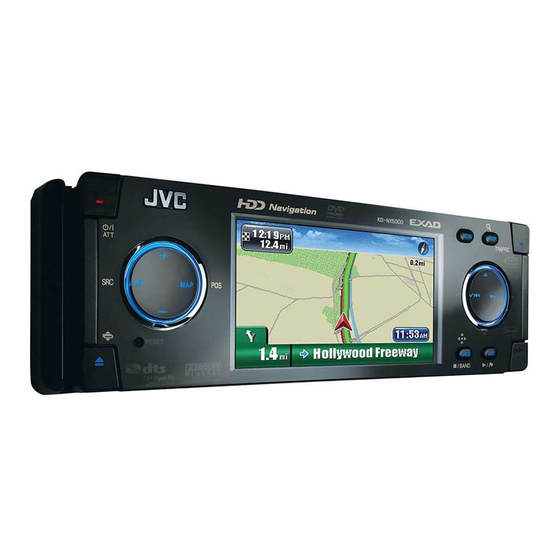
- Page 1 HDD NAVIGATION/DVD RECEIVER HDD NAVIGATION/DVD RECEIVER NAVEGACION HDD/RECEPTOR DVD NAVEGACION HDD/RECEPTOR DVD SYSTEME DE NAVIGATION SYSTEME DE NAVIGATION DISQUE DUR/RECEPTEUR DVD DISQUE DUR/RECEPTEUR DVD KD-NX5000 KD-NX5000 ,..,~ ,..,~ ULT~t=4 ULT~t=4 (illD~i (illD~i ?,O'q ?,O'q I)[]IDOLBVI I)[]IDOLBVI DIGITAL DIGITAL 2.0+0igital Out 2.0+0igital Out...
- Page 2 If you need to operate the unit while driving, Changes or modifications not approved by Changes or modifications not approved by JVC could void the user's authority to operate JVC could void the user's authority to operate be sure to look ahead carefully or you may be be sure to look ahead carefully or you may be involved in a traffic accident.
- Page 3 Hard Disk Drive (HDD) Hard Disk Drive (HDD) Installation Installation • DO NOT install any unit in locations • DO NOT install any unit in locations This unit has a built-in HDD, which is a device This unit has a built-in HDD, which is a device where: where: to read minute magnetic changes.
- Page 4 How to reset your unit How to reset your unit How to forcibly eject adisc How to forcibly eject adisc If a disc cannot be recognized by the unit or If a disc cannot be recognized by the unit or •...
- Page 5 INFORMATION (For U.S.A.) INFORMATION (For U.S.A.) This equipment has been tested and found This equipment has been tested and found - - - - - - • The monitor built in this unit has been • The monitor built in this unit has been to comply with the limits for a Class B digital to comply with the limits for a Class B digital produced with high precision, but it may...
-
Page 6: Table Of Contents
Contents Contents _ m- - - - - - _ m- - - - - - 8 Introduction 8 Introduction Initial settings Initial settings Basic operations Basic operations Parts index Parts index Remote controller-RM-RK250 Remote controller-RM-RK250 18 Navigation system 18 Navigation system Basic operations Basic operations Registering your home... - Page 7 51 Radio 51 Radio Listen ing to the rad io Listen ing to the rad io Listening to the satellite radio Listening to the satellite radio 59 Discs and HDD 59 Discs and HDD Disc operations Disc operations Music server operations Music server operations CD changer operations CD changer operations...
-
Page 8: Initialsettings
Initialsettings Initialsettings When you turn on the unit for the first time, the initial setup screen appears. Follow the procedure When you turn on the unit for the first time, the initial setup screen appears. Follow the procedure below and make necessary settings. below and make necessary settings. - Page 9 Calibration Calibration Before using the Navigation System first time, it is required to calibrate the Navigation System. Before using the Navigation System first time, it is required to calibrate the Navigation System. Reset Calibration) Reset Calibration) • After deleting the calibration data (1& •...
-
Page 10: Basicoperations
Basicoperations Basicoperations ..lye ..lye TRAFFIC TRAFFIC Reset the unit. Reset the unit. • Use only when the internal • Use only when the internal ® ® ® ® malfunctions. malfunctions. ~/". ~/". ./BAND ./BAND To turn on the power To turn on the power To change the source To change the source TUNER""... - Page 11 To switch between the map screen and AV To switch between the map screen and AV AV screen AV screen screen screen AV screen AV screen Station name Station name 92.5 92.5 mi~) mi~) 10:35 10:35 You can always switch between the AV You can always switch between the AV screen and the map screen.
- Page 12 To call up a menu To call up a menu Navu!:atI.on Menus Navu!:atI.on Menus AVMenu AVMenu Map screen Map screen screen screen Station name Station name 92.5 92.5 10:35AM 10:35AM Destination Menu Destination Menu AV Menu AV Menu [90J [90J [42J [42J Destination...
- Page 13 Menu screen Menu screen ~ llIlli!I!IIIII~~ ~ llIlli!I!IIIII~~ Remaining time until the Remaining time until the Total page number Total page number ----e ----e Current page number/ Current page number/ menu screen goes off. menu screen goes off. (Appears only on AV Menu.) (Appears only on AV Menu.) •...
-
Page 14: Parts Index
Parts index Parts index I..I..• Turn on the unit. • Turn on the unit. ,--;-.; ,--;-.; .1,•. .1,•. ·.11· ·.11· ~)tlllAII··. ~)tlllAII··. I • I • Turn off the unit if pressed and held. Turn off the unit if pressed and held. L!j··... -
Page 15: Remote Controller-Rm-Rk250
-.~~~:~ r i i ~ r ; ; : ; ; s , ; " ; ; , ; , , i _ light (direct sunlight or artificial lighting) . light (direct sunlight or artificial lighting) . .JVC .JVC Remote sensor... - Page 16 Operations from the remote controller Operations from the remote controller In Navigation Menus: In Navigation Menus: Switch to the AV screen. Switch to the AV screen. • Change the source. • Change the source. In AV Menu: Change the In AV Menu: Change the source and switch to the source and switch to the AV screen.
- Page 17 • Make selections in disc menus. • Make selections in disc menus. • DISC • DISC buttons: Change discs for a CD changer. buttons: Change discs for a CD changer. Disc: Confirm the selection. Disc: Confirm the selection. DVD/DivX 6: Show the disc menu. DVD/DivX 6: Show the disc menu.
-
Page 18: Navigation System
Navigation System Navigation System Safety instructions for Safety instructions for Navigation System Navigation System Basic operations Basic operations Registering your home Registering your home To register your home To register your home To go home To go home Starting guidance Starting guidance Setting adestination using Shortcut Menu Setting adestination using Shortcut Menu... -
Page 19: 36 Arranging Your Route
36 Arranging your route 36 Arranging your route Setting places to stop by Setting places to stop by Saving and loading routes Saving and loading routes Avoiding acongestion ahead Avoiding acongestion ahead 38 Registering favorite points 38 Registering favorite points Marking your favorite points Marking your favorite points Editing your favorite points... - Page 20 Saf~tx Saf~tx ;n$tlu(f;ODS ;n$tlu(f;ODS Navigation System Navigation System SAFETY INSTRUCTIONS SAFETY INSTRUCTIONS • Traffic signs should be observed carefully • Traffic signs should be observed carefully while driving using the Navigation System. while driving using the Navigation System. Use of the Navigation System is only permitted Use of the Navigation System is only permitted Navigation System is only an aid.
- Page 21 2006 NAVTEQ All rights reserved. and updates may be available." appears on the and updates may be available." appears on the © © monitor, visit <http://www.jvc-exad.com>. monitor, visit <http://www.jvc-exad.com>. For details about updating your unit, visit For details about updating your unit, visit <http://www.jvc-exad.com>.
- Page 22 Basicoperations Basicoperations Current position mode Current position mode - The map scrolls automatically so that your position is always at the center of the map. - The map scrolls automatically so that your position is always at the center of the map. Show traffic information.
- Page 23 To change the map view To change the map view To call up menus To call up menus Navigation Menus Navigation Menus The map view changes as follows: The map view changes as follows: Each time you press the button, the menu Each time you press the button, the menu Heading Up Heading Up...
-
Page 24: To Register Your Home
Registering your home Registering your home To register your home To register your home To go home (Home) To go home (Home) Register your home or your office, wherever Register your home or your office, wherever When you have registered your home, you can When you have registered your home, you can you go often, as Home, so that you can easily set you go often, as Home, so that you can easily set... - Page 25 ..What is Shortcut Menu? What is Shortcut Menu? On the map screen, you can call up Shortcut Menu by pressing ENT. Shortcut Menu is a gateway On the map screen, you can call up Shortcut Menu by pressing ENT. Shortcut Menu is a gateway to various operations.
-
Page 26: Setting Adestination Using Shortcut Menu
Starting guidance Starting guidance • You can set destinations only after calibration is finished. • You can set destinations only after calibration is finished. [9J) [9J) Setting adestination using Shortcut Menu Setting adestination using Shortcut Menu Scroll the map to display the destination at the center of the Scroll the map to display the destination at the center of the map. -
Page 27: Setting Adestination Using Destination Menu
Setting adestination using Destination Menu Setting adestination using Destination Menu Call up Destination Menu. Call up Destination Menu. Select one of the methods to search for your destination. Select one of the methods to search for your destination. Destination Destination Destination Destination [24J... -
Page 28: Searching For Aplace
Searching for aplace Searching for aplace To input names, addresses, or numbers To input names, addresses, or numbers 3 Select the item you want from the 3 Select the item you want from the list. list. Ex. Input screen for a city name Ex. -
Page 29: Poi Near A Place/Route
Input the street name. Input the street name. While guided, select the area to search if While guided, select the area to search if necessary. necessary. • You can also select the center of the city. • You can also select the center of the city. (The list of city centers may appear.) You (The list of city centers may appear.) You ~/"... -
Page 30: From Last Destinations
From last destinations From last destinations From the list of POI From the list of POI (Previous) (Previous) (POI) (POI) You can select a place from the last 50 You can select a place from the last 50 The System has a huge database of POI (Point The System has a huge database of POI (Point destinations and via points. -
Page 31: From Your Favorites
By category and name By category and name By telephone number (Telephone) By telephone number (Telephone) 1 Select a category (then a sub 1 Select a category (then a sub Call up Destination Menu. Call up Destination Menu. category if any) of the POI. category if any) of the POI. - Page 32 Howyou are guided Howyou are guided Route calculation Route calculation Destination found Destination found ABC Hotel ABC Hotel To cancel calculation, press BACK. To cancel calculation, press BACK. Screen while guided Screen while guided Estimated time of Estimated time of arrival and distance arrival and distance to the destination/...
- Page 33 Guidance at turns Guidance at turns When you approach a turn, the System guides you with voice guidance and indications on the When you approach a turn, the System guides you with voice guidance and indications on the screen. screen. •...
-
Page 34: Getting Information On Your Route And Places
Getting information on your route and places To see the itinerary and the turns list • You can also view the trip through Information Trip. Menu ¢ Map screen • You can also view the turns list through Information Turns List. Menu ¢... -
Page 35: Customizing How You Are Guided
To check the estimated arrival time and To see how your trip will go distance to the next via point Information Simulation Menu I!Ia:I!I appears on the display. [Hold] To cancel simulation and resume guidance, press MENU, then DISP. I!Ia:I!I disappears. -
Page 36: Setting Places To Stop By
Arm"g;"gyourroute Setting places to stop by Select the via point you want to move. After selecting your destination, you can select up to nine places ("via points")· to stop by. "I To add via points Intr'l Airport After guidance has started... Select a place you want to stop Move the selected via point in •... -
Page 37: Saving And Loading Routes
To delete saved routes Saving and loading routes Call up Destination Menu. You can save up to 50 combinations of destination and via points. You can easily call up your usual route without the trouble of setting destinations. Destination • Each route can contain up to nine via points. ~Route Edit To save a route... -
Page 38: Marking Your Favorite Points
Just like you mark your friend's house or a nice To proceed to edit the registered favorite Chinese restaurant on your map book, you can point, select [Edit Favorite] after register your favorite points in the system. step Marking your favorite points You can open the edit screen in step •... - Page 39 To delete a favorite point Select the item you want to edit. Press and hold ENT after step of "Editing your favorite points." A confirmation message appears. Press ENT to confirm the operation. Press BACK to cancel. To delete all the favorite points in a group The name of the favorite point.
-
Page 40: Whatistmc
To see detailed information ~~1. Select an item on the list and press As the traffic announcements are transmitted by FM radio stations, JVC cannot assume responsibility for the completeness or accuracy of the announcements. Traffic information on the map... -
Page 41: How Traffic Information Is Reflected In Navigation
Activate your subscription. the System automatically calculates a new route when the traffic service informs of an obstacle Access <http://www.jvc-exad.com> on the on your route. Internet and get your PIN code. • The serial number written down in step... -
Page 42: Destination Menu
[72J for the detailed Menu operations. lavi,ation menu items Start guidance to a home. (Appears only while not guided.) [24J Cancels the guidance. (Appears only while guided.) [24, 26, Starts guidance to the place where you have started your last guidance. (Appears only while not guided.) [27J Calculate a new route avoiding the selected distance ahead. -
Page 43: Setup Menu
Information Menu (continued) You can check the connection status. Learning Lv., Angle, GPS Antenna, Gyro, Speed Signal, Parking Brake, Reverse Signal, Illumination, Tel. Muting You can check the model name, the version of the unit, and the version of the map database. Once the route is determined, you can simulate it on the map. - Page 44 Setup Menu (continued) Selectable settings (Initial setting) Select the voice guidance output on an AV screen. • A small icon of the next turn is always displayed at the lower- right corner of the AV screen while guided, regardless of this setting.
- Page 45 Setup Menu (continued) Selectable settings (Initial setting) North Up, Heading Up,3D Map [23] Select how the zoom scale changes. Off: (Effective only while guided) Zoom into 100 ft (30 m) scale Guidance View is set to Auto Magnification. If at turns if else, the scale does not change at turns.
- Page 46 Setup Menu (continued) Selectable settings (Initial setting) Select the angle of the unit measured by the supplied gauge. (See also the Installation/Connection Manual.) 1: -5.0 to 1.0 to 6.0 to 14.0 to 32.0 14.0 • It is not recommended to install the main unit at an angle of more than 30 otherwise, the malfunction may result.
- Page 47 Additiona'informatiolJ • POI search in Along Route is canceled if the Initial settings guidance finishes or if rerouting starts before • If you select On for Store Display Mode, the search completes. the system starts up in demonstration mode coordinates for shops, and the initial setup screen appears •...
- Page 48 - It may not guide to your destination if free trial expired, To reactivate service, there is only a narrow road or no road to please visit: http://www.jvc-exad. your destination. com appears on the display at turning on the - It may not avoid a congestion even unit.
-
Page 49: Additional Information
List of POI icons Others [Community] Additional information... - Page 50 AV source operations in the map screen ..50...
- Page 51 Radio Listening to the radio FM station automatic presetting -SSM (Strong-station Sequential Memory) Manual presetting Selecting preset stations Assigning titles to stations When an FM stereo broadcast is hard to receive Tuning in to stations with sufficient signal strength Listening to the satellite radio Activating your subscription after connection Selecting channels by channel number Presetting channels...
-
Page 52: Fm Station Automatic Presetting
Listening tlJe ,silio Select JlTUNER." LFM1~FM2~FM3~AMJ Select the bands. Search for a station-Auto Search. until Manual Search appears on • Manual Search: Press and hold either the monitor, then press it repeatedly. • _lights up when receiving an FM stereo broadcast with sufficient signal strength. FM station automatic presetting -SSM (Strong-station Sequential Memory) This function works only for FM bands. -
Page 53: Manual Presetting
Selecting preset stations Manual presetting You can preset six stations for each band. FM '-"FM2-..FM3-..AM FM '-..FM2-..FM3-"AM ./BAND . • /BAND Select a preset number. Tune in to the station you want to preset. FM1 Preset4 Station name 92.5 Display the Preset List. l;..aENTJ J .. -
Page 54: Assigning Titles To Stations
Assigning titles to stations When an FM stereo broadcast is hard to receive You can assign a title to up to 30 radio stations. Tune in to the station you want to assign a title to. AV Menu ¢Mode ¢Mono AV Menu ¢On ¢... -
Page 55: Activating Your Subscription After Connection
• Jve SIRIUS radio DLP-Down Link Processor, for listening to the SIRIUS Satellite radio. • XMDirect™ Universal Tuner Box-With a JVC Smart Digital Adapter (XMDJVC100: not supplied), for listening to the XM Satellite radio. Activating your subscription after connection... - Page 56 Switches the display to program information-artist name/song name(l composer name: only for SIRIUS Satellite radio). Channel number Equalizer type [98]r • IE>' ~-""oo -n. . ~D.. <9/1 TRAFFIC #.11 Channel name ..• RESET 10:35 _'BAND ~,,.. Signal indicator ForXM Radio For SIRIUS Radio Select JlSAT."...
-
Page 57: Selecting Channels By Channel Number
Selecting channels by channel Presetting channels number You can preset six channels for each band. On the remote only: Tune in to a channel you want to preset. Display the Preset List. ~AAA~I ~-~J·.liiDIIII' ~EtiI~1 !"III1ELt!.rll!;.aJ" ~~ Direct Channli",,' m· I .. -
Page 58: Selecting Channels On The Lists
Selecting preset channels Selecting channels on the lists Display the Preset List. You can select a channel using one of the ~-~[jj' ~·lIlIlllm, 1~:-a!;!'ti~.lIII ;-E'lt!· following lists-Preset list/Category list/ I ..1 Channel name Channel list. <Ill ; _'BAND [Hold] AV Menu ~List ~Preset... - Page 59 Discs and HDD Disc operations Playable discs/files Selecting playback modes Selecting tracks on the list Prohibiting disc ejection Remote operations Special functions for DVD Audio Operations using the on-screen bar Music server operations Selecting tracks using lists Selecting playback modes Recording/copying tracks from adisc Editing the library Checking the remaining storage size...
- Page 60 The disc type is automatically detected, and playback starts automatically (for some discs: automatic start depends on its internal program). If a disc does not have any disc menu, all tracks in it will be played repeatedly until you change the source or eject the disc.
-
Page 61: Playable Discs/Files
Playable discs/files Recording format, file type, etc. Playable Disc type DVDVideo %/OK DVDAudio DVDVideo DVD RecordablelRewritable DivX/MPEG1/MPEG2 (DVD-R*'/-RW, +RI+RW*2) tJOK JPEG • Compliant to UDP bridge MP3/WMA/WAV format • DVD-RAM cannot be played. 11., .., DVD side 0/0K Dual Disc NC"'l-DVD 1)(NO Audio CD/CD Text (CD-DA), DTS-CD... - Page 62 Only for CD- Text. /INa Name/l appears DTS icon (only for DTS-CDs) nO./PlaYing~ for conventional CDs. Track [orn 01 0:00:03 J' > ~,~I Press: Select track OOisc Title* Hold: Reverse/ Artist Name* forward search*l Track Name* J' > 10:35 AM Audio format Tag data will be shown instead offolder/ file names when they are recorded and...
- Page 63 DVDVideo n~O.lChaPter I:~:~:rmat Title n o.lPlaying time I..TRAFFIC (ViI@] !lD»G1fA[j Press: Select chapter 01 0:00:03 Hold: Reverse/ ~..-.oi-";';-""" forward search*l ...,,£. Press: Select title ®@ 1o:35AM _'BAND ~,,,. DVDAudio BONUS indicator [68] Group no./Track no./Playing time Audio format BS p. d· t [68] forward search*l ...,,£.
-
Page 64: Selecting Playback Modes
Folder no. File no. rr=========l~ ~ l==============i TRAFFIC I.... ,~~I Press: Select file IIFolder Name ~File Name.jpg T,'" Press: Select folder £::mOl Hold: Display Folder 10:35AM List Selecting playback modes You can use only one of the following playback mill type Repeat Disc modes-Intro/Repeat/Random. -
Page 65: Selecting Tracks On The List
Selecting tracks on the list Prohibiting disc ejection If a disc includes folders, you can display the Folder/Track Lists, then start playback. Display the Folder List. [Hold] "".11" I ... EliiefQencv Eiect M Best ENTl [Hold] Select No Eject. Select a folder, then a track. •... - Page 66 Press: Select a chapter. Press: Select a track. Press and hold: Reverse/forward search*l. Press and hold: Reverse/forward search*l. Select a title. Select a group. Track ... Group'" Reverse/forward search*2 Slow motion*3 during pause. (No sound can Reverse/forward search*2 be heard.) Select audio language.
- Page 67 Press: Select a track. Press: Select a track. Press and hold: Reverse/forward Press and hold: Reverse/forward Press: Select a track. search*4. (No sound can be heard.) search*'. (No sound can be heard.) Select a folder. Select afolder. File Folder Track Folder Track Reverse/forward search*2...
-
Page 68: Special Functions For Dvd Audio
Special functions for DVD Audio Operations using the on-screen bar For DVD/VCD/DivX/MPEG/JPEG discs, you Playing back a bonus group can check the disc information and use some If a DVD Audio including a "bonus group" functions through the on-screen bar. is detected, lmmmllights up on the disc Display the on-screen bar. - Page 69 Information [ Operation Pause Disc type Audio signal format (for DVD) Stop PBC (for VCD) Operation icons Playback mode Change time indication (I@f []]) T. RPT Title Repeat/Track Repeat* Time Search (Enter the elapsed C. RPT Chapter Repeat playing time of the current title F.
-
Page 70: Musicserveroperations
Musicserveroperations The built-in HDD works not only as storage for navigation data, but as a music server, where you can record CD tracks and music files (MP3, WMA and WAV files). The recorded tracks are categorized into genres and albums. You can make 99 genres in the music server, and 99 albums in each genre. -
Page 71: Selecting Tracks Using Lists
Selecting tracks using lists Selecting playback modes You can use only one of the following playback Call up the Genre List. modes-Intro/Repeat/Random. Ex. To select Track Repeat I ..1"1 60's AV Menu ..~Mode [Hold] ~Repeat Select a genre, then an album. ~Track When one of the playback modes is selected, the corresponding indicator lights up on the... -
Page 72: Recording/Copying Tracks From Adisc
Recording/copying tracks from adisc Notes on the name of new genres and albums • You can record tracks of audio CDs into the • If you want to make a new genre or a new HDD. Record appears in AV Menu. album for the tracks to be recorded/copied, •... - Page 73 To record selected tracks To record all the tracks in a disc AV Menu AV Menu ¢Record ¢Record ¢Select All ¢Select Track Select the genre and album to Select the tracks to record. record the tracks into..ENT] • Checkbox operations [105j -~~, - t :...
- Page 74 To copy the current track To copy selected tracks AV Menu AV Menu ~Copy '~Copy ~Current ~Select Track Track Start copying. Select the tracks to copy..Iv' " 'raCl Copying ••• appears..• When you copy a track for the first time ENT] with this function, a new genre and a new album is automatically created for...
-
Page 75: Editing The Library
Store Select to finish editing. • You cannot edit the tag data of tracks. AV Menu C>Record or Copy C>Continue Moving tracks between albums/Moving Start recording/copying. albums between genres Ex. To move tracks between albums • Select the album which the target tracks belong to. -
Page 76: Checking The Remaining Storage Size
Deleting tracks, albums, or genres Rearranging the order of tracks, albums and genres Ex. To delete tracks Ex. To rearrange the order of tracks in an • Select the album which the target tracks album belong to. • Select the album which the target tracks belong to. -
Page 77: Cd Changer Operations
It is recommended to use a JVC MP3-compatible CD changer with your unit. • You can play only CDs (CD-DA) and MP3 discs. Preparation: Changer Make sure is selected for the external input setting. [93]) (I@f .POl 0:00:03 Disc Title* Artist Name* .P Current Track*... -
Page 78: Selecting Playback Modes
Selecting playback modes You can use only one of the following playback modes-Intro/Repeat/Random. Ex. To select Track Repeat When one of the playback modes is selected, the corresponding indicator lights up on the AV Menu monitor. ~Mode To cancel, select in step ~Repeat ~Track... - Page 79 Other functions iPod/D. player operations Selecting atrack from the player's menu Selecting playback modes Playing other external components External input Video input Using Bluetooth® devices -Cellular phone/audio player Menu operation for BI uetooth devices Registering a Bluetooth device Using the Bluetooth cellular phone Using the Bluetooth audio player Phone Menu 90 AV Menu items...
-
Page 80: Selecting Atrack From The Player's Menu
For Apple iPod and JVC D. player, it is required to connect the interface adapter (KS-PDIOO for iPod or KS-PDSOO for D. player) to the CD changer jack on the rear. Preparation: Changer Make sure is selected for the external input setting. -
Page 81: External Input
External input You can connect an external component to the CD changer jack on the rear using the Line Input Adapter-KS-U57 (not supplied) or AUX Input Adapter-KS-U58 (not supplied). Preparation: Ext Input Make sure is selected for the external input setting. [93J) (I@' TRAFFIC... -
Page 82: Video Input
Video input You can connect an external component to the VIDEO IN plug. Preparation: When connecting a video component Make sure Ext Input is selected for the external input setting, and Video for the video input setting. [93]) ((@' • You cannot view the video picture when the parking brake is not engaged. When connecting a camera Ma~e sure Camera is selected for the video input setting. -
Page 83: Using Bluetooth Devices
Using Bluetooth devices-Cellularphone/audioplayer For Bluetooth operations, it is required to connect the Bluetooth Adapter (KS-BTA200) to the CD changer jack on the rear. • Refer also to the instructions supplied with the Bluetooth Adapter and the Bluetooth device. • Refer to the list (included in the box) to see the countries where you may use the Bluetooth® function. - Page 84 Searching for available devices To register another device after you have registered a device, make sure New Device Mode is selected. (l@" [85]) ¢Search Registering using Open The unit searches for available devices and Mode displays the list of them. (If no available ¢Open device is detected, Device Unfound appears.)
-
Page 85: Using The Bluetooth Cellular Phone
Connecting/disconnecting a registered device Select the method to make a call. On the Bluetooth Phone screen or the Bluetooth Audio screen, • Redial: Shows the list of the phone numbers you have dialed. Go to the select a registered device you following step. - Page 86 On the unit: Dial • You can also access the menu by pressing PHONE on the remote controller. Call up the preset list. • You can also access the redial list by pressing and holding PHONE on the remote controller. •...
-
Page 87: Using The Bluetooth Audio Player
When a call comes in... When a text message comes in•.• If the cellular phone is compatible with text Sluetooth Phone Message Info Auto message and is set to CP902i (~[89J), Receiving the unit rings and Name and ReceivinG Call phone number Message appears on the monitor to inform... -
Page 88: Phone Menu
Phone Menu Selectable settings (Initial setting) Select a phone number from the list of the phone numbers you have dialed. Select a phone number from the list of the received calls. Select a name, then phone number from the phone book of the connected cellular phone. - Page 89 Phone Menu (continued) Selectable settings (Initial setting) Only for the registered devices. After selecting a device from among the registered devices [85, 87]), establish the connection with it. [85] Only for the device being connected. Disconnect the current device before connecting another device. [85] Only for the registered devices.
- Page 90 [72J for the detailed Menu operations. "I~2 Menu t-------------I Selectable settings (Initial setting) Fran~ais English US, Espaiiol, Off: Cancels. On: Activates the demonstration on the monitor. You can select the background picture of the monitor. Default, Digital, Midnight, Sunset, Gauges, Sunrise, Nucleus, Carbon, Tunnels, Orbit, Shadow, Forest Off: Cancels.
-
Page 91: Avmenuitems
Selectable settings (Initial setting) 12Hours, 24Hours Alaska, Pacific, Mountain, Central, Eastern, Atlantic, Newfoundl·and Activate this if your residential area is subject to DST. Off: Cancels. Auto: Automatically applies DST when necessary. Select the initial disc menu language (I@" also [97]). (English) (English) Select the initial audio language (I@"... - Page 92 Selectable settings (Initial setting) Select the signal format to be emitted through the DIGITAL OUT (Optical) terminal on the rear. For details, [706J. Off: No signal is' output from the terminal. PCM Only: Select this when connecting an amplifier or a decoder incompatible with Dolby Digital, DTS or MPEG Audio, or connecting to a recording device.
- Page 93 Selectable settings (Initial setting) Auto: Increases the tuner selectivity to reduce interference noises between adjacent stations. (Stereo effect may be lost.) Wide: Subject to the int'erference from adjacent stations, but sound quality will not be degraded and the stereo effect will remain. When using in North/Central/South America.
- Page 94 Selectable settings (Initial setting) Off: Cancels. Reverse: Automatically switch to the camera view when the gear is shifted into reverse.*8 Low Speed: Automatically switch to the camera view when your car slows down.*9 Horizontal adjustment is required according to how you would like to see the picture on the monitor.
- Page 95 Selectable settings (Initial setting) Flat, Hard Rock, R&8, Pop, Jazz, Dance Music, Country, Reggae, Classic, User 1, User 2, User 3 [981 Adjust fader-speaker output balance between the front and rear speakers. (00) F06: front only R06: rear only • When using a two-speaker system, set the fader to the center (00).
- Page 96 Selectable settings (Initial setting) You can adjust the monitor to make it clear and legible. • While picture from VIDEO IN is displayed, you can (Picture adjust the playback picture of VIDEO IN [Video]). • While DISC is selected as the source and playback picture is displayed, you can adjust the playback picture (Picture [Disc]).
- Page 97 Selectable settings (Initial setting) (Off, On) Only for PM. [54] 1& Local) Only for PM. (OX, [54] 1& Only for PM. [52] 1& Only for disc playback, music server, CD changer and iPod/D. player. [64, 71, 78, 1& The accessible lists differ depending on the sources. To record audio CDs into the music server.
-
Page 98: Sound Equalization
Sound equalization Storing your own adjustment Selecting an equalizer type You can store your adjustment into User 1, User and User 3. AV Menu Repeat steps above, then in step 3... Flat Exit type. Select an equalizer Select the frequency. Ir--=~- Adjust the level. - Page 99 - SAT/CD-CH: cannot be selected without Satellite radio operations connecting the target source component. • You can also connect the JVC SIRIUS radio - DISC: cannot be selected if a disc is not in PnP (Plug and Play), using the JVC SIRIUS the loading slot.
- Page 100 Playing Recordable/Rewritable discs Disc operations • This unit can recognize a total of 3 500 files General and 250 folders (a maximum of 999 files per • In this manual, words «track" and «file" are folder). interchangeably used. • If no playable files are recorded in a folder, the •...
- Page 101 Playing MPEG files • This unit can play back files recorded in VBR (variable bit rate). • This unit can play back MPEG files with the Files recorded in VBR have a discrepancy in extension code <.mpg> or <.mpeg>. elapsed time indication. •...
- Page 102 On-screen guide icons Control screen During play, the following guide icons may • The following control screens appear only appear for a while on the monitor. on the external monitor. Appears at the beginning of a scene containing multi-subtitle languages DivX/MPEG/JPEG/MP3/WMA/WAV (for DVD only).
-
Page 103: Additional Information
For iPod users: <http://www.jvc.co.jp/ • You cannot edit the Tag data of tracks in the english/carlsupport/ks-pdl OO/index.html> HDD. For D. player users: <http://www.jvc.co.jp/ • While the System is moving, rearranging or english/car/support/ks-pd500/index.html> deleting items in the library, no sound comes out, and you cannot change the playback source. - Page 104 Using Bluetooth devices AV Menu items General • If you change the Amplifier Gain setting from High Power Low Power while the • While driving, do not perform complicated operation such as dialing the numbers, using volume level is set higher than the unit phone book, etc.
- Page 105 Inputting characters Checkbox operations Ex.: Ex.: Select Track "173 fJDIIElDlIlJlJB ..DDDIJIDllmmaD rac 1 ElDmmlJlalllIllJl1 mamaIlDOO•• ..ENT] ..mmm.iiltiirl. -T-I-T To select an item in the list Enter a space Display other keyboards Delete a character Move the cursor •...
- Page 106 About sounds reproduced through the rear terminals • Through the analog terminals (Speaker out/LINE OUT): 2-channel signal is emitted. When playing a multi-channel encoded disc, multi-channel signals are downmixed. (l@f' [92] Down Mix.) • Through DIGITAL OUT (optical): Digital signals (Linear PCM, Dolby Digital, DTS, MPE'G Audio) are emitted through this terminal. To reproduce multi-channel sounds such as Dolby Digital, DTS, and MPEG Audio, connect an amplifier or a decoder compatible with these multi-channel sources to this terminal, and set Audio Output correctly.
- Page 107 Information 108 Maintenance 109 Troubleshooting 117 Specifications...
- Page 108 Maintenance How to dean the connectors How to handle discs Frequent detachment will deteriorate the Center When removing a disc from its connectors. ~hOlder case, press down the center holder To minimize this possibility, periodically wipe of the case and lift the disc out, the connectors with a cotton swab or cloth holding it by the edges.
- Page 109 Troubleshooting What appears to be trouble is not always serious. Check the following points before calling a service center. Causes/Remed.ies Some operations are prohibited without the parking brake engaged. Park the car in a safe place before the operations. • Adjust the volume to the optimum level. •...
- Page 110 Causes/Remedies Installation angle setting is not correct. Set it correctly. [46J) Reversing signal!speed signal wires are not connected. Connect them correctly Installation/Connection Manual-separate volume). Surround noise interferes. Increase the voice cruise level. [44J) Failed to calculate the route. Select another destination/via point.
- Page 111 Causes/Remedies Store stations manually (l@" [53J). Connect the antenna firmly. • CALL 1-888-539-SI8IUSTO Start subscribing to SIRIUS Satellite Radio (l@" SUBSCRIBE [55J). appears on the monitor. NO SIGNAL Move to an area where signals are stronger. • No Signal or appears on the monitor.
- Page 112 Causes/Remedies The format of the disc is supported. Insert the disc correctly again. The player may have malfunctioned. Eject the disc forcibly. • Stop playback while driving on rough roads. • Change the disc. Parking brake wire is not connected properly. (1lW Installation/Connection Manual.) Some DVD Audios prohibit downmixed output.
- Page 113 Causes/Remedies This is not a malfunction. This is not a malfunction. This is not a malfunction. If you want to enjoy another source, cancel recording/copying and change the source. Tag information instead of the track name is displayed. Set Tag Display Off to display the track name.
- Page 114 Causes/Remedies • Insert a disc into the magazine. • A disc is inserted upside down. Insert the disc correctly. Insert the magazine. Disc does not include playable files. Replace the disc with playable files. Connect this unit and the CD changer correctly and press the reset button of the CD changer.
- Page 115 Causes/Remedies This unit can be connected with one Bluetooth cellular phone and one Bluetooth audio device at a time. While connecting a device, this unit cannot be detected from another device. Disconnect currently connected device and search again. • Check the Bluetooth setting of the device. •...
- Page 116 Playback sources Glossary Dolby Digital Navigation System Compressed digital audio, developed by Dolby Laboratories, which enables multi- channel encode to create the realistic Global Positioning System. By receiving the surround sound. GPS signals from the satellites, the Navigation System determines the position of the car. Compressed digital audio, developed by Digital Theater Systems, Inc., which enables Points of Interest.
- Page 117 Sllcifications code System & Service Global Positioning System Standard Positioning Service Reception System IS-channel multi-channel reception system Reception Frequency 1 575.42 MHz -130 dBm Sensitivity .IIsecond, continuous Update Rate Polarization Right Handed Circular Polarization GPS Antenna Dimensions (approx.) 30.4 mm x 11.7 mm x 35.5 mm inches inch inches)
- Page 118 FM (with channel Frequency Range 87.5 MHz to 107.9 MHz interval set to 100 kHz or 200 kHz): FM (with channel 87.5 MHz to 108.0 MHz interval set to 50 kHz): AM (with channel 530 kHz to 1 710 kHz interval set to 10kHz): AM (with channel 531 kHz to 1 602 kHz...
- Page 119 40 GB (Map data: 16 GB I Storage: 24 GB) MP3 (MPEG Audio Layer 3) Max. Bit Rate: 320 kbps WMA (Windows Media® Audio) Max. Bit Rate: 320 kbps Screen size 3.5 inch wide liquid crystal display 224 640 pixels: 320 (horizontal) x 3 x 234 (vertical) Number of Pixel TFT (Thin Film Transistor) active matrix format Drive Method...
- Page 120 H"aving TROUBLE with operation? Please reset your unit Refer to page of How to reset your unit Still having trouble?? USAONLV Call 1-800-252-5722 http://www.jvc.com We can help you! ..Ive WEN, SP, FR © 2007 Victor Company of Japan, Limited 0107NSMMDWJElN...
- Page 121 . ~. A. CAUT ION ~ ~~ CONNECT BLACK WIRE (G)GND) TO GROUND FIRST. OTHERWISE,DAMAGE TO YOUR UNIT MAY OCCUR. A.CAUTION INCORRECT CONNECTION CAUSES SERIOUS DAMAGE TO THIS UNIT: PLEA~E READ INSTALLATION/CONNECTION MANUAL CAREFU,LLV.
- Page 122 When is not required to detach the front control panel from the main unit, use the provided screws to attach the control panel to the main unit. LV42208-001 A...
- Page 123 CAUTIONIACHTU NGIATTENTION/PRECAUCIC.N/nPEAOCTEPE>KEH 111 EI VARNING The spacer is attached to this unit for protection during transportation. Remove it before use. Das DistanzstUck ist an dieser Einheit zum Schutz beim Transport angebracht. Vor der Verwendung muss es entfernt werden. L'intercalaire est fixee cet appareil pour Ie proteger pendant Ie transport.
- Page 124 En TMC (Canal de mensajes de trafico) 1. Clausula de excepci6n para TMC JVC no proporciona garantia alguna por la compra de una licencia de TMC. 2. Cobertura de TMC El servicio de informacion de tnifico se encuentra disponible solamente en los 48 estados contiguos de los Estados Unidos.
- Page 125 KD-NX5000 _ : 4 • Gauge for confirming installation angle - See the Installation/Connection Manual for details. • Schablone zur Bestatigung des Einbauwinkels - Einzelheiten siehe Einbau-/Anschlussanleitung. • Gabarit pour verifier I'angle d'installation - Referez-vous au manuel d'installation/raccordement pour les details.
- Page 126 JVCcar audio dealers. sera necesario un inversor de tension, que puede ser adquirido en los il vous faut un convertisseur de tension, que vous pouvez acheter chez un concesionarios de JVC de equipos de audio para automoviles. revendeur d'autoradios lVC. WARNINGS...
- Page 127 • If you are not sure how to install this unit correctly, have it installed by a con su concesionario de JVC de equipos de audio para automoviles a una revendeur d'autoradios /VC ou une compagnie d'approvisionnement.
- Page 128 • Reemplace el fusible por uno con la corriente especificada. Si el fusible se consulter votre revendeur d'autoradios lVC. quemase frecuentemente consulte con su concesionario de JVC de equipos • It is recommended to connect to the speakers with maximum power of more de audio para autom6viles.
- Page 129 Conductor del velocfmetro Pincez la cosse sertir fermement. Mettez en contact la partie metallique de la cosse sertir et des fils interieurs. de vitesse, utilisez Ie Generateur d'impulsions Pi! de signal de l'indicateur de vitesse de vitesse KV-PGl de jVC (vendu separement).
- Page 130 Altavoces posteriores Au fil de telecommande de l'autre appareil Enceintes arriere LINE OUT (REAR) II[j ~~IC?' JVC Amplifier Amplificador de JVC ~II~II.-+ KD·NX5000 lVC Amplificateur Signal cord (not supplied for this unit) Front speakers Cable de senal (no suministrado con esta unidad)
- Page 131 • Para utilizar un cambiador de CD JVC, Apple iPod reproductor D. de • Pour utiliser un changeur de CD JVC, un iPod Apple ou Ie lecteur D. Input" to "Changer" (see page 93 of the INSTRUCTIONS). JVC, ajuste "Entrada externa" a"Cambiador" (vease la pagina 93 del de JVC, reglez "Entree ext."...
- Page 132 The countries where you may use the Bluetooth® function/ Die Lander, in denen Sie die Bluetooth® Funktion verwenden k6nnen/ Italia Andorra Pays vous pouvez utiliser la fonction Bluetooth®/ Australia Lichtenstein De landen waar u de Bluetooth®-functie mag gebruiken/ Osterreich Lietuva Pafses en los que se puede utilizar la funci6n Bluetooth®/ Bosna i Hercegovina Luxemburg...
- Page 133 Email Address: Thank you! We appreciate your responses to this questionnaire. The information you choose to share with us will be used by JVC to offer you product information and other communications that may interest you. It you prefer not to be contacted about these special offers, please check here. { }...
- Page 134 Registering your product will allow us to contact you in the unlikely event a product safety notification is required. This form is for Product Registration purposes only. Failure to return this form does not diminish your rights during the warranty period. THANKYOU FOR PURCHASING THIS JVC PRODUCT REGISTER ONLINE AT: WWW.JVC.COM...
- Page 135 JVC la garantie expresse suivante pour tout nouveau product distributed in Canada by JVC and sold by produit JVC, distribu8 au Canada par JVC et vendu an authorized JVC dealer. par un detaillant JVC autorise.
- Page 136 In-Home service to be provided where available. * Where it is not available, the Purchaser must assume the responsibility and expense for the proper packing, shipment, and all costs associated with the delivery of the equipment to and from the closest JVC Authorized Service Centre.
- Page 137 3. Criteres: 3. Standards: Si un produit JVC s'averait defectueux selon les If any defects should be found in a JVC product conditions applicables, les reparations within the applicable terms, necessary repairs necessaires seront effectuees sans couts shall be made at no cost to the purchaser for...
- Page 138 Provo Code Postal Owner's Name Nom du Proprietaire Owner's Address Adresse du Proprietaire Street Apt. App. City or Town Provo Postal Code Provo Code Postal Ville You may also register on-line Vous pouvez egalement vous at:www.jvc.ca inscrire par internet a:www.jvc.ca...
- Page 139 OUR VALUED CUSTOMER - - THANK YOU FOR PURCHASING THIS JVC PRODUCT. WE WANT TO HELP YOU ACHIEVE A PERFECT EXPERIENCE. NEED HELP ON HOW TO HOOK UP? NEED ASSISTANCE ON HOW TO OPERATE? NEED TO LOCATE A JVC SERVICE CENTER? LIKE TO PURCHASE ACCESSORIES? JVC®...
- Page 140 WHAT WE WILL DO: ~ If this product is found to be defective within the warranty period, JVC will repair or replace defective parts with new or : rebuilt equivalents at no charge to the original owner. Such repair and replacement services shall be rendered by JVC during normal business hours at JVC authorized service centers.
Need help?
Do you have a question about the KD-NX5000 and is the answer not in the manual?
Questions and answers