
Related Manuals for SecurityMan DigioutAir


Summary of Contents for SecurityMan DigioutAir
- Page 1 DigioutAir User’s Manual Digital Wireless Outdoor/Indoor Color Camera Kit with Audio and Night Vision...
- Page 2 Warranty SecurityMan Inc warrants that this product will be free from defects in title, materials and manufacturing workmanship for one year or otherwise specified on the product packaging. This limited warranty shall commence from the date of purchase.
- Page 3 The liability of SecurityMan Inc, arising from this warranty and sale shall be limited to a refund of the purchase price. In no event shall SecurityMan be liable for costs of procurement of substitute products or services, or for any lost profits, or for any consequential, incidental, direct or indirect damages, however caused and on any theory of liability, arising from this warranty and sale.
-
Page 4: Table Of Contents
Table of Contents Introduction Important Restrictions Conditions Package Contents Specifications Features Product Basics Camera (SM-703DT) Receiver (SM-451DR) Quick Start On-Screen Display Operation Troubleshooting... -
Page 5: Introduction
Important This guide provides important information on the use and operation of your DigioutAir. Please read all the information carefully prior to using the product for the best performance and to prevent any damage/ injuries or misuse of the device(s). Customers are entitled to have read through this complete user’s manual before using the DigioutAir. -
Page 6: Restrictions
• DO NOT this product to carry out any illegal activities such as sneak preview, and etc. SecurityMan shall not be responsible for any consequences of illegal conducts made by users. • DO NOT put the plastic package bags in reach of children or babies. - Page 7 • DO NOT plug the AC adapter into the outlet in improper situations. • Plugging in an AC adapter with wet hands might cause electric shock. • Plugging in the AC adapter unsteadily might cause fire or electric shock. • DO NOT cover the AC adapter when it is connected to an outlet, place the adapter near heaters, or put it on the floor which is equipped with a heater.
-
Page 8: Conditions
Conditions Please read the following messages to make sure your working environment is suitable. • The temperature should be kept between –20˚C and 50˚C (-4˚F to 122˚F). The relative humidity should be kept between 20% and 80%. • Avoid putting the product in places where temperature or humidity may change rapidly. -
Page 9: Package Contents
Package Contents 1 x Receiver 1 x Camera 1 x Bracket (SM-451DR) (SM-703DT) 1 x Antenna 2 x AC Adapters 1 x AV Cable 5 x Screws User’s Manual... -
Page 10: Specifications
Specifications Image Sensor 1/4” CMOS Color Resolution 510 x 492 pixels (NTSC) View Angle 35 degree Weatherproof Rating IP65 Night Vision Range Up to 50ft / 15m (B/W) SM-703DT Audio Microphone built-in (Camera) (audio monitoring up to 20ft) Minimum Illumination 3 Lux/F1.2 (IR off);... -
Page 11: Features
Features • Do-it-yourself (D.I.Y) easy to setup and use wireless camera kit • Weatherproof camera housing for outdoor and indoor applications • Wireless transmission up to 200ft between walls or up to 490ft in clear line of site • No Wi-Fi interference; no interference from crowded analog 900MHz/2.4GHz/5.8GHz/6.0GHz devices •... -
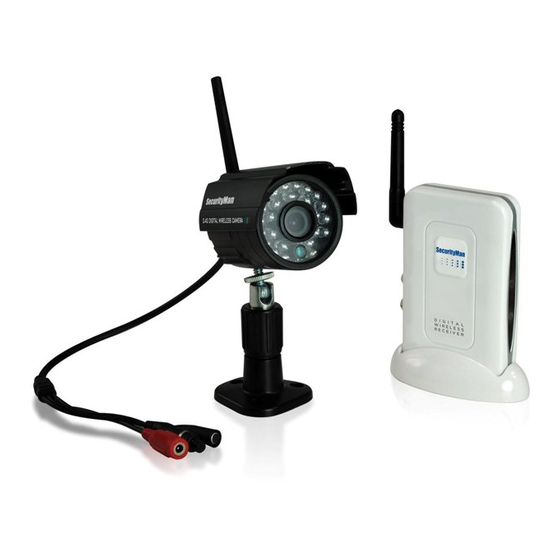
Page 12: Product Basics
Product Basics Antenna Camera (SM-703DT) Sun Visor Lens Night Vision LED Light Sensor Power Jack Pairing Button Bracket Receiver (SM-451DR) Antenna Channel Button LED Lights Pairing Button Audio Output Video Output Power Socket Docking Stand... -
Page 13: Quick Start
Quick Start Camera 5VDC/1.5A 1. Mount the camera in the desired position. Be sure to plug in the power to the camera and attach the supplied antenna. CAUTION: To prevent electric shock or damage to the camera, please be sure to properly insolate the camera’s microphone and power connections if being used as an outdoor application. - Page 14 2. Plug in the receivers power supply and connect the AV (audio/video) cable from the AV output of the receiver to your TV or recording devices (VCR or DVR) AV input. NOTE: Make sure all cords are connected tight and that you are following the proper color coding (Video/Yellow, Audio/White or Red) Input AV Output to...
-
Page 15: On-Screen Display
On-Screen Display Signal Strength Signal Strength Channel The signal bars on the on-screen display indicates the signal strength between the camera and the receiver. [0~1 bars = weak/no reception; No Signal 4 bars = strong reception] Channel The channel number corresponds to the camera that is being monitored or recorded. -
Page 16: Troubleshooting
Switching between channels You can switch between cameras by pressing the “CH” button located on the back of the receiver. The DigioutAir system support manual channel switching only. It does not support automatic channel dwelling and Quad channel view.
Need help?
Do you have a question about the DigioutAir and is the answer not in the manual?
Questions and answers