
Related Manuals for SecurityMan PIR-SD


Summary of Contents for SecurityMan PIR-SD
- Page 1 PIR-SD User’s Manual PIR Motion Sensor with Hidden Color Camera, SD Recorder, and Remote Control...
- Page 2 The content of this manual is furnished for informational use only, is subject to change without notice, and should not be construed as a commitment by SecurityMan. SecurityMan Inc assumes no responsibility or liability for any errors or inaccuracies that may appear in this book.
- Page 3 The liability of SecurityMan Inc, arising from this warranty and sale shall be limited to a refund of the purchase price. In no event shall SecurityMan be liable for costs of procurement of substitute products or services, or for any lost profits, or for any consequential, incidental, direct or indirect damages, however caused and on any theory of liability, arising from this warranty and sale.
-
Page 4: Table Of Contents
SD Full Alert (Memory Full) Playback Recorded Video Integrating with Air-Alarm Series Adding PIR-SD Remote to the Alarm Host Cancelling PIR-SD Remote from the Alarm Host Adding PIR-SD Motion Detection to Alarm Host Cancelling PIR-SD Motion Detection from Alarm Host... -
Page 5: Introduction
So whether you’re looking to expand your wireless security system or just looking for a covert hidden camera, the PIR-SD will fit your needs. Features • PIR motion sensor with color camera and SD recorder (SD card not included) •... -
Page 6: Important
Important This guide provides important information on the use and operation of your PIR-SD. Please read all the information carefully prior to using the product for the best performance and to prevent any damage/injuries or misuse of the device(s). Customers are entitled to have read through this complete user’s manual before using the PIR-SD. - Page 7 • DO NOT use this product for any illegal activities. SecurityMan shall not be responsible for any consequences of illegal conducts made by users. • DO NOT put the plastic package bags in reach of children or babies. Young children can choke on these items if they put them into their mouths.
- Page 8 Please keep in mind the PIR-SD has a 2-sec delay time to record after an event occurred. To compensate for the 2-sec delay time to record and proper use, we recommend to install this product about 15ft away from the intended monitoring object.
-
Page 9: Conditions
Conditions Please read the following messages to make sure your working environment is suitable. • The temperature should be kept between –10˚C and 50˚C (14˚F to 122˚F). The relative humidity should be kept between 20% and 80%. • Avoid putting the product in places where temperature or humidity may change rapidly. -
Page 10: Package Contents
Package Contents **SD card not included. 1 x USB AC Adapters 1 x PIR-SD w/Bracket 1 x Remote Control 1 x USB Cable Screws Plectrum (for Pairing) 2x Warning Stickers User’s Manual... -
Page 11: Product Basics
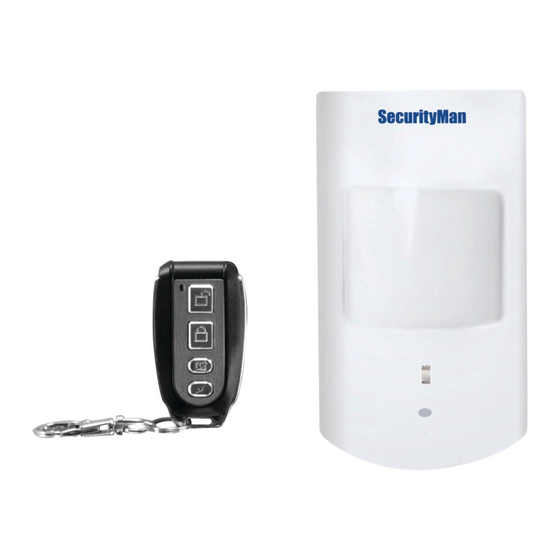
Product Basics PIR-SD Front Back Sensor Window Study Button Study Mini USB Power/USB Power Socket SD Slot Mounting Base Detecting LED Camera Remote Control Stop Record Motion Record Stop Record button Stop/Deactivate Motion Detection and Emergency Recording Emergency Record Motion Record button... -
Page 12: Set Up
PIR-SD as illustrated below. IMPORTANT NOTICE: The PIR-SD required an SD card to be inserted into the SD slot in order for the PIR-SD to function as a motion detector/recorder. Connect the PIR-SD to your PC or Laptop using the USB cable provided... - Page 13 Double-click on the “GetSysTime” folder, double-click on the “GetSysTime.exe” file located on the SD card, and then click on the “Get System Time” pop up to synchronize your computers time to the PIR-SD. Make sure the computer you are using has the current time and date. If it is a newly formatted SD card, please copy and paste the “GetSysTime.
- Page 14 NOTE: A “SysTime.bin” file will be created indicating that the date and time was set correctly. Finally, connect the PIR-SD to the USB power adapter and a solid red light will appear in the motion detection window for 30-sec. After the red light disappeared, the PIR-SD is ready for commands.
- Page 15 PIR-SD as illustrated below. IMPORTANT NOTICE: The PIR-SD required an SD card to be inserted into the SD slot in order for the PIR-SD to function as a motion detector/recorder. Using the supplied USB power adapter, connect the USB mini-B...
-
Page 16: Adding And Cancelling Remote Control
Adding Remote Control: 1) While plugged into the power outlet, press and release the “Study” button located on the back of the PIR-SD. The PIR-SD will beep once after being pressed indicating that it is in study mode. 2) Press any one of the four buttons on the remote control 2 consecutive times and the PIR-SD will beep 5 times to indicate the remote control has been successfully added to the PIR-SD. -
Page 17: Operation
The PIR-SD will record a 1 minute video clip per motion detection event. Note: The PIR-SD has a built in 8 second exit delay that allows the user to exit the detecting area (after activating motion detection) without triggering the PIR to record. -
Page 18: New File Alert
Press both the “DISARM + ARM” buttons once simultaneously again before enabling motion detection or emergency recording and the PIR- SD will beep 4 times to enable the PIR-SD to beep 5 times on “New File Alert” notification. NOTE: You can manually mute the new file alerts by pressing the Stop Record button 3 times rapidly within 5 seconds or simply activate motion or manual recording. -
Page 19: Integrating With Air-Alarm Series
1. Remove the SD card from the PIR-SD by gently pushing on the SD card allowing it to pop out from the SD card slot. 2. Insert the SD card into an SD card reader (not included) connected to your PC (your PC should load the SD card as a new Removable Drive). -
Page 20: Cancelling Pir-Sd Remote From The Alarm Host
PRGM/SET + Password (default is 888) + ENT+ 71 + ENT + XX + ENT [Input zones 11~15 for XX indicating the zone number that the PIR-SD is paired to and using code 71 to remove the PIR-SD will remove any sensor that was paired to that zone.] (The “... -
Page 21: Disabling Video Recording
SM-8808T or SM-8808E Air-Alarm Hosts will have a 2-sec or 3-sec delay time to record respectively due to processing speed. Please note that it is normal for the PIR-SD to have a 2~3-sec delay time to record, so it is important and a recommendation to mount the PIR-SD 15ft from the intended target for proper monitoring view and proper recording file. -
Page 22: Specifications
Host to start alarming and at the same time sends a signal to the PIR- SD to start the video recording. Note: To review the recorded video footages, please follow “Playback Recorded Video” section above. Specifications Image Sensor 1/6.5”CMOS color Resolution 640x480 Recording Speed...
Need help?
Do you have a question about the PIR-SD and is the answer not in the manual?
Questions and answers