Table of Contents
Advertisement
Quick Links
Advertisement
Table of Contents

Related Manuals for SecurityMan DigiminiAir


Summary of Contents for SecurityMan DigiminiAir
- Page 1 DigiminiAir User’s Manual Digital Wireless Mini Indoor Camera Kit with Audio...
- Page 2 Warranty SecurityMan warrants that this product will be free from defects in title, materials and manufacturing workmanship for one year from the date of the purchase or otherwise specified on the package. If the product is found to be defective then, as your sole remedy and as the manufacturer’s only obligation, SecurityMan will...
- Page 3 The liability of SecurityMan Inc, arising from this warranty and sale shall be limited to a refund of the purchase price. In no event shall SecurityMan be liable for costs of procurement of substitute products or services, or for any lost profits, or for any consequential, incidental, direct or indirect damages, however caused and on any theory of liability, arising from this warranty and sale.
-
Page 4: Table Of Contents
Table of Contents Introduction Important Operating Restrictions Conditions Safety Instructions Features Package Contents Product Basics Quick Start Camera Installation (SM-209DT) On-Screen Display Signal Strength Channel No Signal Operation Adding and Pairing Camera to the Receiver Switching between Channels/Cameras Specifications Troubleshooting... -
Page 5: Introduction
Important This guide provides important information on the use and operation of your DigiminiAir. Please read all the information carefully prior to using the product for the best performance and to prevent any damage/ injuries or misuse of the device(s). Customers are entitled to have read through this complete user’s manual before using the DigiminiAir. - Page 6 • DO NOT this product to carry out any illegal activities such as sneak preview, and etc. SecurityMan shall not be responsible for any consequences of illegal conducts made by users. • DO NOT put the plastic package bags in reach of children or babies.
-
Page 7: Conditions
• DO NOT put the camera in quaky paces. The camera may be unstable or out of operation if installed improperly. Such installation may also cause breakdown. • DO NOT touch, shake or hold the antenna. Touching, shaking or holing the antenna might influence the receiving of electromagnetic wave, and thereby influence the receiving effect. -
Page 8: Safety Instructions
• Avoid putting the product in places where temperature or humidity may change rapidly in temperature or humidity. • Keep it dry, dustless and avoid exposure directly in sunlight. • Keep product away from heat sources such as electric heater. •... -
Page 9: Features
parts is forbidden. The manufacturer will not be responsible for any loss arising from such actions. • Do not put the device into fire, oven or microwave oven, in order to avoid explosion. • As a result of version changes, the user manual may be different from the actual product. -
Page 10: Package Contents
Package Contents 1 x Receiver 1 x Camera 1 x AV Cable (SM-451DR) (SM-209DT) 2 x AC Adapters 4 x Screws User’s Manual... -
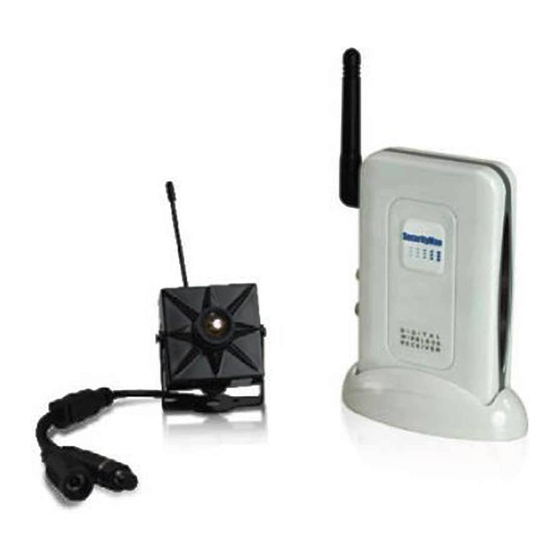
Page 11: Product Basics
Product Basics Antenna Camera (SM-209DT) Lens Microphone Mounting Bracket Power Jack Pairing Button Receiver (SM-451DR) Antenna Channel Button LED Lights Pairing Button Audio Output Video Output Power Socket Docking Stand... -
Page 12: Quick Start
Quick Start Please follow steps 2~5 below and test both the camera and the receiver first prior to installing the camera in the desired location. Do a simple test to make sure the camera and the receiver are both working and that the receiver are able to pick up the camera image. - Page 13 c) Re-attach the camera to the mounting bracket and adjust the viewing angle as needed (adjust by tilting up and down) as illustrated below. 2. Connect the power adapter plug into the power socket attached to the camera and then connect the power adapter (5VDC, 1.5A) into an electrical power outlet as shown below.
- Page 14 3. Plug the receiver power supply (5VDC, 1.5A) to the receiver’s DC IN port and the other end to an electrical power outlet. Next, connect the AV cable out from the receiver to your TV/monitor or recording devices (VCR or DVR) AV input. Note: To power on the receiver, simply plug in the power supply, the receiver do not have power ON/OFF switch.
-
Page 15: On-Screen Display
NOTE: Pairing must be done within 20ft. On-Screen Display Signal Strength Channel No Signal Signal Strength The signal bars on the on-screen display indicates the signal strength between the camera and the receiver. [0~1 bars = weak/no reception; 4 bars = strong reception] Channel The channel number corresponds to the camera that is being monitored... -
Page 16: Operation
or recorded. You can toggle between channels by simply pressing the “CH” button located on the receiver. No Signal A “NO SIGNAL” notification will be displayed (followed by a melody) whenever the user toggles to a channel with no camera matched to it or if the camera and receiver are not successfully matched. -
Page 17: Specifications
Specifications Image Sensor 1/4” CMOS Color Resolution 510 x 492 pixels (NTSC) View Angle 60 degree Audio Microphone built-in (up to 30ft) SM-209DT Minimum Illumination 3 Lux/F1.2 (Camera) Pairing Button Power Supply DC 5V / 1.5A Dimensions 1.45” x 1.45” x0.8” Channel Button 1 CH button (Manually Select CH1~CH4) Pairing Button... -
Page 18: Troubleshooting
Troubleshooting Q: There is no picture from a camera? Check all connections to the camera and the receiver. Make sure that the camera and receiver are both ON and that the camera(s) is in range of the Receiver. Q: The image from the camera(s) is choppy and/or keeps cutting out? The wireless receiver may be out of range of the camera(s).
Need help?
Do you have a question about the DigiminiAir and is the answer not in the manual?
Questions and answers