Table of Contents
Advertisement
Quick Links
Advertisement
Table of Contents

Related Manuals for SecurityMan BoxCam-I


Summary of Contents for SecurityMan BoxCam-I
- Page 1 SecurityMan BoxCam-I Auto lris color CCD Camera kit w/Night Vision...
-
Page 2: Fcc Information
Recording, or otherwise, including translation to another language or format, without the prior written permission of SecurityMan. The content of this manual is furnished for informational use only, is subject to change without notice, and should not be construed as a commitment by SecurityMan. -
Page 3: Limitation Of Liability
Limitation of Liability The liability of SecurityMan arising from this warranty and sale shall be limited to a refund of the purchase price. In no event shall SecurityMan be liable for costs of procurement of substitute... -
Page 4: Table Of Contents
Contents Package Contents SM- 308 Camera Features Package List Diagram Product Basics Installation Caution Specification Warning Troubleshooting EU Environmental Protection ... -
Page 5: Package Contents
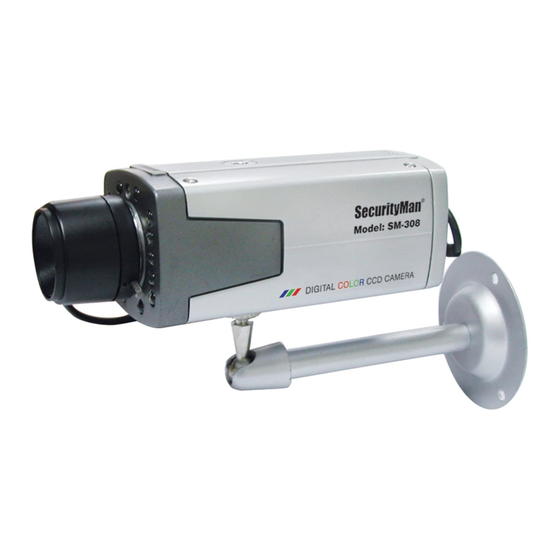
Package Contents • SM- 308 box camera day/night with 4mm auto iris lens • Wall- mount metal bracket • 12 VDC power adapter (UL) • 60ft VP cable • User's Manual SM- 308 Camera Features Crystal • clear indoor color camera with 1/3” SHARP CCD sensor (better than ¼... -
Page 6: Package List
Package List 4mm camera w/ mounting bracket 12VDC adapter for camera Diagram Camera adapter BoxCam-I Output to TV or Recorder BNC Output SecurityMan Box Cam-1 Au to lr is co lo r CC D Ca me ra k it... -
Page 7: Product Basics
Product Basics BoxCam-I 1/ 3" Color CCD 4mm Lens Metal mounting bracket D EO O UT LEVEL VIDEO - + DC IN Electric aperture-Use EE if Al is producing too much lights ... -
Page 8: Installation
Installation Position the camera to a desired screws and then adjust for a suitable angle. 2. Connect the power adapter to the camera and power outlet. 3.Connect the VIDEO OUT to a recorder or monitor/ . cable Note: if recorder or monitor/TV has RCA connector type, an additional female BNC to male RCA adapter may require. -
Page 9: Caution
Caution: 1) Please keep the lens, IR lights, and sensor window clear to prevent IR sensor from malfunctioning. 2) Avoid projection angles where there are bright background lighting. 3) Operate by using the included AC adapter with 12VDC 500mA, positive inside. 4) Use under condition where the temperature is below 122 degree Fahrenheit. -
Page 10: Specification
Specification Image Pick-up Device Effective Picture Elements Horizontal Resolution Minimum IIIumination S/ N Ratio Auto Electronic Shutter Back Light Compensation Gain Control White Balance Gamma Correction Lens Furnished Viewing Angle Synchronous System Video Output Power Supply Operating Temp. IR LED IR ... -
Page 11: Warning
Warning To prevent the risk and electronic shock, instal away from moisture and rain. Refer to the instruction for proper maintenance. Please be careful the symbol of the presence of “Dangerous Voltage”. It may be result in the electronic shock. Warning In order to reduce the electric shock danger,the layman please machine... -
Page 12: Troubleshooting
Troubleshooting Problem The picture is normal in the day time but foggy at night time or the horizontal line across the screen. No Picture EU Environmental Protection Waste electrical products should not be disposed of with household waste. Please recycle where facilities exist.
Need help?
Do you have a question about the BoxCam-I and is the answer not in the manual?
Questions and answers