Table of Contents
Advertisement
Quick Links
Advertisement
Table of Contents

Related Manuals for Socket CF RFID


Summary of Contents for Socket CF RFID
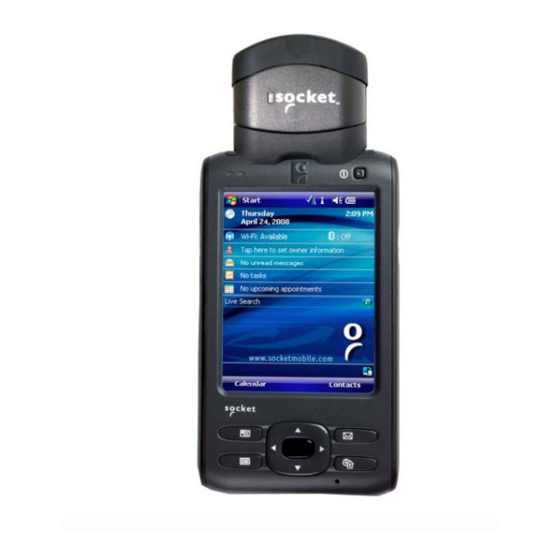
- Page 1 ™ CF RFID Reader Card ™ CF RFID Reader-Scan Card Series 6 User’s Guide...
- Page 2 Copyright © 2008 Socket Mobile, Inc. All rights reserved. Socket, the Socket logo and Mobility Friendly are registered trademarks of Socket Mobile, Inc. CF RFID Reader Card, CF RFID Reader-Scan Card, SoMo, RFID Demo, SocketScan, and SocketScan Trigger are registered trademarks or trademarks of Socket Mobile, Inc.
-
Page 3: Table Of Contents
Table of Contents 1 | INTRODUCTION About the Software Package Contents System Compatibility Requirements Accessories Product Registration 2 | SETUP FOR WINDOWS MOBILE STEP 1: Uninstall Other Scanning Software STEP 2: Install the Software STEP 3: Assign Trigger Button(s) STEP 4: Start SocketScan STEP 5: Insert the Card STEP 6: Verify Card Mode STEP 7: Open Application... -
Page 4: Introduction
• CF RFID Reader-Scan Card 6P: CompactFlash dual-function RFID Reader/Writer and Class 2 laser bar code scanner The CF RFID Reader Cards feature a sleek designed with no cables or batteries – they draw minimal power from the Pocket PC. Plus, the card is designed to withstand repeated three-foot drops to concrete –... -
Page 5: Package Contents
Device Center), both available from the Microsoft website Accessories If you plan to use the CF RFID Reader Card with the Socket SoMo 650 handheld computer, Socket offers a FlexGuard silicone cover that protects both the RFID reader and the handheld computer. -
Page 6: Product Registration
Product Registration Socket highly recommends that all customers register their products. Registered users receive priority for technical support and can choose to receive product updates, and special offers. Register online at: www.socketmobile.com/support/support/new. -
Page 7: Setup For Windows Mobile
2 | Setup for Windows Mobile This chapter shows how to install, configure, and use the CF RFID Reader Card Series 6 on a device running Windows Mobile. Setup Summary STEP 1: Uninstall other scanning software. STEP 2: Install the software. -
Page 8: Step 1: Uninstall Other Scanning Software
STEP 1: Uninstall Other Scanning Software Uninstall any bar code scanning software already in your computer, including previous versions of SocketScan™ software. SoMo 650: The pre-installed SocketScan software cannot be uninstalled, but it can be upgraded. 1. Make sure the software is not running. 2. -
Page 9: Step 2: Install The Software
STEP 2: Install the Software ADVANCED USERS: Refer to the README file for CAB file installation instructions.. Note: If you are using the SoMo 650, software installation is not necessary. SocketScan is pre-loaded on the device. Follow these instructions to install SocketScan. Afterwards, you can use the same process to install RFID Demo and/or Floating Trigger. - Page 10 9. Your web browser will present a series of dialogs. Internet Explorer: • In the File Download –Security Warning dialog, click Run. • In the second warning dialog, click Run. • Internet Explorer will download the file. Firefox: • In the file opening dialog, click Save File. •...
-
Page 11: Step 3: Assign Trigger Button(S)
STEP 3: Assign Trigger Button(s) You must set up a mechanism for triggering the CF RFID Reader Card. Hardware button(s) are the best triggering method from a handheld device. If you have the CF RFID Reader-Scan Card 6M/6P, SocketScan allows you to configure up to four buttons for launching SocketScan and/or triggering the RFID reader or bar code scanner. - Page 12 If desired, repeat to assign additional trigger buttons. When done, tap ok. Note: For best ergonomics, choose a button located beneath your thumb or forefinger when you hold the device. For the Socket SoMo 650, the left and right buttons are ideal.
-
Page 13: Step 4: Start Socketscan
STEP 4: Start SocketScan 1. If you assigned a hardware button to SocketScan, you can press the button to quickly launch the program. Otherwise, tap Start | Programs | SocketScan folder | SocketScan. 2. An icon will appear in the task tray of the Today screen indicating that the system does not detect the RFID reader. -
Page 14: Step 5: Insert The Card
STEP 5: Insert the Card 1. If your device has a cover protecting the CompactFlash slot, open the cover. 2. Insert the card into the CompactFlash slot of your device. Make sure the card is right-side up, with the blue label on top. Push the card all the way into the slot. -
Page 15: Step 6: Verify Card Mode
STEP 6: Verify Card Mode If you are using the dual-function CF RFID Reader-Scan Card 6M/6P, and you did not assign buttons to Trigger ISC or Trigger RFID, make sure the card is in the correct mode you wish to use. -
Page 16: Step 8: Read Data
STEP 8: Read Data Please note that the correct positions for RFID reading and bar code scanning are very different! CORRECT RFID POSITION: Hold the card parallel to and directly above the tag, at most 3.0 inches above the tag. Parallel, 3.0 inches (7.6 cm) maximum... - Page 17 WRONG RFID POSITION: DO NOT direct the RFID Reader-Scan Card at an angle towards the tag. WRONG RFID POSITION: DO NOT hold the RFID Reader-ScanCard perpendicular to the tag. CHAPTER 2: SETUP FOR WINDOWS MOBILE...
- Page 18 When data is read, a beep should sound indicating a good read, and data should appear in your application. For example, in an Excel Mobile spreadsheet, data should appear in the cell you highlighted. The next cell should now be highlighted, ready for the next scan/read.
-
Page 19: Rfid Settings
RFID Settings Note: These settings are only used with the SocketScan keyboard wedge programs and Scan Demo. 1. Tap on the SocketScan icon. In the pop-up menu, tap Settings. 2. In the Prefix/Suffix screen, enter the characters you would like added to each read/scan of data (128 character maximum). - Page 20 4. In the Sound screen, select which sound you would like SocketScan to make to indicate a good read. To you want to play a .WAV file, after selecting Play .wav file, you can search through files by tapping the browse box. In the Open screen, tap on the file you want: Note: You can only select a WAV file from the My Documents folder.
- Page 21 Trigger mode: • Tag ID Only: Select to read only the tag ID. • Read Data Only: Select to read only data from the tag memory. • Tag ID & Read Data: Select to read both the tag ID and tag memory.
-
Page 22: Symbology Selector
Symbology Selector If you have the dual-function CF RFID Reader-Scan Card 6M/6P, SocketScan provides an applet that makes it easy to modify which bar code symbologies the scanner will recognize and attempt to decode. By default, the scanner is set to recognize several of the most common symbologies. -
Page 23: Socketscan Trigger
SocketScan. • Start SocketScan. Tap Start | Programs | SocketScan. • Insert the CF RFID Reader Card into your device. • Open the application that you want to receive data. 2. Start SocketScan Trigger. Tap Start | Programs | SocketScan Trigger. - Page 24 4. A SocketScan Trigger icon will also appear in the menu bar of the Today screen. Tap on this icon to reveal a pop-up menu with the following options: • Tap Scan Now to activate the scanner as if you had tapped the trigger button.
-
Page 25: Dual Device Support
EVICE UPPORT SocketScan for Windows Mobile versions 7.2.4.0 and later support the simultaneous use of two Socket data collection devices with the same computer. Note: SocketScan can capture data from only one cordless scanner at a time. Simply connect or plug in each device you plan to use as you normally would. -
Page 26: Rfid Demo
Chapter 2. • Inserted the CF RFID Reader Card into your device. • When you use this application, you should only trigger the RFID Reader Card by tapping on the Select Tags or Read Tag... -
Page 27: Read An Rfid Tag
2. The main screen of RFID Demo will appear with blank fields. 3. Hold the device in the correct position to read an RFID tag, as described in Chapter 2. Hold the device so the CF RFID Reader Card is parallel to and directly above the tag, at most 2.0 inches above the tag. - Page 28 6. In the Available Tags field, tap to highlight the RFID tag you wish to read, then tap Read Tag. 7. After the CF RFID Reader Card reads the tag, Tag Data will appear. If desired, check Display as hex data to view the...
-
Page 29: Enable Inventory And Loop Modes
Enable Inventory and Loop Modes The CF RFID Reader Card has four reading modes, based on different combinations of inventory mode and loop mode. The chart below shows the results of enabling or disabling the modes. Tag Select Loop Inventory... -
Page 30: Select Tag Type
Select Tag Type 1. In the main screen of Socket Mobile RFID Demo, tap RFID at the bottom of the screen. In the pop-up menu, tap Select Tag Type. 2. In the Select Tag Type dialog box, use the drop-down menu to select the tag type. -
Page 31: Advanced: Write To Tag
ADVANCED: Write to Tag 1. In the main screen of Socket Mobile RFID Demo, tap RFID at the bottom of the screen. In the pop-up menu, tap Advanced. 2. Use the next screen to read and write data in specific blocks of an RFID tag. - Page 32 4. RFID Demo will report any data saved to the RFID tag, as well as the type of tag and number of bytes per block. The bottom of the screen will report the read status and tag ID. 5. To write data to the tag, enter text into the bottom field. The type and amount of text that can be written varies depending on your tag type.
- Page 33 6. After writing data to the tag, the bottom of the screen will report the write status. 7. To verify that the data was written successfully to the tag, hold the device in the correct reading/writing position, and tap Read Tag. 8.
-
Page 34: A Product Specifications
Appendix A Product Specifications Physical Characteristics CompactFlash Card Size: 1.4 x 1.68 x 0.20 inches (36 x 42.7 x 5.0 mm) Reader/Scanner Head Size: 1.8 x 1.9 x 0.83 inches (45 x 49 x 21 mm) Weight: 6E: 1.1 oz. (31 g) 6M/6P: 1.3 oz (37 g) Environmental: Operating Temperature: -10 to +50°C (-4 to +122°F) - Page 35 HF RFID Tags Supported ISO15693: ICode SL1/SL2, LRI512, my-d, Tag-It HF-I Proprietary: ICode 1, PicoTag, Tag-It HF ISO14443A, ISO14443B (Tag ID only): Mifare, Mifare Ultralight Bar Code Scanner Characteristics (6M/6P only): Bar Code Symbologies Automatically Detected (Default): Code 128, Code 39, Interleaved 2 of 5, UPC/EAN Additional Bar Code Symbologies Supported (Must Be Enabled): Chinese 2 of 5, Codabar, Code 11, Code 93, Discrete 2 of 5, MSI, RSS-14/Limited/Expanded...
-
Page 36: B Hf Rfid Standards And Tag Descriptions
Appendix B HF RFID Standards and Tag Descriptions ISO15693 The ISO/IEC 15693 standard was developed for “Contactless Vicinity Cards”. Adopted in 1998, ISO15693 has significantly enabled global acceptance of 13.56MHz RFID technology. Based on contributions by Texas Instruments and Philips, ISO/IEC 15693 is largely a superset of the features and specifications of the Tag-it HF and I·Code1 products, respectively. - Page 37 I·Code SLI ISO15693 (Philips) The complete I·Code SLI specification can be found in the Philips publication titled “I·Code SLI Smart Label IC SL2 ICS20 Functional Specification”. Figure 1 - Memory Structure of the I·Code SLI (version SL2 ICS20) 896 bits (112 bytes) of user memory is available for read/write. 32 bits Block # (4 bytes per block)
- Page 38 Figure 4 - Memory Structure of the my-d SRF55V10P 125 blocks of 8 bytes = 1000 bytes (8000 bits) of user memory is available for read/write. 64 bits Block # (8 bytes per block) 3 (0x03) The user can 4 (0x04) permanently lock any block 5 (0x05)
- Page 39 Tag-it HF The first 13.56MHz RFID IC that Texas Instruments developed was the Tag-it HF. Still in high volume production, Tag-it HF is widely used in applications globally and has an existing installed base of millions of tags. The Tag-it HF uses a protocol air interface that is proprietary to Texas Instruments.
- Page 40 I·Code1 The first long range 13.56MHz RFID IC that Philips released was the I·Code1 (SL1). Still in high volume production, I·Code1 (SL1) is still widely used in applications globally and has an existing installed base of millions of tags. The I·Code1 (SL1) uses a protocol and air interface that is proprietary to Philips.
- Page 41 31 (0x1F) A 64-bit ID (factory programmed) uniquely identifies each PicoTag chip. Unique Tag ID 64 bits (8 bytes) Note: Only the tag ID can be read by the CF RFID Reader-Scan Card. APPENDIX B: HF RFID STANDARDS AND TAG DESCRIPTIONS...
- Page 42 Key B The complete Mifare specification can be obtained from the Philips publication “Mifare Standard 4 kByte Card IC MF1 IC S70” dated October 2002. Note: Only the tag serial number can be read by the CF RFID Reader Card.
- Page 43 Data 1 Data 2 Data 3 Data 44 Data 45 Data 46 Data 47 System Area User Area Note: Only the tag serial number can be read by the CF RFID Reader Card. APPENDIX B: HF RFID STANDARDS AND TAG DESCRIPTIONS...
- Page 44 Figure 12 - Memory Structure of the LTO CM 128 blocks of 32 bytes = 4096 bytes (32768 bits) of user memory is available for read/write. Note: Only the tag serial number can be read by the CF RFID Reader-Scan Card.
-
Page 45: C Bar Code Label Specifications
Appendix C Bar Code Label Specifications All bar code symbols/labels should satisfy the appropriate AIM Uniform Symbology Specification. Background Substrate: The bar code symbol should be printed on material (media) that is reflective and has a matte (not glossy) finish. A background diffuse reflectance of at least 70% to 80% is desirable for optimum contrast. -
Page 46: D Class 1 Vs. Class 2 Laser Scanners
Appendix D Class 1 vs. Class 2 Laser Scanners Socket Mobile offers the popular CF RFID Reader-Scan Card with either a Class 1 or Class 2 laser engine. This document describes the differences between the Class 1 and Class 2 devices and the appropriate applications for each. - Page 47 ‘blind’ the scanner’s decode system. The second difference between the Class 1 and Class 2 lasers in the CF RFID Reader-Scan Card is the wavelength frequency of the laser beam. The Class 1 laser has a 670 nanometer (nm) beam common in most laser bar code scanners, while the Class 2 features a 650 nm beam.
- Page 48 – thus the decline in popularity of the much less expensive bar code contact wands seen at most retail checkout counters during the 1980’s. The higher cost of the Class 2 version of the CF RFID Reader-Scan Card is easily justified if the application requires higher scanning performance.
-
Page 49: E Enabling Or Disabling Symbologies
If you want to modify an option not included in Symbology Selector, you can scan programming bar codes to configure your CF RFID Reader-Scan Card. There are a variety of programming bar codes available that let you enable/disable symbologies as well as configure special features (e.g., specify bar code lengths, transmit check digits, recognize... - Page 50 Table 1. Default Symbologies and Settings of the CF RFID Reader-Scan Card Length with Symbology Default Length Symbology Selector UPC-A Enabled UPC-E Enabled UPC-E1 Disabled EAN-8 Enabled EAN-13 Enabled • Supplementals Disabled • Transmit Check Digit Enabled Bookland EAN Disabled...
-
Page 51: F Laser Decode Zone
Appendix F Laser Decode Zone The decode zones for the Class 1 and Class 2 lasers in the CF RFID Reader-Scan Card are shown below. The minimum element width (“X Dimension” or bar code “size”) is the width in thousandths of an inch (mils) of the narrowest element (bar or space) in the symbol. The figures shown are the typical scanning distances (depths of field) for selected bar code sizes. - Page 52 Class 2 Laser Decode Zone 52 | APPENDIX F: DECODE ZONE...
-
Page 53: G Troubleshooting
Appendix G Troubleshooting For help on SocketScan on a Windows Mobile-based device, tap Start | Help. SYMPTOM: I get the “No Card Detected” icon in the task tray and can’t trigger the RFID reader or scan any bar codes. POSSIBLE REASON SOLUTION Your device does not recognize the card. -
Page 54: H Technical Support
Appendix H Technical Support If you have trouble installing or using the CF RFID Reader Card, Socket has different support options to help you. Online Knowledge Base: Search for articles, Frequently Asked Questions or Hot Topics any time, day or night. -
Page 55: Limited Warranty
Incompatibility is not a defect covered by the Socket Mobile warranty. During the warranty period, Socket Mobile will, at its option, repair or replace the defective product at no charge when furnished with proof of retail purchase, provided that you deliver the product to Socket Mobile or to an authorized Socket Mobile Service Center. -
Page 56: Limited Software Warranty
CUSTOMER REMEDIES. The entire liability of SOCKET MOBILE and your exclusive remedy shall be, at the option of SOCKET MOBILE, either (a) return of the price paid or (b) replacement of the SOFTWARE which does not meet the SOCKET MOBILE Limited Warranty and which is returned to SOCKET MOBILE with a copy of your receipt. -
Page 57: Regulatory Compliance
Interference Problems. This booklet is available from the U.S. Government Printing Office, Washington, D.C. 20402 LASER DEVICES: Socket bar code scanning product(s) described in this User Guide contain a Symbol SE955 laser scan engine. For the Class 1 version of this engine, the following applies: •... - Page 58 A label such as the one below should appear on the end product. Example of Class 1 Laser Warning Label For the Class 2 version of this engine, the following applies: • Complies with 21CFR1040.10 and 1040.11 except for deviations pursuant to Laser Notice No.
- Page 59 10/2008 Printed in U.S.A.
Need help?
Do you have a question about the CF RFID and is the answer not in the manual?
Questions and answers