Table of Contents

Related Manuals for Aastra DT4X3


Summary of Contents for Aastra DT4X3
- Page 1 Aastra DT4X3 Cordless Phones for MX-ONE™ USER GUIDE 1424-EN/LZT103 089 A3 2012-02-23...
- Page 2 Disclaimer While every effort has been made to ensure accuracy, Aastra will not be liable for technical or editorial errors or omissions contained within this documentation. The information contained in this documentation is subject to change without notice.
-
Page 3: Table Of Contents
2.6.2 End User......................8 2.7 Abbreviations and Glossary..................9 2.8 Functions and Accessories................... 9 3 Descriptions........................11 3.1 DT4x3 DECT Telephone ................... 11 3.1.1 Hot Keys......................13 3.1.2 Alphanumeric Keys................... 14 3.1.3 Icons and Text in the Display................14 3.2 Accessories ........................ 18 3.2.1 Desktop Chargers .................... - Page 4 5.5 My Favourites ......................25 5.6 Short cuts ........................26 5.7 Connections ......................26 5.8 Settings ........................27 5.9 In Call Menu ......................28 5.9.1 Additional In Call Functions ................28 5.10 Customizing the Menu Tree..................29 6 Calling..........................30 6.1 Incoming Call ......................
- Page 5 7 Alarm Operation ......................37 7.1 Push-Button Alarm ....................37 7.1.1 Test Alarm ......................37 7.1.2 Personal Alarm....................37 7.2 Man-Down and No-Movement Alarm ..............37 7.3 Alarm with Location Information................38 7.4 Alarm with Location Information................38 7.4.1 Alarm with Data ....................38 7.5 Acoustic Location Signal...................
- Page 6 8.4 Profiles ........................54 8.5 Messaging ........................55 8.5.1 Inbox ......................... 55 8.5.2 Write New Messages..................57 8.5.3 Unsent Messages....................58 8.5.4 Sent Messages ....................58 8.6 My Favourites ......................59 8.6.1 Add Favourites ....................59 8.6.2 Edit Favourites ....................59 8.6.3 Delete Services....................
- Page 7 10.2.2 Send Mobile Data with a Prefix ..............74 11 Operation Notice ......................75 11.1 Accessibility and Voice Quality ................75 12 System Handling ......................76 12.1 Software Upgrade and Additional Features............. 76 13 Maintenance ........................77 13.1 Maintenance of Batteries ..................77 13.1.1 Battery Warnings.....................
-
Page 8: Introduction
Cordless Phones for MX-ONE™ Introduction This document describes features and settings available for DT4x3 telephones. The telephone is a feature-rich telephone with color display, telephony, messaging, and Bluetooth. It is a highly robust telephone to be used in rough demanding environment, for example the industry and hospital environment. - Page 9 Do not attempt to disassemble or alter any part of the phone, the charger(s) or the battery-pack Disassembly or alteration may result n electrical shock or irreversible damage to the equipment. Only a qualified service personnel or an authorized Aastra partner should conduct internal inspections, alterations and repairs.
- Page 10 User Manual Cordless Phones for MX-ONE™ • Use the Desktop Charger or the wall mounted Charging Rack for charging. Charge the battery for at least one hour the first time you use the battery. Note that the wall mounted battery pack charger has to be used if the battery alone is to be charged.
-
Page 11: Ex Safety Instructions
User Manual Cordless Phones for MX-ONE™ equipment and corrupt or end communication or damage the equipment. When condensation is noticed, stop using the equipment. Switch off the phone, remove the battery and unplug the mains adapter from the power outlet. Wait until the moisture evaporates from the equipment before putting it in operation again. - Page 12 User Manual Cordless Phones for MX-ONE™ When using in hazardous/classified areas, use an approved battery pack only. The battery pack must be marked with art. no.: 660274 on the label. Charging parameters: Um = 5.25 V, Im = 1.15 A For approved battery types, see certificate IECEx SIR 10.0038 or Sira 10ATEX2072 and following supplements.
-
Page 13: Regulatory Compliance Statements
This equipment is intended to be used in the whole EU & EFTA. This equipment is in compliance with the essential requirements and other relevant provisions of R&TTE Directive 1999/5/EC. The Declaration of Conformity may be consulted at: http://www.aastra.com/sdoc The handset is marked with the label this handset. -
Page 14: Regulatory Compliance Statements (Russia Only)
User Manual Cordless Phones for MX-ONE™ Regulatory Compliance Statements (Russia only) Telecom/Radio Corresponds to "Rules for the use of terminal equipment connected to the two-wire analogue interface of the general purpose telephone communication network", supplemented by Russian Ministry of Infocommunications regulation of 29.08.2005 in No. 102 (registered by Russian Ministry of Justice 02.09.2005, registration no. -
Page 15: Functions And Accessories
User Manual Cordless Phones for MX-ONE™ ELISE3 Embedded LInux SErver: A hardware platform used for Unite modules. IPDI International Portable DAM Identity DAM (DECT Authentication Module) See IPEI for more information. IPEI International Portable Equipment Identity IPEI/IPDI is needed to enable network subscription of the handset. - Page 16 User Manual Cordless Phones for MX-ONE™ Functions Man-down and No-movement alarm Send Alarm with Data Send Data with Prefix Acoustic Location Signal (ALS) Location, Base Station Centralized Management Push To Talk (PTT) Downloadable Languages Easy replaceable battery Easy replacement of handset Clear lists in charger Site Survey tool Bluetooth...
-
Page 17: Descriptions
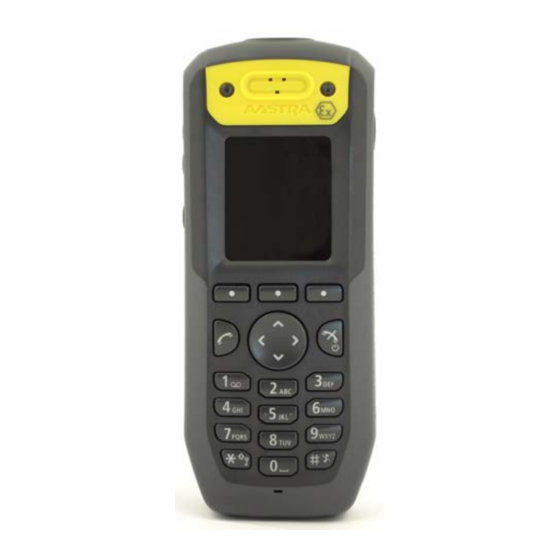
User Manual Cordless Phones for MX-ONE™ Descriptions DT4x3 DECT Telephone IMPORTANT: The handset may retain small metal objects around the mouth cap or earcap region. Case The plastic cover parts are made of durable PC/ABS material. Antenna The antenna is integrated inside the handset. - Page 18 User Manual Cordless Phones for MX-ONE™ Push button (DT423/DT433 only) The button is placed on the top side of the handset. The Push button is used for sending alarms, see 7.1 Push-Button Alarm on page Earpiece speaker Colour display The full graphic type display is 128 pixels wide and 160 pixels high. The display has multiple colours and backlighting.
-
Page 19: Hot Keys
User Manual Cordless Phones for MX-ONE™ Multi-purpose connector The connector is used for battery charging, software download, configuration and connection of an IP 65 classified headset connector. Microphone The microphone is placed on the front bottom side of the handset. Key lock and Upper/Lower case key This key is to lock the keypad in combination with the soft key "Lock". -
Page 20: Alphanumeric Keys
User Manual Cordless Phones for MX-ONE™ 3.1.2 Alphanumeric Keys Figure 1. a b c à â ä æ ç 2 . , ? ! - ‘ ” 1 d e f é è 3 j k l 5 m n o ñ ò ö ø 6 g h i î... - Page 21 • The Soft key bar (5) is used for Soft keys which can be used as short cuts for functions in the handset. See 3.1 DT4x3 DECT Telephone on page 11. Icons “Signal strength” icon is visible in the upper left corner. The staples shown in display depends on the signal strength.
- Page 22 User Manual Cordless Phones for MX-ONE™ “Loudspeaking” icon is displayed in the soft key bar during a call. Pressing this icon will turn on the loudspeaker. “Loudspeaking off” icon is displayed after the soft key for Loudspeaking icon has been pressed. Pressing this icon will turn off the loudspeaker. “New message”...
- Page 23 User Manual Cordless Phones for MX-ONE™ "No-movement" icon indicates that the No-movement alarm is enabled. "Profile active" icon "Alarm" icon indicates that the handset is a DT423/DT433. 1424-EN/LZT 103 089 A3 2012-02-23...
-
Page 24: Accessories
User Manual Cordless Phones for MX-ONE™ Menu Icons The ”Contacts” menu contains all names/numbers in the local phonebook. In addition, a company phonebook with up to 1000 entries can be downloaded to the phone via the PDM. It is also possible to access a central phonebook from the "Contact"... -
Page 25: Charging Rack
User Manual Cordless Phones for MX-ONE™ The charger is delivered with a plug-in power supply and is connected into an ordinary wall socket. For more information, see the advanced charger’s Installation and Operation Manual. IMPORTANT: When charging the EX classified handset, it is only permitted to use a charger marked with DC3-BxxB or DC4-BxxB?on the label. -
Page 26: Basic Operation
User Manual Cordless Phones for MX-ONE™ Basic Operation Tip: For information on how to answering/ending a call, see 6.1 Incoming Call on page 30. Switch the Handset On/Off Switch on the Handset Press and hold until the handset vibrates and the display lights up. A DT413/DT423/DT433 Switch on? dialog window is displayed. -
Page 27: Turn The Audible Signal On/Off
User Manual Cordless Phones for MX-ONE™ Turn the Audible Signal On/Off Prerequisite: The handset is in idle mode: Tip: While in a menu, press to return to idle mode. A long press on , or , changes between ring signal on/off. The icon indicates a silenced handset. - Page 28 User Manual Cordless Phones for MX-ONE™ Select Select “Locks”. Select "Phone lock" Select “Auto phone lock”. Select “On”, "On in charger", or "Off". Enter PIN code. If the PIN code is forgotten it can be removed by the system administrator. Press "OK".
-
Page 29: Menu Tree
User Manual Cordless Phones for MX-ONE™ Menu Tree Calls > —> • Call 7891 01:30 • Call list —> 7827 03:35 —> > • More • Time of call 7682 05:26 Edit number > • • Back 7845 20-Oct-09 > •... -
Page 30: Contacts
User Manual Cordless Phones for MX-ONE™ Contacts > • Call contact • Search ——> • From contact list > ——> • Add contact • Name > ——> • New • Work number > • From Call list > • Mobile number >... -
Page 31: Messaging
User Manual Cordless Phones for MX-ONE™ Messaging ——> ——> • Enter text > —> Message List —> • Reply • Inbox • View • More ——> > • Delete > • Close • Forward > • Call sender • Call no. in text* >... -
Page 32: Short Cuts
User Manual Cordless Phones for MX-ONE™ Short cuts Soft Keys ---> Middle ---> Name > Not used Right ---> Function -----------> Phone call ---> Enter number Value > Call list Control question --> Contact list Central phonebook* Message inbox ---> 0, 2 - 9 --->... -
Page 33: Settings
User Manual Cordless Phones for MX-ONE™ Settings • Internal call • Volume > • Sound & Alerts —> • External call —> • Ring signals • Callback • PTT • Message alert > • Vibrator alert —> • On • On if silent •... -
Page 34: In Call Menu
User Manual Cordless Phones for MX-ONE™ In Call Menu The In Call menu can be accessed during an ongoing call by pressing the soft key "More". If the handset is configured via WinPDM/CPDM3, it is possible to access a certain function in the In call menu directly by pressing the right Soft key. -
Page 35: 5.10 Customizing The Menu Tree
User Manual Cordless Phones for MX-ONE™ 5.10 Customizing the Menu Tree The menu tree can be customized by hiding some of the functions that are available but for example not in use. Which functions that should be hidden are defined in the PDM. See the handset’s Configuration Manual. -
Page 36: Calling
User Manual Cordless Phones for MX-ONE™ Calling Incoming Call The flashing LED, accompanied by a ring signal and/or a vibrating handset, gives a notice of a call. Ring signal and vibrator can be disabled, see 8.8.1 Sound and Alert Settings on page 61. -
Page 37: Dial Using A Pre-Programmed Navigation Key, Hot Key, Soft Key, Or Headset Button
User Manual Cordless Phones for MX-ONE™ 6.2.3 Dial Using a Pre-programmed Navigation Key, Hot Key, Soft key, or Headset Button A Navigation key , Hot key , Soft key , or a headset button can be programmed with a number. Press the pre-programmed key/button to dial the number. The call will automatically be connected. -
Page 38: Dial A Name From The Central Phonebook
User Manual Cordless Phones for MX-ONE™ Select "Call contact". The local and company phonebook appears in the same list, but the company names are indicated by a icon in front of the name. Select contact from list, or search name/ number by entering characters and select search. -
Page 39: Adjust The Volume During A Call
User Manual Cordless Phones for MX-ONE™ 6.3.1 Adjust the Volume during a Call Press to increase the volume, and to decrease the volume. The handset will now store and keep the new volume level. It is also possible to use the on the navigation key to adjust the volume. -
Page 40: Audio Transfer
User Manual Cordless Phones for MX-ONE™ 6.3.4 Audio Transfer To transfer audio between the Bluetooth headset and the handset’s earpiece, do as follows: Press "More" during the call. Select "Audio transfer" Press "Select". 6.3.5 Start a New Call during Conversation Press "More"... -
Page 41: Switch Between Calls
User Manual Cordless Phones for MX-ONE™ Press Wait for the call timer to start in the display. Press .to finish the procedure Cancel all callbacks: Press #37# (U.S. and Canada, Press #6#) Press Wait for the call timer to start in the display Press to finish the procedure. -
Page 42: Conference Call
User Manual Cordless Phones for MX-ONE™ 6.3.12 Conference Call Prerequisite, a new call has been started during conversation, see 6.3.5 Start a New Call during Conversation on page 34. By initiate a conference call, an conversation can be made between several participants simultaneously. -
Page 43: Alarm Operation
User Manual Cordless Phones for MX-ONE™ Alarm Operation The parameters described in this chapter are set in the WinPDM/CPDM3. See the handset’s Configuration Manual. Note: The alarm functionality is applicable for DT423/DT433 only. Push-Button Alarm The push-button can be defined to send an alarm by a long press and by multiple press. By default, long press is defined for test alarm (see 7.1.1 Test Alarm), and multiple press is... -
Page 44: Alarm With Location Information
User Manual Cordless Phones for MX-ONE™ When an alarm is triggered, the following occurs; • A Man-down warning. Cancel? or No- movement warning. Cancel? dialog window is shown in the display, and a warning tone is also signaling during a period (default 7 seconds) before the alarm is sent. -
Page 45: Automatic Call After Alarm
User Manual Cordless Phones for MX-ONE™ Automatic Call after Alarm A handset can be setup to call a pre-defined number after an alarm has been sent. It is also possible to dial the number without sending an alarm by pressing a push-button that is not configured with alarm functionality. -
Page 46: Menu Operation
User Manual Cordless Phones for MX-ONE™ Menu Operation Figure 4. 13:00 Messaging Select Back Figure 4. The Main Menu (1) Messaging (5) Profiles (2) Short cuts (6) Services (3) Settings (7) Connections (4) Contacts (8) Calls Calls 8.1.1 Call List The 25 last received, dialled or missed calls are stored in a call list. - Page 47 User Manual Cordless Phones for MX-ONE™ Edit Number from Call list Enter the menu by pressing the “Menu” soft key. Select in the menu. Select "Call list". Step with the to select number in the list. Press "More". Select "Edit number". Save Number Enter the menu by pressing the “Menu”...
-
Page 48: Missed Calls
User Manual Cordless Phones for MX-ONE™ 8.1.2 Missed Calls The user can view the missed call(s) by pressing "Yes". If the user presses "No", the missed calls can be viewed as follows: Enter the menu by pressing the “Menu” soft key. Select in the menu. -
Page 49: Accept An Invitation
User Manual Cordless Phones for MX-ONE™ 8.1.5 Accept an Invitation Accept Invitation Received as Incoming Call A PTT invitation received as an incoming call is indicated by the icon. In the dialog window, a message containing maximum 24 characters can also be shown. SeeFigure 5 12:34 PTT Group 1... -
Page 50: Call A Ptt Group
User Manual Cordless Phones for MX-ONE™ 8.1.7 Call a PTT Group Note: PTT group(s) must be defined in the PDM and Messaging Group(s) in CPDM3 to be able to use this function. See the handset’s Configuration Manual, and Installation and Operation Manual for CPDM3. -
Page 51: Order Absence For Another Extension
User Manual Cordless Phones for MX-ONE™ Deactivate the Absence Setting Enter the menu by pressing the “Menu” soft key. Select in the menu. Select "Call services". Select "Absence" Select “Deactivate”. Press "Select". Note: Following procedure can be used to cancel Absence: Press: #23# and Press (U.S:#24#) 8.2.2 Order Absence for Another extension... -
Page 52: Internal/External Follow-Me
User Manual Cordless Phones for MX-ONE™ The handset sends a diversion reason code to the system by establishing a call. The call will automatically be disconnected after a few seconds. To stop diversion select "Deactivate" and press the soft key "OK". See also 8.2.4 Internal Follow- me and 8.2.5 External Follow- me. -
Page 53: Free Seating
User Manual Cordless Phones for MX-ONE™ Wait for the call timer t start in the display Press to finish the procedure. 8.2.5 Free Seating The free seating function is used for persons who have an office extension number but no telephone set of their own. -
Page 54: Parallel Ringing
User Manual Cordless Phones for MX-ONE™ Dial the account code and press # and Wait for the dial tone. Dial digit or digits to get an external line or external number. 8.2.8 Parallel Ringing This feature makes it possible for an incoming call to ring on several phones simultaneously and for the call to be answered on any of the phones. - Page 55 User Manual Cordless Phones for MX-ONE™ Authorization code, Common If you are authorized to use an common authorization code (1-7 digits) you can change temporarily any phone used within the exchange to the authority level connected to this code. You can use the code for one call only or you can open the phone for some calls and lock it when leaving the phone.
-
Page 56: Disa
User Manual Cordless Phones for MX-ONE™ To open the phone: Press #76* Enter Authorization code and press # and Press to finish the procedure. To assign your own authority level to another phone: Press *75* (Germany, The Netherlands, and Sweden, Press *72*) Enter Authorization code and Press * Dial your own extension number and Press # and Wait for a verification tone. -
Page 57: Group Features
User Manual Cordless Phones for MX-ONE™ 8.2.13 Group Features Group Call- pick-up: People working in a team can have their phones programmed by system administrator to form Call-pick-up groups. In a Call-pick-up group, any member can answer any individual call to group members. -
Page 58: Call Contact
User Manual Cordless Phones for MX-ONE™ 8.3.1 Call Contact Enter the menu by pressing "Menu". Select in the menu. Select "Call contact". Select contact from the list, or enter name or number in the Search field. Press "Call", or It is also possible to edit the contact and to send a message by selecting "View" > "More". Note that it is not possible to edit a contact indicated by a icon in front of the name. -
Page 59: Edit Contact
User Manual Cordless Phones for MX-ONE™ Press "Save". Different ring signals can be set to distinguish this contact from another contact by selecting "Ring signal". 8.3.3 Edit Contact Note: It is not possible to edit a company phonebook contact. The contacts are indicated by a icon in front of the name. -
Page 60: Profiles
User Manual Cordless Phones for MX-ONE™ Search by Number Enter the menu by pressing "Menu". Select in the menu. Select "Central phonebook". Select "Search by number". Enter number. Press "Search". The search result is displayed. View Last Search Result Enter the menu by pressing "Menu". Select in the menu. -
Page 61: Messaging
User Manual Cordless Phones for MX-ONE™ Select profile from list. Press "More". Select "Delete" from menu. Press "Select". Press "Yes" to confirm. Edit Profile Enter the menu by pressing "Menu". Select in the menu. Select the profile to edited. Press "More" and then select "Edit". Following options can be performed: •... - Page 62 User Manual Cordless Phones for MX-ONE™ Press "View". Reply to Sender Enter the menu by pressing "Menu". Select in the menu. Select "Inbox" to view the message list. Select a message by using the on the navigation key. Press "View". Press "Reply".
-
Page 63: Write New Messages
User Manual Cordless Phones for MX-ONE™ Select "Call Sender". Call Number in Text Enter the menu by pressing "Menu". Select in the menu. Select "Inbox" to view the message list. Select a message by using the on the navigation key. Press "View". -
Page 64: Unsent Messages
User Manual Cordless Phones for MX-ONE™ 8.5.3 Unsent Messages Enter the menu by pressing "Menu". Select in the menu. Select "Unsent" to view the list. Select message to edit/send. Select "Edit", edit text and/or just select "Send". Delete/Delete All Enter the menu by pressing "Menu". Select in the menu. -
Page 65: My Favourites
User Manual Cordless Phones for MX-ONE™ Select "Yes" to delete the message. Delete/Delete All Enter the menu by pressing "Menu". Select in the menu. Select "Sent" to view the list. Select "More". Select "Delete" or "Delete all". Select "Yes" if the message(s) shall be deleted. Services With this menu it is possible to customize your own menu with services/functions that are used often. -
Page 66: Short Cuts
User Manual Cordless Phones for MX-ONE™ Short Cuts Predefined functions can be set as short cuts for the Soft Keys, Hot keys, and Navigation keys. It is for example possible to define the Soft Key to make a call or as a short cut to send a message. -
Page 67: Settings
User Manual Cordless Phones for MX-ONE™ Select "Value" (only for some of the functions). Enter a value for example a number. Press "Back". Select "Control question". It is disabled by default. If the control question is enabled, a Proceed? dialog window is displayed when pressing the defined key. - Page 68 User Manual Cordless Phones for MX-ONE™ Turn the Vibrator on/off If the vibrator is activated, it will vibrate at incoming call and message. Tip: It is also possible to activate the handset’s vibrator when receiving a message during a call via PDM.
-
Page 69: Lock Settings
User Manual Cordless Phones for MX-ONE™ Set the Key Sound This means that every time a key is used, the handset gives a small sound. Enter the menu by pressing "Menu". Select in the menu. Select “Sound & Alerts”. Select “Key sound”. Select “Silent, “Click”, or “Tone”. -
Page 70: Display Settings
User Manual Cordless Phones for MX-ONE™ Select “On”, or "On in charger". Enter PIN code Press "OK". If the PIN code is forgotten it can be removed by your distributor. Deactivate the Phone Lock Enter the menu by pressing "Menu". Select in the menu. -
Page 71: Time & Date Settings
User Manual Cordless Phones for MX-ONE™ Select in the menu. Select “Display”. Select “Brightness”. Select “Normal” or “Power save”. Press "Back". Contrast Enter the menu by pressing "Menu". Select in the menu. Select “Display”. Select “Contrast”. Step with to increase and to decrease the contrast. -
Page 72: Answering
User Manual Cordless Phones for MX-ONE™ Select “Date format”, press "Select". Selectable date format: • DD MMM YY, for example 30 Jan 11 • MMM DD YYYY, for example Jan 30 2011 • YYYY-MM-DD, for example 2011-01-30 (ISO 8601) • MM/DD/YYYY, for example. -
Page 73: Change The Menu Language
User Manual Cordless Phones for MX-ONE™ Press "Back". 8.8.7 Change the Menu Language Enter the menu by pressing "Menu". Select in the menu. Select “*Language”. Select the language to be used. Press "Back". Tip: It is also possible to download an additional language to the handset, see 12.1 Software Upgrade and Additional Features on page 76. -
Page 74: Connections
User Manual Cordless Phones for MX-ONE™ When an alarm is activated, the corresponding alarm icon is show, see Table 6. Man-down alarm No-movement alarm Table 6. Alarms icons Note: See also the handset’s Configuration Manual for additional settings and 7 Alarm Operation on page 37. -
Page 75: Headset
User Manual Cordless Phones for MX-ONE™ Select "Add new". A Put headset in Pairing mode dialog window is displayed. Press "OK". It will now search for a Bluetooth headset for connection. When headset is found, press "Pair". If needed, enter PIN code, see user manual for the Bluetooth headset. Press "OK". The dialog Successful pairing appears if the pairing process was successful. - Page 76 User Manual Cordless Phones for MX-ONE™ Select in the menu. Select "System". Select "Subscribe". The handset’s IPDI is displayed. The IPDI is a unique code that has been assigned to the handset. Press "Next". Enter System name (optional). If no system name is entered, the default name will be used.
-
Page 77: In Charger Action When In Call
User Manual Cordless Phones for MX-ONE™ Note: This is used in combination with system set to be "Automatic", see Change System page 69. Enter the menu by pressing "Menu". Select in the menu. Select "System". Select "Priority". Change the priority if needed by selecting "Up" or "Down". The priority will be saved when "Back"... - Page 78 User Manual Cordless Phones for MX-ONE™ but additional profiles will be visible if they are configured. See 8.4 Profiles on page 1424-EN/LZT 103 089 A3 2012-02-23...
-
Page 79: Advanced Functions
User Manual Cordless Phones for MX-ONE™ Advanced Functions Admin Menu The handset has a hidden menu for system administrators. See the handset’s Configuration Manual. The Admin menu contains: • Software, hardware, IPEI/IPDI, and user ID • DECT information • Centralized Management showing online information •... -
Page 80: Enhanced Messaging
User Manual Cordless Phones for MX-ONE™ Enhanced Messaging 10.1 Voice Mail Note: This feature is only available if configured in the system. 10.1.1 Receive a Voice Mail When receiving a voice mail, the content of the voice mail notification is displayed automatically on the screen, and is also indicated by the icon in the status bar. -
Page 81: Operation Notice
User Manual Cordless Phones for MX-ONE™ Operation Notice 11.1 Accessibility and Voice Quality The base network is not always available. If you do not get in contact with your system, contact your system administrator. For best voice quality, avoid positioning near computer, radio or similar equipment. -
Page 82: System Handling
User Manual Cordless Phones for MX-ONE™ System Handling 12.1 Software Upgrade and Additional Features Software and parameters in the handset can be upgraded by using the PDM/CPDM3. Examples of additional features that can be downloaded/configured via PDM/CPDM3: • Company phonebook •... -
Page 83: Maintenance
User Manual Cordless Phones for MX-ONE™ Maintenance 13.1 Maintenance of Batteries 13.1.1 Battery Warnings The "Low battery" icon is displayed when the battery has 10% or less remaining capacity left. In addition; a warning signal sounds every minute, the LED flashing orange, and the dialog window "Battery low. -
Page 84: 13.2 Easy Replacement Of Handset
User Manual Cordless Phones for MX-ONE™ Figure 5. Non-Intrinsically handset Intrinsically safe handset Figure 7. Replaceable battery. Unlock the lid/untighten the screws and remove the battery according to the illustration. 13.2 Easy Replacement of Handset Easy replacement can be used if a handset needs to be replaced due to, for example, a broken display. - Page 85 User Manual Cordless Phones for MX-ONE™ IMPORTANT: Never remove a handset from the charger until the instructions in the display or the LED tells you to do so (see status on the LED if the display is broken). If there is an error indication it may be allowed to remove the handset, see 14 Troubleshooting on page 83 for...
- Page 86 User Manual Cordless Phones for MX-ONE™ 6, 7 When the text "Please insert new phone in charger" is displayed, replace the old handset with the new handset. The text "Restoring settings" is displayed. IMPORTANT: Do not remove the handset while the text "Restoring settings" is displayed When the text "Phone successfully replaced.
-
Page 87: 13.3 Attach The Hinge-Type Clip
User Manual Cordless Phones for MX-ONE™ 13.3 Attach the Hinge-type Clip Attach the hinge-type belt clip as described in Figure Figure 6. Figure 8. Screw the hinge-type clip into position. 13.4 Attach the Swivel-type Clip Attach the swivel-type belt clip as described in Figure Figure 7. -
Page 88: 13.5 Attach Cover For No Clip
User Manual Cordless Phones for MX-ONE™ 13.5 Attach Cover for No Clip Attach the enclosed cover as described when no clip is to be used. Figure 8. Figure 10. Screw the cover into position. 1424-EN/LZT 103 089 A3 2012-02-23... -
Page 89: Troubleshooting
User Manual Cordless Phones for MX-ONE™ Troubleshooting This section contains information on how to solve common operational problems, and warnings you may receive. Go through the following lists if you encounter any problems. If this checklist does not solve the problem, contact your system administrator. - Page 90 User Manual Cordless Phones for MX-ONE™ SERVICE NEEDED Easy replacement procedure not Send the handset for service. Invalid IPDI followed correctly or failure during easy replacement procedure. Note: This display message is only shown in English. SERVICE NEEDED The handset is defective. Select reset option on the middle Parameters corrupt.
-
Page 91: Appendix A: Bluetooth Headset
User Manual Cordless Phones for MX-ONE™ Appendix A: Bluetooth Headset Introduction Bluetooth technology replaces the cord between the handset and the headset. This allows the user to move more freely and eliminates the risk of a headset cord getting stuck. Bluetooth is optional to the handset to be able to use a Bluetooth headset. - Page 92 User Manual Cordless Phones for MX-ONE™ Operation Step between the menus with the navigation key. Confirm each menu selection by pressing the Soft key "Select". A.4.1 Enable Bluetooth To enable the Bluetooth function enter in the handset menu, select "Bluetooth" and select “Enable”.
- Page 93 User Manual Cordless Phones for MX-ONE™ A.4.5 Remove a Bluetooth Headset To remove a Bluetooth headset, enter in the handset menu, select Bluetooth > Headset. Step with the navigation key, to the headset to be removed and press "More". Select "Delete".
- Page 94 User Manual Cordless Phones for MX-ONE™ Transfer a call A.8.1 Transfer a Call to the Handset To transfer a call to the handset from the Bluetooth headset, press "More" on the handset during the call, and select “Audio transfer”. If supported by the headset, it is also possible to transfer a call to the handset with by pressing the headset button.
- Page 95 User Manual Cordless Phones for MX-ONE™ A.12 Environmental Requirements A.12.1 Bluetooth Headset Battery See the manual for the Bluetooth headset. A.13 Trouble Shooting Problem Reason Solution No headset found Headset is turned off Turn on headset Headset is out of battery Charge headset Headset is out of range Move headset closer to handset...
-
Page 96: Appendix B: Telephony Function Codes
Cordless Phones for MX-ONE™ Appendix B: Telephony Function Codes This chapter describes the country specific function codes used in MX-ONE/Aastra 700 that are relevant for the cordless phone. The codes are listed in standard and alternative codes. Service codes are entered as *[code] # for activation, and # for deactivation. - Page 97 User Manual Cordless Phones for MX-ONE™ Calling Line Identification Restriction Per Call By-pass of Diversion U.S. and Canada: 1 Account Code Predialing Finland: 71 Norway: 71 Authorization Code Predialing Germany: 75 The Netherlands: 75 U.S. and Canada: 6 Sweden: 75 Lock/Unlock Common Authorization U.S.
- Page 98 User Manual Cordless Phones for MX-ONE™ 1424-EN/LZT 103 089 A3 2012-02-23...
Need help?
Do you have a question about the DT4X3 and is the answer not in the manual?
Questions and answers