IBM BladeCenter Installation And User Manual
4-port gb ethernet switch module
Hide thumbs
Also See for BladeCenter:
- Installation manual (82 pages) ,
- User manual (78 pages) ,
- Manual (43 pages)

Related Manuals for IBM BladeCenter


Summary of Contents for IBM BladeCenter
- Page 1 ERserver IBM BladeCenter 4-Port Gb Ethernet Switch Module Installation and User’s Guide...
- Page 3 ERserver IBM BladeCenter 4-Port Gb Ethernet Switch Module Installation and User’s Guide...
- Page 4 “Warranty information” on page 143 and Appendix G, “Notices” on page 155. First Edition (November 2002) © Copyright International Business Machines Corporation 2002. All rights reserved. US Government Users Restricted Rights – Use, duplication or disclosure restricted by GSA ADP Schedule Contract with IBM Corp.
-
Page 5: Table Of Contents
Ethernet switch subsystem overview ....17 BladeCenter chassis configuration and operation ... 17 Switch management and control ....18 IP addresses and SNMP community names . - Page 6 Chapter 6. Configuring the switch module through the Telnet interface Remotely managing the Ethernet switch module ... . 75 IBM BladeCenter 4-Port Gb Ethernet Switch Module: Installation and User’s Guide...
- Page 7 Connecting to the switch module ....76 Telnet usage conventions ....76 First-time connection to the Ethernet switch module .
- Page 8 European Union EMC Directive conformance statement ..158 Taiwanese Class A warning statement ....158 IBM BladeCenter 4-Port Gb Ethernet Switch Module: Installation and User’s Guide...
- Page 9 Japanese Voluntary Control Council for Interference (VCCI) statement Index ......161 Contents...
- Page 10 IBM BladeCenter 4-Port Gb Ethernet Switch Module: Installation and User’s Guide...
-
Page 11: Safety
Les sikkerhetsinformasjonen (Safety Information) før du installerer dette produktet. Antes de instalar este produto, leia as Informações sobre Segurança. Antes de instalar este producto, lea la información de seguridad. Läs säkerhetsinformationen innan du installerar den här produkten. © Copyright IBM Corp. 2002... - Page 12 2. First, remove power cords from outlet. 3. Attach signal cables to connectors. 3. Remove signal cables from connectors. 4. Attach power cords to outlet. 4. Remove all cables from devices. 5. Turn device ON. IBM BladeCenter 4-Port Gb Ethernet Switch Module: Installation and User’s Guide...
- Page 13 Statement 2: CAUTION: When replacing the lithium battery, use only IBM Part Number 33F8354 or an equivalent type battery recommended by the manufacturer. If your system has a module containing a lithium battery, replace it only with the same module type made by the same manufacturer.
- Page 14 Class 1 Laser Product Laser Klasse 1 Laser Klass 1 Luokan 1 Laserlaite Appareil A Laser de Classe 1 IBM BladeCenter 4-Port Gb Ethernet Switch Module: Installation and User’s Guide...
- Page 15 Statement 4: ≥ 18 kg (39.7 lb) ≥ 32 kg (70.5 lb) ≥ 55 kg (121.2 lb) CAUTION: Use safe practices when lifting. Statement 5: CAUTION: The power control button on the device and the power switch on the power supply do not turn off the electrical current supplied to the device.
- Page 16 Hazardous voltage, current, and energy levels are present inside any component that has this label attached. There are no serviceable parts inside these components. If you suspect a problem with one of these parts, contact a service technician. IBM BladeCenter 4-Port Gb Ethernet Switch Module: Installation and User’s Guide...
- Page 17 Statement 13: DANGER Overloading a branch circuit is potentially a fire hazard and a shock hazard under certain conditions. To avoid these hazards, ensure that your system electrical requirements do not exceed branch circuit protection requirements. Refer to the information that is provided with your device for electrical specifications.
- Page 18 IBM BladeCenter 4-Port Gb Ethernet Switch Module: Installation and User’s Guide...
-
Page 19: Chapter 1. Introducing The Ibm Bladecenter 4-Port Gb Ethernet Switch Module
7. For additional information, see the instructions in your BladeCenter publications. Your IBM BladeCenter 4-Port Gb Ethernet Switch Module is one of up to four Ethernet switch modules that can be installed in the IBM Eserver BladeCenter Type 8677, also known as the BladeCenter unit. This high-performance... -
Page 20: Related Publications
(MAC) address Verify that the shipping carton contains an IBM BladeCenter 4-Port Gb Ethernet Switch Module. If the Ethernet switch module is missing or damaged, contact your local reseller for replacement. Otherwise, return the Ethernet switch module to its static-protective package. - Page 21 Depending on your blade server model, additional publications might be included on the IBM BladeCenter Documentation CD. In addition to reviewing the publications in this library, be sure to review the IBM BladeCenter Planning and Installation Guide located at http://www.pc.ibm.com/eserver/bladecenter on the World Wide Web for information to help you prepare for system installation and configuration.
-
Page 22: Notices And Statements Used In This Book
Module The orange color on components and labels on your Ethernet switch module and BladeCenter unit identifies hot-swap or hot-plug components. You can install or remove these components while the system is running, provided that your system is configured to support this function. -
Page 23: Specifications And Features
MAC address, see “IP addresses and SNMP community names” on page 19. Specifications and features This section provides a summary of the specifications and features for your IBM BladeCenter 4-Port Gb Ethernet Switch Module. The IBM BladeCenter 4-Port Gb Ethernet Switch Module features include: v Ports –... -
Page 24: Standards And Topology
IEEE 802.1P Tagged Packets v IEEE 802.3ab 1000BASE-T v IEEE 802.3x Full-duplex Flow Control v ANSI/IEEE 802.3 NWay auto-negotiation The following topology applies to the Ethernet switch module: Star IBM BladeCenter 4-Port Gb Ethernet Switch Module: Installation and User’s Guide... -
Page 25: Chapter 2. Installing And Removing A Switch Module
Ethernet switch that provides a network connection to Ethernet Link 1 in all the blade servers in the BladeCenter unit. To provide a network connection for Ethernet Link 2 in each blade server, install an Ethernet switch module in switch-module bay 2. -
Page 26: Installation Guidelines
The blue color on components and labels identifies touch points where you can grip a component, move a latch, and so on. v You do not need to turn off the BladeCenter unit to install or replace any of the hot-swap modules on the rear of the BladeCenter unit. -
Page 27: Handling Static-Sensitive Devices
While the device is still in its static-protective package, touch it to an unpainted metal part of the BladeCenter chassis for at least two seconds. (This drains static electricity from the package and from your body.) v Remove the device from its package and install it directly into your BladeCenter unit without setting it down. - Page 28 3. Select a switch-module bay in which to install the switch module. 4. Select a switch-module bay in which to install the switch module, in accordance with the instructions in “Ethernet interface requirements” on page 7. IBM BladeCenter 4-Port Gb Ethernet Switch Module: Installation and User’s Guide...
- Page 29 6. If you have not already done so, touch the static-protective package that contains the switch module to an unpainted metal part of the BladeCenter unit for at least two seconds. 7. Remove the switch module from its static-protective package.
-
Page 30: Removing A Switch Module
5. Slide the switch module out of the bay and set it aside. 6. Place either another switch module or a filler module in the bay within 1 minute. IBM BladeCenter 4-Port Gb Ethernet Switch Module: Installation and User’s Guide... - Page 31 7. If you placed another switch module in the bay, reconnect any cables that you unplugged in step 3. 8. Replace the acoustic attenuation module option, if you removed it in step 1. Chapter 2. Installing and removing a switch module...
- Page 32 IBM BladeCenter 4-Port Gb Ethernet Switch Module: Installation and User’s Guide...
-
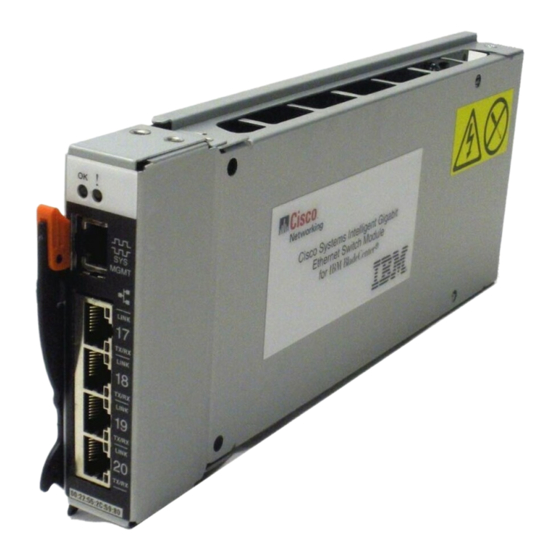
Page 33: Chapter 3. Information Panel Leds And External Ports
Chapter 3. Information panel LEDs and external ports This chapter describes the information panel and LEDs (also known as indicators) on the IBM BladeCenter 4-Port Gb Ethernet Switch Module. This chapter also identifies the external ports on the information panel. - Page 34 10/100/1000 Mbps port. When this LED blinks on a port, it indicates that data is being received or transmitted (that is, activity is occurring) on that port. The blink frequency is proportional to the amount of traffic on that port. IBM BladeCenter 4-Port Gb Ethernet Switch Module: Installation and User’s Guide...
-
Page 35: Chapter 4. Switch Management And Operating Concepts
Two independent switch modules provide redundancy in the base system configuration. Each of the 14 server blades within a BladeCenter chassis has a dedicated, 1000 Mbps (1 Gbps) full-duplex link to each of the two switch modules. -
Page 36: Switch Management And Control
IBM BladeCenter Documentation CD for more information). Switch management and control This document describes the user interfaces, screens, parameters, and other information that you need for remote management and control of your BladeCenter 4-Port Gb Ethernet Switch Module. Complete the following initial configuration steps: 1. -
Page 37: Ip Addresses And Snmp Community Names
IP addresses and SNMP community names Each switch must be assigned its own Internet protocol (IP) address, which is used for communication with an SNMP network manager or other transmission control protocol/Internet protocol (TCP/IP) applications (for example, BOOTP or TFTP). The switch default IP address is 192.168.70.1xx, where xx depends on the number of the bay into which you have installed the switch module, as shown in Table 1. -
Page 38: Traps
(trap recipient). Trap recipients are special users of the network who are given certain rights and access in overseeing the maintenance of the network. Trap recipients will receive IBM BladeCenter 4-Port Gb Ethernet Switch Module: Installation and User’s Guide... -
Page 39: Mibs
traps sent from the switch; they must immediately take certain actions to avoid future failure or breakdown of the network. You can also specify which network managers can receive traps from the switch by entering a list of the IP addresses of authorized network managers. You can enter up to four trap recipient IP addresses, and four corresponding SNMP community strings. -
Page 40: Snmp
The remote user SNMP application and the router SNMP must use the same community string. SNMP community strings of up to 20 characters can be entered under the Remote Management Setup menu. IBM BladeCenter 4-Port Gb Ethernet Switch Module: Installation and User’s Guide... -
Page 41: Packet Forwarding
Packet forwarding The switch uses a forwarding table to store the information that it collects. The switch programs the mapping from the destination MAC address to the destination port number into its forwarding table. This information is then used to forward packets. -
Page 42: Vlans
A port on a switch where packets are flowing out of the switch, either to another switch or to an end station, and where tagging decisions must be made. IBM BladeCenter 4-Port Gb Ethernet Switch Module: Installation and User’s Guide... -
Page 43: 802.1Q Vlan Packet Forwarding
IEEE 802.1Q (tagged) VLANs are implemented on the IBM BladeCenter 4-Port Gb Ethernet Switch Module. 802.1Q VLANs require tagging, which enables them to span the entire network (provided that all switches on the network are IEEE 802.1Q-compliant). VLANs enable a network to be segmented to reduce the size of broadcast domains. -
Page 44: 802.1Q Vlan Tags
4 octets. All of the information that was originally contained in the packet is retained. 1. CFI is used for encapsulating Token Ring packets so that they can be carried across Ethernet backbones. IBM BladeCenter 4-Port Gb Ethernet Switch Module: Installation and User’s Guide... -
Page 45: Port Vlan Id
IEEE 802.1Q Tag IEEE 802.1Q Tag Octets Destination Address (6 octets) Destination Address (6 octets) Source Address (6 octets) Source Address (6 octets) EtherType = 0x8100 EtherType = 0x8100 Tag Control Information Tag Control Information MAC Length/Type MAC Length/Type Begining of Data Begining of Data Cyclic Redundancy Check (4 octets) Cyclic Redundancy Check (4 octets) -
Page 46: Tagging And Untagging
802.1Q VLAN information. (Remember that the PVID is only used internally within the switch). Untagging is used to send packets from an 802.1Q-compliant network device to a noncompliant network device. IBM BladeCenter 4-Port Gb Ethernet Switch Module: Installation and User’s Guide... -
Page 47: Ingress Filtering
Ingress filtering A port on a switch where packets are flowing into the switch and VLAN decisions must be made is referred to as an ingress port. If ingress filtering is enabled for a port, the switch will examine the VLAN information in the packet header (if present) and decide whether to forward the packet. - Page 48 The conflicting address should be removed for the list of active leases, or it should be excluded until the conflict is identified and resolved. IBM BladeCenter 4-Port Gb Ethernet Switch Module: Installation and User’s Guide...
-
Page 49: Chapter 5. Web-Based Network Management
Guide publications on the IBM BladeCenter Documentation CD for more information. In addition to reviewing the publications in this library, be sure to review the IBM BladeCenter Planning and Installation Guide located at http://www.pc.ibm.com/eserver/bladecenter on the World Wide Web for information to help you prepare for system installation and configuration. -
Page 50: Getting Started
IBM Director Configuration and Deployment Wizard or the BladeCenter Configuration Management program (see the applicable BladeCenter Installation and User’s Guide publications on the IBM BladeCenter Documentation CD for more information). Note: An IP interface consists of two parts: a subnet mask and a network address. - Page 51 Enter USERID for the User Name and PASSW0RD for the Password (where the sixth alphanumeric character is the number zero, not the letter O) and click OK. This opens the main page in the management module. Note: Capital letters are required, as these fields are both case-sensitive. To increase system security, change the password after you log onto the system for the first time and, be sure to store the new password in a safe location.
-
Page 52: Configuration
The Configuration menu includes: Switch Information, IP Setup, Port Setting, Switch Setup, VLANs, Multicasting, Mirroring, Spanning Tree, Class of Service, Link Aggregation, and Forwarding, as well as secondary windows. IBM BladeCenter 4-Port Gb Ethernet Switch Module: Installation and User’s Guide... -
Page 53: Switch Information
Switch Information When you select Switch Information from the Configuration menu, a window similar to the following opens: To establish the basic switch settings, enter a name for the switch in the System Name field, the physical location of the switch in the System Location field, and the name of the contact person responsible for the switch in the System Contact field. -
Page 54: Ip Setup
Bay number Default IP address Bay 1 192.168.70.127 Bay 2 192.168.70.128 Bay 3 192.168.70.129 Bay 4 192.168.70.130 The data fields on the IP Setup window are described as follows: IBM BladeCenter 4-Port Gb Ethernet Switch Module: Installation and User’s Guide... - Page 55 Class C network, but you can also use custom subnet masks. Note: For switch communication with a remote management station, such as the IBM Director server, through the management module external Ethernet port, the switch module internal network interface and the management module internal and external interfaces must be on the same subnet.
-
Page 56: Port Setting
To view the configuration settings for the ports on the switch module, see “Display Ports”. Display Ports When you select Port Setting from the Configuration menu and Display Ports from the Port Setting menu, a window similar to the following opens: IBM BladeCenter 4-Port Gb Ethernet Switch Module: Installation and User’s Guide... -
Page 57: Switch Settings
This window displays the applicable configuration information for all the internal and external ports on the switch module, based on the configuration settings that you selected or accepted in “Configure Ports” on page 38. Ports are not selectable on this window and, the information on this window is not changeable. To change the configuration settings for the ports on the switch module, see “Configure Ports”... -
Page 58: Telnet Settings
To create, modify, or remove an 802.1Q VLAN, select VLANs from the Configuration menu (see “Configuration” on page 34) and Edit 802.1Q VLANs from the VLANs menu. A window similar to the following opens: IBM BladeCenter 4-Port Gb Ethernet Switch Module: Installation and User’s Guide... -
Page 59: 802.1Q Vlans Entry Settings -- Add
You can delete, add, and remove entries through this window. To delete an entry, click the circle next to the appropriate entry; then, click Remove. To add an entry, click Add and follow the instructions in “802.1Q VLANs Entry Settings -- Add”. To modify an existing entry, click Edit and follow the instructions in “802.1Q VLANs Entry Settings -- Edit”... -
Page 60: 802.1Q Vlans Entry Settings -- Edit
1. Select VLANs from the Configuration menu (see “Configuration” on page 34). 2. Select 802.1Q Port Settings from the VLANs menu. 3. Select Port VLAN ID (PVID) from the 802.1Q Port Settings window. A window similar to the following opens: IBM BladeCenter 4-Port Gb Ethernet Switch Module: Installation and User’s Guide... -
Page 61: Port Priority
This window enables you to assign a Port VLAN ID (PVID) number to an individual port. Click Apply to make your changes effective. The information on this window is described as follows: PVID The PVID is used by the port to tag outgoing, untagged packets, and to make filtering decisions about incoming packets. -
Page 62: Port Ingress Filter
VIDs and PVIDs of VLANs assigned to the port. If the VID tag of an incoming port is different from either the VID or PVID assigned to the port, the port filters (drops) the packet. IBM BladeCenter 4-Port Gb Ethernet Switch Module: Installation and User’s Guide... -
Page 63: Port Gvrp Settings
Port GVRP Settings Complete the following steps to display the Port GVRP Settings window: 1. Select VLANs from the Configuration menu (see “Configuration” on page 34). 2. Select 802.1Q Port Settings from the VLANs menu. 3. Select Port GVRP Settings from the 802.1Q Port Settings window. A window similar to the following opens: GARP VLAN Registration Protocol (GVRP) is a Generic Attribute Registration Protocol (GARP) application that provides 802.1Q-compliant VLAN pruning and... -
Page 64: Ieee 802.1Q Multicast Setting
10 seconds. IEEE 802.1q Multicast Setting To edit the IEEE 802.1q multicast settings, highlight IEEE 802.1q Multicast Setting on the Multicasting menu to access the following window: IBM BladeCenter 4-Port Gb Ethernet Switch Module: Installation and User’s Guide... -
Page 65: Mirroring
To add a new entry to the multicast forwarding table, enter the MAC address of the multicast source in the Multicast MAC Address field and enter the VLAN ID number of the VLAN that will be receiving the multicast packets in the VID field. Then, select the member ports. -
Page 66: Spanning Tree
The switch supports 801.2d STP, which enables you to create alternative paths (with multiple switches or other types of bridges) in your network. See “Spanning Tree Protocol” on page 23 for a detailed explanation. IBM BladeCenter 4-Port Gb Ethernet Switch Module: Installation and User’s Guide... -
Page 67: Stp Port Settings
Click Apply after making changes to the preceding window. The parameters that you can change are: Status This drop-down menu enables you to enable the STP setting. Max Age: [6 .. 40] <20> The maximum age can be set from 6 to 40 seconds. At the end of the Max Age, if a BPDU has still not been received from the root bridge, your switch will start sending its own BPDU to all other switches for permission to become the root bridge. -
Page 68: Class Of Service
Output Priority Queue Method on the Class of Service following window. Otherwise, only the round-robin method can be used to schedule the packets in four different priority queues. IBM BladeCenter 4-Port Gb Ethernet Switch Module: Installation and User’s Guide... - Page 69 When Output Priority Queue Method is enabled, the weight and latency specified in the Class of Service Configuration window will take effect. Note that the weight can only be a value between 1 and 15. A higher priority queue always has a larger weight than a lower priority queue.
-
Page 70: Link Aggregation
You can configure up to two trunk connections (combining two to four ports into one fat pipe) between any two BladeCenter switches or other Layer 2 switches. However, before making any physical connections between devices, use the Link Aggregation menus to specify the ports that will belong to the trunking group on both switches. -
Page 71: Distribution Method
When using a port trunk, note that: v The ports used in a trunk must all be of the same speed (100 Mbps or 1000 Mbps) and operate in full-duplex mode only. v The ports that can be assigned to the same trunk have certain other restrictions, as described in this section. -
Page 72: Port Trunking
For IP packets, the available methods are: Src Mac, Dest Mac, Src & Dest Mac, Src IP, Dest IP, or Src & Dest IP. Port Trunking The Port Trunking window contains the following information: IBM BladeCenter 4-Port Gb Ethernet Switch Module: Installation and User’s Guide... -
Page 73: Setup Ieee 802.3Ad Link Aggregation
The switch module offers link aggregation on four external ports for up to two static trunk groups or two LACP 802.3ad link aggregation groups. The trunked ports can be non-continuous (that is, have non-sequential port numbers). All of the ports in the group must be members of the same VLAN. -
Page 74: Forwarding
LACP switches. Status This displays the current status of a link aggregation port. Forwarding The MAC Address Forwarding window enables you to set up static packet forwarding on the switch. IBM BladeCenter 4-Port Gb Ethernet Switch Module: Installation and User’s Guide... -
Page 75: Remote Management Setup
The information on the window is described as follows: MAC Address The MAC address from which packets will be statically filtered. The VLAN ID number of the VLAN to which the MAC address belongs. Type Select the filter type, Permanent or DeleteOnReset. Port Map You can designate the port on which the MAC address resides. -
Page 76: Management Station Ip Settings
The Management Station IP Settings window contains the following information: SNMP Community Settings The SNMP Community Settings window contains the following information: Setting up trap receivers The Setup Trap Receivers window contains the following information: IBM BladeCenter 4-Port Gb Ethernet Switch Module: Installation and User’s Guide... -
Page 77: Setting Up User Accounts
For a detailed list of the trap types that are used for this switch, see “Traps” on page 20. Setting up user accounts The switch module enables you to set up and manage user accounts in the following three windows. The Setup User Accounts window contains the following information: The information on this window is described as follows: User Name... - Page 78 <User> has read only access. A <User+> has the same privileges as a <User>, but with the added ability to restart the switch. IBM BladeCenter 4-Port Gb Ethernet Switch Module: Installation and User’s Guide...
-
Page 79: Assigning Root, User+, And User Privileges
Assigning Root, User+, and User privileges There are three levels of user privileges: Root, User+, and User. Some menu selections that are available to users with Root privileges might not be available to those with User+ and User privileges. Note: User privileges are also known as normal user privileges. The following table summarizes the Root, User+, and User privileges: Table 3. -
Page 80: Network Monitoring
Port Error Packets The Web Manager enables various packet statistics to be viewed as either a line graph or a table. The Port Error Packet window contains the following information: IBM BladeCenter 4-Port Gb Ethernet Switch Module: Installation and User’s Guide... - Page 81 Rx Frames Received packets. CRC Error For 10 Mbps ports, the counter records CRC errors; that is, frame-check sequence (FCS) errors or alignment errors. For 100 Mbps ports, the counter records the sum of CRC errors and code errors (frames received with rxerror signal).
-
Page 82: Port Packet Analysis
Displays the number of bytes (octets) received by the switch in total number (Total), and rate (Total/sec). RX Frames Displays the number of packets (frames) received by the switch in total number (Total), and rate (Total/sec). IBM BladeCenter 4-Port Gb Ethernet Switch Module: Installation and User’s Guide... -
Page 83: Address Table
TX Bytes Displays the number of bytes (octets) transmitted by the switch in total number (Total), and rate (Total/sec). TX Frames Displays the number of packets (frames) transmitted by the switch in total number (Total), and rate (Total/sec). Address Table This section contains a description and illustration of the Browse MAC Address Table window. -
Page 84: Applications
The Link Aggregation Control Protocol aggregator displays the status of dynamic LACP trunked ports from the group point of view. The information on this read-only window is described as follows: IBM BladeCenter 4-Port Gb Ethernet Switch Module: Installation and User’s Guide... -
Page 85: Igmp Snooping
Index The LACP Aggregator ID number. Operation Key Displays the operational key used by the aggregator to communicate with other aggregators. Member Port Displays the port member status in the aggregator group. Status Displays the status of each aggregator. When there is only one port member in the aggregator, the aggregator acts as a normal individual port (by default, each LACP-enabled port is assigned to their own aggregator group). -
Page 86: Maintenance
Note: TFTP server software must be running on the management station for the TFTP services listed here to work. Download Configuration File The Download Configuration File from TFTP Server window contains the following information: IBM BladeCenter 4-Port Gb Ethernet Switch Module: Installation and User’s Guide... -
Page 87: Upgrade Firmware
Enter the IP address of the TFTP server in the Server IP Address field and the complete path and file name of the firmware code file for the switch. Click Apply to enter the server IP address into the switch RAM (select Save Changes to enter the address into the switch NVRAM). -
Page 88: Upload Configuration File
The switch module management agent can upload its history log file to a TFTP server. Note: An empty history file on the TFTP server must exist on the server before the switch can upload its history file. IBM BladeCenter 4-Port Gb Ethernet Switch Module: Installation and User’s Guide... -
Page 89: Using The Browser
Enter the IP address of the TFTP server in the Server IP Address field and the complete path and file name of the firmware code file for the switch. Click Apply to enter the server IP address into the switch RAM (select Save Changes to enter the address into the switch NVRAM). -
Page 90: Download Configuration/Log Files
When the switch configuration settings have been saved to NVRAM, they become the default settings for the switch. These settings will be used every time that the switch module is restarted. IBM BladeCenter 4-Port Gb Ethernet Switch Module: Installation and User’s Guide... -
Page 91: Restoring The Default Configuration Parameters
Restoring the default configuration parameters The Factory Reset window contains the following information: A remote reset returns the device to the initial parameters that were set at the factory. Click Reset to Factory Default to reset the switch module. Restarting the switch The Restart System window contains the following information: To perform a restart of the switch, which resets the system, click the Restart button. - Page 92 IBM BladeCenter 4-Port Gb Ethernet Switch Module: Installation and User’s Guide...
-
Page 93: Chapter 6. Configuring The Switch Module Through The Telnet Interface
Guide publications on the IBM BladeCenter Documentation CD for more information. In addition to reviewing the publications in this library, be sure to review the IBM BladeCenter Planning and Installation Guide located at http://www.pc.ibm.com/eserver/bladecenter on the World Wide Web for information to help you prepare for system installation and configuration. -
Page 94: Connecting To The Switch Module
Note: The passwords used to access the switch module are case-sensitive; therefore, an uppercase S is not the same as a lowercase s. IBM BladeCenter 4-Port Gb Ethernet Switch Module: Installation and User’s Guide... - Page 95 Complete the following steps to connect to the switch module through the Telnet interface: 1. Display a window that contains a DOS prompt command line; for example, C:\>. 2. Type the following command on the DOS prompt command line and press Enter: telnet x where x is the IP address for your switch module When you first connect to the switch module, the first login window (shown in the...
-
Page 96: Setting Up User Accounts
To create a new user account, highlight Setup User Accounts in the main menu and press Enter: The Setup User Accounts window opens, as shown in the following illustration. IBM BladeCenter 4-Port Gb Ethernet Switch Module: Installation and User’s Guide... -
Page 97: Assigning Root, User+, And User Privileges
Complete the following steps to create a new user account: 1. Toggle the Action field to <Add> using the Spacebar. This will enable the addition of a new user. The other options are: <Delete> Deletes a user entry. <Update> Makes changes to an existing user entry. 2. -
Page 98: Saving Changes
To keep any configuration changes permanently, highlight Save Changes in the main menu and press Enter. To verify that your new settings have been saved to NVRAM, the following window opens. IBM BladeCenter 4-Port Gb Ethernet Switch Module: Installation and User’s Guide... -
Page 99: Restoring Default Configuration Values
When the switch configuration settings have been saved to NVRAM, they become the default settings for the switch. These settings will be used every time that the switch module is restarted. Restoring default configuration values The only way to change the configuration stored in NVRAM is to save a new configuration using Save Changes, or to process a Load Factory Default Configuration function from the Reboot menu. -
Page 100: Logging Onto The Switch Module
“Setting up user accounts” on page 78 for complete details. Complete the following steps to update a user account: 1. Select Setup User Accounts in the main menu. The following Setup User Accounts window opens: IBM BladeCenter 4-Port Gb Ethernet Switch Module: Installation and User’s Guide... -
Page 101: Deleting A User Account
2. Toggle the Action field by using the Spacebar to select Update. 3. Type in the user’s name in the Username field for the user account that you want to change; then, press Enter. Type in the old password in the Old Password field for that user account;... -
Page 102: Basic Setup
Some settings must be entered to enable the switch module to be managed from an SNMP-based Network Management System such as SNMP version 1 or to be able to access the switch module using the Telnet protocol. IBM BladeCenter 4-Port Gb Ethernet Switch Module: Installation and User’s Guide... - Page 103 BladeCenter management and configuration program. For a detailed description of this program, see the Eserver BladeCenter Type 8677 Installation and User’s Guide on the IBM BladeCenter Documentation CD. The Get IP From options are:...
-
Page 104: Remote Management Setup
“password” to control access to the switch. If the switch receives a request with a community name that it does not recognize, it will trigger an authentication trap. IBM BladeCenter 4-Port Gb Ethernet Switch Module: Installation and User’s Guide... - Page 105 The SNMP enables up to four different community names to be defined. The community name public is defined by default; you can change this name and add others. You will need to coordinate these names with the community name settings that you use in your network management system.
-
Page 106: Switch Settings
The options are 2 mins, 5 mins, 10 mins, 15 mins, and Never. Telnet Sessions (1..4) [1] This sets the maximum number of available Telnet sessions. IBM BladeCenter 4-Port Gb Ethernet Switch Module: Installation and User’s Guide... -
Page 107: Configure Ports
Configure Ports Highlight Configure Ports in the main menu and press Enter. The following window opens. Toggle the View Ports field, using the Spacebar, to view the configuration of a range of internal or external ports. To configure a specific port, toggle the Configure Port from [ ] to [ ] field until the applicable port number or port range appears. -
Page 108: Upgrade Firmware From Tftp Server
Download Configuration File from TFTP Server To download a switch configuration file from a TFTP server, highlight Download Configuration File from TFTP Server on the Switch Utilities menu and press Enter. IBM BladeCenter 4-Port Gb Ethernet Switch Module: Installation and User’s Guide... -
Page 109: Upload Configuration File To Tftp Server
Enter the IP address of the TFTP server and specify the path and file name of the switch configuration file on the TFTP server. Highlight APPLY and press Enter to record the IP address of the TFTP server. Select Save Changes in the main menu to enter the address into NVRAM. Highlight START and press Enter to initiate the file transfer. -
Page 110: Ping Test
Network Monitoring The switch module provides extensive network monitoring capabilities. To display the network data compiled by the switch, highlight Network Monitoring on the main menu and press Enter. IBM BladeCenter 4-Port Gb Ethernet Switch Module: Installation and User’s Guide... -
Page 111: Port Utilization
Port Utilization To view the port utilization of all the ports on the switch, highlight Port Utilization on the Network Monitoring menu and press Enter. The Port Utilization window shows the number of packets transmitted and received per second and calculates the percentage of the total available bandwidth being used on the port (displayed under %Util.). -
Page 112: Port Packet Analysis
In this case, the switch will broadcast the packet to all ports, thus negating many of the benefits of having a switch. IBM BladeCenter 4-Port Gb Ethernet Switch Module: Installation and User’s Guide... -
Page 113: Gvrp
Complete the following steps to search for a particular MAC address: Toggle the Browse By field to MAC Address. A MAC Address field will appear. Enter the MAC address in the field and press Enter. Highlight BROWSE and press Enter to initiate the browsing action. Highlight CLEAR ALL and press Enter to reset the table counters. -
Page 114: Lacp Aggregator
Otherwise, it will start to aggregate when there is more than one port that wants to join the aggregator group. Switch History To view the switch history log, highlight Switch History from the Network Monitoring menu and press Enter. IBM BladeCenter 4-Port Gb Ethernet Switch Module: Installation and User’s Guide... -
Page 115: Restarting The Switch Module
Restarting the switch module The switch module has several reboot (restart) options. To restart the switch, highlight Reboot in the main menu and press Enter. The reboot options are as follows: Reboot Restarts the switch. Any configuration settings that are not saved through Save Changes in the main menu will be lost. -
Page 116: Logging Out
Login window will open so that you can start a new switch-module session (see “First-time connection to the Ethernet switch module” on page 76 for additional information). IBM BladeCenter 4-Port Gb Ethernet Switch Module: Installation and User’s Guide... -
Page 117: Advanced Setup
Advanced Setup The main menu is divided into two sections, Basic Setup and Advanced Setup. The Advanced Setup menus are organized into seven main categories: Spanning Tree (see “Spanning Tree”), Forwarding (see “Forwarding” on page 101), Class of Service (see “Class of Service” on page 101), Mirroring (see “Mirroring” on page 103), Multicasting (see “Multicasting”... -
Page 118: Stp Port Settings
The spanning tree port cost can be set between 1 and 65535. The lower the cost, the greater the probability that the port will be chosen as the designated port (chosen to forward packets). IBM BladeCenter 4-Port Gb Ethernet Switch Module: Installation and User’s Guide... -
Page 119: Forwarding
Priority [128] The spanning tree port priority can be set between 0 and 255. The lower the priority, the greater the probability that the port will be chosen as the root port. Fast STP <Disabled> Toggle between Enabled and Disabled. When the STP is turned on, a change from link-down to link-up will trigger the STP. -
Page 120: Class Of Service Configuration
802.1p Priority Mapping Select 802.1p Priority Setting on the Class of Service menu and press Enter to access the following window: IBM BladeCenter 4-Port Gb Ethernet Switch Module: Installation and User’s Guide... -
Page 121: Diffserv Mapping
This window enables you to configure traffic class priority by specifying the class value, from Low Priority to High Priority, of the switch eight levels of priority. Press APPLY to make your changes effective. Diffserv Mapping The switch module supports DiffServ Mapping (Differential Services RFC 2475) for Ipv4 frames when DiffServ Mapping is enabled on the Setup DiffServ Mapping window. -
Page 122: Multicasting
Also, the target port cannot be a member of a trunk group. Port mirroring is not possible if you use the same egress and ingress target port. Multicasting Select Multicasting on the main menu to access the following window: IBM BladeCenter 4-Port Gb Ethernet Switch Module: Installation and User’s Guide... -
Page 123: Igmp Snooping
IGMP Snooping IGMP Snooping can be globally enabled or disabled from the IGMP Snooping window. To configure IGMP Snooping, highlight IGMP Snooping on the Multicasting Menu and press Enter: To configure IGMP Snooping, complete the following steps: Toggle the Switch IGMP Snooping field to Enabled. Toggle the Querier State field to the appropriate choice among Non-Querier, V1-Querier, and V2-Querier to determine the version of IGMP that is used in your network. -
Page 124: Setup Ieee 802.1Q Multicast Settings
E (Egress Member) Specifies the port as being a static member of the multicast group. Egress member ports are ports that will be transmitting traffic for the multicast group. IBM BladeCenter 4-Port Gb Ethernet Switch Module: Installation and User’s Guide... -
Page 125: Vlans
- (Non-Member) Specifies the port as not being a member of the multicast group, but the port can become a member of the multicast group dynamically. Highlight APPLY and press Enter to make the changes current. Use Save Changes in the main menu to enter the changes into NVRAM. VLANs The switch reserves one VLAN, VID = 1, called the DEFAULT_VLAN, for internal use. - Page 126 Specifies the port as not being a member of the VLAN, but the port can become a member of the VLAN dynamically. Next, determine which of the ports that are members of the new VLAN will be tagged or untagged ports. IBM BladeCenter 4-Port Gb Ethernet Switch Module: Installation and User’s Guide...
-
Page 127: Configure 802.1Q Port Settings
To set a port as either a tagged or an untagged port, highlight the first field of Tagging (U/T) field. The state of each port can be set by highlighting the port entry using the arrow keys and then toggling between U or T using the Spacebar. Specifies the port as an Untagged member of the VLAN. -
Page 128: Link Aggregation
You can configure up to two trunk connections (combining two to four ports into one fat pipe) between any two BladeCenter switches or other Layer 2 switches. However, before making any physical connections between devices, use the Link Aggregation menus to specify the ports that will belong to the trunking group on both switches. - Page 129 Trunking can be set as a static port/group using the Port Trunking window or as a dynamic port/group using the IEEE 802.3ad Link Aggregation window. To configure a port trunking group, highlight Link Aggregation on the main menu and press Enter. Link aggregation, or port trunking, enables several ports to be grouped together and to act as a single link.
-
Page 130: Port Trunking
IEEE 802.3ad Link Aggregation Use the IEEE 802.3ad Link Aggregation menu to set up dynamic port trunking. IBM BladeCenter 4-Port Gb Ethernet Switch Module: Installation and User’s Guide... - Page 131 To enable Link Aggregation Control Protocol and set the System Priority, value select Setup IEEE 802.3ad Link Aggregation on the Link Aggregation menu: The user-changeable parameters on this window are as follows: LACP This parameter enables Link Aggregation to be Enabled or Disabled. Disabling LACP when it is not in use can eliminate some traffic on the network.
- Page 132 Oper Key This displays the operational key used by the port to communicate with other LACP switches. Status This displays the current status of a link aggregation port. IBM BladeCenter 4-Port Gb Ethernet Switch Module: Installation and User’s Guide...
-
Page 133: Appendix A. Rj-45 Pin Specifications
Tx - (transmit) Rx + (receive) Not used Not used Rx - (receive) Not used Not used The four external Ethernet ports of this switch module are auto-configuring and do not require straight-through or crossover cables. © Copyright IBM Corp. 2002... - Page 134 IBM BladeCenter 4-Port Gb Ethernet Switch Module: Installation and User’s Guide...
-
Page 135: Appendix B. Run-Time Switching Software Default Settings
2 secs Bridge forward delay 15 secs Bridge priority 32768 Port STP cost Port STP priority NWay Enable Flow control Enable Community string “public”, “private” VLAN mode IEEE 802.1Q Default port VID Ingress rule checking Disable © Copyright IBM Corp. 2002... - Page 136 IBM BladeCenter 4-Port Gb Ethernet Switch Module: Installation and User’s Guide...
-
Page 137: Appendix C. Cable Lengths
1000 Mbps Category 5e UTP 100 meters (328.1 ft) cable Category 5 UTP cable 100BASE-TX 100 Mbps Category 5 UTP 100 meters (328.1 ft) cable 10BASE-T 10 Mbps Category 3 UTP 100 meters (328.1 ft) cable © Copyright IBM Corp. 2002... - Page 138 IBM BladeCenter 4-Port Gb Ethernet Switch Module: Installation and User’s Guide...
-
Page 139: Appendix D. Understanding And Troubleshooting The Spanning Tree Protocol
A relative priority for each port. Lower 32768 numbers give a higher priority and a greater chance of a given port being elected as the root port. Port cost A value used by STP to evaluate paths © Copyright IBM Corp. 2002... -
Page 140: Bridge Protocol Data Units
In addition, STP specifies a series of states a port must go through to further ensure that a stable network topology is created after a topology change. IBM BladeCenter 4-Port Gb Ethernet Switch Module: Installation and User’s Guide... - Page 141 Each port on a switch using STP exists in one of the following five states: Blocking The port is blocked from forwarding or receiving packets. For additional information, see “Blocking state” on page 127. Listening The port is waiting to receive BPDU packets that might tell the port to go back to the blocking state.
-
Page 142: Setting User-Changeable Stp Parameters
BPDU packets sent by the root bridge to tell all other switches that it is indeed the root bridge. If you set a hello time for your IBM BladeCenter 4-Port Gb Ethernet Switch Module: Installation and User’s Guide... -
Page 143: Illustration Of Stp
switch, and it is not the root bridge, the set hello time will be used if and when your switch becomes the root bridge. Note: The hello time cannot be longer than the Max. Age. Otherwise, a configuration error will occur. Max. - Page 144 The switch with the lowest bridge ID (switch A) was elected the root bridge, and the ports were selected to give a high port cost between switches B and C. IBM BladeCenter 4-Port Gb Ethernet Switch Module: Installation and User’s Guide...
-
Page 145: Blocking State
Note also that the example network topology is intended to provide redundancy to protect the network against a link or port failure, not a switch failure or removal. For example, a failure of switch A would isolate LAN 1 from connecting to LAN 2 or LAN 3. -
Page 146: Listening State
Does not add addresses to its forwarding database v Receives BPDUs and directs them to the CPU v Processes BPDUs received from the CPU v Receives and responds to network management messages IBM BladeCenter 4-Port Gb Ethernet Switch Module: Installation and User’s Guide... -
Page 147: Learning State
The following illustration shows the actions that occur when a port is in the listening state. Network Segment Network Segment Port 1 Port 1 Forwarding Network Network Data Data Addresses Management Management BPDUs Packets Packets Packets Packets Forwarding Forwarding Database Database Switch Switch... -
Page 148: Forwarding State
The port waits for the expiration of the forward delay timer. It then moves to the learning state. v In the learning state, the port learns station location information from the source address of packets and adds this information to its forwarding database. IBM BladeCenter 4-Port Gb Ethernet Switch Module: Installation and User’s Guide... - Page 149 v The expiration of the forwarding delay timer moves the port to the forwarding state, where both learning and forwarding are enabled. At this point, packets are forwarded by the port. A port in the forwarding state does the following: v Forwards packets received from the network segment to which it is attached.
-
Page 150: Disabled State
Management BPDUs Packets Packets Packets Packets Forwarding Forwarding Database Database Switch Switch Fabric Fabric Discard BPDUs Data Data Packets Packets Port 2 Port 2 Learning Network Segment Network Segment IBM BladeCenter 4-Port Gb Ethernet Switch Module: Installation and User’s Guide... -
Page 151: Troubleshooting Stp
Troubleshooting STP This section describes how to troubleshoot the STP. Spanning Tree Protocol Failure A failure in the STA generally leads to a bridging loop. A bridging loop in an STP environment comes from a port that should be in the blocking state, but is forwarding packets. -
Page 152: Unidirectional Link
Unidirectional links can be caused by an undetected failure in one side of a fiber cable, or a problem with a ports transceiver. Any failure that enables a link to remain up while providing one-way communication is very dangerous for STP. IBM BladeCenter 4-Port Gb Ethernet Switch Module: Installation and User’s Guide... -
Page 153: Packet Corruption
Root Port 1 Port 1 Port 2 Port 2 Port 1 Port 1 Port 1 Port 1 Designated Port 2 Port 2 Port 2 Port 2 Blocked BPDUs Lost BPDUs Lost In this example, port 2 on bridge B can receive but not transmit packets. Port 2 on bridge C should be in the blocking state, but since it can no longer receive BPDUs from port 2 on bridge B, it will change to the forwarding state. -
Page 154: Identifying A Data Loop
A single blocking port changing to the forwarding state at an inappropriate time can cause a large part of a network to fail. Limiting the number of blocked ports helps to limit the risk of an inappropriate change. IBM BladeCenter 4-Port Gb Ethernet Switch Module: Installation and User’s Guide... - Page 155 Appendix D. Understanding and troubleshooting the Spanning Tree Protocol...
- Page 156 VLAN 2. Switch C is also blocking one port for VLAN 2. Thus, there are three redundant paths between switches A and B and two blocked ports per VLAN. This increases the chance of a data loop. IBM BladeCenter 4-Port Gb Ethernet Switch Module: Installation and User’s Guide...
- Page 157 Trunk VLAN 1 VLAN 1 VLAN 2 VLAN 2 Blocked Blocked VLAN 1 VLAN 1 VLAN 2 VLAN 2 VLAN 1 VLAN 1 VLAN 2 VLAN 2 In this example, the VLAN definitions are extended to switches A and B. This gives only a single blocked port per VLAN and enables the removal of all redundant links by removing switch A or B from the network.
- Page 158 IBM BladeCenter 4-Port Gb Ethernet Switch Module: Installation and User’s Guide...
-
Page 159: Appendix E. Getting Help And Technical Assistance
If you need help, service, or technical assistance or just want more information about IBM products, you will find a wide variety of sources available from IBM to assist you. This chapter contains information about where to go for additional information about IBM and IBM products, what to do if you experience a problem ®... -
Page 160: Software Service And Support
Setting up e-mail notification of technical updates about your products Software service and support Through IBM Support Line, you can get telephone assistance, for a fee, with usage, configuration, and software problems with xSeries servers, IntelliStation workstations, and appliances. For information about which products are supported by Support Line in your country or region, go to http://www.ibm.com/services/sl/products/. -
Page 161: Appendix F. Warranty Information
1. parts and labor during the first year of the warranty period 2. parts only, on an exchange basis, in the second and third years of the warranty period. IBM will charge you for any labor it provides in performance of the repair or replacement. -
Page 162: Warranty Service And Support
IBM hardware repair - If the problem is determined to be caused by IBM hardware under warranty, trained service personnel are available to provide the applicable level of service, either on-site or at an IBM service center as determined by IBM. -
Page 163: Purchasing Additional Services
International Warranty Service (IWS) is available during the warranty period. Eligible IBM systems are identified by their four-digit machine types. You can obtain IWS through the service delivery method (such as depot, carry-in, or on-site) provided in the servicing country or region. Service methods and procedures vary by country or region, and some service or parts might not be available in all countries and regions. -
Page 164: Ibm Statement Of Limited Warranty Z125-4753-06 8/2000
Country-unique Terms. The terms of Part 2 replace or modify those of Part 1. The warranties provided by IBM in this Statement of Limited Warranty apply only to Machines you purchase for your use, and not for resale, from IBM or your reseller. The term “Machine” means an IBM machine, its features, conversions, upgrades, elements, or accessories, or any combination of them. - Page 165 IBM or your reseller of changes in a Machine’s location. IBM is responsible for loss of, or damage to, your Machine while it is 1) in IBM’s possession or 2) in transit in those cases where IBM is responsible for the transportation charges.
-
Page 166: Part 2 - Country-Unique Terms
“Machine” includes Machine Code and Licensed Internal Code. This limit also applies to IBM’s suppliers and your reseller. It is the maximum for which IBM, its suppliers, and your reseller are collectively responsible. UNDER NO CIRCUMSTANCES IS IBM LIABLE FOR ANY OF THE FOLLOWING: 1) THIRD-PARTY CLAIMS AGAINST YOU FOR DAMAGES (OTHER THAN THOSE UNDER THE FIRST ITEM LISTED ABOVE);... - Page 167 Trade Practices Act 1974 or other similar legislation and are only limited to the extent permitted by the applicable legislation. Limitation of Liability: The following is added to this Section: Where IBM is in breach of a condition or warranty implied by the Trade Practices Act 1974 or other similar legislation, IBM’s liability is limited to the repair or replacement of the goods...
- Page 168 2. as to any other actual damage arising in any situation involving nonperformance by IBM pursuant to, or in any way related to the subject of this Statement of Limited Warranty, IBM’s liability will be limited to the charge paid by you for the individual Machine that is the subject of the claim.
- Page 169 Machine in any of those countries from either (1) an IBM reseller approved to perform warranty service or (2) from IBM. If you purchase an IBM Machine in a Middle Eastern or African country, you may obtain warranty service for that Machine from the IBM entity within the country of...
- Page 170 IBM with fraud or gross negligence and for express warranty. The following sentence is added to the end of item 2: IBM’s liability under this item is limited to the violation of essential contractual terms in cases of ordinary negligence.
- Page 171 Services Act 1982. Applicability of suppliers and resellers (unchanged). The following is added to the end of this Section: IBM’s entire liability and your sole remedy, whether in contract or in tort, in respect of any default shall be limited to damages.
- Page 172 IBM BladeCenter 4-Port Gb Ethernet Switch Module: Installation and User’s Guide...
-
Page 173: Appendix G. Notices
Web sites. The materials at those Web sites are not part of the materials for this IBM product, and use of those Web sites is at your own risk. IBM may use or distribute any of the information you supply in any way it believes appropriate without incurring any obligation to you. -
Page 174: Trademarks
Lotus, Lotus Notes, SmartSuite, and Domino are trademarks of Lotus Development Corporation and/or IBM Corporation in the United States, other countries, or both. ActionMedia, LANDesk, MMX, Pentium, and ProShare are trademarks of Intel Corporation in the United States, other countries, or both. -
Page 175: Electronic Emission Notices
IBM makes no representations or warranties with respect to non-IBM products. Support (if any) for the non-IBM products is provided by the third party, not IBM. Some software may differ from its retail version (if available), and may not include user manuals or all program functionality. -
Page 176: Industry Canada Class A Emission Compliance Statement
This is a Class A product. In a domestic environment this product may cause radio interference in which case the user may be required to take adequate measures. Taiwanese Class A warning statement IBM BladeCenter 4-Port Gb Ethernet Switch Module: Installation and User’s Guide... - Page 177 Japanese Voluntary Control Council for Interference (VCCI) statement Appendix G. Notices...
- Page 178 IBM BladeCenter 4-Port Gb Ethernet Switch Module: Installation and User’s Guide...
- Page 179 76, 77 GARP VLAN Registration Protocol (GVRP) 110 general requirements 5 Generic Attribute Registration Protocol (GARP) 110 GVRP Status window 66 data loop 136 GVRP window 95 data transmission rates 5 default remote-management mode 31, 75 © Copyright IBM Corp. 2002...
- Page 180 MAC address forwarding 56, 101 privileges for user accounts, assigning 59, 61, 79 MAC Address Forwarding window 56, 101 protocols 6 main menu 73, 77, 80, 81 maintenance 68 major components 4 IBM BladeCenter 4-Port Gb Ethernet Switch Module: Installation and User’s Guide...
- Page 181 STP illustration after applying STA rules 126 Reboot menu 81, 97 before applying STA rules 125 redundancy 17 STP parameters 121, 124 remote access 31, 75 STP port parameters 121 remote management 31, 75 STP Port Settings menu 100 remote management setup 57 STP Port Settings window 49 Remote Management Setup menu 87 STP port states 122...
- Page 182 21 Web site compatible options 8 IBM products 1 Web-based network management 31, 32 World Wide Web 1 IBM BladeCenter 4-Port Gb Ethernet Switch Module: Installation and User’s Guide...
- Page 184 Part Number: 59P6530 Printed in U.S.A. (1P) P/N: 59P6530...
Need help?
Do you have a question about the BladeCenter and is the answer not in the manual?
Questions and answers