Magellan MG6250 Console User Manual
All-in-one wireless security system
Hide thumbs
Also See for MG6250 Console:
- Section programming manual (56 pages) ,
- Section programming manual (36 pages)
Table of Contents
Advertisement
Advertisement
Table of Contents

Related Manuals for Magellan MG6250 Console


Summary of Contents for Magellan MG6250 Console
- Page 1 Magellan All-in-one Wireless Security System MG6250 Console User Guide...
- Page 2 One or more of the following US patents may apply: 7046142, 6215399, 6111256, 6104319, 5920259, 5886632, 5721542, 5287111, and RE39406. Canadian and international patents may also apply. © 2011 Paradox Ltd. All rights reserved. Specifications may change without prior notice. Magellan and Spectra SP are trademarks or registered trademarks of Paradox Ltd. or its affiliates in Canada, the United States and/or other countries.
-
Page 3: Table Of Contents
Document Conventions..................................7 How to Use this Manual ..................................7 Chapter 2- Getting Started........................... 8 Your MG6250 System ..................................8 MG6250 Console at a Glance ................................9 MG6250 LCD Screen ......................................10 MG6250 Keypad ........................................10 MG6250 Status LEDs ......................................12 Remote Controls at a Glance ................................ 13 Secondary Keypads at a Glance .............................. - Page 4 Viewing the History Log ................................. 34 Performing a System Test ................................35 Chapter 5 - System Setup .......................... 36 Managing Users ........................................37 Lost Remote ..........................................39 Communicator Settings ..................................... 40 4 | Table of Contents MG6250 Console • User Guide...
- Page 5 Changing labels ........................................50 Setting the Language ......................................52 Changing LCD Screen Settings ..................................53 Ring Setup ..........................................54 Viewing MG6250 Version Numbers ................................56 Demo Mode ..........................................57 Chapter 6 - Fire and Panic Alarms ......................58 Fire Alarms ......................................58 Standard Fire Zones ......................................
-
Page 6: Chapter 1 - Introduction
MG6250 Console The MG6250 Console is the latest addition to the Magellan line of all-in-one consoles. The MG6250 offers a combination of security, wireless convenience, and attractive consumer features. In addition, it features Paradox’s simultaneous six-channel reporting that allows you to report via IP, GPRS, GSM, SMS, voice, and traditional landline. -
Page 7: About This Manual
About this Manual This manual provides information on how to operate your MG6250 alarm system. It includes definitions of commonly-used terms, illustrative descriptions of the different keypads and remote controls compatible with your MG6250 system, and detailed descriptions of the various alarms and trouble messages associated with your system. -
Page 8: Chapter 2- Getting Started
C hapter 2- Getting Started This chapter introduces you to the MG6250 console and helps you get acquainted with the products used in conjunction with your alarm system. Also, this chapter provides a quick-reference guide to the most common user-related tasks. -
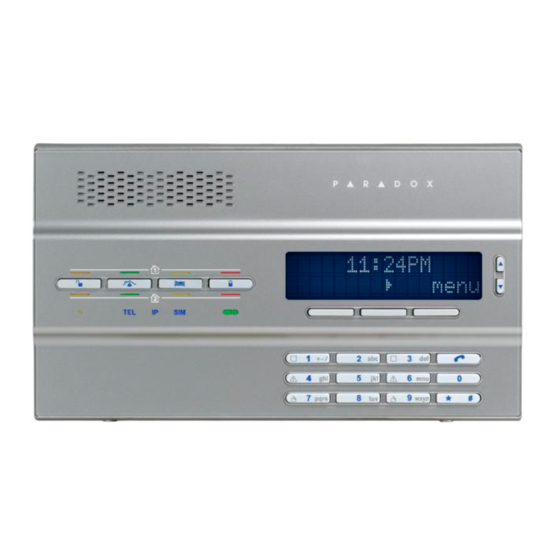
Page 9: Mg6250 Console At A Glance
MG6250 Console at a Glance The following provides you with an overview of your console. For detailed information on the functions of your console, refer to the function’s respective chapter. Figure 1: MG6250 console Speakerphone Partition 1& 2 status LEDs... -
Page 10: Mg6250 Lcd Screen
The 32-character LCD screen provides visual aids for alarm settings, system information, system troubles, and more. The following screen illustrates several types of symbols that you may encounter. Figure 2: MG6250 LCD screen Alarm clock feature enabled Instructions and/or messages appear here. - Page 11 This menu is only available if there Speakerphone Mode: is/was a zone in alarm and only until Press the 4 key to convert your Magellan the next system arming. console into a remote speakerphone. You can listen in at your home and/or speak to someone already there.
-
Page 12: Mg6250 Status Leds
MG6250 Status LEDs The following table provides a description of the MG6250’s LED functionality. Figure 5: MG6250 LEDs Partition 1 status LEDs Partition 2 status LEDs LED Type Description Orange: System is armed Green: Stay arm is activated Orange: Sleep arm is activated... -
Page 13: Remote Controls At A Glance
Remote Controls at a Glance The remotes shown in figure 6 are those which are available with your MG6250 alarm system. For detailed information on each of these remotes, refer to the remote’s user documentation. Your installer can add other functions and/or change the default settings of your remote controls. -
Page 14: Secondary Keypads At A Glance
Secondary Keypads at a Glance The K32RF and K37 keypads shown in figure 7 are compatible with your MG6250 alarm system. For detailed information on the keypad functions, refer to the keypad’s user documentation. Figure 7: Compatible keypads K32RF 14 | Chapter 2- Getting Started... -
Page 15: Chapter 3 - Arming And Disarming
C hapter 3 - Arming and Disarming This chapter describes the different methods of arming and disarming your MG6250 system. In this chapter we will cover: • How to arm your system (see Arming the System on page 16) •... -
Page 16: Arming The System
To regular arm your system: Press the key. Enter your user code (default: 1234). The LED will turn red indicating that the system has been armed. 16 | Chapter 3 - Arming and Disarming MG6250 Console • User Guide... -
Page 17: Stay Arming
If you have access to both partitions: Press the key corresponding to the desired partition (1 or 2). For both partitions, press the other key after the confirmation beep. NOTE: The LCD screen will also display STAY in the top-right corner of the screen. MG6250 Console • User Guide Chapter 3 - Arming and Disarming | 17... -
Page 18: Sleep Arming
- even when entering an armed area. StayD lives with you and protects you at all time, without any unprotected periods, and automatically re-arms the system for you. 18 | Chapter 3 - Arming and Disarming MG6250 Console • User Guide... -
Page 19: Force Arming
This feature is useful when a motion detector is protecting the area where your MG6250 console is located. During Force arming, the motion detector will remain unarmed until you exit the area, after which the system will arm the motion detector as well. By default, your system is programmed with this feature. -
Page 20: Bypassing Zones
Your installer can set the timed auto-arming method to function in either Regular or Stay arming modes. A 60-second exit delay sequence will begin prior to your system automatically arming itself at the programmed time. Contact your installer for more information. 20 | Chapter 3 - Arming and Disarming MG6250 Console • User Guide... -
Page 21: Entry Delay Timer
Disarming an Armed System When an entry point, like the front door, is opened, the MG6250 console will produce a sound indicating that the system has started the entry delay timer. If a valid user code is entered before the entry delay elapses, your system will disarm and will not generate an alarm. -
Page 22: Disarming A System In Alarm
Alarm Memory Display on page 23. In case of a burglar alarm, leave the premises immediately and call the police from a safe WARNING: location (e.g., a neighbor’s house). 22 | Chapter 3 - Arming and Disarming MG6250 Console • User Guide... -
Page 23: Alarm Memory Display
Alarm Memory Display When an alarm has occurred on your system, the MG6250 console will store that alarm in its alarm memory. All zones where alarms have occurred will also be stored in the alarm memory. The MG6250 console will... - Page 24 Press the next or prev key the scroll keys to switch between alarm Zone 02 in alarm messages. Once done, select the exit key. Area 1 24 | Chapter 3 - Arming and Disarming MG6250 Console • User Guide...
-
Page 25: Chapter 4 - User Features
Viewing alarms in memory (see Viewing the Alarm Memory on page 33) • Viewing the history log (see Viewing the History Log on page 34) • Performing a system test (see Performing a System Test on page 35) MG6250 Console • User Guide Chapter 4 - User Features | 25... -
Page 26: Bypassing Zones
Scroll through the zones and use the left menu key to bypass or unbyp next back unbypass zones. Press exit to return to the previous menu. End of List next exit 26 | Chapter 4 - User Features MG6250 Console • User Guide... -
Page 27: Using The Message Center
Using the Message Center The MG6250 comes with a message center that allows you to record a voice message that can be played at a later time. This message center is useful when you need to leave a message for another member of your family or even for yourself. -
Page 28: Playing A Message
The system plays the message and displays the time and date the message Left on: was recorded. 09:15AM 20-Dec Press exit to return to the previous menu. 2-MESSAGE CENTER next exit 28 | Chapter 4 - User Features MG6250 Console • User Guide... -
Page 29: Erasing A Message
From the Erase Message menu, press ok to erase the existing message. Erase Message next back Press exit to return to the previous menu. 2-MESSAGE CENTER next exit MG6250 Console • User Guide Chapter 4 - User Features | 29... -
Page 30: Setting The Alarm Clock
Setting the Alarm Clock You can also use the MG6250 system as an alarm clock. At the programmed time, System Ready the system will begin to play a selected tune. When the alarm clock is enabled, the menu bell symbol will appear in the upper left corner of the screen. -
Page 31: Speakerphone
Speakerphone The MG6250 is equipped with a feature that transforms the console into a speakerphone. Dial the desired telephone number and talk as you would on a normal telephone. You can also configure the ring tone and volume for incoming calls. -
Page 32: Setting Chime Zones
Select the tone that will play when the zone opens, the press ok. Tone: Tonality 1 next back Press back to return to the previous menu. Zone 01 chime edit next back 32 | Chapter 4 - User Features MG6250 Console • User Guide... -
Page 33: Viewing The Alarm Memory
Viewing the Alarm Memory When an alarm occurs in your system, the MG6250 will store the alarm event information in its alarm memory. The system will notify you if there is a alarm in memory by displaying on the home screen. -
Page 34: Viewing The History Log
Use the prev and next keys to scroll through system events. prev next exit Press exit to return to the previous menu. 03:25PM 20-Dec prev next exit 34 | Chapter 4 - User Features MG6250 Console • User Guide... -
Page 35: Performing A System Test
When the system hardware is tested, the speaker and sirens will also be tested. Do not be in WARNING: close proximity to the MG6250 when performing the hardware test to avoid any damage to your hearing. To access the System Test menu: Press the menu key. -
Page 36: Chapter 5 - System Setup
C hapter 5 - System Setup This chapter covers advanced system settings. The MG6250 settings menu (08-SYSTEM SETUP) was designed to be extremely user-friendly. This section will give you the information that you require in order to easily manage your system. -
Page 37: Managing Users
To add a new user to the system, or to modify an existing user: Press the menu key. System Ready menu Select 08-SYSTEM SETUP, then press ok. 08-SYSTEM SETUP next exit Enter your master code (default: 1234). Enter a Code back MG6250 Console • User Guide Chapter 5 - System Setup | 37... - Page 38 Press ok to enter the user’s name. When finished, press ok. Modify Text Name next back 10. To program a remote, press ok, and follow the on-screen instructions. Press Program Remote? next back 38 | Chapter 5 - System Setup MG6250 Console • User Guide...
-
Page 39: Lost Remote
08-SYSTEM SETUP next exit Enter your master code (default: 1234). Enter a Code back Scroll through the options and select 02-Lost Remote, press ok. 02-Lost Remote next exit MG6250 Console • User Guide Chapter 5 - System Setup | 39... -
Page 40: Communicator Settings
To program a telephone number for system event reporting: Press the menu key. System Ready menu Select 08-SYSTEM SETUP, then press ok. 08-SYSTEM SETUP next exit 40 | Chapter 5 - System Setup MG6250 Console • User Guide... - Page 41 Select whether or not you would like the system to place a voice call to the Voice Call? number to report system events. Pressing the left key will toggle the selection next back between yes and no. To continue, press next. MG6250 Console • User Guide Chapter 5 - System Setup | 41...
- Page 42 12. Select whether you want the system to call the telephone number if a panic Panics? alarm is triggered. Press edit to modify; press next to continue. edit next back 42 | Chapter 5 - System Setup MG6250 Console • User Guide...
- Page 43 Press edit to modify; press next to continue. edit next back 15. Press next to repeat the list. Press exit to return to the previous menu. End of List next exit MG6250 Console • User Guide Chapter 5 - System Setup | 43...
-
Page 44: Setting The Time And Date
12hrs 24hrs Set the time, then press ok. Time: 12:00 back Set the year, month and day. Press ok to return to the previous menu. Y:2010 M:12 D:14 back 44 | Chapter 5 - System Setup MG6250 Console • User Guide... -
Page 45: Setting Delays And Tones
To modify entry delay 1, press ok. Entry Delay 1? next back Set the entry delay 1 time between 0 and 255 seconds, then press ok. Delay: [045] sec clear back MG6250 Console • User Guide Chapter 5 - System Setup | 45... - Page 46 13. Set the area 1 exit delay time between 0 and 255 seconds, then press ok. Delay: [045] sec clear back 14. Select the tone or beep for the area 1 exit delay, then press ok. Tone: Tonality 1 next back 46 | Chapter 5 - System Setup MG6250 Console • User Guide...
- Page 47 21. If your system is divided into areas, you will be given the option to modify the Area 2 area 2 bell cutoff delay, press ok. next back MG6250 Console • User Guide Chapter 5 - System Setup | 47...
- Page 48 24. To modify the pre-alarm delay, press ok. Pre-Alarm Delay? next back 25. Set the pre-alarm delay time between 0 and 255 minutes, then press ok. Delay: [045] sec clear back 48 | Chapter 5 - System Setup MG6250 Console • User Guide...
-
Page 49: Auto-Arming
To select which area to arm, press next. To modify, press ok. Area 1? next exit To select the arming level, press next. To modify, press ok. Auto Arm Full next back MG6250 Console • User Guide Chapter 5 - System Setup | 49... -
Page 50: Changing Labels
Enter a Code back Scroll through the options and select 07-Change Label, then press ok. 07-Change Label next back To program zone labels, press ok. Zones next back 50 | Chapter 5 - System Setup MG6250 Console • User Guide... - Page 51 The following label groups can be modified with the same procedure as described for zone labels: areas, outputs, keypads, repeaters, sirens, doorbells. MG6250 Console • User Guide Chapter 5 - System Setup | 51...
-
Page 52: Setting The Language
Scroll through the options and select 08-Language, then press ok. 08-Language next back Select a new language, then press ok. The system returns to the previous English menu. next back 52 | Chapter 5 - System Setup MG6250 Console • User Guide... -
Page 53: Changing Lcd Screen Settings
Scroll through the options and select 09-LCD Display, then press ok. 09-LCD Display next back To change the screen contrast, press ok. Contrast Adj. next exit Adjust the setting, then press ok. Contrast Adj. MG6250 Console • User Guide Chapter 5 - System Setup | 53... -
Page 54: Ring Setup
08-SYSTEM SETUP next exit Enter your master code (default: 1234). Enter a Code back Scroll through the options and select 10-Tel. Ring, then press ok. 10-Tel. Ring next back 54 | Chapter 5 - System Setup MG6250 Console • User Guide... - Page 55 To change the ring count, press ok. Ring Count? next back 10. Enter a ring count between 1 and 255. Press ok to return to the previous menu. Ring: [008] clear back MG6250 Console • User Guide Chapter 5 - System Setup | 55...
-
Page 56: Viewing Mg6250 Version Numbers
To scroll through current software versions (FW, RF, S/N, HW, and ECO), press Ver. Main 00.00 next. Press exit to return to the previous menu. next exit 56 | Chapter 5 - System Setup MG6250 Console • User Guide... -
Page 57: Demo Mode
Demo Mode Use this demo mode to preview the MG6250 features. After entering demo mode, the system will begin displaying its features by flashing its lights, playing tones, etc. When in Demo mode, the MG6250 console’s speaker and siren will also be played. Do not WARNING: stay in close proximity to the console to avoid damaging your hearing. -
Page 58: Chapter 6 - Fire And Panic Alarms
• At the bottom of a basement stairwell. • At the top of the first to second floor stairwell and subsequent stairwells in multi-floored residential units. 58 | Chapter 6 - Fire and Panic Alarms MG6250 Console • User Guide... -
Page 59: Standard Fire Zones
To disarm a false alarm: Press the key. Enter your user code (default: 1234). Call your monitoring station quickly to advise them of the false alarm. WARNING: MG6250 Console • User Guide Chapter 6 - Fire and Panic Alarms | 59... -
Page 60: Delayed Fire Zones
If you are unable to cancel the false WARNING: alarm, your system will send an alert. Call your monitoring station to advise them of the false alarm. 60 | Chapter 6 - Fire and Panic Alarms MG6250 Console • User Guide... -
Page 61: Fire Safety Tips
Stay alert when smoking. Careless smoking is the leading cause of fire deaths. Smoke detectors, smoulder-resistant bedding, and upholstered furniture are significant fire deterrents. • Maintain your heating system. Faulty heating systems are the second leading cause of residential fires. MG6250 Console • User Guide Chapter 6 - Fire and Panic Alarms | 61... -
Page 62: Panic Alarms
Your system can be programmed to send an alarm to your monitoring station, requesting help from the police, a medical facility, the fire department, or anyone you wish when you press a pre-determined combination of keys on MG6250’s main keypad. To generate a panic alarm: Press the OFF key. -
Page 63: Index
Setting the time and date 36 No movement auto-arming 21 Delayed fire zones 60 Regular arming 16 Delays Sleep arming 18 Changing delays and tones 36 Stay arming 17 Exit 16 Audio voice tag 50 Disarming MG6250 Console • User Guide Index | 63... - Page 64 Standard fire zone 59 Answering a call 31 Force arming 19 Communication Status LEDs 9 Console overview 9 Description 6 GPRS 6 Hands-free speaker phone 9 GPRS14 module 12 Keypad 10 GSM 6 64 | Index MG6250 Console • User Guide...
- Page 65 System demo 36 Phone key 10 System master default code 37 Place a voice call 41 Playing a message 28 Power 12 Time Power LED 9 Setting the date and time 44 MG6250 Console • User Guide Index | 65...
- Page 66 Version numbers 36 Viewing alarms 33 Viewing the history log 34 Voice call 41 Voice message 27 Voice prompts 52 Voice tag 38 Zone Delayed fire zones 60 Standard Fire zone 59 66 | Index MG6250 Console • User Guide...
- Page 68 For support, please contact your local distributor, or dial 1-800-791-1919 (in North America) or +1-450-491-7444 (outside North America), Monday to Friday, from 8:00 a.m. to 8:00 p.m. EST. You may also e-mail us at support@paradox.com. Additional information can be found at PARADOX.COM Printed in Canada - 03/2011 PARADOX.COM MG6250-EU00...
Need help?
Do you have a question about the MG6250 Console and is the answer not in the manual?
Questions and answers