Table of Contents
Advertisement
Quick Links
Advertisement
Table of Contents

Related Manuals for ACN Iris V


Summary of Contents for ACN Iris V
-
Page 1: User Manual
User Manual ®... - Page 2 © 2010, ACN Inc. All rights reserved. ACN, ACN IRIS 5000 Videophone, ACN Digital Phone Service are trademarks and/or service marks of ACN Inc. and may be registered. All other trademarks are the property of their respec- tive owners. ACN is continually improving/updating the software of the ACN Video- phone, which may result in screen shots in this manual not exactly match- ing the actual display on the product.
-
Page 3: Table Of Contents
IMPORTANT SAFETY INSTRUCTIONS ....................7 SETTING UP THE PHONE ..........................8 CONNECTING THE VIDEO PHONE TO THE NETWORK ..............8 CONNECTING CONVENTIONAL PHONE TO YOUR IRIS V ...............8 SETTING UP THE PHONE VIA A MODEM .....................9 RECEIVING SOFTWARE UPDATES ....................... 10 GETTING THE BEST VIDEO IMAGE POSSIBLE .................. 10 GeTTING TO KNOW YOUR NeW PHONe ............ - Page 4 Table of Contents eXTeRNaL VIDeO DISPLaY ....................27 CONTaCTS............................ 28 SELECTING AND DIALING A CONTACT ..................... 28 ADDING/EDITING A CONTACT ......................29 VIEWING CONTACT DETAILS ........................ 30 DELETING A CONTACT ........................... 30 USING CONTACT GROUPS ........................31 CaLL HISTORY ..........................32 VIEWING INCOMING, OUTGOING, AND MISSED CALLS .............
-
Page 5: Introduction
TV. With its simple plug-and-play installation and intuitive user-friendly interface, the ACN IRIS 5000 Videophone is easy to use. If you have a question when using a feature of your new phone, simply select the on-screen Help option. -
Page 6: Getting Started
Getting Started Chapter 2 Getting Started What you need To set up your ACN IRIS 5000 Videophone, you need: • A high speed Internet connection (i.e., DSL, Cable, Fibre) with modem - 200 kbps upload speed • ACN Digital Phone Service... -
Page 7: Important Safety Instructions
Getting Started Important Safety Instructions When using your telephone equipment, basic safety precautions should always be followed to reduce the risk of fire, electric shock and injury to persons, including the following: • Do not use this product near water, for example, near a bathtub, washbowl, kitchen sink or laundry tub, in a wet basement or near a swimming pool. -
Page 8: Setting Up The Phone
Take the provided Ethernet cable and plug one end of the cable into an open LAN/Ethernet port on the back of your router. Take the other end and plug this into the blue port labelled WAN on the back of the ACN IRIS 5000 Videophone. -
Page 9: Setting Up The Phone Via A Modem
Setting up the Phone via a Modem Connecting the Phone to the Network Note: If you have an ACN or a combined modem-router device, please follow these steps. Before installing your Videophone, ensure your Internet connection is working. Unplug and turn off your modem for 5 minutes. -
Page 10: Receiving Software Updates
Setting up the Phone Chapter 2 Receiving Software Updates If you receive the onscreen message to the left while starting up or activating your Videophone, your phone is ready to install a software update. Select Ask Me Later begin the installation right away or to delay the installation. -
Page 11: Getting To Know Your New Phone
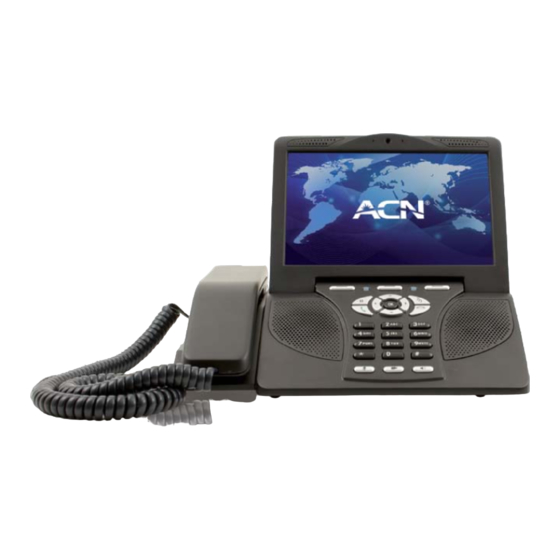
Getting to Know Your New Phone Chapter 3 Microphones Video Screen Camera Handset Speakers Keypad Getting to Know Your Phone Front View 1 Video Screen During a call, the video screen displays an image of the person you’re calling with your own image inset. When not on a call, it displays the screens you use for accessing your phone’s features. -
Page 12: Back View
Getting to Know Your New Phone Chapter 3 Video Audio Audio Out L Out R Phone DC Power Video and Phone Jack 4 LaN audio Output DC Power 5 WaN Back View 1 Phone Jack The Phone jack connects a cordless or corded telephone to the Videophone. 2 DC Power The DC Power supply port connects to the power adapter. -
Page 13: Keypad
Getting to Know Your New Phone Chapter 3 Soft Keys Navigational Keys Call and Call end Keys alpha-numeric Keys Keypad Soft Keys Soft Keys are programmed to enable various functions (e.g. Accept Incoming Call, Send to Mail, etc.) depending on the options available within a particular Menu/Screen. - Page 14 Getting to Know Your New Phone Chapter 3 Status and Message Lights Function Keys Status and Message Lights Status Light – the left-hand light indicates that the phone is connected and ready for use. When you power on your phone, the light flashes during the start- up sequence.
-
Page 15: Navigating
Chapter 3 Navigating Navigating menus is very easy on the ACN IRIS 5000 Videophone. At the top of the keypad are three Soft Keys that correspond to the labels on the screen. These are called Soft Keys because their function will change depending on which screen you are on. -
Page 16: Entering Text
Chapter 3 Entering Text The ACN IRIS 5000 Videophone uses a method that is similar to that of a mobile phone to enter numbers and letters. Fields where you enter a name, for example, will show “Abc” as the Input Type in the upper right-hand corner when you highlight the field. -
Page 17: Making And Receiving Calls
Making and Receiving Calls Chapter 4 Making and Receiving Calls Dialing a Call The ACN IRIS 5000 Videophone enables you to make both video and audio-only telephone calls. With the Homescreen displayed, use the numeric keypad to enter your number or optionally: •... -
Page 18: Making A Call From Your Contacts Or Call History
Making and Receiving Calls Chapter 4 Making a Call from Your Contacts or Call History You can place a call by selecting a number from your Contacts screen or Call His- tory screen and selecting Dial. Contacts Navigate to your Contacts by selecting the Contacts icon on the Menu. You can also press and hold the Call key to go directly to your Contacts from... -
Page 19: In-Call Functions
Making and Receiving Calls Chapter 4 In-Call Functions During a call, you can: Set the call volume by pressing the up and down directional arrow keys. Mute Mute/Unmute your outgoing audio by pressing the key. The feature indicator light will turn blue to indicate that it is enabled. Video Privacy Turn off/on the transmission of your video by pressing the key. -
Page 20: Answering Calls
Making and Receiving Calls Chapter 4 Answering Calls When a call comes in, you’ll hear the phone ring and see the screen display the Note: You can change the ringtone caller ID information of the caller (if not blocked by the caller). If the caller is in of your phone. -
Page 21: Making A Conference Call
Making and Receiving Calls Chapter 4 Making a Conference Call (3-Way Call) To initiate a 3-way audio conference call: While on a call, press the Conference key. The current call is placed on hold and a Dialer is displayed. Enter the number of the third-party and select Dial. Initiate the call with the third-party. -
Page 22: Answering A Call-Waiting Call
Making and Receiving Calls Chapter 4 Answering a Call-Waiting Call When you are on a call and another call comes in, the phone alerts you by displaying an Incoming Call message. The screen also displays the following Soft Keys: End & Answer –... -
Page 23: Homescreen And Menu
Homescreen and Menu Chapter 5 Homescreen and Menu Homescreen On the Homescreen, you can: • Make a speakerphone call by entering a number on the keypad and pressing Dial. or selecting • You can also make a speakerphone call by pressing Speakerphone, entering a number on the keypad, and pressing selecting Dial. - Page 24 Homescreen and Menu Chapter 5 The Home screen can be customised to display one of the images you’ve loaded to your phone as a wallpaper/background. Select the Settings icon from Appearance the Menu. Then select and use the right directional arrow key to navigate to the Display tab.
-
Page 25: Menu
Homescreen and Menu Chapter 5 Menu Note: You can make a speakerphone call while on the Menu screen by The Menu screen displays icons used to access key features of your phone. entering a number on the keypad and When you navigate to one of the icons, the title area displays the name of that pressing or selecting Dial. -
Page 26: Voice And Video Mail
Voice and Video Mail Chapter 6 Voice and Video Mail There are two ways to access your Voice and Video Mail: By selecting the Voice and Video Mail icon on the Menu. Mail By selecting the Soft Key option on the Home screen. The bottom right portion of the Home screen displays: •... -
Page 27: External Video Display
External Video Display Chapter 7 External Video Display Note: Video Output must be used in conjunction with Audio Output. In other words, you cannot send video to an external device while your phone provides audio or vice versa. External Video Display To send your phone’s video and audio signal to an external device: Plug a composite video + audio cable into the Video and Audio Out ports on the back of your phone. -
Page 28: Contacts
Chapter 8 Contacts Contacts is used to store and retrieve names, addresses, phone numbers and other details for the people you want to call. The ACN IRIS 5000 Videophone can store up to 500 contacts. On the Contacts screens, you can: •... -
Page 29: Adding/Editing A Contact
Contacts Adding/Editing a Contact Options • On the Contacts screen select the Soft Key and use the directional New Contact Edit Contact. Press or Select. arrow keys to highlight The Overview tab displays. Enter name and number information. A contact must contain a name and at least one number. -
Page 30: Viewing Contact Details
Contacts Chapter 8 Viewing Contact Details On the Contacts screen, highlight a contact. Select Options Soft Key and use the directional arrow keys to highlight View Contact. Press OK or Select. The View Contact screen displays the Overview tab with the information you’ve entered for your contact. -
Page 31: Using Contact Groups
Contacts Chapter 8 Using Contact Groups assigning Contacts to Groups You can use groups as a way to help organize your contacts. To put a contact into a group or groups: On the Contacts screen, select Options and use the directional arrow keys to highlight Edit Contact. -
Page 32: Call History
Call History Chapter 9 Call History Call History displays a log of the last 50 calls. On the Call History screens, you can: • View incoming, outgoing and missed calls • Dial from your call history • Save a caller to your contact list •... -
Page 33: Saving A Call To Your Contact List
Call History Chapter 9 Saving a Call to your Contact List From the Call History screen, use the directional arrow keys to select an entry Options/ on either the All, Outgoing, Incoming or Missed calls tabs. Select Save to Contacts. •... -
Page 34: Settings
Settings Chapter 10 Settings Settings enable you to configure and customise your phone. On the Setting screens, you can: • Configure your phone’s appearance • Configure display settings • Configure the keypad and sound • Configure network settings • Configure the date and time Configuring Appearance From the Menu, use the directional arrow keys to select the Settings icon. -
Page 35: Configuring Display
Settings Chapter 10 Configuring Display 1 Use the right directional arrow key to move from the Themes tab to the Display tab. Screen. The resulting change will be Select a brightness setting for your LCD visible as you highlight each option. 3 Choose a Screensaver option. The screensaver option will display when the phone has been idle for 15 minutes or based on the time you select (as noted below). Screensaver: Remain on last screen displayed. • Show Home screen: Display the Home screen. With this setting the screen • shuts off after 15 minutes idle on the Home screen. Play Slideshow: Play slideshow using current slideshow settings. If the • slideshow cannot be played successfully using current settings, the Home screen displays. Off: Turn off the screen. (Based off the time you select.) • • Select the amount of time your phone should be idle before the screensaver is activated. Highlight the entry box and press OK or Edit. • Use the up and down directional arrow keys to select a value, or use the keypad to enter a value between 30 and 600. Once activated, pressing any key, lifting the handset, or receiving an incoming call will deactivate the screensaver. - Page 36 Settings Choose a Wallpaper. The wallpaper image selected displays on your Home Select Image screen. Select the button and navigate to select one of the images loaded on your phone. A preview of the image you select displays. Remove Image •...
-
Page 37: Configuring Sound
Settings Chapter 10 Configuring Sound Sound From the Settings screen use the directional arrow keys to select or Select. press Select a Ringtone. This ringtone is used for all incoming calls except those from contacts for whom you’ve assigned a different ringtone. •... -
Page 38: Configuring Network
Also, be sure you are not on a video call. Select an IP setting for Get IP Address. Enter the appropriate information for the setting type you choose. Fore more complex settings, please contact ACN Customer Services. -
Page 39: Configuring Date And Time
Settings Chapter 10 Configuring Date and Time Date and From the Settings screen use the directional arrow keys to select Time and press OK or Select. Region Time Zone. The zones available are determined by the Select a region selected. Time Date Formats. -
Page 40: Administrator Settings
Settings Chapter 10 Administrator Settings YOU ARE UNABLE TO ADJUST ITEMS IN THE ADMINISTRATOR MENUS. PLEASE CONTACT ACN CUSTOMER SERVICES FOR ASSISTANCE. -
Page 41: Digital Photo Frame
Digital Photo Frame Chapter 11 Digital Photo Frame The Digital Photo Frame feature enables you to copy photos between your phone and a USB device. You can also create albums for your photos and config- ure a slideshow to display photos on your phone as a digital photo frame. On the Digital Photo Frame screens, you can: •... -
Page 42: Configuring A Slideshow
Digital Photo Frame Chapter 11 Configuring a Slideshow From the Digital Photo Frame screen, use the right directional arrow key to move from the Overview tab to the Settings tab. Configure Pictures Select the to use in your slideshow: • Use Local Pictures – these are images stored locally on your phone as opposed to images stored on a USB flash drive. - Page 43 Digital Photo Frame Chapter 11 Loop – determines whether the slideshow plays one time or repeats • continuously: use directional arrow keys to select Loop. Press or Select. or Deselect. A checkmark appears. To deselect, press Display Names – determines whether to display names of images as they •...
-
Page 44: Creating And Using Picture Albums
Digital Photo Frame Chapter 11 Creating and Using Picture Albums From the Digital Photo Frame screen, select Local Images. Create a new album by selecting Options/New Album. Use keypad to enter an album name. Getting to Know Your New Phone: Entering Text. Delete to backspace;... -
Page 45: Viewing Pictures On Your Phone
Digital Photo Frame Chapter 11 Viewing Pictures on Your Phone From the Digital Photo Frame screen, use the directional arrow keys to select Local Images button. Press or Select. The Local Pictures screen displays. Use directional arrow keys to scroll through pictures. -
Page 46: Loading Your Own Pictures
This pop-up will appear anytime you insert your USB drive unless you are in a call. You do not need to be on the Local Pictures screen to insert your USB drive. Note: You can store up to 500 pictures on the IRIS V. -
Page 47: Copying Pictures To Usb
Digital Photo Frame Chapter 11 Copying Pictures to USB There are two ways to copy pictures from your phone to your USB drive. Options/Copy to USB. From the Local Images screen select • A screen displays showing all the images on the phone. •... -
Page 48: Viewing Usb Pictures
Digital Photo Frame Chapter 11 Viewing USB Pictures From the Digital Photo Frame screen use the directional arrow keys to select USB Pictures button. Press or Select. The USB Pictures screen displays. Use directional arrow keys to scroll through pictures. To view picture details, use directional arrow keys to select an image. -
Page 49: Information And Help
Information and Help You can use the Information screen to easily view the name and phone number for your ACN IRIS 5000 Videophone, as well as other technical de- tails. You can also access in-phone Help information from this screen. -
Page 50: Troubleshooting
Internet. 5. Plug in the power source for the router and wait for it to connect to the modem and Internet. 6. Plug in the power source for the ACN IRIS 5000 Videophone. When I receive a call, the •... - Page 51 • Verify that the phone is functioning properly phone connected to the without being connected to the videophone. videophone. • Verify that the phone cable from the ACN IRIS 5000 Videophone to the conventional phone is securely connected. See Getting Started: Connecting...
- Page 52 Troubleshooting Chapter 13 Video Problems Problem Solution The call is connected, but • Ask the other party to improve the lighting in the the other party’s screen is room. See Getting Started: Getting the Best Video dark and the sound quality Image Possible.
-
Page 53: Audio Problems
Troubleshooting Chapter 13 Audio Problems Problem Solution The call is connected, the • Increase the volume levels. See Settings: Configuring screen is visible, but there is Keypad and Sound. no sound. • Have the other party confirm that their mute setting is off.
Need help?
Do you have a question about the Iris V and is the answer not in the manual?
Questions and answers