Table of Contents
Advertisement
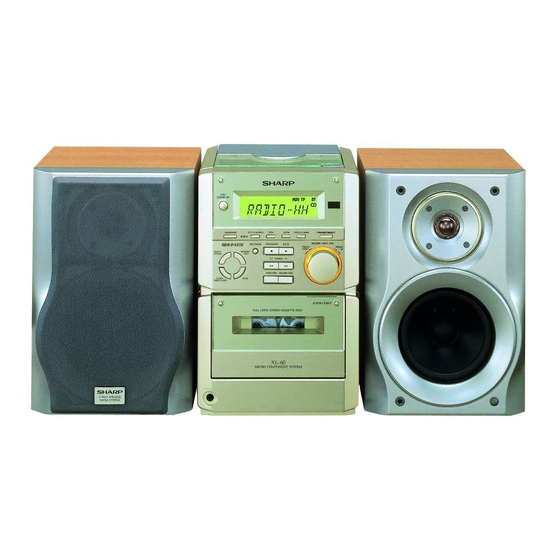
MICRO COMPONENT SYSTEM
OPERATION MANUAL
Thank you for purchasing this SHARP product.
To obtain the best performance from this product
please read this manual carefully.
It will guide you in operating your SHARP product.
XL-60H
XL-70H
60H/70H(SUK).FRONT
XL-60H/XL-70H Micro Component System consist-
ing of XL-60H/XL-70H (main unit) and CP-XL60H/
CP-XL70H (speaker system).
1
MODEL
XL-60H
XL-70H
00.1.7, 5:07 PM
Advertisement
Table of Contents

Related Manuals for Sharp XL-60H


Summary of Contents for Sharp XL-60H
-
Page 1: Operation Manual
XL-60H/XL-70H Micro Component System consist- To obtain the best performance from this product ing of XL-60H/XL-70H (main unit) and CP-XL60H/ please read this manual carefully. CP-XL70H (speaker system). It will guide you in operating your SHARP product. XL-60H XL-70H 60H/70H(SUK).FRONT 00.1.7, 5:07 PM... - Page 2 SPECIAL NOTES NOTE FOR USERS IN THE U.K. The mains lead of this product is fitted with a non- Ensure that neither the brown nor the blue wire is rewireable (moulded) plug incorporating a 3A fuse. connected to the earth terminal in your three pin Should the fuse need to be replaced, a BSI or ASTA plug.
- Page 3 (Continued) Warning: Recording and playback of any material may require consent, which SHARP is unable to give. To prevent fire or shock hazard, do not expose Please refer particularly to the provisions of the this appliance to dripping or splashing. No ob-...
-
Page 4: Table Of Contents
Refer internal service to 20cm (8”) of free space on the top of the unit. your local SHARP service facility. Do not use oil, solvents, petrol, paint thinners or Use the unit on a firm, level surface free from vi- insecticides on the unit. -
Page 5: Cassette Tape
For recording, use only normal tape. causing damage. Do not use C-120 tapes, tapes with large diam- SHARP will not be held responsible for any dam- eter reels, or poor-quality tapes, as they may age resulting from use of this unit with a voltage cause malfunctions. -
Page 6: Names Of Controls And Indicators
NAMES OF CONTROLS AND INDICATORS Front panel 1. Timer Indicator 2. Record Indicator 3. Sleep Indicator 4. (CD) Random Indicator 5. (CD/TUNER) Memory Indicator 1 2 3 5 6 7 8 9 6. RDS Indicator 7. Traffic Programme Indicator 8. Traffic Announcement Indicator 9. - Page 7 (Continued) Rear panel 1. CD Digital Output Socket 2. AC Power Input Socket 3. FM 75 ohms Aerial Socket 4. AM Loop Aerial Input Socket 5. Video/Auxiliary (Audio Signal) Input Sock- 6. Speaker Terminals Speaker section CP-XL60H 1. Tweeter 2. Woofer 3.
- Page 8 (Continued) Remote control 1. Remote Control Transmitter LED Tuner control section 2. Programme Type/Traffic Information Search Button 3. Preset Up/Down Buttons CD control section 4. Clear Button 5. Random/Repeat Button 6. Memory Button 7. Stop Button 8. Play/Pause Button 9. Track Down/Review Button 10.
-
Page 9: Preparation For Use
PREPARATION FOR USE Removing the speaker grilles Unplug the AC power lead from the AC socket before connecting or disconnecting any com- ponent. Speaker connection Right speaker Left speaker Remove the lower part of the speaker grille first. Remove the upper part of the speaker grille. Caution: When the speaker grilles are removed, the speaker diaphragms are exposed. -
Page 10: Aerial Connection
(Continued) Aerial connection Connecting the AC power lead AC 230 V, 50Hz FM aerial AM loop aerial To AC INPUT To an AC socket Connect the AC power lead to the AC power input socket, then connect the AC power lead plug to an AC socket. -
Page 11: Sound Control
(Continued) When inserting or removing the batteries, push Remote control them towards the ë battery terminals. Installing the batteries incorrectly may cause the unit to malfunction. Precautions for battery use: Insert the batteries according to the direction in- dicated in the battery compartment. Replace all old batteries with new ones at the same time. - Page 12 (Continued) Surround Bass “Surround” refers to an acoustical effect similar to (Main unit) the ambience of a concert hall, where the listener has the feeling of being “surrounded” by the sound. (Main unit) (Remote control) (Remote control) SURROUND To enjoy the surround effect: (Main unit operation) Press the SURROUND button to activate it.
-
Page 13: Setting The Clock
SETTING THE CLOCK (Main unit operation) Press the MEMORY/SET button. In this example, the clock is set for the 24-hour (0:00) system. Adjust the minutes by turning the jog dial. MEMORY/SET When the jog dial is turned one click clockwise, CLOCK/TIMER/ the time will increase by 1 minute. -
Page 14: Compact Disc Operation
COMPACT DISC OPERATION CD playback Press the ON/STAND-BY button to turn the power on. Press the FUNCTION button until “CD” or “NO DISC” appears in the display. Press the CD button on the remote control. If no disc is loaded, the display will be “NO DISC” OPEN/CLOSE instead of “CD”. - Page 15 (Continued) APSS (Auto Program Search System) APSS automatically locates the beginning of any track. To listen again to the track being played: (Main unit operation) Press the VOLUME/JOG button. The track number will flash. Jog dial Whilst the track number is flashing, turn the jog dial anti-clockwise.
- Page 16 (Continued) The CD can be programmed to play the tracks APMS (Automatic Programmable in any order, or skip certain tracks. Music Selector) Load a compact disc and close the CD com- partment. Press the MEMORY/SET (MEMORY) button to prepare for programming. “MEMORY”...
-
Page 17: Cassette Operation
CASSETTE OPERATION Tape playback Press the ON/STAND-BY button to turn the power on. Press the FUNCTION button until “TAPE” ap- pears in the display. Press the TAPE button on the remote control. Open the cassette door by pushing the area marked “7 PUSH EJECT”. -
Page 18: Radio Operation
RADIO OPERATION Tuning Preset tuning You can store up to 30 stations in memory (30 sta- tions consisting of any combination of FM and AM stations you like) and recall them. 3,5,6 Press the ON/STAND-BY button to turn the power on. Press the FUNCTION button until “FM”... - Page 19 (Continued) To recall a memorised station: To clear a memorised station: PRESET Press the VOLUME/JOG button. Turn the jog dial to select the preset channel number you want to erase. Press the MEMORY/SET button. Within 5 seconds, press the TUN CLEAR button. Preset memory scan (Main unit operation) The stations saved in the preset memory can be...
-
Page 20: Rds (Radio Data System) Operation
FM stations to send additional signals along Announcement) with their regular programme signals. For exam- With the XL-60H/XL-70H, you can search for and ple, the stations send their station names, and in- receive the following PTY, TP and TA signals. - Page 21 (Continued) LIGHT M: Classical Musical for general, rather NATION M: Current Popular Music of the Nation than specialist appreciation. Exam- or Region in that country’s language, ples of music in this category are in- as opposed to international ‘Pop’ strumental music, and vocal or cho- which is usually US or UK inspired ral works.
- Page 22 (Continued) ASPM (Auto Station Program Memory) At first, it is recommended that you store stations in memory using ASPM. (This memory can be used for PTY searches.) When the ASPM button is pressed whilst tuned to the FM band, the RDS (Radio Data System) func- tion will automatically search for new RDS stations.
- Page 23 (Continued) To recall stations that have been Whilst the selected programme type is flashing stored in memory (PTY search) (within 4 seconds), press the PTY.TI SEARCH (PTY.TI) button again. You can search a desired station by specifying the programme type (news, sports, traffic programme, etc.
- Page 24 (Continued) To switch the display To manually recall the stations stored in memory (Main unit operation) (Main unit operation) DISPLAY MODE Each time the DISPLAY MODE button is pressed Press the VOLUME/JOG button. whilst an FM station is tuned in, the display will Each time you turn the jog dial one step, the switch as follows: channel number will change.
- Page 25 (Continued) EON-PTY When a programme of the type specified starts on an ON (other network) station, the unit will automatically switch to the station broadcasting the selected programme type, and “PTY” will flash. When the programme specified for the ON sta- tion is over, the unit will automatically return to the original station you were tuned to.
- Page 26 (Continued) EON-TI When a TA specified starts on an ON (other network) station, the unit will automatically switch to that station, and “TI” will flash. When the traffic announcement is over, the unit will automatically return to the original station you were tuned to.
- Page 27 (Continued) About the TP and TA indicators TP indicator TA indicator Meaning This programme does not carry traffic announcements nor does Not lit Not lit it refer, via EON, to a programme that does. This programme carries EON information about another pro- Not lit gramme which gives traffic information.
-
Page 28: Recording
RECORDING When recording important selections, be sure Recording from the built-in radio to make a preliminary test to ensure that the desired material is being properly recorded. The ALC (Automatic Record Level Control) cir- cuit automatically controls the level of the input signal used for recording. -
Page 29: How To Use The Built-In Timer
HOW TO USE THE BUILT-IN TIMER Timer playback Turn the jog dial to set the minute at which to start, and then press the MEMORY/SET but- ton. The timer playback starting time, function, and volume will be displayed, and then the unit will enter the stand-by mode automatically. - Page 30 (Continued) (Remote control operation) Sleep operation Play back the desired sound source. The radio, compact disc and cassette deck can all be turned off automatically. Press the SLEEP button. The sleep timer is initially set to 3 hours. To change the sleep time: Press the SLEEP button repeatedly to select the desired sleep time.
-
Page 31: Using External Units
USING EXTERNAL UNITS VIDEO/AUX (Audio signal) input CD digital output (optical) DIGITAL Commercially available digital cable External unit To listen to or record signals from exter- The CD digital signal from this unit can be re- nal sources through this unit: corded by other DAT or MiniDisc recorders. -
Page 32: Resetting The Microcomputer
(Continued) Headphones Before plugging in or unplugging the head- phones, make sure the volume level is reduced. Be sure your headphones have a 3.5 mm (1/8") diameter plug and are between 16 ohms and 50 ohms impedance. The recommended impedance is 32 ohms. -
Page 33: Specifications
SPECIFICATIONS As a part of our policy of continuous improvement, SHARP reserves the right to make design and specification changes for product improvement without prior notice. The performance specification fig- ures indicated are nominal values of production units. There may be some deviations from these values in individual units. - Page 34 MEMO 60H/70H(SUK)MEMO 00.1.7, 5:50 PM...
- Page 35 MEMO 60H/70H(SUK)MEMO 00.1.7, 5:50 PM...
-
Page 36: Sharp Corporation
3. To benefit from this guarantee, any fault which occurs must be notified to Sharp, or its appointed Service Facility within one year from the date this product was purchased. Proof of purchase must be provided.
Need help?
Do you have a question about the XL-60H and is the answer not in the manual?
Questions and answers