Table of Contents
Advertisement
Quick Links
Advertisement
Table of Contents

Related Manuals for Vadem Clio C-1050 Series

Summary of Contents for Vadem Clio C-1050 Series
- Page 1 C-1050 Series User Manual...
- Page 2 Notice The information in this manual is subject to change without notice. VADEM SHALL NOT BE LIABLE FOR TECHNICAL OR EDITORIAL ERRORS OR OMMISSIONS CONTAINED HEREIN; NOR FOR INCIDENTAL OR CONSEQUENTIAL DAMAGES RESULTING FROM THE FURNISHING, PERFOMANCE OR USE OF THIS MATERIAL.
-
Page 3: Table Of Contents
Contents About this Manual x Important Safety Instructions xii Operating Precautions xiii Where to Find Information xiv Conventions xvi Getting Acquainted with Clio 1-1 Attaching to AC Power 1-3 Calibrating and Personalizing the Device 1-4 Managing Power 1-5 Cycling Power 1-6 Notification LED/Switch 1-7 Power Manager Control Panel 1-7 Battery Status Tab 1-8... - Page 4 Windows Explorer 1-19 Internet Explorer 1-19 Communications and Connectivity 1-20 Connecting to the Modem 1-20 Using Infrared 1-21 Removing or Replacing the Battery Pack 1-22 Removing the Battery 1-23 Replacing the Battery 1-24 Memory 1-26 Using Optional Flash Cards 1-26 Installing a Compact Flash Card 1-28 Installing ROM 1-30 Resetting Clio 1-32...
- Page 5 Inbox: Sending and Receiving E-mail Messages 3-10 Setting up Inbox for Connecting to a Mail Server 3-10 Connecting to a Mail Server 3-13 Downloading Messages from a Mail Server 3-13 Disconnecting From a Mail Server 3-14 Managing Messages and Folders on a Mail Server 3-14 Synchronizing E-mail Using ActiveSync 3-15 Creating an Email Message 3-18 Getting Help on Connectivity 3-18...
- Page 6 Calendar: Scheduling Meetings and Appointments 5-15 Contacts: Tracking Friends and Colleagues 5-18 Tasks: Keeping a To Do List 5-19 Using the Bundled Programs 6-1 Vadem ViewFinder™ 6-2 Viewing, Finding and Editing Your Personal Information 6-3 Archiving and Restoring Notes 6-4 CalliGrapher® 5.3 6-6...
- Page 7 Clio Troubleshooting Guide and Tips A-1 What should I do if… A-1 …the power button won’t turn the device on? A-1 …my screen is dark? A-2 ...Clio’s Notify button is not working? A-2 …the system is not responding properly to the stylus taps? A-2 …my Clio will not respond to screen taps or keystrokes? A-3 ...
- Page 8 Hardware Specifications B-1 Regulatory Information for the C-1050 Series C-1 Supported PC Cards D-1 Limited Warranty E-1 Vadem Software License Agreement F-1 BSQUARE® EULA G-1 Software Programs H-1 Glossary Glossary-1 Index viii Clio User Manual...
- Page 9 Preface Congratulations on purchasing Clio, the ideal PC Companion powered by the Microsoft ® Windows ® CE operating system. The size and capabilities of this device let you keep your most impor- tant business and personal information up-to-date and close at hand.
-
Page 10: About This Manual
Information about using the Microsoft appli- Other Companion Programs cations bundled with Clio. Chapter 6: Using the Bundled Programs Information about using the Vadem applica- tions bundled with Clio: ViewFinder, CalliG- rapher, BSQUARE bFAX Pro, bUSEFUL BACKUP Plus and bREADY Publisher and Viewer. - Page 11 C-1050 Series Appendix D: Supported PC Cards Listing of PC Cards supported by Windows Appendix E: Vadem Limited Warranty Complete text of Vadem limited warranty Appendix F: Vadem Software Complete text of software license agreement License Agreement Appendix G: ®...
-
Page 12: Important Safety Instructions
There may be a remote risk of electric shock from lightning. Use only the power adapter supplied with Clio. If you need to replace the supplied power adapter, go to the Vadem web site, http://www.vadem.com for information on how to order a replacement. -
Page 13: Operating Precautions
Operating Precautions Operating Precautions Clio is a precision digital instrument. Be sure to observe the following important precautions in order to prevent malfunction that can result in improper operation or corruption of data in memory. • Never continue to use the device when battery power is low. Low battery power can cause corruption or loss of data stored in memory. -
Page 14: Where To Find Information
• Always use the stylus that comes with the device when operating its touch screen, and only use the shiny end of the stylus. • Never use paint thinner, benzene, or other volatile agents to clean the device or its display panel. Instead, use a soft cloth moistened with water. - Page 15 The Vadem Home Page: cific tips, troubleshooting and FAQs http://www.vadem.com (Frequently Asked Questions) Information about accessories, The Vadem Home Page: software and upgrades for Clio http://www.vadem.com Vadem Technical Support Email to: custsupport@vadem.com Vadem Technical Support, Service and 1-888-GO-VADEM Repair Clio User Manual...
-
Page 16: Conventions
Conventions This manual uses several conventions to present information of special importance. Warning: Warnings are cautions and alerts of things that can interfere with or damage the function of this device. Note: Notes highlight helpful and important things to keep in mind when using this mobile device. - Page 17 Courier font. Clio paths to resources are shown usually Start>Settings>Control Panel in bold font cd \letters\business\legal PC keyboard entries or URLs you are expected to enter exactly as shown are [ENTER] indicated in Courier font. http://www.Vadem.com Clio User Manual xvii...
- Page 18 xviii Clio User Manual...
-
Page 19: Getting Acquainted With Clio
1 Getting Acquainted with Clio Before you start using Clio, you will need to charge the unit until the orange indicator light on the front turns to green, indicating a fully charged battery. This chapter will show you how to: Attach to AC power and charge the batteries. - Page 20 Getting Acquainted with Clio The names and locations of key components on your Clio are shown below. Figure 1-1 shows a top view of Clio in Keyboard Mode, and Figure 1-2 shows a bottom view of Clio. Display Power Button Microphone Birghtness control keys Screen contrast control keys...
-
Page 21: Attaching To Ac Power
Important: Use only the AC power adapter supplied with Clio. If you need to replace the adapter, go to the Vadem web site, http://www.vadem.com, for information on how to order replacement. -
Page 22: Calibrating And Personalizing The Device
Getting Acquainted with Clio Calibrating and Personalizing the Device The first time you power on, the “Welcome to Windows CE for the Handheld PC” wizard appears on your screen. Just follow the instructions as they appear. Calibrate the screen: Remove the stylus from its holder. At the center of each cross or target (+) that appears on the display, tap using the stylus. -
Page 23: Managing Power
Managing Power Managing Power Clio uses two types of batteries and will maintain memory for at least two weeks when the device is turned off: • The rechargeable main battery pack, which comes packaged with the device. It provides approximately 12 hours of power under normal use. -
Page 24: Cycling Power
Getting Acquainted with Clio Cycling Power Clio is ready to use as soon as you power on. Unlike a PC, Clio does not need to boot up or shut down. There are three ways to power on and off: • Power Button. To power on, press the Power Button (large button recessed into the frame to the right of the display). -
Page 25: Notification Led/Switch
Power Manager Control Panel Notification LED/Switch Clio features a Notification LED/switch on its lower front edge. To interpret signals from the LED, refer to Table 1-1. Notification LED/switch TABLE 1-1 Indicator Meaning Steady green light Clio is attached to AC power and the bat- tery pack is fully charged. -
Page 26: Battery Status Tab
Getting Acquainted with Clio Battery Status Tab Figure 1-3 shows the Power Properties dialog box with the Battery Status tab displayed. Battery Status Tab in the Power Properties Dialog Box FIGURE 1-3 The Battery Status tab displays the battery level as a meter with green (good), yellow (low) and red (very low) zones. - Page 27 Power Manager Control Panel Note: To preserve your data stored in RAM memory, Clio will automatically power off after the battery level enters into the red zone. If you attempt to turn the device on again, it may turn on briefly, then turn off again to protect memory. Use the AC Adapter as soon as possible to recharge the device.
-
Page 28: Suspend Options Tab
Getting Acquainted with Clio Suspend Options Tab The Suspend Options tab (Figure 1-5) allows you to set options for automatically powering the device on or off. You can choose to have Clio turn on and off automatically whenever you open or close the case. -
Page 29: Backlight Tab
Power Manager Control Panel Backlight Tab The Backlight tab (Figure 1-6) allows you to set a timeout to automatically dim the backlight after an idle period. Enabling this feature will maximize the battery life of your device under normal operating conditions. Touching the screen or any key on the keyboard will automatically brighten the backlight back to its original setting. -
Page 30: Managing Battery Pack Life
Getting Acquainted with Clio Managing Battery Pack Life When fully charged, the main battery pack supports up to 12 hours of use. The backup battery provides an emergency power source to protect your memory contents if the main battery pack is removed for short periods of time. -
Page 31: Using Batteries Efficiently
Managing Battery Pack Life Using Batteries Efficiently Here is a list of things you can do to maximize your battery pack’s life and charge: • Charge the battery pack as soon as the first low battery pack warning appears. Keep the battery fully charged whenever possible. -
Page 32: Using Display Modes
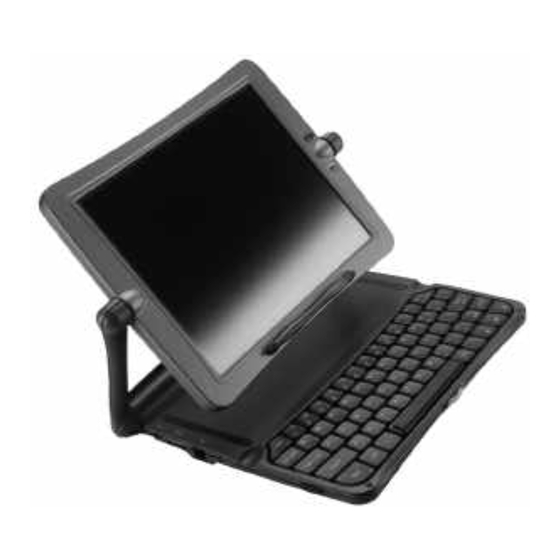
Getting Acquainted with Clio Using Display Modes The display screen is designed to make Clio as easy to use, under as many conditions, as possible. Using Clio in Keyboard Mode To open the screen in keyboard mode: Place Clio face up on a flat surface with the Notification LED/switch facing you. -
Page 33: Using Clio In Tablet Mode
Using Display Modes To close Clio: Align the screen with the screen arms. Close the screen by pushing it down to meet the body of Clio. Using Clio in Tablet Mode Once the screen is open, you can convert it to tablet mode: Pivot the screen so that it is facing away from the keyboard and is aligned with the screen arms. -
Page 34: Using The Stylus
Getting Acquainted with Clio brightness, press A (+) to increase or A (-) to INUS reduce brightness. Using the Stylus Clio comes with a stylus, a pencil-shaped device for tapping or dragging to select or to move displayed items. To reduce the risk of scratching the Touch Screen, use the grey end of the stylus. -
Page 35: Exploring The Desktop
Exploring the Desktop Exploring the Desktop The Clio Windows CE desktop contains shortcuts to programs and features the standard “My Handheld PC” icon, Start menu and taskbar. The following section briefly describes Clio’s desktop features. For more in-depth information on Windows CE applications, see Chapter 4, “A Tour of Windows CE”. -
Page 36: Taskbar
Getting Acquainted with Clio Taskbar The taskbar is displayed along the lower edge of the desktop. It displays the programs you are currently running, the Desktop icon, and status tray. When selected, the Desktop icon minimizes all opened programs to display the desktop. The taskbar icons display the following information from left to right: •... -
Page 37: Using Windows And Internet Explorer
Using Windows and Internet Explorer The online help system contains the most up-to-date information about Clio’s features and functions. Using Windows and Internet Explorer Clio uses its own version of Windows Explorer and Internet Explorer. Windows Explorer The Windows Explorer program is useful for viewing, transferring and organizing files. -
Page 38: Communications And Connectivity
Getting Acquainted with Clio Communications and Connectivity Clio provides a modem jack, an IR (infrared) port, a serial/ docking port, a PC Card slot, and a Compact Flash slot. This section describes the use of each of these features. Connecting to the Modem To use the internal modem, plug any analog phone line into the standard RJ11 jack on the side of Clio (Figure 1-9). -
Page 39: Using Infrared
Communications and Connectivity To use the built-in modem, choose “Built-in modem on COM5:” as the modem type. Refer to Chapter 3, “Setting Up Remote Networking” for information on creating dial-up connections. Using Infrared You can establish an IR (infrared) connection between Clio and another device that runs Windows CE using the infrared port. -
Page 40: Removing Or Replacing The Battery Pack
Getting Acquainted with Clio Note: The IR port and the serial port cannot work simulta- neously. Removing or Replacing the Battery Pack For certain operations, such as installing more memory or install- ing certain types of PC cards, you will need to remove the battery pack. -
Page 41: Removing The Battery
Removing or Replacing the Battery Pack Back of the device facing Lift the Battery Pack door up Device face down and away from on a flat surface FIGURE 1-11 Removing the Battery Pack Door Removing the Battery Rotate the tab of the battery pack away from the battery contacts and lift the battery pack out of the device. -
Page 42: Replacing The Battery
Getting Acquainted with Clio Replacing the Battery Open the battery compartment as described in steps 1-3 above. Insert the battery pack. Orient the battery pack so the tab is on the side matching the three battery contacts on Clio (and so that the tab is facing away from Clio). - Page 43 Removing or Replacing the Battery Pack Replace the battery pack cover. Insert the tabs on the curved side of the door into the body of Clio (Figure 1-15), then press down on the straight side and snap into place (Figure 1-16). Note: If the battery pack door does not close completely, the device will not power on.
-
Page 44: Memory
Getting Acquainted with Clio Memory Clio uses three types of memory: • Optional Flash Cards, which can be used to store files. • ROM, which contains the operating system and built-in programs. • RAM, which contains additional programs and data. This section describes installation and use of each type of memory. - Page 45 Memory Remove the PC Card, flip it over and try again. After removing the protection card, insert the PC card until snug. Do not force the card, as it will not fit all the way into Clio. Inserting a PC Card FIGURE 1-17 If this is the first time you have inserted this PC Card, you may be prompted by the device to identify or format the...
-
Page 46: Installing A Compact Flash Card
Getting Acquainted with Clio Removing a PC Card Note: Carefully follow these steps when removing a PC Card. Otherwise, you may lose your data. To remove a PC card from Clio: Exit all programs that are using files that reside on your PC card. - Page 47 Memory Remove the battery pack Insert compact flash card into available slot, label side up. FIGURE 1-18 Inserting a Compact Flash Card Replace the battery pack. Warning: When removing the battery pack, please replace it as quickly as possible and be careful not to leave it out of the system for an extended period of time.
-
Page 48: Installing Rom
Getting Acquainted with Clio Installing ROM Warning: Never open the battery pack door or remove the battery pack without FIRST shutting off the device. REMOVING THE BATTERY WHILE THE DEVICE IS ON MAY CAUSE YOU TO LOSE ALL OF YOUR DATA. You can upgrade the ROM module in Clio: •... - Page 49 Memory Inserting a ROM Module FIGURE 1-19 Install the new ROM module. The ROM and RAM modules have unique connectors that will not accept the wrong module. Align the connectors on the module with the connectors in the Clio. Then firmly and evenly snap into place.
-
Page 50: Resetting Clio
Getting Acquainted with Clio Note: Always read and follow the specific instructions that came with your ROM module. There may be important updated information. Resetting Clio If the device does not turn on after you install the battery pack and attach the device to AC power, first check if the contrast and brightness are set correctly (see “Adjusting Contrast/Brightness”... -
Page 51: Clearing Memory
Clearing Memory FIGURE 1-20 Resetting Clio Clearing Memory Warning: Clearing memory will completely erase all data on the system. This should only be done as an emergency procedure or when you wish to completely erase all data; for example, when assigning your device to a new owner. To clear memory: Synchronize information to your desktop PC. - Page 52 Getting Acquainted with Clio With Clio face down and its Notification LED/switch facing you, the Memory Erase button can be found adjacent to the RAM module. Replace the memory module cover. Be sure the cover is firmly in place. Power on the device. Synchronize with your desktop PC to restore your data.
-
Page 53: Setting Up A Partnership With A Desktop Pc
2 Setting up a Partnership with a Desktop PC Microsoft ActiveSync ® with Windows CE Services enables you to synchronize the information on your desktop computer with the information on Clio. Synchronization compares the data on Clio and your desktop computer, then updates both with the most recent information. -
Page 54: Connecting With The Travel Dock
Setting up a Partnership with a Desktop PC Synchronizing or exchanging files with your PC requires: • A physical connection with Clio via a Travel Dock or network connection. Refer to “Connecting with the Travel Dock” on page 2-2. • Installation of ActiveSync with Windows CE Services and setting up a “partnership”... - Page 55 Connecting with the Travel Dock Insert the travel dock into the serial/docking port. AC power is supplied to Clio through the serial/docking port when using the Travel Dock. Refer to Figure 2-1. Verify that AC power is correctly supplied to Clio by checking the Notification LED/switch on the front of the device.
-
Page 56: Setting Up Communications
Setting up a Partnership with a Desktop PC Setting up Communications After you have calibrated and personalized Clio (refer to “Calibrating and Personalizing the Device” on page 1-4), you can install ActiveSync with Windows CE Services and set up a partnership between Clio and your computer. - Page 57 Setting up Communications Note: If the wizard does not launch automatically, type d:\setup, where d is your CD-ROM drive. The Setup Program automatically searches your PCs COM ports for a device. If it reports no device found, check your serial cable connection, make sure your Clio is turned on, and repeat.
- Page 58 Setting up a Partnership with a Desktop PC • File Type. You can have synchronization apply to appointments, channel items, contacts, files, messages, tables, and/or tasks. When you are finalized, your device will synchronize for the first time. If you chose manual synchronization during setup, you will need to choose Synchronize Now in the Tools menu of the Mobile Devices folder.
-
Page 59: Customizing Synchronization
Customizing Synchronization Customizing Synchronization The default frequency and file types work well for most users. To change either setting after you’ve completed the wizard: Select your device icon in the Mobile Devices folder and then tap Tools > Synchronization Options. You can tap Tools >... - Page 60 Setting up a Partnership with a Desktop PC • Contacts. All address book or contact information in Outlook or Schedule Plus (or another contacts program if you have third-party software that supports ActiveSync). • Files. Allows synchronization of desktop and Clio files. If you do not select this, you can still drag and drop files between systems.
-
Page 61: Synchronizing Files And File Conversion
Synchronizing Files and File Conversion Synchronizing Files and File Conversion When you transfer a file from your desktop computer to your device, the file is converted to a format that the device can read. During file conversion, some of the file’s attributes may be changed or removed, and the file extension is changed. -
Page 62: Drag And Drop
Setting up a Partnership with a Desktop PC Drag and Drop Files can be dragged and dropped from Clio to the PC workstation and vice-versa. To do this, connect Clio and desktop computer, double-tap the desktop computer’s device icon (in the Mobile Devices folder), and drag the files between the PC and the Mobile Devices folder. -
Page 63: Backup And Restore
Backup and Restore Backup and Restore Regularly back up your device data on your desktop computer using ActiveSync, or use BSQUARE bUSEFUL BACKUP Plus (see page 6-12), to prevent losing information if your device is ever corrupted or lost. To do this, connect your systems, then tap Tools >... - Page 64 Setting up a Partnership with a Desktop PC 2-12 Clio User Manual...
-
Page 65: Setting Up Remote Networking
3 Setting Up Remote Networking With a dialup connection, you can connect to your desktop computer, a network, or the Internet while away from your office. This is called remote networking and Clio provides the following remote networking options: • Use the Internet Connection Wizard to connect. •... -
Page 66: Connecting To An Isp
Setting Up Remote Networking Connecting to an ISP You can connect to your ISP via a dial-up connection. Once connected, you can send and receive e-mail messages and view Web pages. To create a dial-up connection to an ISP: Obtain the following information from your ISP: •... -
Page 67: Connecting To A Network
Connecting to a Network then tap Connect. Once connected, you can use Pocket Inter- net Explorer to visit Web pages or Inbox to send and receive e- mail. Note: Before you can use Inbox, you need to provide the information it needs to communicate with the mail server. For specific instructions, refer to “Inbox: Sending and Receiving E-mail Messages”... -
Page 68: Creating A Dial-Up Connection To A Network
Setting Up Remote Networking Creating a Dial-up Connection to a Network To create a dial-up connection to a network: Obtain the following information from your network administrator: • Corporate dial-up access telephone number • User name and Password • Domain name If you use a PCMCIA modem card, insert the card into Clio. -
Page 69: Creating A Network (Ethernet) Connection
Connecting to a Network devices/PCs to Clio. Optionally, select configuration and TCP/IP settings, then tap Next. You should not need to change any settings in the Configura- tion or TCP/IP Settings dialog boxes. Enter your access phone number and tap Finish. Once created, the dial-up connection is available anytime. -
Page 70: Synchronizing With A Desktop Computer
Setting Up Remote Networking Select your Ethernet driver, then tap Properties. Most networks use DHCP, so you should not have to change these settings. In the Identification tab, enter your name, password, and domain. See your network administrator if you need assistance. Once connected, you can use Pocket Internet Explorer to visit intranet Web pages and Inbox to send and receive e-mail. - Page 71 Synchronizing with a Desktop Computer • If you are communicating with the desktop computer through a dial-up or network connection, you must be logged on to the network on the desktop computer. Select “Enable a network connection” in the ActiveSync Properties dialog box.
- Page 72 Setting Up Remote Networking In the ActiveSync dialog box, select Network Connection as the method to connect and the name of the computer with which to connect. Once connected to the network, your device will find your desktop computer and initiate synchronization. •...
-
Page 73: Creating A Dial-Up Connection To A Modem
Creating a Dial-up Connection to a Modem Creating a Dial-up Connection to a Modem To create a dial-up connection to a modem attached to a desktop computer: Perform any relevant prerequisite steps: If you are a Windows 95 user, install the Dial-Up Net- working Upgrade 1.2. -
Page 74: Inbox: Sending And Receiving E-Mail Messages
Setting Up Remote Networking Inbox: Sending and Receiving E-mail Messages Use Inbox to send and receive e-mail messages. You can access your e-mail by connecting to a mail server through an Internet or network account or by synchronizing with your desktop computer. - Page 75 Inbox: Sending and Receiving E-mail Messages • User name • Password • Domain name (for network connections only). Select Start > Programs > Pocket Outlook > Inbox. Select Services > Options. On the Services tab, tap Add. Choose “IMAP4 Mail” or “POP3 Mail”, enter a name for the connection, and then tap OK.
- Page 76 Setting Up Remote Networking • In When Getting Full Copy, choose whether you want to download file attachments and meeting requests with messages. This setting applies whether you have chosen to download full copies of messages by default, or to selectively down- load full copies of messages (by opening the message and selecting the Get Full Copy button).
-
Page 77: Connecting To A Mail Server
Inbox: Sending and Receiving E-mail Messages Connecting to a Mail Server You can send and receive messages by connecting directly to your mail server. To do this, either: • Connect to your Internet service provider (ISP) via modem. • Connect to the local area network that includes your mail server, via modem or Ethernet PC card. -
Page 78: Disconnecting From A Mail Server
Setting Up Remote Networking Disconnecting From a Mail Server To disconnect Inbox from a mail server, tap Services/Disconnect. You must also disconnect your dial-up connection by double- tapping the icon in the status bar and selecting Disconnect. Managing Messages and Folders on a Mail Server By default, messages are displayed in one of four folders in the service you created: Inbox, Deleted (local), Outbox, and Sent. -
Page 79: Synchronizing E-Mail Using Activesync
Inbox: Sending and Receiving E-mail Messages example, if you move two messages from the Inbox folder to a folder called Family, the server will create a copy of the Family folder and copy the messages into that folder. Therefore, messages are available to you anytime you connect to your mail server, whether it is from your device, laptop computer, or desktop computer. - Page 80 Setting Up Remote Networking When you synchronize, any changes made on either computer are transferred to the other: • If you have received new messages in Inbox on your desktop computer, the messages are copied to your device. • If you delete a message on the device, it is deleted from the desktop the next time you synchronize.
- Page 81 Inbox: Sending and Receiving E-mail Messages Managing Messages and Folders Using ActiveSync Messages are stored in one of four folders in the ActiveSync service: Inbox, Deleted (local), Outbox, and Sent. The behavior of the Deleted and Sent folders depends on the Inbox options you have chosen.
-
Page 82: Creating An Email Message
Setting Up Remote Networking Creating an Email Message To create a message: Tap Compose > New Message. In the To field, enter the address of one or more recipients. You can also tap Address Book to select addresses from the Contacts list or an address service. -
Page 83: 4 A Tour Of Windows Ce
4 A Tour of Windows CE Your device comes with a keyboard, touch screen, and stylus. You use the keyboard just as you do on your desktop computer. The stylus and touch screen replace the pointing device; you select and move objects on the screen by tapping and dragging them with the stylus. -
Page 84: Programs
A Tour of Windows CE Programs The Windows CE programs that come with your device are stored in ROM (read-only memory) and cannot be removed or lost. You can install additional programs that will be placed in RAM (random access memory). Table 4-1 provides a listing of programs and descriptions. - Page 85 Programs TABLE 4-1 Programs Bundled with Clio Program Description World Clock Set the date, time, and alarm for your home city or the city you are visiting. Calculator Perform calculations. Solitaire Entertain yourself while on the road. Note: There are many Windows CE programs available, including freeware and shareware.
-
Page 86: Using The Start Menu And Taskbar
A Tour of Windows CE Using the Start Menu and Taskbar Use the Start menu to open programs, settings, Help, and recently used documents. Just select Start, and then select the program or item you want to open. In addition to the Start menu, the taskbar contains buttons for the programs you have running, a status area, and a desktop icon (Figure 4-1). -
Page 87: Using The Command Bar
Using the Command Bar Using the Command Bar Each program has a command bar located at the top of the program window (Figure 4-2). The command bar displays both menu names and toolbar buttons. Select the slider to switch between displaying toolbar buttons only or menu names and toolbar buttons. -
Page 88: Printing
A Tour of Windows CE To access Internet or intranet Web pages, you must first set up a connection between your device and the Internet or an intranet. Note: To view the HTML source code of a Web page on your device, tap File >... -
Page 89: Customizing Clio
Customizing Clio Customizing Clio Clio uses the standard Microsoft CE Control panel. You can customize and adjust settings on Clio by using the Control Panel. To open the Control Panel, tap Start > Settings > Control Panel. Double tap any icon to bring up properties for that item. A list of icons and their functions follows. -
Page 90: Display
A Tour of Windows CE Display Changes the background (wallpaper) and appearance (window color scheme) on the Windows CE desktop. You can add a bitmap by copying a .bmp file to your the Windows directory on Clio. Then select this .bmp file in the Appearance tab. -
Page 91: Password
Customizing Clio Password Allows you to set a password to restrict access when Clio emerges from suspend mode. Once set, password access cannot be circumvented: Clio must be reset. Thus, if you set a password, write it down in a retrievable place. Password mode can be toggled on and off. -
Page 92: Remove Programs
A Tour of Windows CE Remove Programs Lists programs that can be removed. Tap to select a program from the list, then tap Remove. Stylus Adjusts how Windows CE recognizes your double taps (as slow or rapid successive taps). You can also recalibrate your screen. -
Page 93: Volume And Sounds
Customizing Clio Volume and Sounds Lets you adjust volume and select sounds to accompany programs, notices, and events. Toggles sound on or off, enables audible clicks and taps (for keys and screen taps). You can also add a sound by copying a .wav file to the Windows directory on Clio. - Page 94 A Tour of Windows CE 4-12 Clio User Manual...
-
Page 95: Using The Microsoft Office And Other Companion Programs
5 Using the Microsoft Office and Other Companion Programs The Microsoft Office companion programs consist of Microsoft Pocket Word, Microsoft Pocket Excel, Microsoft Pocket Access, and Microsoft Pocket PowerPoint. You can access the Office companion programs by tapping Start > Programs > Office, and then the program you want to open. -
Page 96: Pocket Word: Creating Documents
Using the Microsoft Office and Other Companion Programs Pocket Word: Creating Documents You can use Pocket Word to create documents, such as letters, meeting minutes, and trip reports. You can also use Pocket Word to open and edit documents created in the desktop version of Word. - Page 97 Pocket Word: Creating Documents FIGURE 5-1 Pocket Word: Meeting Minutes Template To take meeting minutes using Pocket Word: Tap File > New > Document from Template. In the Template dialog box, tap Meeting Notes, then OK. Tap File > Save. Enter a name, choose a storage location, then tap OK.
-
Page 98: Pocket Excel: Creating Workbooks
Using the Microsoft Office and Other Companion Programs Pocket Excel: Creating Workbooks You can use Pocket Excel to create workbooks, such as expense reports and mileage logs. You can also use Pocket Excel to open and edit workbooks created in the desktop version of Excel. When you are ready to save a workbook you created or edited, you can save it in a variety of formats, including Pocket Excel (.pxl) and Excel (.xls). - Page 99 Pocket Excel: Creating Workbooks To log travel expenses using Pocket Excel: Tap File > New > Workbook from Template. In the Template dialog box, tap Expense Report, then OK. Tap File > Save. Enter a name, choose a storage location, and then select Overtype the text in the template.
-
Page 100: Pocket Access: Viewing And Creating Data
Using the Microsoft Office and Other Companion Programs Pocket Access: Viewing and Creating Data Use Pocket Access to view and update data from Microsoft Access, Microsoft SQL Server, and other ODBC databases on your desktop computer. Simply create the database on your desktop computer and then transfer the data to your device. - Page 101 Pocket Access: Viewing and Creating Data To create a new database and table on Clio: Tap Start > Programs > Office > Microsoft Pocket Access. When Pocket Access appears, with the cursor in the Name field, enter a name for the database and tap OK. Double-tap the Create a new table icon.
-
Page 102: Pocket Powerpoint: Showing Presentations
Using the Microsoft Office and Other Companion Programs Pocket PowerPoint: Showing Presentations Use Pocket PowerPoint to quickly and easily deliver a professional presentation on your device (for one-on-one presentations) or connect your device to a VGA monitor (using a VGA PC Card) and show the presentation to a larger group. Simply create the presentation in Microsoft PowerPoint on your desktop computer and then transfer the presentation to your device. - Page 103 Pocket PowerPoint: Showing Presentations To show a Powerpoint presentation: Using ActiveSync, copy the presentation from your desk- top computer to your device. Tap Start > Programs > Office > Microsoft Pocket PowerPoint. In the Open Presentation dialog box, select the presentation you want to show, and then OK.
-
Page 104: Voice Recorder And Inkwriter
Using the Microsoft Office and Other Companion Programs Voice Recorder and InkWriter Voice Recorder and InkWriter are programs for quickly capturing your ideas, notes, and thoughts. With Voice Recorder, you can record reminders and ideas. With InkWriter, you can take handwritten and typed notes and create drawings. - Page 105 Voice Recorder and InkWriter To record and play a recording: Select Start > Programs > Accessories > Microsoft Voice Recorder. Hold your mobile device’s microphone near your mouth or other source of sound. Tap Record (stop sign button). You’ll hear a beep when recording begins. To stop recording, tap Stop (square button).
-
Page 106: Inkwriter: Creating Notes And Drawings
Using the Microsoft Office and Other Companion Programs InkWriter: Creating Notes and Drawings InkWriter, a text, graphics, and ink processor with Rich Ink technology, makes it easy to write and draw the way you do on paper, but with the benefit of being able to edit and format what you've written and drawn. - Page 107 Voice Recorder and InkWriter To create an InkWriter document: Select Start > Programs > Accessories > InkWriter. Create your document: • To write, select View > Writing, then use the stylus like a pen. • To type, select View > Typing, then use the keyboard. •...
-
Page 108: Microsoft Pocket Outlook
Using the Microsoft Office and Other Companion Programs Microsoft Pocket Outlook The Microsoft Pocket Outlook program includes Calendar, Contacts, Tasks, and Inbox. Using ActiveSync, you can synchronize information in Microsoft Outlook , Microsoft Schedule+, or Microsoft Exchange on your desktop computer with your device. -
Page 109: Calendar: Scheduling Meetings And Appointments
Microsoft Pocket Outlook Calendar: Scheduling Meetings and Appointments Use Calendar to schedule appointments, meetings, and other events (Figure 5-7). You can check your appointments in one of several views (Day, Week, Month, Year, and Agenda) and easily switch among the views by selecting the corresponding toolbar button. - Page 110 Using the Microsoft Office and Other Companion Programs To create a new appointment: From any view, tap New Appointment. The Appointment dialog box appears (Figure 5-8). FIGURE 5-8 New Appointment dialog box Enter a description and a location. Select the time and date. To add notes, tap Notes, then select the notes area and enter your notes.
- Page 111 Microsoft Pocket Outlook meeting is automatically added to their schedule. In addition, their response is automatically sent back to you, and your calendar is updated. Before you can send a meeting request, enter e-mail addresses in Contacts and set up Inbox to send and receive messages. Refer to “Contacts: Tracking Friends and Colleagues”...
-
Page 112: Contacts: Tracking Friends And Colleagues
Using the Microsoft Office and Other Companion Programs Contacts: Tracking Friends and Colleagues Contacts maintains a list of your friends and colleagues so that you can easily find the information about them (Figure 5-9). Using the Clio IR port, you can also quickly share Contacts information with other Windows CE-based mobile device users. -
Page 113: Tasks: Keeping A To Do List
Microsoft Pocket Outlook Supply an e-mail address if you want to send meeting requests and e-mail messages to this contact. To add a note or assign the contact to a category, tap Notes/Categories, then select the notes area and enter your notes, or select a category from the list. - Page 114 Using the Microsoft Office and Other Companion Programs To create a new task: Tap New Task. The Task dialog box appears (Figure 5-12). Task Dialog Box FIGURE 5-12 Enter a description. Select start date, due date, and other information. To add notes, tap Notes, then the notes area. Enter your notes.
-
Page 115: Using The Bundled Programs
Vadem has included several programs specifically designed for Clio. You can access these programs by tapping Start > Programs > Vadem. The bundled programs discussed in this chapter are: • “Vadem ViewFinder™” on page 6-2. -
Page 116: Vadem Viewfinder
Using the Bundled Programs Vadem ViewFinder™ ViewFinder is a program designed to let you quickly view and find your personal information, including contacts, calendar, tasks and notes. You can see what your day looks like in one screen, and you can also globally search across all of your personal information. -
Page 117: Viewing, Finding And Editing Your Personal Information
Vadem ViewFinder™ Viewing, Finding and Editing Your Personal Information To look at your day: Select Start > Programs > Vadem > ViewFinder to launch ViewFinder. Tap Go To Today to see the current day’s calendar and tasks, as well as all your contacts and notes. -
Page 118: Archiving And Restoring Notes
Using the Bundled Programs Select Tools > Options and tap the Find tab to change the find options. The default is to search for all words, ignoring case. Archiving and Restoring Notes To archive your notes: Tap the Clear Search button in the Find window if a search filter is active. - Page 119 Vadem ViewFinder™ To archive your notes to your PC: First, archive your note to a file in RAM or Flash on Clio, as described above. Establish a partnership with your PC and use ActiveSync to transfer the archive file to your PC.
-
Page 120: Calligrapher® 5.3
Starting CalliGrapher You can start CalliGrapher in three ways: • Select the Calligrapher desktop icon. • Select Start > Programs > Vadem > CalliGrapher. • By default, CalliGrapher will start when you put Clio into tablet position. Note: You can change this default setting from the Clio con- trol panel. -
Page 121: Recognition Mode
CalliGrapher® 5.3 Recognition mode ScreenDraw mode Recognition mode and ScreenDraw mode FIGURE 6-2 Tap the icons to switch between modes or tap the icon that is highlighted to turn its mode off. Press and hold on the icons to open the CalliGrapher pop-up menu. Note: CalliGrapher remembers your preferred settings in Clio’s tablet mode and in Clio’s keyboard mode and... - Page 122 Using the Bundled Programs FIGURE 6-3 Recognition mode Here are some tips for using CalliGrapher Recognition mode most effectively: Use the entire screen as your writing surface. You don’t need to limit yourself to the location of the cursor. Characters about ½” - 1” tall are recognized most accurately.
-
Page 123: Screendraw Mode
CalliGrapher® 5.3 ScreenDraw mode In ScreenDraw mode, you may use Clio as a writing tablet or as a drawing surface. Use the stylus to draw lines and free-hand shapes, or make notes in your own handwriting. Your drawing is displayed as the original ink, writing or scribbling without interpretation by the handwriting recognition program. -
Page 124: Bsquare® Bfax® Pro
Using the Bundled Programs BSQUARE® bFAX® Pro BSQUARE’s bFAX Pro lets you send and receive faxes. It works with both the built-in Clio modem and PC Card modems. bFAX Pro is fully integrated with the Contacts database to make sending to recipients easy and quick. -
Page 125: Sending A Fax Via The Built-In Modem
Sending a Fax via the Built-In Modem Attach an analog phone line to the modem jack. Select Start > Programs > Vadem > BSQUARE bFAX Pro. Select Options > Communications… Choose Built-in Modem on COM5: in the “Modem To Use” field. This option will be remembered the next time you fax. -
Page 126: Bsquare Buseful
Using the Bundled Programs BSQUARE bUSEFUL Backup Plus Avoid data loss on your Clio. The bUSEFUL Backup gives you peace of mind by backing up your device. Starting a bUSEFUL Backup Tap Start > Programs > bSQUARE > bUSEFUL Backup Plus. Select the bUSEFUL wizard to back up your device. - Page 127 BSQUARE bUSEFUL Backup Plus Deleting Old Backups Because old backup files can take up a large amount of space, it’s important to delete backups you won’t need. Be sure to check all associated folders: files could be located in the directory where you installed bUSEFUL Backup Plus, or in the My Documents folder.
- Page 128 Using the Bundled Programs Flashcard or to your desktop PC, and reset your device. The results of having low memory may be unpredictable. Restoring Compressed Files If the number of bytes being restored is larger than the total number of bytes, this is due to a backup being compressed more than once.
-
Page 129: Bsquare Publisher And Viewer
BSQUARE Publisher and Viewer BSQUARE Publisher and Viewer BSQUARE Publisher and Viewer lets you collect and organize data from your desktop or network into electronic "books" with "chapters" on a desktop machine, and then download the informa- tion to your Clio for easy reference while mobile. As an elec- tronic book publisher, bREADY is the easiest, most convenient way to publish and/or read electronic books. -
Page 130: Starting And Running The Bsquare Bready Viewer On Your Clio
Using the Bundled Programs Starting and Running the BSQUARE bREADY Viewer on your Clio The BSQUARE bREADY Viewer displays files in book format on your Clio. You can annotate, bookmark and search a book any book you open in the bREADY Viewer. From the Start menu, select Programs>bSquare>bVIEWER. -
Page 131: Clio Troubleshooting Guide And Tips
Appendix A Clio Troubleshooting Guide and Tips This section contains useful tips and troubleshooting information for Clio. Be sure to visit the Vadem Home Page, for a complete list of tips, http://www.vadem.com, troubleshooting information and answers to Frequently Asked Questions (FAQs). -
Page 132: My Screen Is Dark
Clio’s World Clock window, and also confirm that you have selected the audio and video alarm options you expect. If these measures don’t work, call Vadem Service at 1-888-GO VADEM. …the system is not responding properly to the stylus taps? •... -
Page 133: My Clio Will Not Respond To Screen Taps Or Keystrokes
What should I do if… • Alternatively, you may use the keyboard to access the calibration screen by pressing the C , and “=” keys simultaneously. • If the CalliGrapher application is active (you can verify this by looking at the taskbar, near the time display, for a pen icon with a blue background), you may need to hold the stylus down until you hear a beep (approximately 1/2 second) before dragging the stylus to move or select an object or text. -
Page 134: I Can't Install The Battery
If you have verified that the AC current is not recharging Clio’s battery, (see “Power Manager Control Panel” on page 1-7) you may need to replace the AC adapter. Contact Vadem Service at 1-888-GO VADEM for a replacement..my Clio is not receiving audio? First, go to the Volume&... -
Page 135: I Can't Insert A Pc Card Into The Card Slot
If the slot is empty, make sure the PC card is inserted properly (right-side up, contacts facing the unit). Finally, check for damage in the external area by the PC card slot. Call Vadem Service at 1-888-GO VADEM. …I forget my power-on protection password? If you forget your password, you must clear the memory of your Clio to reset the password. -
Page 136: My Clio's Battery Led Is Not Working
...my Clio’s battery LED is not working? If Clio’s battery is fully charged, or you are connected to AC power via the AC power adapter, call Vadem Service at 1-888-GO VADEM..my Clio’s serial port is not working? Sometimes you’ll need to reset the connection, by resetting your Clio, disconnecting and replacing the serial port cable, or, if con- nected to your PC, rebooting your machine to recognize Clio. -
Page 137: End An Application That Is Not Responding
How do I… …end an application that is not responding? Press Ctrl + Alt + Del at the same time. The Task Manager box will appear, then you can highlight the non-responsive task, and press End Task. …tell if the Caps Lock is active? Clio displays a blue capital A in a white box inside the taskbar at the bottom of the screen when Caps Lock is active. -
Page 138: Maximize My Battery Life
…maximize my battery life? • Use the external AC power adapter whenever possible. This is especially important during high battery drain events, such as when a PCMCIA or Compact Flash card is being used, when the modem is in use, and when connecting and/or synchronizing with your desktop computer. -
Page 139: Specifications
Appendix B Hardware Specifications This appendix contains hardware specifications for Clio, including: • TABLE B-1, “Physical Description of C-1050 Series” • TABLE B-2, “Power” • TABLE B-3, “Processor and Input/Output” • TABLE B-4, “Communications” • TABLE B-5, “Expansion” Clio User Manual... - Page 140 TABLE B-1 Physical Description of C-1050 Series Attribute Value Dimensions 8.7 in. x11.25 in.x1 inch (288mm x 222mm x 24.5mm) Weight 3.2 pounds, with main battery pack Power TABLE B-2 Attribute Value Main Battery Pack Lithium Ion Rechargeable Battery Pack, Part Number CA-LI Backup Battery Rechargeable Lithium Coin Cell, built-in...
- Page 141 TABLE B-3 Processor and Input/Output Attribute Value Indicator Lights Green : Fully Charged Battery and AC Power Applied Orange : Battery Charging and AC Power Applied Red : Alarm/Appointment Notifica- tion Audio In Omnidirectional microphone (voice quality) Audio Out 1.5” or Speaker that can play stan- dard .wav files Clio User Manual...
- Page 142 TABLE B-4 Communications Attribute Value Modem Built-in 56Kbps V.90 data/fax modem and RJ11 connec- Compatible with ITU-T Standards Data Modes: V.21 0-300bps, Bell 103 V.22, V.22bis - automode 1200bps, 2400bps V.32 - adaptive rate 4800 - 9.6kbps V.32bis - adaptive rate 4800 - 14.4kbps V.32terbo - adaptive rate 4800 - 19.2kbps V.34 2400-28.8kbps V.90+ adaptive rate 2400bps to 33.6kbps plus 200 bps...
- Page 143 Expansion TABLE B-5 Attribute Value PC Card Type II PC Card slot Compact Flash Type II Compact Flash slot (internal) Serial/Docking RS-232 serial port and DC power port for docking connec- tions Clio User Manual...
- Page 144 Clio User Manual...
-
Page 145: Regulatory Information For The C-1050 Series
Appendix C Regulatory Information for the C-1050 Series FCC Registration This device complies with Part 15 of the FCC rules. Operation is subject to the following two conditions: (1) this device may not cause harmful interference, and (2) this device must accept any interference received, including interference that may cause undesired operation. - Page 146 If trouble is experienced with this equipment, please contact Vadem for repair and (or) warranty information. If the trouble is causing harm to the telephone network, the telephone company may request you remove the equipment from the network until the problem is resolved.
- Page 147 In accordance with Part 15 of the FCC rules, the user is cautioned that any changes or modifications to the equipment described in this manual that are not expressly approved by Vadem, could void the user’s authority to operate the equipment.
- Page 148 Repairs to certified equipment should be made by an authorized Canadian maintenance facility designated by the supplier. Any repairs or alterations made by the user to this equipment, or equipment malfunctions, may give the telecommunications company cause to request the user to disconnect the equipment.
- Page 149 suite de réparations ou de modifications effectuées par l’utilisateur, ou à cause de mauvais fonctionnement. Pour sa propre protection, l’utilisateur doit assurer que tous les fils de mise à la terre de la source d’énergie électrique, des lignes téléphoniques et des canalisations d’eau métalliques, s’il y en a, soient raccordés ensemble.
- Page 150 Clio User Manual...
-
Page 151: Supported Pc Cards
Appendix D Supported PC Cards TABLE D-1 lists PC Card (PCMCIA) peripherals that have been tested for use with Windows ® CE™. For the most up to date information on compatible PC Cards, go to http://www.microsoft.com/windowsce Supported PC Cards TABLE D-1 Hardware Category Company Name Product Name... - Page 152 TABLE D-1 Supported PC Cards (Continued) Hardware Category Company Name Product Name Modem/Analog Practical Peripherals ProClass (PC288T2) Modem/Analog Simple Technology 33.6 Communicator Modem/Analog Motorola SecurID V.34 Modem/Analog U.S. Robotics/Megahertz PC Card Modem (XJ1144) Modem/Analog U.S. Robotics/Megahertz PC Card Modem (XJ2288) Modem/Analog U.S.
- Page 153 TABLE D-1 Supported PC Cards (Continued) Hardware Category Company Name Product Name Storage/Flash Memory Simple Technology PCMCIA ATA Flash 8MB Storage/Flash Memory Verbatim 20 MB Clio User Manual...
- Page 154 Clio User Manual...
-
Page 155: Limited Warranty
No updates are provided. The sole obligation of Vadem with respect to this express warranty shall be (at the discretion of Vadem) to refund the purchase price paid by Customer for any defective software products, or to replace any defective media with software which substantially conforms to applicable Vadem published specifications. - Page 156 Customer must be sent prepaid and packaged appropriately for safe shipment; obtaining insurance for packages is advisable. In the United States, if such products or parts are not shipped by Customer to arrive at Vadem within thirty (30) days from the date warranty service authorization is provided, Customer will pay Vadem the price of such product or part at the product’s then...
- Page 157 CONNECTION WITH THE SALE, INSTALLATION, MAINTENANCE, USE, PERFORMANCE, FAILURE, OR INTERRUPTION OF THIS PRODUCT, EVEN IF VADEM OR ITS AUTHORIZED RESELLER HAS BEEN ADVISED OF THE POSSIBILITY OF SUCH DAMAGES, AND LIMITS ITS LIABILITY TO REPLACEMENT OR REPAIR OF THE PRODUCT OR PART, OR REFUND OFTHE PURCHASE PRICE PAID, AT THE OPTION OF VADEM.
- Page 158 Clio User Manual...
-
Page 159: Vadem Software License Agreement
® VADEM AND PARAGRAPH , A DIVISION OF VADEM (hereafter collectively known as "Vadem") IS WILLING TO LICENSE THE USE OF THE SOFTWARE PRODUCTS DESCRIBED HEREIN ONLY UPON THE ACCEPTANCE BY LICENSEE (“you” or “your”) OF ALL OF THE TERMS CONTAINED IN THIS LICENSE AGREEMENT ("Agreement"). - Page 160 2. License Grant and Notices. Vadem and its licensors (if any) at all times shall retain exclusive ownership of the Software. Vadem hereby grants to you a personal, non-exclusive license to use the Software on a single System, and to make a single copy of the Software for archive purposes.
- Page 161 (90) days from the date you acquired the Software. Your sole remedy, for any breach of this warranty shall be, in Vadem's sole discretion: (i) to replace your defective media; or (ii) if the above remedy is impracticable, to refund the license fee you paid for the Software.
- Page 162 Vadem relating to the Software or the terms of its license to you, and may only be modified by written amendment signed by you and an authorized representative of Vadem.
-
Page 163: Gbsquare® Eula
® Appendix G BSQUARE EULA ® ® ® BSQUARE bFAX Pro and BSQUARE bUSEFUL Backup Plus and bREADY EULA IMPORTANT-READ CAREFULLY: This End User License Agreement ("EULA") is a legal agreement between you (either an individual or a single entity) and BSQUARE Corporation ("Manufacturer") the manufacturer of bFax Pro, bUSEFUL Backup Plus and bREADY (“SOFTWARE”). - Page 164 you transfer all of the SOFTWARE (including all component parts, the media, any upgrades or backup copies, and this EULA), and the recipient agrees to the terms of this EULA. If the SOFTWARE is an upgrade, any transfer must include all prior versions of the SOFTWARE. •...
- Page 165 THE END USER (INCLUDING, BUT NOT LIMITED TO, GENERAL, SPECIAL, CONSEQUENTIAL OR INCIDENTAL DAMAGES INCLUDING DAMAGES FOR LOSS OF BUSINESS PROFITS, BUSINESS INTERRUPTION, LOSS OF BUSINESS INFORMATION AND THE LIKE), ARISING FROM OR IN CONNECTION WITH THE DELIVERY, USE OR PERFORMANCE OF THE SOFTWARE. •...
- Page 166 Clio User Manual...
-
Page 167: Software Programs
Appendix H Software Programs Clio contains a variety of specially-developed applications. These software programs, developed by Vadem and its partners, are shown in the table below. TABLE H-1 Vadem Bundled Programs Program Description View and find contacts, calendar, tasks Vadem... - Page 168 The following table lists the Microsoft CE programs installed on Clio. These programs are stored in ROM and cannot be erased. Microsoft CE Programs TABLE H-2 Program Description Keep track of your appointments and cre- Calendar ate meeting requests. Contacts Keep track of your friends and col- leagues.
- Page 169 Glossary AC adapter A connector that provides external power (not battery power) to your device. See “Attaching to AC Power” on page 1-3 for information about installation and use. ActiveSync (formerly known as Windows CE Services) The desktop com- puter program used to synchronize, transfer, and manage data and files between your device and desktop computer.
- Page 170 data Information that is stored in any of your Windows CE program files. desktop computer A computer running Microsoft Windows 95/98 or Windows NT to which you connect your device. dial-up connection A connection between your device and a remote computer by means of a modem.
- Page 171 intranet A network designed for information sharing within a company or organization. IR (infrared) connection A connection between your device and another com- puter or device (such as a printer) by means of the IR port on each device. local folder A folder that is available only from the location in which it was created.
- Page 172 RAS (Remote Access Service) account A network account that enables your device to remotely access your corporate network. remote connection A connection between your device and a remote computer. You make a remote connection by using a modem or an Ethernet card. Remote Networking The Windows CE folder where you establish a dial-up connection between a mobile device and a remote computer.
- Page 173 1-28–1-29 bFAX Pro 6-10 components BSQUARE Publisher and Viewer 6-15 backlight control keys 1-2 Calligrapher 6-6 battery pack door 1-3 Vadem ViewFinder 6-2 display 1-2 bUSEFUL Backup Plus 6-12–6-14 external power port 1-2 Clio User Manual Index-1...
- Page 174 IR port 1-2 dialing icon 4-7 memory erase button 1-33 dialup connection to a modem 3-9 memory module cover 1-3 display 1-2–1-15 modem jack 1-2 adjusting 1-15 Notification LED/switch 1-2 backlight 1-11 notification LED/switch 1-7 keyboard mode 1-14–1-15 PC card ejector 1-3 tablet mode 1-15 PC card slot 1-3 display icon 4-8...
- Page 175 Microsoft Outlook Calendar 5-15 LED signals 1-7 Contacts 5-18 license agreement F-1 Microsoft Pocket Outlook 5-14 end user G-3 modem 1-20 limited warranty E-1 “Built-in modem on COM 5” 1-21 analog phone line only 1-20 modem jack 1-2 mail creating connection 3-12 disconnecting 3-12 network icon 4-8 downloading 3-12...
- Page 176 Screen contrast control key 1-2 screen contrast control keys 1-2 ScreenDraw mode, CalliGrapher 6-9 serial docking port 1-2 Vadem ViewFinder 6-2 serial/docking port 1-2 Vadem ViewFinder software license setting up Clio 1-1–1-33 agreement F-1 software license agreement F-1 ViewFinder 6-2 speaker 1-3...
- Page 177 volume and sounds icon 4-11 warranty, limited E-1 Windows CE 4-1–4-11 command bar 4-5 Internet Explorer 4-5 printing 4-6 start menu 4-4 taskbar 4-4 world clock 1-4 world clock icon 4-11 writing with Calligrapher 1-16 Clio User Manual Index-5...
- Page 178 Index-6 Clio User Manual...
- Page 179 VADEM 1960 Zanker Road San Jose, CA 95112 408-467-2100 Technical Support: web: http://www.vadem.com email: custsupport@vadem.com phone: 1-888-GO-VADEM...
Need help?
Do you have a question about the Clio C-1050 Series and is the answer not in the manual?
Questions and answers