Table of Contents
Advertisement
Quick Links
Download this manual
See also:
User Manual
Advertisement
Table of Contents

Related Manuals for Kramer TP-581T


Summary of Contents for Kramer TP-581T
- Page 1 Kramer Electronics, Ltd. Preliminary USER MANUAL Models: TP-581T, HDMI Line Transmitter TP-582T, HDMI Switcher/Line Transmitter TP-582R, HDMI Line Receiver DA...
-
Page 2: Table Of Contents
Figure 7: Connecting the Contact Closure Remote Control PINs Figure 8: TP PINOUT Tables Table 1: TP-581T HDMI Line Transmitter Features Table 2: TP-582T HDMI Switcher/Line Transmitter Features Table 3: TP-582R HDMI Switcher/Line Receiver Features Table 4: Technical Specifications of the TP-581T, TP-582T and TP-582R... -
Page 3: Introduction
Introduction Introduction Welcome to Kramer Electronics! Since 1981, Kramer Electronics has been providing a world of unique, creative, and affordable solutions to the vast range of problems that confront the video, audio, presentation, and broadcasting professional on a daily basis. In recent years, we have... -
Page 4: Quick Start
Getting Started Quick Start This quick start chart summarizes the basic setup and operation steps. KRAMER: SIMPLE CREATIVE TECHNOLOGY... -
Page 5: Overview
Two RJ-45 CAT 5 output connectors: one for the line output and the other for the Ethernet input 1 Since the TP-581T has only one input, it does not have the input selection control which the TP-582T has (that is, contact closure, IR and front panel input selection) -
Page 6: About Hdbaset™ Technology
Momentary remote contact closure for input switching Front panel input select button IR remote control input switching (via the Kramer IR remote control transmitter) Front-panel input selection The TP-582R HDMI Line Receiver DA also features: ... -
Page 7: Recommendations For Achieving The Best Performance
European Advanced Recycling Network (EARN) and will cover any costs of treatment, recycling and recovery of waste Kramer Electronics branded equipment on arrival at the EARN facility. For details of Kramer’s recycling arrangements in your particular country go to our recycling pages at http://www.kramerelectronics.com/support/recycling/. -
Page 8: Your Hdmi Line Transmitters/Receiver
Your TP-581T HDMI Line Transmitter Figure 1 Table 1 define the TP-581T: Figure 1: TP-581T HDMI Line Transmitter Table 1: TP-581T HDMI Line Transmitter Features Feature Function Connects to the CAT 5 IN RJ-45 connector on the TP-582R LINE OUT RJ-45 Connector... -
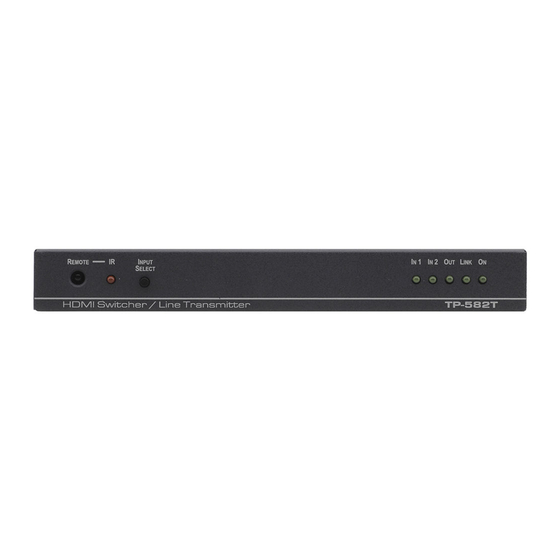
Page 9: Your Tp-582T Hdmi Switcher/Line Transmitter
Connects to an RS-232 port 5V DC +5V DC connector for powering the unit REMOTE IR Sensor Senses commands from the Kramer IR remote control device 10 IR LED Lights when an infrared signal is detected 11 INPUT SELECT Switch... -
Page 10: Your Tp-582R Hdmi Line Receiver Da
Table 3: TP-582R HDMI Switcher/Line Receiver Features Feature Function LINE IN RJ-45 Connector Connects to the CAT 5 OUT RJ-45 connector on the TP-581T or TP-582T HDMI OUT 1 Connector Connects to the HDMI acceptor 1 HDMI OUT 2 Connector... -
Page 11: Connecting The Tp-581T, Tp-582T And Tp-582R
8. Connect the 5V DC power adapter to the power socket and connect the adapter to the mains electricity (not shown in Figure 1 On the TP-581T, connect the HDMI IN connector to the HDMI source 2 There is no HDMI IN 2 connector for the TP-581T... -
Page 12: Connecting The Tp-582R
Connecting the TP-581T, TP-582T and TP-582R Connecting the TP-582R To connect the TP-582R as shown in the example in Figure 4, do the following: 1. Connect the HDMI OUT 1 connector to the first HDMI acceptor (for example, LCD display 1). -
Page 13: Figure 4: Connecting The Tp-582T/Tp-582R Transmitter/Receiver
Connecting the TP-581T, TP-582T and TP-582R Figure 4: Connecting the TP-582T/TP-582R Transmitter/Receiver... -
Page 14: Controlling The A/V Equipment Via An Ir Transmitter
Figure 5: Controlling a DVD Player via the TP-582R 1 That is used for controlling a peripheral device (for example, a DVD player). The Kramer IR remote control transmitter supplied with the TP-582 is used to select the inputs of the machine 2 P/N: 95-0104050 3 P/N: C-A35/IRE-10;... -
Page 15: Figure 6: Controlling An Lcd Display Via The Tp-582T
Connecting the TP-581T, TP-582T and TP-582R Figure 6 illustrates how to control the LCD display via the TP-581T/TP-582T. Figure 6: Controlling an LCD Display via the TP-582T... -
Page 16: Controlling The Tp-582T Via The Remote Terminal Block Connector
Connecting the TP-581T, TP-582T and TP-582R Controlling the TP-582T via the REMOTE Terminal Block Connector The contact closure remote control pins operate in a similar way to the INPUT SELECT button. Using the contact closure remote control you can select the HDMI input. To do so, momentarily connect the required input... -
Page 17: Wiring The Rj-45 Connectors
Connecting the TP-581T, TP-582T and TP-582R Wiring the RJ-45 Connectors This section defines the TP pinout, using a straight pin-to-pin cable with RJ-45 connectors. Note, that the cable Ground shielding must be connected / soldered to the connector shield. Figure 8: TP PINOUT... -
Page 18: Acquiring The Edid
Connecting the TP-581T, TP-582T and TP-582R Acquiring the EDID To acquire the EDID, connect the transmitter and receiver system as described Section Once the power is connected, the system acquires the EDID according to the following priorities: If only one output is connected, the EDID will be acquired from that output ... -
Page 19: Technical Specifications
Technical Specifications Technical Specifications Table 4 includes the technical specifications Table 4: Technical Specifications of the TP-581T, TP-582T and TP-582R TP-581T TP-582T TP-582R INPUTS: 1 HDMI connector 2 HDMI connectors 1 RJ-45 connector 1 remote contact closure on a terminal block... -
Page 20: Default Edid
Modeline...."1280x720" 74.250 1280 1390 1430 1650 720 725 730 750 +hsync +vsync Detailed timing #4..720x480p at 60Hz (16:10) Modeline...."720x480" 27.000 720 736 798 858 480 489 495 525 -hsync -vsync CE video identifiers (VICs) - timing/formats supported KRAMER: SIMPLE CREATIVE TECHNOLOGY... - Page 21 Default EDID 1920 x 1080p at 60Hz - HDTV (16:9, 1:1) 1920 x 1080i at 60Hz - HDTV (16:9, 1:1) 1280 x 720p at 60Hz - HDTV (16:9, 1:1) [Native] 720 x 480p at 60Hz - EDTV (16:9, 32:27) 720 x 480p at 60Hz - EDTV (4:3, 8:9) 720 x 480i at 60Hz - Doublescan (16:9, 32:27) 720 x 576i at 50Hz - Doublescan (16:9, 64:45) 640 x 480p at 60Hz - Default (4:3, 1:1)
- Page 22 KRAMER: SIMPLE CREATIVE TECHNOLOGY...
- Page 23 For the latest information on our products and a list of Kramer distributors visit www.kramerelectronics.com where updates to this user manual may be found. We welcome your questions, comments and feedback. Safety Warning: Disconnect the unit from the power supply before opening/servicing.
Need help?
Do you have a question about the TP-581T and is the answer not in the manual?
Questions and answers