ETC ColorSource User Manual
Color changer and power supply
Hide thumbs
Also See for ColorSource:
- User manual (70 pages) ,
- Quick manual (5 pages) ,
- Manual (3 pages)
Table of Contents
Advertisement
Quick Links
Advertisement
Table of Contents

Related Manuals for ETC ColorSource


Summary of Contents for ETC ColorSource
- Page 1 User Manual...
-
Page 2: Table Of Contents
Color Changer and Power Supply User Manual Software version 1.011 Contents Introduction ..................5 The ColorSource System ..............6 Using ColorSource ................7 ColorSource components ..............8 Color Changer ................8 Gelstring ..................8 Power Supply ................9 Cables ..................9 Installing ColorSource .............. - Page 3 Electronic Theatre Controls, Inc.
-
Page 4: Introduction
Introduction The ColorSource system includes a scrolling Color Changer and Power Supply. Its ten-color capacity and DMX512 compatibility makes it economical and versatile, particularly for designers with limited budget and space. The lightweight Color Changer slides easily into the gel frame holder of the light fixture and the compact 12 output Power Supply attaches easily to the truss of the lighting rig or in a 19 inch rack. -
Page 5: The Colorsource System
The ColorSource system The ColorSource system consists of one or more ColorSource Color Changers and a ColorSource Power Supply which can power and control up to 12 scrolling Color Changers. The DMX512 control signal from the lighting board is connected to the power supply and can continue on to more ColorSource power supplies or other DMX512 controlled devices. -
Page 6: Using Colorsource
Supply. The following chart shows the level settings that correspond with each frame position, and the color of that frame, if you are using the standard ColorSource gelstring. If you are using a custom gelstring, of course, the colors are different, but the channels and frames are the same. -
Page 7: Colorsource Components
ColorSource components Color Changer The ColorSource Color Changer holds a ten color gelstring. A signal from the power supply controls the position of the gelstring. Low voltage AC from the Power Supply provides power to the Color Changer. This control signal and the low voltage AC power are both supplied by the single cable connecting the Color Changer to the Power Supply. -
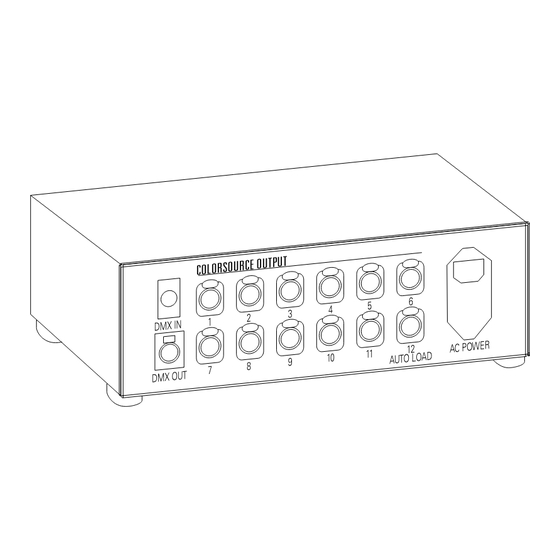
Page 8: Power Supply
Power Supply controls Cables A ColorSource cable connects each Color Changer to one of the 12 Power Supply outputs and provides the Color Changer with power and control signal. A DMX512 cable connects the Power Supply to a DMX512 signal source, usually a lighting control... -
Page 9: Installing Colorsource
Installing ColorSource To get your ColorSource system up and running, follow these hookup and checkout procedures. 1. Attach the Color Changer to the lamp Slide the Color Changer’s mounting plate into the gel frame holder of your lamp and lock the gel frame retention clip. - Page 10 Hint: Hold down [+] or [–] to scroll through the channels quickly Note: The Power Supply automatically senses the number of dimmers transmitted by the lighting console and won’t allow you to set the DMX512 channels outside this range. ColorSource User Manual...
-
Page 11: Mounting The Power Supply
The Power Supply comes with four sturdy rubber feet installed, allowing you to set it on any stable flat surface. If you wish, bracket kits are available from ETC that allow you to hang the Power Supply from a pipe, or install it into a rack. The following instructions explain how to use both kits. -
Page 12: Installing Pipe Mount Brackets On The Power Supply
Installing pipe mount brackets on the Power Supply To install pipe mount brackets on your ColorSource Power Supply, follow these steps. 1. Unplug the power cord from the Power Supply. 2. Place the Power Supply upside down on a flat surface. -
Page 13: Replacing A Gelstring
Remove old gelstring Left roller (trailer/frame 10) 1. Place the Color Changer on a flat surface with the ColorSource logo facing up. The power/signal cable connector should be Right roller facing you, with the cable connecting it to output 12 on the (leader/frame 1) Power Supply (labeled AUTOLOAD). - Page 14 Channel Display screen. 17. Replace the front panel and tighten the thumbscrews securely. The gelstring is now loaded onto the ColorSource Color Changer. If the gelstring colors did not center properly at the zero and full positions, remove the gelstring (see previous page) and repeat the Autoload process until they center properly.
-
Page 15: Replacing The Mounting Plate
Follow these steps to replace the mounting plate. 1. Place the Color Changer on a flat surface, with the ColorSource logo face down. 2. Unscrew the four screws that hold the current mounting plate 3. -
Page 16: Specifications
XLR Pin # Wire Color Function Black Transformer center tap Transformer secondary Brown Transformer secondary Green Signal ground White Signal 0 - 10 Vdc --------- No connection Note: Maximum cable length of 100 feet to each ColorSource Color Changer. ColorSource User Manual... -
Page 17: Parts List
CS ....ColorSource Color Changer ColorSource Color Changers are supplied with an installed ten color gelstring and a mounting plate. To specify the type of gelstring and mounting plate to be supplied with a ColorSource Color Changer, add the following suffixes to the catalog number. -
Page 18: Custom Gelstring Order Form
Custom ColorSource gelstring Any combination of color filter manufacturer’s gels can be combined to create a custom ColorSource gelstring. Please specify using the following format. Specify: (L) Lee, (G) GAM, (R) Rosco with the color number and the color name. - Page 19 Electronic Theatre Controls North America 3030 Laura Lane • Middleton, Wisconsin 53562 • USA • Tel: (+1) 608 831 4116 • Fax: (+1) 608 836 1736 Asia Room 1619-20 • 16/F Metro Centre II • 21 Lam Hing Street • Kowloon Bay • Hong Kong • Tel: (+852) 2799 1220 • Fax: (+852) 2799 9325 Home Page http://www.etcconnect.com •...
Need help?
Do you have a question about the ColorSource and is the answer not in the manual?
Questions and answers