
Related Manuals for 2easy DT24


Summary of Contents for 2easy DT24
- Page 1 DT24 USER MANUAL(EN) 2-Wire Video Intercom System Read this manual carefully before using the product, and keep it well for future use.
-
Page 3: Parts And Function
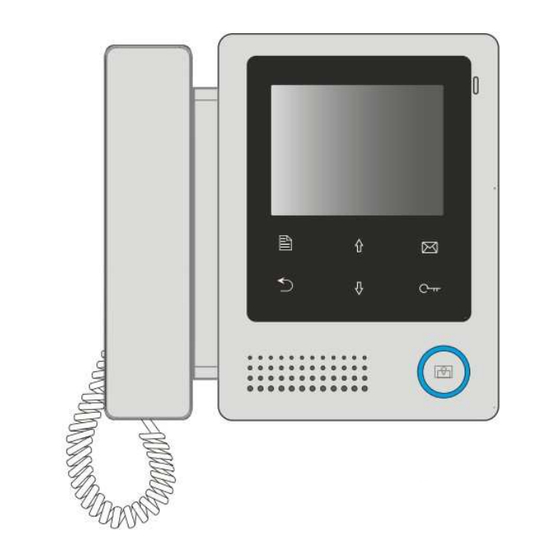
Introduction The monitor is designed with 4 inch screen, it provides a resolution of 320x240 pixels with high quality image display, and it equipped with a handset to com- municate. The touch sensitive button makes the operation more easily. Parts and Function Microphone Mounting Hook LCD Screen... -
Page 4: Unit Mounting
Unit Mounting Accessory contents: Accessories include a Bracket, two 4X25 screws (use to fasten the Mounting Bracket), 2 wire connectors (use to connect with Monitor). Installation steps: Installation height for indoor monitor usually is 145~160cm(refer to sketch map). Wire the cable correctly(see the later connection chapter) then hang the Monitor on the Mounting Bracket firmly. - Page 5 • Pick up handset to talk with the visitor, the talking duration time is 90s. To end the conversation, please hand up the handset. If the system connects two or more Monitors, pick up any Monitor, the others will be automatically shut off.
-
Page 6: Ring Tone Setting
swers the call, conversation is started.and the other monitors will stop ringing at the same time. (Note:the user code of all monitors must be same.) Direct Call Guard unit: A Monitor can be assigned as Guard Unit Monitor; when the Guard Unit Monitor answers the call, conversation with the guard person is started.. -
Page 7: Monitor Time Setting
Monitor Time Setting Monitor Time Select Select Manual Monitor item on main menu page, then select Monitor Current : 01min Time Set... item. Use button to increase / decrease the value, press MENU button to confirm and return Cancel Save&Exit Last/Next last page. - Page 8 Step1 Step2 Step3 Code Number:[0000] Main Menu H/W : [0010]:Remove remote [0011]:Add remote Monitor ... S/W: Local addr: Manual Monitor Unlock timing: [8000]:Master 0 [8001]~[8003]:Slaver 1~3 Intercom Unlock2 select: Video standard: User Setup Language: [8004]:Guard unit [8005]:Not guard unit Close [8006]:Panel on as slaver called [8007]:Panel off Exit [8010]:Unlock mode 0...
- Page 9 2 locks control: The monitor can be set to control 2 locks while you should set the unlock2 item to “on “ state. The code number of 8015 is used to set the unlock2 off that it can only control one lock.
- Page 10 Note: 1. the monitor can only support 4 languages. English,French,Spanish and German are default.But you can customize any 4 languages by yourself. 2. we reserve the copyright to add languages without notice to users. How to set the address for monitor Each monitor should be assigned an address in the system, total 32 address- es can be configured, the code number of 8200 to 8231 is used to controlled the address of 00 to 31.
-
Page 11: Specification
Specification: • Power Supply: DC 24V • Power Consumption: Standby 6mA; Working status 194mA • Monitor Screen: 4 Inch color LCD • Display Resolutions: 320(R, G, B) x 240 pixels • Video Signal: 1Vp-p, 75 , CCIR standard • Wiring: 2 wires, non-polarity •... - Page 12 The design and specifications can be changed without notice to the user. Right to interpret and copyright of this manual are preserved. DT-ENG-DT24-V1 P120924...
Need help?
Do you have a question about the DT24 and is the answer not in the manual?
Questions and answers