2easy 2-wire Series Installation And User Manual
Wifi/ip
Hide thumbs
Also See for 2-wire Series:
- Manual (17 pages) ,
- Technical manual (30 pages) ,
- Technical manual (26 pages)

Related Manuals for 2easy 2-wire Series


Summary of Contents for 2easy 2-wire Series
- Page 1 2 WIRE HOME WiFi/IP SYSTEM DX471-TD7 7" COLOR WiFi/IP MONITOR DX-471 Video Door System WIFI/IP/ 2-wire Series Installation and User Manual Image Recording Touch Screen Monitor www.intelligenthomeonline.com...
- Page 2 PRECAUTIONS ● Read this manual through before using the product ● Slots or openings in the back of the monitor, are provided for ventilation and to ensure reliable operation of the video monitor or equipment and to protect if from overheating. These openings must not be blocked or covered.
-
Page 3: Table Of Contents
Content 1.Parts and Functions ..........1 2.Mounting .............2 3.Main Menu ............3 4. Answering a Call ..........5 5. Zoom Pan&Tilt...........6 6.Manual Monitoring ..........6 7.Call Another Room or Apartment (Intercom) ..8 8.View Call Records ..........10 9.Operating a Light ..........11 10.Don’t Disturb Function ........12 11.Settings .............13 Enter settings .............13... -
Page 4: Parts And Functions
1. Parts and Functions Touch Screen Power/ Don’t Disturb Indicator Speaker Microphone Talk/Mon Button Unlock Button RING 1 2 3 4 5 6 Connection P ort SD Card Slot, WIFI Adaptor Key Functions Speaker To listen the visitors Press for hands free communication with visitors Talk/Mon button Press to view the doorbell in standby mode LCD screen... -
Page 5: Mounting
Terminals Description SW+,SW-: Extra Door Bell button connection port Ring,GND: Extra Ringer RING connection port 1 2 3 4 5 6 POW,GND: 12~16V extra power connection port DIP switches: Set the address of USB-Wi-Fi adaptor monitor DIP 1~DIP5: User Code •... -
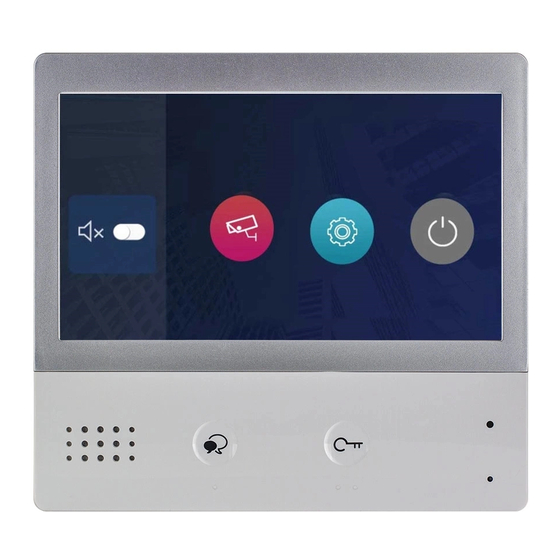
Page 6: Main Menu
3. Main Menu When you power-up a monitor for the first time, give it 20 sec to boot. Touch screen will be not responsive whilst booting. When Power LED stopped flashing- booting has been finished. Touch Unlock button, or touch anywhere on the screen of monitor in standby and Main menu will appear as follows: Monitor Intercom... - Page 7 Icon Meaning Description WiFi connection active but not connected WiFi connection disabled Touch to enter WiFi setting interface - shortcut WiFi connection active and configured While Talking with a Door Station Shows status of talking, unlocking Displays which door station etc.
-
Page 8: Answering A Call
4. Answering a Call 1. Touch to answer the call 00:10 Door Station1 Touch again to end the call 2. If necessary, during the call, touch to display audio/video adjustment icons 3. Touch to record image/ video manually 4. Touch icons to adjust the parameters you want 00:10 Door Station1... -
Page 9: Zoom Pan&Tilt
5. Zoom Pan&Tilt If want to see greater details of visitors,move to the desired position by touching on the screen to view the image in Zoom Pan&Tilt mode 1. Touch to activate zoom pan&tilt 00:10 Door Station1 function 6. Manual Monitoring Touch to select Door Station/s or CCTV cameras if installed for manual monitoring function even when nobody rung the bell 1. - Page 10 2. Touch to activate desired camera 3. Touch “>” (to display in sequence) all other cameras 4. Touch to return to the previous page 5. Touch to activate specified camera - shortcut 6. If camera belongs to the Door Station, touch to activate 00:10 Door Station 2 Audio if needed Touch again to return to...
-
Page 11: Call Another Room Or Apartment (Intercom)
7. Call Another Room or Apartment (Intercom) It is possible to communicate with another monitor if multiple monitors installed in House system or with another apartment in Apartments system 1. Touch to display available Intercom options 2. Touch Intercom by Namelist: to a specific room only 3. - Page 12 4. Touch to Intercom with another room via Inner Call: all other Intercom Intercom Namelist monitors will ring Inner Call Guard Station Input Numbers 5. Touch to Intercom with Guard Station- concierge (apartments Intercom Intercom Namelist system only) Inner Call Guard Station Input Numbers 6.
-
Page 13: View Call Records
7. Type in numbers, then OK. For example 02 will call the monitor with 02 _ Address (User Code) 2 Note: Call from Door Station has a priority and will cancel Intercom call in progress 8. View Call Records Power indicator turned red and flashing- there are some missed calls 1. -
Page 14: Operating A Light
100 images from Door Station will be automatically recorded on internal memory 3. Touch to scroll to a next image 1/223 4. Touch to delete the image [2017/09/16 09:50] Door Station 1 9. Operating a Light This function is available only when actual security light is connected with an additional RLC Interface 1. -
Page 15: Don't Disturb Function
10. Do Not Disturb Function Do Not Disturb function will set the monitor to not react to door station or other monitors calls 1. Touch Call Scene 2. Touch to set Don’t disturb mode: Don’t Disturb 8H or Call Scene Don’t Disturb Always Call Scene Normal... -
Page 16: Settings
11. Settings Enter setting page 1. Touch to enter Setting Setting Call Tune Ring volume [04] General Door1 calling tune [01] Installer Door2 calling tune [01] Wireless Door3 calling tune [01] About Door4 calling tune [01] 2. Touch icons for desired customization, choosing amongst: Ring volume -Door1 calling tune -Door2 calling tune -Door3 calling tune -Door4 calling tune Call Tune -Doorbell calling tune -Intercom calling tune -Inner Call calling tune -Guard Call calling tune... -
Page 17: Ring Tone Settings
Ring Tone Settings If system has more that one Door Bell the ring tones can be set individually to distinguish different calling sources. There are 22 tones to choose from Scroll to next page 1. Select Call Tune Setting Call Tune Ring volume [04] 2. - Page 18 Date and Time Settings The current date and time can be modified here Setting Date time set Call Tune Date and time General Date mode: MM_DD_YYYY General Language Time mode: HOUR_12 Installer Monitor time Date: xxxx_xx_xx Wireless Shortcut setting Time: xx:xx About SD card 1. Select Date and Time 2.
- Page 19 Monitoring Time Settings The monitoring time can be changed at any time. It’s available to set 30s, 60s, 90s, 120s, 150s, 180s, 210s, 240s, 270s, 300s * 30s is the default Setting Monitor time select Call Tune Date and time General 30(s) General...
- Page 20 SD Card Maximum 32GB micro SD card can be installed to enable records of 10s video clips Setting SD Card Call Tune Date and time General SD information General Language Copy image Installer Monitor time Firmware Update Wireless Shortcut setting About SD card 1.
-
Page 21: Date And Time
Multiple Monitors System for a House DX-471 monitor: maximum 3 x DT 2-wire series monitors can be added and up to 5 x smart phones A ll additional DT monitors have to be programmed as Slave 1, Slave 2 , Slave 3... - Page 22 DIP SWITCH TABLES FOR 32 USER CODES/ADDRESS Tables can be found in Installer Settings. Program via DIP switches on the back of monitor Setting Call Tune Current address [00] General Intercom enable Enable Installer FW upgrade Wireless System setting About -19-...
- Page 23 Enabling/Disabling Intercom Function It is possible to enable/disable the intercom function Setting Intercom enable Call Tune Current address [00] Installer Disable General Intercom enable Enable Enable Installer FW upgrade Wireless System setting About *Intercom function is enabled by default Software Upgrade It’s available to upgrade the device software via SD card when upgrade become available.
-
Page 24: Wireless Settings
Wireless Settings WiFi/IP DX-471 video monitor can divert call to your smart phones and tablets. It connects to the Internet via WiFi Step 1 : connect your monitor to the Internet SD card WIFI adaptor Wi-Fi monitor DX - 471 3P-USB cable for FW updating Local WiFi Settings... - Page 25 PWD: vtk_ 7. Enter the password (if required) 8. Touch Connect SSID: VTKAP03 Wireless PWD: vtk@123 Connect/Disconnect Icon Meaning Description WiFi connection active but not connected WiFi connection disabled Touch to enter WiFi setting interface - shortcut WiFi connection active and configured Step 2: Choose Divert Type...
-
Page 26: The App
Call Scene Call Scene Normal Use No Disturb 8H No Disturb Always Divert Call If No Answer Divert Call Always Divert Call If No Answer: When Door Station called and call is not answered within 30s, the system will divert the call to a smart phone Divert Call Always: When Door Station called, call diverts to smart phone immediately STEP 3: Download VDP Connect APP... -
Page 27: Surveillance Via App
Door station surveillance via VDP CONNECT APP On VDP CONNECT APP, press on the icon and wait for a few seconds. If the system have multiple door stations,you can switch to view the door station you want. Push PTT icon to talk, or push unlock icon to open the door GATE -24-... -
Page 28: Sip Tools
SIP Tools SIP tools could test divert function and with an unattended door station 1. Touch to enter the ‘SIP tools’ page Wireless Call Tune Wifi switch [ON] General Wlan setting Installer Wireless device regist [00] Wireless SIP config About SIP tools 2. - Page 29 IPC Setting Function to add IP CCTV cameras Setting IPC Setting Call Tune Current address [01] Installer Add IPC by searching General Intercom enable Enable Add IPC by manual Installer IPC Setting IPC list Wireless Monitor list man IPC DHCP [Enable] About System settings...
- Page 30 IPC monitor IPC monitor IPC edit [192.168.xxx.xxx] Her oSpeed IPC edit [192.168.xxx.xxx] HeroSpeed IPC delete IPC delete Touch to enter ‘Delete IP camera’ 3. Touch to confirm delete you can either enable or disable the IP CCTV Cameras IPC DHCP: IPC Setting IPC DHCP Installer...
- Page 31 About 1. Touch to enter ‘About’ page Setting Call Tune Device Type: DX471 General S/W Ver: V1.0.0.171110111114 Installer Serial No: 040019b93333 Wireless Node ID: About IP Address: 192.168.01.100 linked Device Type: the device name S/W Ver: the software version Serial No: the device serial number Node Id: Node ID number IP Address: the device IP address H/W Address: the device Mac address...
-
Page 32: Specifications
16. Specifications ● Power supply: DC 20~28V ● Power consumption: Standby 1.8W; Working 8.16W ● Monitor screen: 7 Inch digital colour TFT ● Display Resolutions: 800*3(R, G, B) x 480 pixels ● Video signal: 1Vp-p, 75Ω, CCIR standard ● Wiring: 2 wires, no-polarity ● Dimensions: H161×W174×D22mm -29-... - Page 33 WARRANTY CARD NB Please keep this document safe, as it is proof of your Warranty Your Video door system comes with a one year Manufacturers Warranty. When used normally, the following services are offered: The following actions will void the Warranty: 1.
- Page 34 DX-471 WiFi/IP Right to interpret and copyright of this manual are preserved www.intelligenthomeonline.com -18-...
Need help?
Do you have a question about the 2-wire Series and is the answer not in the manual?
Questions and answers