Table of Contents
Advertisement
Quick Links
RTA1320 ADSL Router
User's Manual
Rev: 1.0
2005/2/1
No part of this publication may be reproduced in any form by any means without the prior written permission. Other
trademarks or brand names mentioned herein are trademarks or registered trademarks of their respective companies.
This manual currently suits for RTA1320.
Advertisement
Table of Contents

Subscribe to Our Youtube Channel
Related Manuals for NetComm RTA1320


Summary of Contents for NetComm RTA1320
- Page 1 No part of this publication may be reproduced in any form by any means without the prior written permission. Other trademarks or brand names mentioned herein are trademarks or registered trademarks of their respective companies. This manual currently suits for RTA1320.
- Page 2 Safety Notes Use only the type of power source indicated on the marking labels. For Installation Use only power adapter supplied with the product. Do not overload wall outlet or extension cords as this may increase the risk of electric shock or fire. If the power cord is frayed, replace it with a new one. Proper ventilation is necessary to prevent the product overheating.
-
Page 3: Table Of Contents
Contents Contents Before You Use ..................vii Features ......................vii Unpacking .......................viii Subscription for ADSL Service................ix Chapter 1....................1 Physical Outlook ....................1 Front Panel ....................1 Rear Panel ....................2 Chapter 2....................3 Choosing a place for the ADSL Router ..............3 Connecting the ADSL Router................. - Page 4 ADSL Router User Manual Internet Connection ................33 Traffic Statistics..................33 DHCP Table.................... 33 Routing Table ..................34 ARP Table ....................34 Advanced ......................35 Local Network- IP Address ............... 35 Local Network - DHCP Server ..............35 Local Network – UPnP................37 Internet-Connections Setting..............
- Page 5 Contents...
- Page 6 ADSL Router User Manual...
-
Page 7: Before You Use
Before You Use Before You Use Thank you for choosing the Asymmetric Digital Subscriber Line (ADSL) Router. With the asymmetric technology, this device runs over standard copper phone lines. In addition, ADSL allows you to have both voice and data services in use simultaneously all over one phone line. The ADSL Router is designed to offer cost-effective high-speed services for home or office users. -
Page 8: Unpacking
ADSL Router User Manual OAM F4/F5 End-to-End/Segment Loopback Cells Bridging Features Supports self-learning bridge specified in IEEE 802.1D Transparent Bridging Supports up to 4096 learning MAC addresses Transparent Bridging among 10/100 Mb Ethernet and USB Routing Features NAT (Network Address Translation) / PAT (Port Address Translation) let multiple users on the LAN to access the internet for the cost of only one IP address. -
Page 9: Subscription For Adsl Service
ADSL Router User Manual RJ-11 ADSL Line Cable RJ-45 Ethernet Cable Quick Start Guide Driver & Utility Software CD Subscription for ADSL Service To use the ADSL Router, you have to subscribe for ADSL service from your broadband service provider. According to the service type you subscribe, you will get various IP addresses: Dynamic IP: If you apply for dial-up connection, you will be given an Internet account with username and password. - Page 10 ADSL Router User Manual...
-
Page 11: Chapter 1
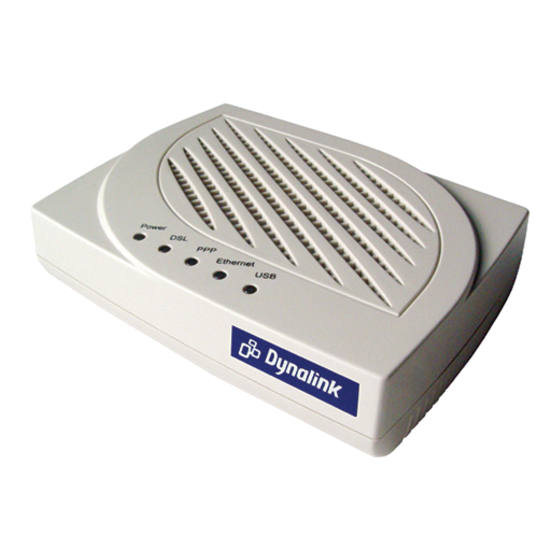
Chapter 1: Overview Chapter 1 Overview This chapter provides you the description for the LED and connector for front and rear view of the router. Before you use/install this router, please take a look at this information first. Physical Outlook Front Panel The following illustrations show the front panel of the ADSL Router: LED Indicators... -
Page 12: Rear Panel
ADSL Router User Manual Rear Panel The following figures illustrate the rear panel of your ADSL Router. Connector Description RJ-11 connector Ethernet RJ-45 connector Ethernet Power switch 9VAC Power connector 9VAC... -
Page 13: Chapter 2
Chapter 2: Installation Chapter 2 Installation Choosing a place for the ADSL Router Place the ADSL Router close to ADSL wall outlet and power outlet for the cable to reach it easily. Avoid placing the device in places where people may walk on the cables. Also keep it away from direct sunlight or heat sources. - Page 14 ADSL Router User Manual Connect the supplied power adapter to the PWR port of your ADSL Router, and plug the other end to a power outlet. Turn on the power switch.
-
Page 15: Chapter 3
Chapter 3:Configuration Chapter 3 Configuration In order to access the Internet through the router, each host on your network must install/setup TCP/IP. Please follow the steps below for select a network adapter. Setting TCP/IP on Client PC To access the ADSL Router via Ethernet, the host computer must meet the following requirements: With Ethernet network interface. -
Page 16: For Windows 98
ADSL Router User Manual For Windows 98 Click on the Start menu, point to Settings and click on Control Panel. Double-click the Network icon The Network window appears. On the Configuration tab, check out the list of installed network components. Option 1: If you have no TCP/IP protocol, click Add. - Page 17 Chapter 3: Configuration On the left side of the windows, highlight Microsoft and then select TCP/IP on the right side. Then click OK When returning to Network window, highlight TCP/IP protocol for your NIC and click Properties. On IP Address tab: Enable Specify an IP address option.
- Page 18 ADSL Router User Manual When returning to Network window, click Wait for Windows copying files. When prompted with System Settings Change dialog box, click Yes to restart your computer.
-
Page 19: For Windows Me
Chapter 3: Configuration For Windows ME 1. Click on the Start menu, point to Settings and click on Control Panel. 2. Double-click the Network icon. 3. The Network window appears. On the Configuration tab, check out the list of installed network components. Option 1: If you have no TCP/IP protocol, click Add. -
Page 20: For Windows Nt
ADSL Router User Manual window, click OK. 9. Wait for Windows copying files. 10. When prompted with the System Settings Change dialog box, click Yes to restart your computer. For Windows NT 1. Click Start, point to Settings, and then click Control Panel. - Page 21 Chapter 3: Configuration 4. Highlight TCP/IP Protocol and click 5. Click Yes to use DHCP. 6. Insert the Windows NT CD into your CD-ROM drive and type the location of the CD. Then click Continue. 7. Returning to the Network window, you will find the TCP/IP Protocol among the list.
- Page 22 ADSL Router User Manual Enable Specify an IP address option. Enter the IP Address: 10.0.0.x (x is between 1 and 100) and Subnet Mask: 255.255.255.0 and Default Gateway: 10.0.0.138 as in figure below. 10. 0. 0. 100 10. 0. 0. 138 When returning to Network window, click Close.
-
Page 23: For Windows 2000
Chapter 3: Configuration For Windows 2000 From the Start menu, point to Settings and then click Network and Dial-up Connections. Right-click the Local Area Connection icon and then click Properties. On the General tab, check out the list of installed network components. Option 1: If you have no TCP/IP Protocol, click Install. - Page 24 ADSL Router User Manual Highlight Protocol and then click Add. Click Internet Protocol (TCP/IP) and then click OK. When returning to Local Area Connection Properties window, highlight Internet Protocol (TCP/IP) and then click Properties. Under the General tab, enable Use the following IP Address.
-
Page 25: For Windows Xp
Chapter 3: Configuration For Windows XP From the Start menu, point to Control Panel and then click Network and Internet Connections. Click Network Connection and then click Properties. Click Network Connection and then click Properties.3. On the General tab, check out the list of installed network components. -
Page 26: Configure Pc To Get Ip Address From Dhcp
ADSL Router User Manual Configure PC to get IP address from DHCP If your ADSL Router operates as a DHCP server for the client PCs on the LAN, you should configure the client PCs to obtain a dynamic IP address. Please follow the previous section to install TCP/IP component. -
Page 27: For Windows Nt
Chapter 3: Configuration For Windows NT On the IP Address tab, click on the drop-down arrow of Adapter to select required adapter. Enable Obtain an IP address from a DHCP server and then click OK.. When prompted with the message below, click Yes to continue. - Page 28 ADSL Router User Manual...
-
Page 29: For Windows Xp
Chapter 3: Configuration For Windows XP On the IP Address tab, select Obtain an IP address automatically. Then click OK. Renew IP Address on Client PC There is a chance that your PC does not renew its IP address after the ADSL Router is on line and the PC cannot access the Internet. -
Page 30: For Windows Nt
ADSL Router User Manual For Windows NT 1. Select Run from the Start menu. 2. Type cmd in the dialog box and the click 3. Type ipconfig at prompt. Then you will see the IP information from DHCP server. 4. If you want to get a new IP address, type ipconfig /release to release the previous IP address and then type ipconfig /renew to get a new one. -
Page 31: For Windows 2000
Chapter 3: Configuration For Windows 2000 1. From the Start menu, point to Programs, Accessories and then click Command Prompt. 2. Type ipconfig at prompt. Then you will see the IP information from DHCP server. 3. If you want to get a new IP address, type ipconfig /release to release the previous IP address and then type ipconfig /renew to get a new one. -
Page 32: Chapter 4
Chapter 4: Web Configuration Chapter 4 Web Configuration Using Web-Based Manager Once your host PC is properly configured, please proceed as follows: 1. Start your web browser and type the private IP address of the ADSL Router in the URL field: 10.0.0.138. 2. -
Page 33: Outline Of Web Manager
Chapter 4: Web Configuration Outline of Web Manager For configure the web page, please use Admin as the username and the password. The main screen will be shown as below. Title: It indicates the title of this management interface. Main Menu: Includes Quick Start, Status, Advanced, and Management. -
Page 34: Quick Start
ADSL Router User Manual Quick Start Quick Setup The quick setup wizard will guide you to configure the DSL router through some steps. VPI (Virtual Path Identifier): 8. VCI (Virtual Channel Identifier): 48. After finished entering the VPI/VCI value, please click Next for next step Connection Type After clicking on the Next button from the VPI/VCI web page, the following screen will... - Page 35 Chapter 4: Web Configuration PPP Username: Type in the username that you got from your ISP. PPP Password: Type in the password that you got from your ISP. Always On: Check this button to make the connection is always active. Please type the username and password that you got from your ISP.
-
Page 36: Ip Over Atm
ADSL Router User Manual You can check it at this time. If you find something is incorrect, click Back to change the settings. If everything is OK, click Finish to accept these settings. Now, the system will reboot to activate the new settings that you have done in this section. - Page 37 Chapter 4: Web Configuration Enable NAT: Check Enable NAT to enable this function. Please type in the WAN IP address, Subnet Mask and DNS server addresses. Then Click Next to get the following page. Primary IP Address: Type in the first IP address that you got from your ISP for your LAN connection.
- Page 38 ADSL Router User Manual Now, the system will reboot to activate the new settings that you have done in this section. Please wait for 2 minutes for restarting the router.
-
Page 39: Bridging
Chapter 4: Web Configuration Bridging If the type you choose is Bridging, please refer to the following information. The bridging mode can configure your router to send packets received on any port such as ATM PVC or Ethernet with a broadcast MAC address to all other ports. - Page 40 ADSL Router User Manual Primary IP Address: Type in the IP address that you got from your ISP for LAN interface. Subnet Mask: Type in the subnet mask that you got from your ISP for LAN interface. MTU: Type in the number for the MTU. The default setting is 1500.
-
Page 41: Status
Chapter 4: Web Configuration Status Overview This page is displaying the current status for the DSL connection. -
Page 42: Adsl Line
ADSL Router User Manual ADSL Line This page shows all information for ADSL. For knowing the quality of the ADSL connection, please click ADSL BER Test button to have advanced information. Click More Information to show more detailed information about ADSL Line Status. -
Page 43: Internet Connection
Chapter 4: Web Configuration When the test is over, the result will be shown on the following dialog for your reference. Click Close to close this dialog. Internet Connection This page displays the connection information for your router, such as PVC name, category, protocol, invoking NAT or not, IP address, link status and so on. -
Page 44: Routing Table
ADSL Router User Manual Routing Table This table shows the routing method that your router uses. ARP Table This table shows the IP address record for IP-to-Physical translation in your router. -
Page 45: Advanced
Chapter 4: Web Configuration Advanced Local Network- IP Address This page is the same as you can see in the Configure LAN side Settings page while running the Quick Setup. It allows you to set IP Address and Subnet Mask values for LAN interface. Primary IP Address: Type in the first IP address that you got from your ISP for your LAN connection. - Page 46 ADSL Router User Manual type in the Server IP in this field. Server and Relay Off: Check this item if DHCP service isn’t needed on the LAN. Apply: Click this button to activate the settings listed above. Cancel: Click this button to discard the settings listed above.
-
Page 47: Local Network - Upnp
Chapter 4: Web Configuration Local Network – UPnP This allows you to enable the UPnP function through the web page for your router. Internet-Connections Setting To set WAN settings for each service, please open Advanced– Internet Setting. This page allows you to add new WAN settings, to edit or remove created WAN settings. - Page 48 ADSL Router User Manual After click Next, you will see the web page listed as the right. Choose the protocol that you want. And click Next again. The WAN IP settings will differ slightly according to the protocol that you choose. This graphic is the one that you will get if you choose to add a new interface of PPPoA mode.
-
Page 49: Wan - Adsl Settings
Chapter 4: Web Configuration WAN - ADSL Settings Enable ADSL Port: Check this box to enable this function. Select the support of line modes: There are several selections for your choosing. Select the one that you need. Capability Enabled: Check the item that you want to enable. -
Page 50: Ip Routing - Static Route
ADSL Router User Manual IP Routing - Static Route Routing Table shows all static route status and allows you to add new static IP route or delete IP route. A Static IP Routing is a manually defined path, which determines the data transmitting route. If your local network is composed of multiple subnets, you may want to specify a routing path to the routing table. -
Page 51: Configuring Other Routers On Your Lan
Chapter 4: Web Configuration A dialog appears to ask you to confirm the action. Click Yes to remove the static route, or click No to keep the setting. Configuring Other Routers on Your LAN It is essential that all IP packets for devices that are not on the local LAN can be passed to the Router, so that they can be forwarded to the external LAN, WAN, or Internet. -
Page 52: Ip Routing - Dynamic Routing
ADSL Router User Manual IP Routing – Dynamic Routing Routing Information Protocol (RIP) is utilized as a means of exchanging routing information between routers. It helps the routers to determine optimal routes. This page allows you to enable/disable this function. Version: It incorporates the RIP information when receiving and broadcasting the RIP packets. -
Page 53: Virtual Servers-Port Forwarding
Chapter 4: Web Configuration Virtual Servers-Port Forwarding The Router implements NAT to let your entire local network appear as a single machine to the Internet. The typical situation is that you have local servers for different services and you want to make them publicly accessible. -
Page 54: Ip Address Seen By Internet Users
ADSL Router User Manual IP Address seen by Internet Users Please note that, in the above picture, both Internet users are connecting to the same IP address, but using different protocols. To Internet users, all virtual servers on your LAN have the same IP Address. This IP Address is allocated by your ISP. -
Page 55: Virtual Servers-Port Triggering
Chapter 4: Web Configuration After adding a new virtual server, click Apply. The following screen will be shown to display the status for new ones. If you do not want the new server that you added, please check the Delete box of that one and click the Delete button to discard it. -
Page 56: Virtual Servers - Dmz Host
ADSL Router User Manual Virtual Servers - DMZ Host Direct Mapping Zone (DMZ) uses a technology that makes Router forwarding all incoming packet to internal specific server. To close the function of DMZ Host, please click Discarded. To activate a DMZ host, please click Forwarded to the DMZ host radio button and type the IP Address into the field of IP address of DMZ host, then click Apply. -
Page 57: Nat - Dynamic Dns
Chapter 4: Web Configuration NAT - Dynamic DNS This page allows you to access into virtual servers with a domain name and password. Dynamic DNS: Selects Enable to enable DDNS; select Disabled to disable this function. Internet Connection: Selects the interface that you want to use for connecting Internet. -
Page 58: Firewall
ADSL Router User Manual Firewall The firewall is a software that interrupts the data between the Internet and your computer. It is the TCP/IP equivalent of a security gate at the entrance to your company. All data must pass through it, and the firewall (functions as a security guard) will allow only authorized data to be passed into the LAN. - Page 59 Chapter 4: Web Configuration Then, to add a new IP Filtering, click Add. This page provides some settings for you to adjust for adding a new outbound IP Filtering. Allow Traffic: No stops the data transmission, Yes lets the data pass through. Protocol: Here provide several default policies for security levels for you to choose.
-
Page 60: Igmp Proxy
ADSL Router User Manual A new IP filtering setting for Outbound traffic is created in the web page. To edit the setting, please click the pencil mark to get into the editing page. To delete the setting, click the trash mark to erase it. To set another IP filtering, click Add again. - Page 61 Chapter 4: Web Configuration Internet Connection: This field displays the internet connection that you currently use. IGMP Proxy Enabled: Check this box to enable this function or uncheck this box to disable this function. After finish the settings, click Apply.
-
Page 62: Management
ADSL Router User Manual Management Diagnostics To check the link status for the network and your computer, a diagnostic test can guide you to detect the network problem. The testing items are listed and accomplished one by one. If the previous one is failed, than the items below that failed one will be failed too. -
Page 63: Admin Account
Chapter 4: Web Configuration Admin Account This page allows you to type in the password for accessing into your DSL Router. For the Admin Account, the default setting for user password is admin. If you want to change the username and the password, please retype the new password in the Confirm field for confirmation. -
Page 64: Internet Time
ADSL Router User Manual Internet Time The router’s clock must synchronize with global Internet’s time. The time you set in the screen will be adapted to system log. Update: Click this button to refresh the current time. Set Time by: The default setting is Manual. -
Page 65: Viewing System Log
Chapter 4: Web Configuration There are 8 types for log level and display level for your choose. The default is Debugging. The mode selection includes Local, Remote and Both. The default one is Local. If you choose Remote or Both, all the events will be sent to the specified UDP port of the specified log server. -
Page 66: Backup Config
ADSL Router User Manual Backup Config To backup your configuration for the router to your computer, you can use Backup Config web page to save the settings. And when you want to restore the settings in the future, simply open Backup Config web page and use Browse button to located the file and click Restore. -
Page 67: Upnp For Xp
Chapter 4: Web Configuration UPnP for XP Universal plug and play (UPnP) is an architecture for pervasive peer to peer network connectivity of intelligent appliances and PCs of all form factors. It is designed to bring easy-to-use, flexible, standards-based connectivity to ad-hoc or unmanaged networks whether in the home, in a small business, public spaces, or attached to the Internet. - Page 68 ADSL Router User Manual 7. Now, the NAT traversal function will be provided. The ADSL router will create a new virtual server automatically for mapping while the router detecting the computer running some Internet applications.
- Page 69 Chapter 4: Web Configuration...
-
Page 70: Chapter 5
Chapter 5:Connection Mode Chapter 5 Connection Mode Prior to configuring the ADSL Router, you must decide whether to configure the ADSL Router as a bridge or as a router. This chapter presents some deployment examples for your reference. Each mode includes its general configure procedures. For more detailed information about web configuration, refer to "Web Configuration". -
Page 71: Ppp Over Atm (Pppoa) Mode
Chapter 5:Connection Mode PPP over ATM (PPPoA) Mode Default Private IP Dynamic Public IP 192.168.1.1 assigned by BRAS 192.168.1.3 STM-1 Loop (Internet Service Provider) Ethernet ADSL BRAS DSLAM Router RDAIUS 192.168.1.2 Server PC(S) PPP over ATM *BRAS: Broadband Remote Access Server PPPoA+NAT+DHCP on Private LAN Description:... -
Page 72: Ppp Over Atm (Pppoa) Ip Extension Mode
ADSL Router User Manual PPP over ATM (PPPoA) IP Extension Mode Default Private IP 192.168.1.1 Dynamic Public IP assigned by BRAS STM-1 Loop (Internet Service Provider) Ethernet ADSL BRAS DSLAM Router RDAIUS Server PPP over ATM *BRAS: Broadband Remote Access Server PPPoA+NAT+DHCP on Private LAN Description:... -
Page 73: Ppp Over Ethernet (Pppoe) Mode
Chapter 5:Connection Mode PPP over Ethernet (PPPoE) Mode Default Private IP Dynamic Public IP 192.168.1.1 assigned by BRAS 192.168.1.3 STM-1 (Internet Service Provider) Loop Ethernet ADSL BRAS DSLAM Router 192.168.1.2 RDAIUS Server PC(S) PPP over Ethernet *BRAS: Broadband Remote Access Server PPPoE+NAT+DHCP on Private LAN Description:... -
Page 74: Ppp Over Ethernet (Pppoe) Ip Extension Mode
ADSL Router User Manual PPP over Ethernet (PPPoE) IP Extension Mode Default Private IP 192.168.1.1 Dynamic Public IP assigned by BRAS (Internet Service Provider) STM-1 Loop Ethernet ADSL DSLAM BRAS Router PC(S) RDAIUS Server PPP over Ethernet *BRAS: Broadband Remote Access Server PPPoE IP Extension Mode Description:... -
Page 75: Numbered Ip Over Atm (Ipoa)
Chapter 5:Connection Mode Numbered IP over ATM (IPoA) Default Private IP 192.168.1.1 10.3.75.51 STM-1 Loop 10.3.75.49 (Internet Service Provider) 10.3.70.1 ADSL BRAS DSLAM Router 10.3.75.50 RDAIUS PC(S) Server IP over ATM *BRAS: Broadband Remote Access Server Public IP Pre-assigned by ISP Description: If you apply for multiple IP addresses from your ISP, you can assign these public IP addresses to the ADSL Router and public server, e.g., Web or FTP server. - Page 76 ADSL Router User Manual Check the network information. Make sure the settings match the settings provided by ISP. Click Finish. Set TCP/IP for your computer. Specify an IP Address, subnet mask and set default gateway. eg: IP Address: 10.3.75.51 Subnet Mask: 255.255.255.248 Gateway: 10.3.75.49 Now the router is well configured.
-
Page 77: Numbered Ip Over Atm (Ipoa)+Nat
Chapter 5:Connection Mode Numbered IP over ATM (IPoA)+NAT Description: In this deployment environment, we make up a private IP network of 10.0.0.138. NAT function is enabled (on ADSL Router or use another NAT box connected to hub) to support multiple clients to access the Router and some public servers (WWW, FTP). - Page 78 ADSL Router User Manual LAN. Primary IP Address: 10.0.0.138 Subnet mask: 255.255.255.0 Start IP Address: 10.0.0.1 End IP Address: 10.0.0.100 Check Configure the second IP Address and Subnet Mask for LAN Interface and type in the second IP address and subnet mask. Then click Next. Secondary IP Address: 10.3.75.49 Subnet mask: 255.255.255.248 Check the network information.
-
Page 79: Unnumbered Ip Over Atm (Ipoa)
Chapter 5:Connection Mode Unnumbered IP over ATM (IPoA) Default Private IP 192.168.1.1 10.3.75.51 STM-1 Loop 10.3.75.49 (Internet Service Provider) ADSL BRAS DSLAM Router 10.3.75.50 RDAIUS PC(S) Server IP over ATM *BRAS: Broadband Remote Access Server Public IP Pre-assigned by ISP Description: If you apply for multiple IP addresses from your ISP, you can assign these public IP addresses to the ADSL Router and public server, e.g., Web or FTP server. - Page 80 ADSL Router User Manual IP Address: 10.3.75.51 Subnet Mask: 255.255.255.248 Gateway: 10.3.75.49 Now the router is well configured. You can access into Internet.
-
Page 81: Unnumbered Ip Over Atm (Ipoa)+Nat
Chapter 5:Connection Mode Unnumbered IP over ATM (IPoA)+NAT Description: In this deployment environment, we make up a private IP network of 10.0.0.138. NAT function is enabled (on ADSL Router or use another NAT box connected to hub) to support multiple clients to access the Router and some public servers (WWW, FTP). - Page 82 ADSL Router User Manual Primary IP Address: 10.0.0.138 Subnet mask: 255.255.255.0 Start IP Address: 10.0.0.1 End IP Address: 10.0.0.100 Check Configure the second IP Address and Subnet Mask for LAN Interface and type in the second IP address and subnet mask. Then click Next. Secondary IP Address: 10.3.75.49 Subnet mask: 255.255.255.248 Check the network information.
-
Page 83: Bridge Mode
Chapter 5:Connection Mode Bridge Mode Default Private IP 192.168.1.1 Loop STM-1 (Internet Service Provider) PPPoE Client S/W ADSL BRAS DSLAM Router RDAIUS Server PC(S) PPP over Ethernet *BRAS: Broadband Remote Access Server Bridge Mode Description: In this example, the ADSL Router acts as a bridge which bridging PC IP address from LAN to WAN. PC IP address can be a static public address that is pre-assigned by ISP or a dynamic public address that is assigned by ISP DHCP server, or can be got from PPPoE software. -
Page 84: Chapter 6
Chapter 6:Troubleshooting Chapter 6 Troubleshooting If the suggested solutions in this section do not resolve your issue, contact your system administrator or Internet service provider. Problems with LAN PCs on the LAN cannot get IP addresses from the ADSL Router. The chances are that the interface used as DHCP server is modified and the client PCs do not renew IP addresses. - Page 85 Chapter 6: Troubleshooting DNS IP is 168.95.1.1, then ping 168.95.1.1. If the following response occurs: Relay from 168.95.1.1 bytes=32 time=100ms TTL=253 Then the connection to the DNS is OK. If you get a failed ping with the response of: Request time out Then the DNS is not reachable.
-
Page 86: Chapter 7
Chapter 7: Glossary Chapter 7 Glossary ARP (Address Resolution Protocol ) ARP is a TCP/IP protocol for mapping an IP address to a physical machine address that is recognized in the local network, such as an Ethernet address. A host wishing to obtain a physical address broadcasts an ARP request onto the TCP/IP network. -
Page 87: Private Ip Address
Chapter 7: Glossary NAT (Network Address Translation) IP Address NAT is an Internet standard that translates a private IP within one network to a public IP address, either a static or dynamic one. NAT provides a type of firewall by hiding internal IP addresses. - Page 88 ADSL Router User Manual Virtual Server You can designate virtual servers, e.g., a FTP, web, telnet or mail server, on your local network and make them accessible to the outside world. A virtual server means that it is not a dedicated server -- that is, the entire computer is not dedicated to running on the public network but in the private network.
- Page 89 Chapter 7: Glossary...
-
Page 90: Appendix A
Appendix A: Specifications Appendix A Specifications Hardware Interface One RJ-11 port for ADSL connection One RJ-45 port for IEEE 802.3/802.3u 10/100 Base-T auto-sensing Ethernet connection One USB port compliant to USB v1.1 for 12 Mbps connection rate One hidden reset button for restoring to factory default settings Regulatory EMI: FCC part 15 Class B... - Page 91 Appendix A: Specifications...
Need help?
Do you have a question about the RTA1320 and is the answer not in the manual?
Questions and answers