Xantrex TC1012 Owner's Manual
Truecharge2 series
Hide thumbs
Also See for TC1012:
- Owner's manual (80 pages) ,
- Installation manual (74 pages) ,
- Installation manual (66 pages)

Subscribe to Our Youtube Channel
Related Manuals for Xantrex TC1012


Summary of Contents for Xantrex TC1012
- Page 1 TC1012 10A–12V TC1512 15A–12V TC2012 20A–12V TC3012 30A–12V TC4012 40A–12V TC5012 50A–12V TC6012 60A–12V TC1524 15A–24V TC2024 20A–24V TC3024 30A–24V TC5024 50A–24V Owner’s Guide Series Battery Charger...
- Page 3 Truecharge ™ Series Battery Chargers Owner’s Guide...
-
Page 4: Contact Information
Suite #3, Stafford House, The Garrison, St. Michael, Barbados Xantrex International reserves the right to revise this document and to periodically make changes to the content hereof without obligation or organization of such revisions or changes unless required to do so by prior arrangement. -
Page 5: About This Guide
Please consult individual battery manufacturers for this information. Audience The Guide is intended for users and operators of the Xantrex™ Truecharge™ 2 Series Battery Charger. Organization This Guide is organized into three chapters and one appendix. - Page 6 When all models are being referred to, they will be referred to as Truecharge™ 2 Battery Chargers. Related Information You can find more information about Xantrex Technology Inc. as well as its products and services at www.xantrex.com 975-0401-01-01...
-
Page 7: Important Safety Instructions
WNER UIDE FOR FUTURE REFERENCE This chapter contains important safety and operating instructions for the Xantrex™ Truecharge™ 2 Series Battery Chargers. 1. Before using a Truecharge™ 2 Battery Charger, read all instructions and cautionary markings on the Truecharge™ 2 Battery Charger unit, the batteries, and all appropriate sections of this guide. - Page 8 Safety 4. This appliance is not intended for use by persons (including children) with reduced physical, sensory, or mental capabilities or lack of experience and knowledge, unless they have been given supervision or instruction concerning use of the appliance by a person responsible for their safety.
- Page 9 Safety 9. The Truecharge™ 2 Battery Charger must be provided with equipment-grounding conductors connected to the AC input ground and to the DC chassis ground. WARNING: Explosion hazard 10. Working in the vicinity of lead-acid batteries is dangerous. Batteries generate explosive gases during normal operation.
- Page 10 Safety 3. Wear proper, non-absorbent gloves, complete eye protection, and clothing protection. Avoid touching your eyes and wiping your forehead while working near batteries. 4. If battery acid contacts skin or clothing, wash immediately with soap and water. If acid enters your eye, immediately flood it with running cold water for at least twenty minutes and get medical attention immediately.
- Page 11 Safety 13. Study and follow all of the battery manufacturer's specific precautions, such as removing or not removing cell caps while charging, whether equalization is acceptable for your battery, and recommended rates of charge. 14. For flooded non-sealed batteries, add distilled water in each cell until battery acid reaches the level specified by the battery manufacturer.
- Page 12 Safety FCC Information to the User This equipment has been tested and found to comply with the limits for a Class B digital device, pursuant to part 15 of the FCC Rules. These limits are designed to provide reasonable protection against harmful interference in a residential installation.
-
Page 13: Table Of Contents
Contents Important Safety Instructions - - - - - - - - - - - - - - - - - - - - v 1 Introduction Truecharge™ 2 Battery Charger - - - - - - - - - - - - - - - - - - - - - 1–1 Standard and Protection Features - - - - - - - - - - - - - - - - - - - - 1–2 Truecharge™... - Page 14 Contents Reporting While Charging or Equalizing - - - - - - - - - - - -2–15 Reporting Without AC Power or While on Standby - - - - -2–16 Using A Generator As Source Power - - - - - - - - - - - - - -2–16 3 Troubleshooting Care and Maintenance- - - - - - - - - - - - - - - - - - - - - - - - - - - - 3–2 Indicator LEDs on the Onboard Display Panel and...
-
Page 15: Introduction
Introduction Chapter 1 describes the standard features of a Truecharge™ 2 Battery Charger, as well as its protection features. It also provides information on the different parts of the Truecharge™ 2 Battery Charger including information on the optional remote panel. Truecharge™... -
Page 16: Standard And Protection Features
• isolated design 1.Model TC1012 has one output and model TC1512 has two outputs. All other models have three outputs. Each output (for models with 2 or 3 outputs) can charge different bat- teries that either have the same chemistry or can tolerate the same charge sequence. - Page 17 Standard and Protection Features • short circuit protection for the BTS and communication connector ports including protection from incorrectly inserting the remote panel communication cable plug into the BTS port and vice versa • drip-proof rubber boots for DC terminals for added moisture protection •...
-
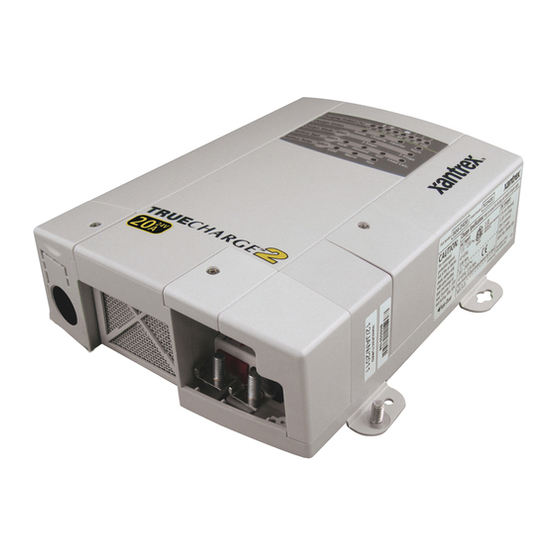
Page 18: Truecharge™ 2 Battery Charger
Introduction Truecharge™ 2 Battery Charger This section describes the different parts of the Truecharge™ 2 Battery Charger. Figure 1-1 Truecharge™ 2 Battery Charger Item Description Onboard control and status display panel or simply onboard display (see “Rear Panel” on page 1–6 for more information) for controlling the Truecharge™... - Page 19 Truecharge™ 2 Battery Charger Item Description Fuse access panel cover provides access to the DC fuse in the event of an accidental reverse battery polarity installation. WARNING: Shock hazard Disconnect the batteries and AC power before opening the fuse access panel. AC wiring compartment cover provides the installer with easy access to the AC wiring compartment, to allow for a trouble free installation.
-
Page 20: Rear Panel
Battery negative (–), common for all three banks (6 mm stud) (common for both banks in model TC1512) (model TC1012 has a single bank only–one positive terminal and one negative terminal) Air intake vent - located inside is the fan assembly... -
Page 21: Onboard Control And Status Display Panel
Onboard Control and Status Display Panel Onboard Control and Status Display Panel This section describes the parts of the onboard control and status display panel of the Truecharge™ 2 Battery Charger. Important: To prevent any unintentional changes in the setting, “press and hold”... - Page 22 Introduction Item Description Charging Output (%) LEDs • The LEDs illuminate like a bar graph displaying the present total output charge current as a percentage of the maximum rated charge current. For example, unit model TC4012 has a maximum rated charge current of 40 A so at 60% the charger’s current output is 24 A.
- Page 23 Onboard Control and Status Display Panel Item Description Charger Mode Select button • Press and hold the button for three seconds to select either of two settings. An indicator LED corresponds to each setting. Each setting optimizes the charging sequence differently in charging the batteries by stages.
- Page 24 Introduction Item Description • Cold - for battery temperature below 5 °C (41 °F); raises the continued charging voltage to compensate • Warm - for battery temperature between 5 and 30 °C (41 and 86 °F); default setting • Hot - for battery temperature above 30 °C (86 °F); lowers charging voltage to compensate •...
- Page 25 Onboard Control and Status Display Panel Table 1-1 on page 1–11 summarizes the various fault conditions that might occur during the operation of the charger. For suggestions in what to do after a fault condition is detected, see Table 3-1, “Interpreting Fault and Warning Indicators”...
- Page 26 Introduction Table 1-1 Fault and Warning Indicators Temp Battery Fuse Charger Remote Fault Fault or Warning Condition Charger Output over voltage fault; >16.6V High Charger Temp warning; >50°C High Charger Temp fault; >65°C Locked Fan warning (for ten seconds Locked Fan fault (after one minute Loss of Remote Connection warning...
-
Page 27: Input Voltage Operating And Derating
Onboard Control and Status Display Panel Input Voltage Operating and Derating When there is an AC input out of range warning in the lower range between 90–108 Vac, the Truecharge™ 2 Battery Charger derates to 80% of maximum current. However, when AC input increases above 108 Vac up to 255 Vac, maximum current returns to 100% capacity. -
Page 28: Remote Panel (Sold Separately)
Introduction Remote Panel (Sold Separately) This section describes the parts of the optional remote panel (Part number: 808-8040-00) of the Truecharge™ 2 Battery Charger. The remote panel can be mounted using a communications cable up to 15 m (50 ft) from the Truecharge™... - Page 29 Remote Panel (Sold Separately) Item Description Button STANDBY • Press to enable or disable the charger while AC power is connected. • When in Setup Mode: Press to select the Charger Mode: two or three-stage. • To set or cancel an Equalization program: Press and hold both the Status and buttons for more than five seconds.
- Page 30 Introduction Item Description Battery Status LEDs Displays the present status of each battery (or each battery bank). This feature is available only on the Remote Panel. Each row represents the battery (or battery bank) number designation—1, 2, or 3. Each column represents Low, Medium, or Full battery capacity.
-
Page 31: Advantages Of Current Limiting Feature
Remote Panel (Sold Separately) Item Description Set Max Output Button (see below) • Press to select and limit the maximum rated charge current. For example, the unit model TC4012 has a maximum rated charge current of 40 A. A setting from 100 to 80 by pressing the button once, will have a new limited maximum charge current of 32 A (80% of 40 A). - Page 32 1–18...
-
Page 33: Operation
Operation WARNING The battery charger must be properly installed in accordance with all local and application-specific codes and ordinances before it is used. For installation instructions, see Truecharge™ 2 Battery Charger Installation Guide (doc. part number: 975-0402-01-01). Chapter 2 describes the operating states and provides procedures for charging a battery and performing an equalization. -
Page 34: About Truecharge™ 2 Battery Charger
Model TC1012 has only one output while model TC1512 has two outputs that share the full rated current output. The Truecharge™ 2 Battery Charger can perform either three-stage charging (Bulk, Absorption, and Float) or two-stage charging (Bulk and Absorption). -
Page 35: Three-Stage Charging
About Truecharge™ 2 Battery Charger Three-Stage Charging The three-stage charging mode employs the following sequence: Bulk, Absorption, and Float. During the Bulk stage the batteries are accepting a constant maximum current. In the Absorption stage, the battery voltage is held constant and the current declines. -
Page 36: Two-Stage Charging
Operation Two-Stage Charging The two-stage charging mode employs the following sequence: Bulk and Absorption. It runs similar to the three- stage sequence except that there is no float stage; after the absorption stage the charger stops providing current to the battery and the charger output drops to 9 V (12 Vdc chargers) or 18V (24 Vdc chargers). -
Page 37: Charging Voltage Setpoints
About Truecharge™ 2 Battery Charger Charging Voltage Setpoints The Truecharge™ 2 Battery Charger charging process is designed to make the battery or battery banks reach the following voltage setpoints. Table 2-1 Charging Maximum Voltages for 12 Vdc chargers Absorption Equalization Battery Type (Volts) Float (Volts) -
Page 38: Temperature Considerations
Bank 2 are both charged, but Bank 1 has a load and Bank 2 does not, then the charger may rarely charge Bank 2. Temperature Considerations Xantrex strongly recommends that you purchase and install the optional Battery Temperature Sensor (BTS) to protect your battery and improve charging accuracy. Attach the BTS to the warmest battery. - Page 39 About Truecharge™ 2 Battery Charger Using the Onboard Display Panel To configure the battery temperature: NOTE: By default, the Battery Temp. is set to Warm. 1. Press and hold the Battery Temp. Select button for three seconds to advance to the next setting. 2.
-
Page 40: Operating Dc Loads
Operation Table 2-3 Battery Temperature Compensation Levels Recommended Temperature for battery Voltage added for temperature Selection temperature of: compensation offset from 25 °C Cold below 5 °C Flooded/PbCa/Gel 0.675 (41 °F) 0.525 Warm between Flooded/PbCa/Gel 5 and 30 °C (41 and 86 °F) above 30 °C Flooded/PbCa/Gel -0.27... -
Page 41: Charging Batteries
Charging Batteries Charging Batteries Before you start to charge batteries read the “Important Safety Instructions” on page v and follow all safety precautions when working with batteries. To charge your batteries: 1. If possible, disconnect any heavy loads on the batteries beaing charged, by opening disconnect switches or by switching the loads off. - Page 42 Operation 5. After charging is completed, reconnect all loads to the battery. The charger can be in one of eight different modes which will be indicated on the onboard display in the Charger Status LEDs: Mode Charger Status LED—ON Bulk Charging Absorption Charging...
-
Page 43: Equalizing Flooded Batteries
• there is an active fault on the battery you are trying to charge Xantrex recommends that you run a complete normal charge cycle on the batteries before you equalize them. WARNING: Explosion hazard During equalization, the battery generates explosive gases. Follow all the battery safety precautions listed in this guide. -
Page 44: Performing An Equalization
Operation Performing An Equalization CAUTION: Risk of equipment damage Turn off or disconnect all DC loads on the battery during equalization. The voltage applied to the battery during equalization may be above safe levels for some loads but the absolute maximum is 16 V for 12 Vdc chargers and 32 V for 24 Vdc chargers within operational temperature range. - Page 45 Equalizing Flooded Batteries Important: If equalization is programmed prior to float or rest mode, the Equalize LED will flash and equalization will start prior to reaching float or rest mode. 3. Press and hold for five seconds the Charger Mode Select button and Battery Temp Select button at the same time to put the Truecharge™...
-
Page 46: Transitioning The Truecharge™ 2 Battery Charger To On, Standby, Or Disabled
Operation Transitioning the Truecharge™ 2 Battery Charger to ON, Standby, or Disabled There are two ways to turn ON the Truecharge™ 2 Battery Charger: • Connect the batteries to the charger (i.e., charger is on standby) then connect AC power at the source. If the batteries are not fully charged then charging begins immediately. -
Page 47: Accessing Charger Information
Accessing Charger Information There is only ONE way to safely turn the Truecharge™ 2 Battery Charger off (Disable): ◆ Disconnect the AC power at the source and disconnect all DC batteries. This is the only state where the Truecharge™ 2 Battery Charger is completely de-energized. -
Page 48: Reporting Without Ac Power Or While On Standby
Operation Reporting Without AC Power or While on Standby If AC power has been disconnected or if you have used the optional remote panel to place the Truecharge™ 2 Battery Charger on Standby mode, the onboard display (and the optional remote panel, if installed) LEDs will be turned off to conserve battery power. -
Page 49: Troubleshooting
Troubleshooting Chapter 3 contains information and procedures for troubleshooting your Truecharge™ 2 Battery Charger. -
Page 50: Care And Maintenance
Troubleshooting Care and Maintenance WARNING: Risk of electric shock The Truecharge™ 2 Battery Charger contains no user serviceable components. Do not open or disassemble the charger. Attempting any kind of service will void your warranty. Contact your dealer or the manufacturer for service information. The Truecharge™... -
Page 51: Indicator Leds On The Onboard Display Panel And Optional Remote Panel
Indicator LEDs on the Onboard Display Panel and Optional Remote Panel Indicator LEDs on the Onboard Display Panel and Optional Remote Panel All indicator LEDs on the Onboard Display panel (and the optional remote panel, if installed) will illuminate for one second when AC (or DC) power is supplied to the Truecharge™... - Page 52 Indicator LEDs on the Onboard Display Panel and Optional Remote Panel Table 3-1 Interpreting Fault and Warning Indicators Fault or Warning Solution Temp Battery Fuse Charger Remote Fault Condition High Battery Temp • Check the batteries. Do not charge a battery that is rated other than 12 V nominal for all 12 Vdc chargers warning (>50°C) or 24 V nominal for all 24 Vdc chargers.
- Page 53 Indicator LEDs on the Onboard Display Panel and Optional Remote Panel Table 3-1 Interpreting Fault and Warning Indicators Fault or Warning Solution Temp Battery Fuse Charger Remote Fault Condition High Battery Temp • Check the batteries. Do not charge a battery that is rated other than 12 V nominal for all 12 Vdc chargers fault (>70°C) or 24 V nominal for all 24 Vdc chargers.
- Page 54 Troubleshooting Table 3-1 Interpreting Fault and Warning Indicators Fault or Warning Solution Temp Battery Fuse Charger Remote Fault Condition Low Battery Temp • Check the batteries. Do not charge a frozen battery. Charging a frozen battery may present a risk of fault (<...
- Page 55 Indicator LEDs on the Onboard Display Panel and Optional Remote Panel Table 3-1 Interpreting Fault and Warning Indicators Fault or Warning Solution Temp Battery Fuse Charger Remote Fault Condition High Battery voltage • Discontinue charging or disconnect AC power source from supplying power to the charger.
- Page 56 No further action required. If the fan resumes its operation automatically then the charger will resume charging. • If the fault remains, call Xantrex for support. Loss of Remote • Reconnect the communication cable to the port. It takes about 15 seconds to re-establish Connection warning communication.
- Page 57 • Disconnect AC and DC sources before replacing the fuse on the charger. See “Replacing the DC Output Fuse” on page 3–11. Internal fault • Call Xantrex for support. Flashing LED Solid LED 975-0401-01-01 3–9...
- Page 58 Troubleshooting Table 3-2 Charger Status LED Sequences on the Truecharge™ 2 Battery Charger Charger Status LED Activity Charger status Ready LED illuminates The charger is in standby (or rest) mode of two- solid stage charging. All batteries have been fully charged.
-
Page 59: Replacing The Dc Output Fuse
CAUTION ® For continued protection, replace only with Littelfuse type 257 (or equivalent) with ratings as shown below. Amperage Voltage Model TC1012 15 A (blue) 32 Vdc TC1512 25 A (natural) 32 Vdc TC2012 30 A (green) 32 Vdc... - Page 60 Troubleshooting Amperage Voltage Model TC4012 2×30 A (green) 32 Vdc TC5012 2×35 A (blue-green) 32 Vdc TC6012 2×40 A (amber) 32 Vdc TC1524 25 A (natural) 32 Vdc TC2024 30 A (green) 32 Vdc TC3024 40 A (amber) 32 Vdc TC5024 2×35 A (blue-green) 32 Vdc 6.
-
Page 61: Troubleshooting
Troubleshooting Troubleshooting In the event that you have a problem with your Truecharge™ 2 Battery Charger, the following tables will help you to identify the problem and offer possible solutions to the problem. Symptom Indicator LEDs do not illuminate when charger is connected to an AC power source. - Page 62 Troubleshooting Symptom Fault indicator LED illuminates. Temp and Battery indicator LEDs flash. Possible Cause Solution Battery temperature is either too If battery is too hot, allow battery to cool. hot or too cold for safe Improve ventilation or install in cooler charging.
- Page 63 Troubleshooting Symptom The Truecharge™ 2 Battery Charger appears to be taking too long to charge battery. Ready indicator LED does not illuminate after 24 hours of charging. Possible Cause Solution Battery capacity is too high for Use a higher capacity charger. the Truecharge™...
- Page 64 Symptom The Truecharge™ 2 Battery Charger will not perform equalization. Possible Cause Solution Battery is the wrong type, or set Determine if the battery type is set to GEL or to the wrong type to equalize. AGM. These battery types cannot be equalized.
-
Page 65: Specifications
Specifications Appendix A contains physical, electrical performance, and regulatory approval specifications for the Truecharge™ 2 Battery Charger. Note: Specifications are subject to change without notice. -
Page 66: Physical Specifications
Specifications Physical Specifications Base Unit TC1012, TC1512: Dimensions: 200 × 170 × 70mm (7.87 × 6.70 × 2.76 in.) L × W × H TC2012, TC3012, TC4012: 250 × 170 × 70mm (9.84 × 6.70 × 2.76 in.) TC5012, TC6012: 350 ×... -
Page 67: Electrical Specifications
Automatic derating to 80% output: 90 – 108 ±4 Vac Maximum AC input at 104 Vac at 230 Vac – 20% current TC1012: 2.5 A TC1012: 1.25 A TC1512: 3.5 A TC1512: 1.9 A TC2012: 4.5 A TC2012: 2.5 A TC3012: 7.0 A... -
Page 68: Dc Output Specifications
Normal operating output 12 Vdc units: 0 – 16 Vdc range 24 Vdc units: 0 – 32 Vdc Maximum DC output current TC1012: 10 +10% A (total) TC1512: 15 +10% A TC2012: 20 +10% A TC3012: 30 +10% A TC4012: 40 +10% A... -
Page 69: Environmental Specifications
Environmental Specifications Absorption voltage: 12 Vdc units 24 Vdc units ±0.1 V for 12 Vdc units 25 °C (77 °F) 25 °C (77 °F) ±0.2 V for 24 Vdc units Flooded 14.4 28.8 14.2 28.4 14.3 28.6 Lead-calcium 15.5 31.0 Float voltage: 12 Vdc units 24 Vdc units... -
Page 70: Protection Features
Protected by replaceable DC output fuses polarity Over-voltage limits The Truecharge™ 2 Battery Charger will stop charging if the output voltage is above 16.6 ±0.5 Vdc. Output current limit TC1012: 10 +10% A TC1512: 15 +10% A TC2012: 20 +10% A... -
Page 71: Approvals
Approvals Approvals Safety NRTL approved to CSA E60335-2-29, UL1236, including the marine supplement, ignition protection, and UL1564 CE marked for the Low Voltage Directive 2006-95-EC, (complying with EN60335-2-29 Battery Chargers) Designed to IEC60335-2-29 including Australian deviations, ISO 8846: Ignition Protection for Small Craft, ABYC E11 - Alternating Current and Direct Current Electrical Systems on Boats, and ABYC A31 - Battery Chargers and Inverters... - Page 72 A–8...
-
Page 73: Warranty And Return Information
During the Warranty Period Xantrex will, at its option, repair the product (if economically feasible) or replace the defective product free of charge, provided that you notify Xantrex of the product defect within the Warranty Period, and provided that Xantrex through inspection establishes the existence of such a defect and that it is covered by this Limited Warranty. - Page 74 Authorization Policy described in your product manual. For some products, Xantrex maintains a network of regional Authorized Service Centers. Call Xantrex or check our website to see if your product can be repaired at one of these facilities. What proof of purchase is required?
- Page 75 Xantrex or its authorized service centers (hereafter "ASCs"); d) the product if it is used as a component part of a product expressly warranted by another manufacturer;...
-
Page 76: Return Material Authorization Policy
Return Material Authorization Policy For those products that are not being repaired in the field and are being returned to Xantrex, before returning a product directly to Xantrex you must obtain a Return Material Authorization (RMA) number and the correct factory "Ship To"... -
Page 77: Out Of Warranty Service
To return your product for out of warranty service, contact Xantrex Customer Service for a Return Material Authorization (RMA) number and follow the other steps outlined in "Return Procedure"... -
Page 78: Information About Your System
Warranty and Return Information About Your System As soon as you open your Xantrex™ Truecharge™ 2 Series Battery Charger package, record the following information and be sure to keep your proof of purchase. ❐ Serial Number _________________________________ ❐ Product 804-1210, 804-1215, 804-1220, 804-1230,... - Page 80 Xantrex Technology Inc. 1 800 670 0707 Tel toll free NA 1 408 987 6030 Tel direct +34 93 470 5330 Europe 1 800 994 7828 Fax toll free NA +34 93 473 6093 Europe customerservice@xantrex.com www.xantrex.com 975-0401-01-01 Printed in China...
Need help?
Do you have a question about the TC1012 and is the answer not in the manual?
Questions and answers