
Subscribe to Our Youtube Channel
Related Manuals for Doro DECT 160


Summary of Contents for Doro DECT 160
-
Page 1: User Guide
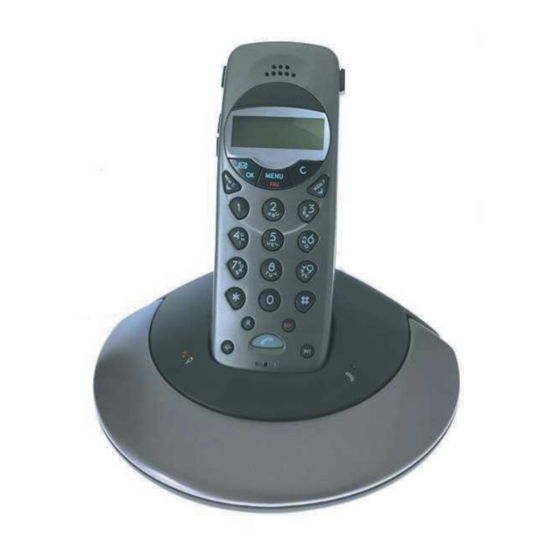
DECT 160/360 English Digital Cordless Telephone with Caller ID and Answering Machine (360) User guide DECT160-360_20010530.indd 2001-05-30, 11:29... - Page 2 10 Speaker button (360) / Priority 3 CID Log/OK button Number (160) 4 Left Scroll button 11 Menu/End button 5 Recall button 12 Right Scroll button 6 Headset Socket 13 Cancel button 7 Redial button 14 Display www.doro.com DECT160-360_20010530.indd 2001-05-30, 11:29...
- Page 3 15. Remote access code button 6. Delete button 16. Ring select button 7. Speaker volume Up 17. Day/time button 8. Speaker volume Down Note: DECT 160 has items 3, 4, 5, 13 and 9. ON/OFF button 14 ONLY. 10. Skip button www.doro.com DECT160-360_20010530.indd...
-
Page 4: Table Of Contents
Out of Memory....30 The Handset Signal .... 17 Button Click ......17 Other Timer........17 Phone Lock......18 Troubleshooting ....31 Handset PIN Code....18 Guarantee......32 User Name ......18 Notes for New Zealand..33 Handset Register www.doro.com DECT160-360_20010530.indd 2001-05-30, 11:29... -
Page 5: Installation
2. The earpiece of the handset may attract small ferromagnetic objects such as staples and pins, care should be taken when placing the handset near these items. 3. Do not place the base unit where it will be exposed to direct sunlight or other major heat sources. www.doro.com DECT160-360_20010530.indd 2001-05-30, 11:29... -
Page 6: Belt Clips
When the telephone is installed for the first time, the battery must be charged for 14 hours before using the telephone. Use only DORO original batteries. The guarantee does not cover any damage caused by incorrect batteries. The handset is charged with the buttons facing upward. -
Page 7: Battery Charge Indicator
The handset can be used with an optional headset via the socket on the side. When using a headset, there is no change in the way a call is received or made. When a headset is connected, the microphone and speakers of the handset are automatically disconnected. www.doro.com DECT160-360_20010530.indd 2001-05-30, 11:29... -
Page 8: The Display
Base Unit Indicators (green) - Indicates that a call is connected to the handset. - Flashes while searching, registering, or ringing. (red) - The base unit is on and connected to the mains. www.doro.com DECT160-360_20010530.indd 2001-05-30, 11:29... -
Page 9: Operation
By pressing on the base unit (located behind the charge pins), the paging signal of the handset will be activated. This function is used to help find the handset or to page the person carrying the handset. www.doro.com DECT160-360_20010530.indd 2001-05-30, 11:29... -
Page 10: Optional Network Services
3. The speaker volume can be adjusted with the +/- buttons. 4. To continue the conversation in the handset only, press again. 5. Press to terminate the call and disconnect the line. www.doro.com DECT160-360_20010530.indd 10-11 2001-05-30, 11:29... -
Page 11: Menu
Pressing the MEMC button steps through the menu in the following sequence. Pressing the MEMP button steps through the menu in reverse. COMMON MEM SYSTEM HANDSET NAME REGISTER PHONE LOCK CALL TIMER KEY TONE HS RINGER PERSONAL MEM www.doro.com DECT160-360_20010530.indd 10-11 2001-05-30, 11:29... -
Page 12: Phone Book
1.......... [Space character] - / 2.......... A B C 3.......... D E F 4.......... G H I 5.......... J K L 6.......... M N O 7.......... P Q R S 8.......... T U V 9.......... W X Y Z www.doro.com DECT160-360_20010530.indd 12-13 2001-05-30, 11:29... - Page 13 (see the table on the previous page). 6. Press to dial the number . brings you directly to the common phone book from standby mode. brings you directly to the personal phone book from standby mode. www.doro.com DECT160-360_20010530.indd 12-13 2001-05-30, 11:29...
- Page 14 5. Scroll the entries or find it faster by pressing the button corresponding to the first letter in the name (see the table on page 12). 6. Press C and then OK. Storing a Priority number (DECT 160, only) 1. Press MENU. 2. Scroll to PERSONAL MEM. Press OK.
-
Page 15: Caller Id
2. Scroll to preferred entry. If the same number has called more than once then this is indicated by a >. Press in order to see how many repeat calls were made. 3. Press to dial the number or MENU to return to standby mode. www.doro.com DECT160-360_20010530.indd 14-15 2001-05-30, 11:29... - Page 16 . The display will indicate the number of new phone numbers as well as the total number stored. 2. Press C. The display will show DELETE?. 3. Press OK. The display will show DELETE ALL?. 4. Press OK to erase. www.doro.com DECT160-360_20010530.indd 16-17 2001-05-30, 11:29...
-
Page 17: Settings
Following the connection of a call the timer is shown on the display. This call duration timer can be switched on or off. 1. Press MENU. 2. Scroll to CALL TIMER. Press OK. 3. Scroll to preferred setting (ON/OFF). 4. Press OK to store. www.doro.com DECT160-360_20010530.indd 16-17 2001-05-30, 11:29... -
Page 18: Phone Lock
Settings Phone Lock The telephone can be blocked for outgoing calls. However, calls to numbers in the phone book, emergency numbers, and to the Priority number (DECT 160 only) can still be made. 1. Press MENU. 2. Scroll to PHONE LOCK. Press OK. -
Page 19: Handset Register
3. Scroll to SELECT BASE. Press OK. 4. Select a base unit by pressing the corresponding number button (0=AUTO). The selected number remains steady and the available alternatives will flash. 5. Press OK to store. www.doro.com DECT160-360_20010530.indd 18-19 2001-05-30, 11:29... -
Page 20: System Settings
The ring signal of the base unit can be switched on or off. 1. Press MENU. 2. Scroll to SYSTEM. Press OK. 3. Scroll to BASE RINGER. Press OK. 4. Scroll to preferred setting (ON/OFF). 5. Press OK to store. www.doro.com DECT160-360_20010530.indd 20-21 2001-05-30, 11:29... -
Page 21: Select Country Of Installation
In order for the R button and the Caller ID to work properly, the proper country must be selected. The default setting on delivery is for Australia. 1. Press MENU. 2. Scroll to SYSTEM. Press OK. 3. Scroll to SELECT AU/NZ. Press OK. 4. Scroll to proper setting. Press OK. www.doro.com DECT160-360_20010530.indd 20-21 2001-05-30, 11:29... -
Page 22: Expanded System
It is essential that the range of the base units overlap, in order to achieve uninterrupted coverage. The transfer from one base unit to another is automatic, however, it cannot be done while a call is in progress. www.doro.com DECT160-360_20010530.indd 22-23... -
Page 23: Several Handsets
Should an external call come in while an internal call is in progress (2 handset system), a tone will be heard. You must then terminate the internal call by pressing INT, in order to be able to receive the external call by pressing www.doro.com DECT160-360_20010530.indd 22-23... -
Page 24: Transferring Calls Between Handsets
The other handset receives the call just as always, and it is possible to talk internally. 3. To transfer the external call, press on the calling handset. If you decide not to transfer the call, press INT on the calling handset to return to the external caller. www.doro.com DECT160-360_20010530.indd 24-25 2001-05-30, 11:30... -
Page 25: Answering Machine
- Activate the answering machine. - Adjust the speaker volume. The following buttons are located under the base unit. CODE - Remote access code. RING - Number of rings before the machine answers. TIME - Day/Time stamp. www.doro.com DECT160-360_20010530.indd 24-25 2001-05-30, 11:30... -
Page 26: Number Of Rings
The ! button is used to switch the answering machine on and off. In the ON position all incoming calls will be answered by the machine. If the display indicates -- , then the answering machine is off and no calls will be answered. www.doro.com DECT160-360_20010530.indd 26-27... -
Page 27: Outgoing Message
The caller can leave a message up to 2 minutes in length, if this time is exceeded the call will be disconnected. The memory will store a total of 15 minutes of messages (including the outgoing message). www.doro.com DECT160-360_20010530.indd 26-27... -
Page 28: Playback Of Messages
- Terminate playback. DELETE - Hold button down about 2 seconds to erase current message. - Adjust the speaker volume. To erase all old messages, hold down DELETE for 2 seconds after playback has stopped. www.doro.com DECT160-360_20010530.indd 28-29 2001-05-30, 11:30... -
Page 29: Remote Control
5. To end the remote control session, hang up the phone. Please note! If the machine doesn’t respond correctly to the remote control commands, try pressing the touch-tone buttons for a longer or shorter time. www.doro.com DECT160-360_20010530.indd 28-29 2001-05-30, 11:30... -
Page 30: Out Of Memory
The symbol .. on the display of the base unit indicates that memory is full. When memory is full the machine will answer after 12 rings to allow remote playback and deletion of messages. www.doro.com DECT160-360_20010530.indd 30-31 2001-05-30, 11:30... -
Page 31: Other
Check the charge status of the handset battery. Try connecting another telephone, known to be in working order, to the line socket. If that phone works then it is likely that this equipment is faulty. www.doro.com DECT160-360_20010530.indd 30-31 2001-05-30, 11:30... -
Page 32: Guarantee
9AM - 5PM Monday-Friday excluding Bank Holidays. Alternatively, You can contact us in writing: Consumer Support Group, Doro UK Ltd., 22 Walkers Road, North Moons Moat, Redditch, Worcestershire, B98 9HE, (regarding any Spares or Technical query), or Telephoning Spares: 01527 584377 E-mail on: tech@doro-uk.com... -
Page 33: Notes For New Zealand
If you believe this product is malfunctioning, please refer to the relevant section and/or consult the troubleshooting guide in this manual to ensure that you have followed the instructions carefully. Additional information on DORO and our products can be found by visiting our web site www.doro.com Guarantee The product is guaranteed for a period of 12 months from the date of purchase. - Page 34 In addition, the Principles enumerated in the Privacy Act 1993 shall be complied with in respect to the nature of the personal information collected, the purpose for its collection, how it is used and what is disclosed to any other party. www.doro.com DECT160-360_20010530.indd 34-35...
- Page 35 English www.doro.com DECT160-360_20010530.indd 34-35 2001-05-30, 11:30...
- Page 36 DECT160-360_20010530.indd 2001-05-30, 11:30...
Need help?
Do you have a question about the DECT 160 and is the answer not in the manual?
Questions and answers