Peg-Perego Primo Viaggio Owner's Manual
Latch system
Hide thumbs
Also See for Primo Viaggio:
- Instructions for use manual (68 pages) ,
- Instructions for use manual (18 pages) ,
- Instructions for use manual (69 pages)
Table of Contents
Advertisement
FIUS0301122
Primo Viaggio
LATCH System
Instructions for U.S.A.
WARNING:
Do not install or use
!
this infant restraint until you read
and understand all instructions in
this manual. To avoid serious injury
to your baby, follow the instructions
carefully and be sure to buckle your
baby using the 5-point harness.
OWNER'S MANUAL
English
Advertisement
Table of Contents

Related Manuals for Peg-Perego Primo Viaggio


Summary of Contents for Peg-Perego Primo Viaggio
-
Page 1: Latch System
FIUS0301122 Primo Viaggio LATCH System Instructions for U.S.A. WARNING: Do not install or use this infant restraint until you read and understand all instructions in this manual. To avoid serious injury to your baby, follow the instructions carefully and be sure to buckle your baby using the 5-point harness. -
Page 2: Table Of Contents
Using the Car Seat Outside the Vehicle ....26 Your Car Seat ......8 How to use the car seat Primo Viaggio LATCH System ..8 on an aircraft ........ 28 Ganciomatic System ....10 Cleaning & Maintenance..29 Installing the Base ....11 How to install the base using Replacement Parts....32... -
Page 3: Before You Start
Before You Start Please read this manual carefully. Keep this manual in the plastic pocket on the base of the infant car seat. Review car seat parts and read through instructions. Also read the labels. Read and understand all instructions before using this car seat. -
Page 4: Customer Service
Customer Service Call Peg Perego customer service at Registration form 1-800-671-1701 (toll free) for information about repairs or spare parts. Important! Child restraints could be If any parts are missing or damaged, recalled for safety reasons. You must replace with Peg Perego parts only. See register this restraint to be reached page 32 for a list of replacement parts. -
Page 5: Safety
Safety • This car seat meets or exceeds all • Use only approved parts. Use of applicable Federal Motor Vehicle unapproved parts can affect the safety Safety Standard 213 requirements of the car seat and cause serious injury for use in motor vehicles and aircraft. or death in an accident. -
Page 6: Warnings
Continued Safety • Never install the car seat in the Warnings front vehicle seat unless instructed • Your child could be seriously injured by your vehicle manual. The if you do not follow instructions and National Highway Traffic Safety warning labels correctly. Administration (NHTSA) says infants are safest in the rear facing position in •... -
Page 7: Safety Rules
• Be sure the car seat is properly Safety Rules leveled. If the seat reclines too • This car seat is designed to be used much, your baby can be injured or rear facing only and for infants who ejected from the seat. If the seat is weigh no more than 20 pounds (mass too upright, it can cause your baby 9 kg) and are no more than 26 inches... -
Page 8: Your Car Seat
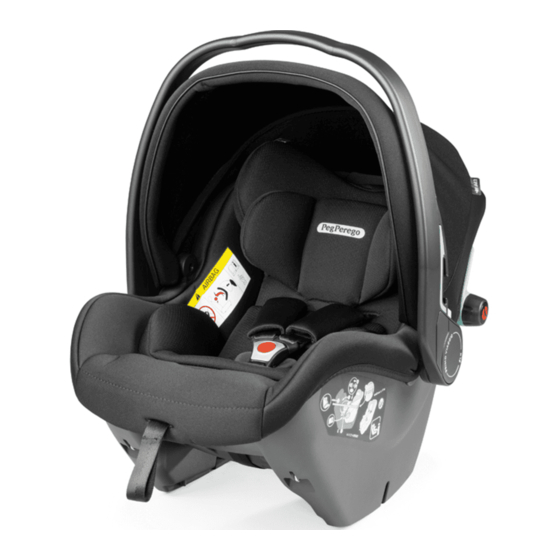
Your Car Seat 5-point harness system Primo Viaggio Chest clip LATCH System Harness latches Harness buckle Release lever Seat handle Harness straps Head Slide protection adjuster Chest harness Anchor buckles Harness adjuster button Harness adjuster strap FRONT BACK... - Page 9 Locking Clip Storage Belt slots Level indicator Level knob SIDE Locking clip Owner's Manual book pocket FRONT Latch strap Anchor latches BACK...
-
Page 10: Ganciomatic System
Continued Your Car Seat Ganciomatic System Tender XL Caravel Duette Aria csr Classic / Velo Classic / Velo Pliko Milano Milano Surefix Base V enezia Atlantico... -
Page 11: Installing The Base
Installing the Base The Peg Perego Primo Viaggio car seat has two major parts: The base and the car seat. First you install the base, and then you install the car seat on the base. Important! Read your vehicle manual for instructions on where to best install an infant car seat in your vehicle. -
Page 12: How To Install The Base Using The Latch System
How to Install the Base Using the LATCH System Important! Read your vehicle manual for the recommended placement of the infant seat and for the use and position of anchors. Install the base with your vehicle parked on level ground. 1. - Page 13 3. Remove the two anchor latches from their housing. The latches are on the sides of the base. First loosen the latch strap by pressing on the gray button and pulling the strap as shown. Then press the red button on top of the latch and pull the latch out of its housing.
- Page 14 Continued How to Install the Base Using the LATCH System 5. Make sure the latch strap is threaded flat against the base. 6. Tighten the base against the seat by pulling the free end of the latch strap. Press down on the base with your body weight and tighten further.
-
Page 15: How To Install The Base Using Your Vehicle Seat Belts
How to Install the Base Using Your Vehicle Seat Belts Important! Not all seat belts work the same way. To make sure the infant car seat is properly installed using your seat belts, read your vehicle owner’s manual. It will suggest proper placement of an infant car seat in your particular vehicle. - Page 16 Continued How to Install the Base Using Your Vehicle Seat Belts 3. Pull the strap to tighten the seat belt. Press down on the base with your body weight and pull the strap tighter. Then push and pull on the base. If you can move the base more than one inch, tighten the belt further.
- Page 17 Primo Viaggio is designed for use with lap or shoulder/lap seat belts. Four of the most common types are listed below. Please read your vehicle manual for instructions on installing an infant car seat using your vehicle seat belts. Lap/Shoulder belt with Switchable...
- Page 18 Continued How to Install the Base Using Your Vehicle Seat Belts To install the locking clip, hold the shoulder strap and lap belt together just above the buckle. Unbuckle the belt while holding the straps. Hook the locking clip around both straps as shown. Leave 1⁄2 inch space between the clip and latch.
- Page 19 Lap/shoulder belt with a locking latch plate If you have a lap/shoulder belt with a locking latch plate and the belt comes loose after buckling, unbuckle it, flip it over, and re-buckle. This will usually keep the seat belt locked in place. If not, read your vehicle manual for specific instructions.
- Page 20 Continued How to Install the Base Using Your Vehicle Seat Belts Important! Do not install this car seat on seats with: Lap/motorized shoulder belts. Belts mounted on the door. Side-facing seats. Rear-facing seats or seats that rotate. For your child’s safety, always read your vehicle manual for instructions on installing child car seats.
-
Page 21: Installing The Car Seat On The Base
Installing the Car Seat on the Base Important! Do not use this child restraint in your vehicle without the base. Now that you have installed the base in your vehicle, you are ready to install the car seat on the base. 1. - Page 22 Continued Installing the Car Seat on the Base 2. Adjust the handle so it rests at the top edge of the car seat as shown. Any other position may injure your baby in an accident. To move the handle, press the gray buttons on the sides of the handle at the same time and push the handle.
-
Page 23: How To Buckle Your Baby Into The Car Seat
How to Buckle Your Baby into the Car Seat This restraint uses the 5-point system to secure your baby into the car seat. See illustration on page 8. 1. Put your baby in the car seat. Bring the two shoulder straps over your baby’s shoulders. -
Page 24: How To Buckle Your Baby Into The Car Seat
Continued How to Buckle Your Baby into the Car Seat 3. To undo the chest harness, press the red button and pull the latches up. 4. To undo the chest clip, press the buttons on the side of the clip and pull apart as shown. 5. -
Page 25: How To Raise Or Lower The Shoulder Straps
How to Raise or Lower the Shoulder Straps 1. To raise or lower the harness strap, first remove your baby from the seat. Then turn the seat over and remove the straps from the slide adjuster. 2. Pull the shoulder straps from slots and rethread through other slots to raise or lower the position. -
Page 26: Using The Car Seat Outside The Vehicle
Using the Car Seat Outside the Vehicle This unit can be used as an infant seat. The special shell shape is designed for rocking your baby. The hood provides shade for your baby. 1. To rock your baby, move the handle into the up position as shown. - Page 27 2. To attach the hood, move the handle to the top of the seat. Insert the hood couplings over the handle bases as shown. Snap into place. The hood has two positions. To raise or lower hood, push on the inner sides of the couplings and move the hood until you hear the click.
-
Page 28: How To Use The Car Seat On An Aircraft
How to Use the Car Seat on Aircraft This unit is certified for aircraft use. 1. Buckle the base to the aircraft seat using the lap belt as shown. A secondary belt path can also be used as shown in Fig. B. 2. -
Page 29: Cleaning & Maintenance
Cleaning and Maintenance This unit needs minimal maintenance. • Keep all moving parts clean. Lubricate with light oil, if necessary. • Clean the plastic parts often with a damp cloth. Do not use solvents or harsh products. • Brush the fabric parts to remove dust. •... -
Page 30: To Wash The Chair Padding
Continued Cleaning and Maintenance To Wash the Chair Padding: 1. Remove the hood, head protection, and shoulder strap covers. 2. Unfasten and remove the harness from the seat. To do this, unhook the harness straps from the slide adjuster. Pull up on the anchor buckles located on each side of the slide adjuster. - Page 31 4. Wash the padding using the instructions to the right. Use a damp cloth to clean Hand wash only. Do not iron or Do not bleach. Do not dr the plastic. press with heat. Hand wash only. Do not iron or Do not bleach.
-
Page 32: Replacement Parts
Replacement Parts Primo Viaggio LATCH System Part Number 1 ARPI 0258US* 2 BRCACSUS* 3 BRMACSUS* 4 MMHC 0010 5 SPST 5209 GA 6 BAKRCSUS* 7 IAKCNBUS 8 SPST 5207 KGL 9 MUCI 0052 GA 10 SPST 5386 GL 11 SPST 5303S*... -
Page 33: Peg Perego Contact Information
15-01-03 Printed in Digital by GraficheCola — Lecco (www.grafichecola.it) Primo Viaggio LATCH System www.pegperego.com Peg Perego S.p.A. Peg Perego U.S.A. Inc. Peg Perego CANADA Inc. VIA DE GASPERI 50 3625 Independence Drive 585 Granite Court 20043 ARCORE MI ITALIA Fort Wayne, Indiana 46808...
Need help?
Do you have a question about the Primo Viaggio and is the answer not in the manual?
Questions and answers