Table of Contents
Advertisement
Advertisement
Table of Contents

Related Manuals for Toyota RSE


Summary of Contents for Toyota RSE
- Page 1 OWNER’S MANUAL SEAT TOP DVD REAR SEAT ENTERTAINMENT SYSTEM...
-
Page 3: Federal Communication Commission (Fcc) Compliance
INTRODUCTION Your vehicle is equipped with a Seat Top DVD Rear Seat Entertainment System (RSE). The system is designed to give you and your passengers many years of video and audio entertainment in a mobile environment. The system allows you to listen to audio CD’s and watch DVD’s. -
Page 4: Safety Precautions
This manual contains certain CAUTION and NOTICE Warnings that are used to prevent or reduce the chance of injury or damage to passengers and vehicle equipment, respectively. If you are driving a TOYOTA Vehicle with a RSE system, please adhere to the following... - Page 5 CAUTION CAUTION Conversational speech on some DVDs is recorded at a 1. Keep the monitor clean and dry. low volume to emphasize the impact of sound eff ects. If 2. Always seek qualifi ed personnel to perform repairs. you adjust the volume assuming that the conversations Never attempt your own repairs.
- Page 6 NOTICE NOTICE Do not operate video games or video equipment if the Exercise care to prevent dirt and foreign objects from power cords and/or cables are broken, split or damaged. entering the DVD player compartment. Be especially Carefully place cords and/or cables where they will not be careful not to spill liquids of any kind onto the media stepped on or interfere with the operation of seats and/ controls or into the system.
- Page 7 NOTICE NOTICE Do not play the Rear Seat Entertainment System for Do not insert foreign objects into the DVD openings or extended periods of time with the engine shut off as this ventilation openings. will drain the battery. NOTICE NOTICE Do not attempt to service, repair or modify the Rear Seat Do not expose the liquid crystal display (LCD) screen to Entertainment System.
-
Page 8: Table Of Contents
TABLE OF CONTENTS INTRODUCTION .................II OPERATION INSTRUCTIONS .............12 Federal Communication Commission (FCC) Compliance ..I Control and Indicators Functional Descriptions .......12 Main Menu / Source Selection ..............13 SAFETY PRECAUTIONS ............I-V DVD Basics ........................14 Region Coding ...................... 14 QUICK START GUIDE ..............1 Types of Discs Your System Will Play ............ - Page 9 TABLE OF CONTENTS RATING SETUP ................21 TROUBLESHOOTING ..............30 Parental Control ....................21 Change Password ....................21 SPECIFICATIONS .................32 MISC SETUP.................22 FUSE REPLACEMENT ..............33 Use Default Settings ..................22 Sienna Vehicles .....................33 Screen Saver ......................22 Camry Vehicles ......................34 Align Screen ......................22 Other Vehicle Applications ................35 PLAYING MP3 DISCS ..............23 OWNER’S NOTES ................37 Selecting Folders and Songs ................23...
- Page 10 This page intentionally left blank. - VIII -...
-
Page 11: Quick Start Guide
QUICK START GUIDE Operating the DVD System 8. If audio playback through the vehicle radio is preferred, set The Seat Top DVD System can be operated using the touch the radio to AUX mode. Verify that nothing is connected screen or the Remote Control. to the radio’s AUX jack. -
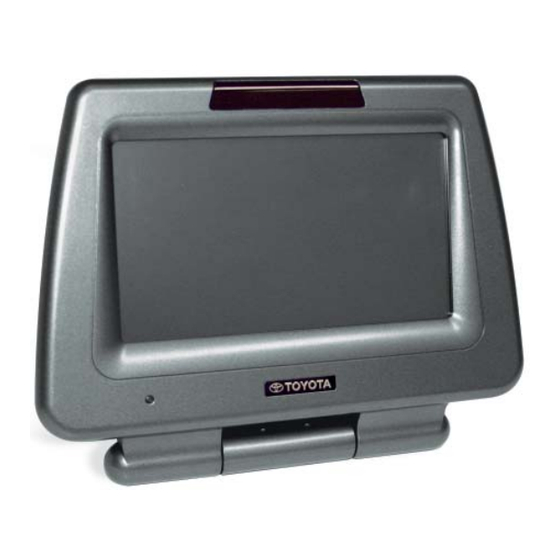
Page 12: Controls And Indicators Diagram
CONTROLS AND INDICATORS DIAGRAM Controls and Indicators 1. POWER/MENU Button 2. DVD disc insertion slot (disc label towards viewer) 3. EJECT Button 4. Power Indicator LED 5. IR Sensor/IR Transmitter LEDs 6. LCD Screen & Touch Screen 7. AUX Audio/Video Input Jacks 8. -
Page 13: Seat Top Dvd System Overview
SEAT TOP DVD SYSTEM OVERVIEW 6. Each monitor uses a separate set of Remote Control IR 1. The Seat Top DVD system is a versatile audio / video system codes. The passenger side monitor will only respond to the which includes two monitors, each with a built-in DVD Remote Control unit when the Monitor Select (M1) button player and a touch screen interface. -
Page 14: Remote Control Operation
REMOTE CONTROL OPERATION Battery Installation Before attempting to operate your remote control, install the batteries as described below. 1. Turn the remote control face down. Using a fi ngernail, lift the battery cover off . 2. Install two “AAA” batteries. Make sure that the proper polarity (+/-) is observed. -
Page 15: Remote Control Functional Description
Remote Control Functional Description * Function control is available on the unit and remote control. 1. POWER Button* – Press this button to turn the passenger side or driver side monitor ON. Press the button again to turn the passenger side or driver side monitor OFF. 2. - Page 16 6a. Up () / Down () Buttons – Use these buttons to scroll upward and downward, respectively, in menu options. 6b. Left () / Right () Buttons – Use these buttons to shift left and right, respectively, in the menu options. 6c.
- Page 17 12. SOURCE Button – Press this button to select the available sources. On the passenger side monitor, the sources are DVD, M2, and AUX. On the driver side monitor, the sources are DVD, M1, and AUX. 13. SUBTITLE Button – Press to display and select the subtitle language in DVD mode.
- Page 18 16. AUDIO Button – Press to display and select the audio language in DVD mode. Each time you press the button, the language changes. Note: The languages for audio vary from disc to disc. 17. DISPLAY Button – Press to display the current disc information while the disc is playing.
- Page 19 19. PLAY () Button – Press to activate the play mode while a disc is loaded in the disc compartment. 20. SCAN FORWARD () Button – Press to search in a forward direction. Press repeatedly to change the search speed from 2, 4, 8 or 16 times the normal speed.
-
Page 20: Wireless Headphones Operation
WIRELESS HEADPHONES OPERATION The system includes built-in infrared transmitters for use with Wireless Headphones. The passenger side monitor (M1) IR transmitter transmits on channel 1. The driver side monitor (M2) IR transmitter transmits on channel 2. A channel select switch on the headphones allows the user to select the audio from either the passenger side monitor or the driver side monitor. -
Page 21: Fold Flat Feature
Fold Flat Feature To Operate the Headphones 1. To use the headphones, place one ear piece in each hand, Headphones are intended for use by rear seat passengers only rotate the ear pieces 90 degrees to the fully open position. and will not operate in the front seats. -
Page 22: Operation Instructions
OPERATION INSTRUCTIONS Controls and Indicators Functional Descriptions 1. POWER/MENU Button - Press this button to turn the monitor on. When the monitor is on, press this button again to display the Main Menu. Press and hold the button to turn the monitor off... -
Page 23: Main Menu / Source Selection
Main Menu / Source Selection When the monitor is on, press the POWER/MENU button or touch the screen to display the Main Menu. The Main Menu allows a user to access available input sources or the System Setup Menu. Driver Side Sources Passenger Side Sources - Touch DVD to view the internal DVD player. -
Page 24: Dvd Basics
Disc Compatibility DVD Basics Before a disc is loaded, make sure that it is compatible with the To get the optimum use out of your Seat Top DVD System, player. Insert the disc with the label facing the viewer. please read this section completely. Note: The following discs cannot be played with this player: Region Coding... -
Page 25: Loading And Playing Dvd Discs
LOADING AND PLAYING DVD DISCS To Load and Play a Disc DVD Navigation Menu 1. Apply power to the Seat Top DVD Rear Seat Entertainment When the DVD root menu is displayed, a user can touch a System by placing the vehicle in the ACC or ON mode using corner on the touch screen to bring up the DVD Navigation the power (ignition) switch. -
Page 26: Dvd Control Menu
DVD Control Menu When a DVD video disc is playing, touch the LCD screen to Scan Forward Icon access the DVD Control Menu. Touch this icon to search in a forward direction. Touch repeatedly to change the search speed from 2, 4, 8, and 16 times the normal speed. -
Page 27: Volume Menu
Volume Menu Touch the volume icon on the DVD Control Menu to access the Volume Control Menu. Mute Icon Touch this icon to mute audio to the headphones. Touch the icon again to restore audio. Return Icon Touch this icon to close the volume menu. Home Icon Touch this icon to access the Main Menu. -
Page 28: Dvd Settings And Adjustments
Touch Screen Access: DVD SETTINGS AND ADJUSTMENTS 1. Touch the touch screen to bring up the DVD control menu. The DVD Setup Menu contains features and options to 2. Touch the settings icon to bring up the DVD Setup customize the DVD player. For example, a user can set a Menu. -
Page 29: Language Setup
LANGUAGE SETUP Subtitle Setup On-Screen Display (OSD) Language Setup The OSD Language menu allows the user to select the Select “Subtitle” using the icon, then touch icon to enter the subtitle. Select a subtitle language language for the on-screen display. The user can either using the button, then touch the OK icon to... -
Page 30: Audio Setup
Audio Setup VIDEO SETUP Select “Audio” using the icon, then touch TV Display icon to enter the audio menu. Select an audio language The TV DISPLAY setup allows the user to adjust the screen using the button, then touch the OK icon to setting (aspect ratio) from 4:3 or 16:9. -
Page 31: Rating Setup
RATING SETUP Change Password Parental Control To change the password to your own password, select “Set This feature limits the content of movie playback from G to Password” mode and touch the OK icon. Enter the default Adult. The lower the number, the more strict the control. password (3308) and touch the OK icon. -
Page 32: Misc Setup
MISC SETUP Screen Saver This option allows the user to set the Screen Saver mode. Select “Misc” using the icon, then touch the icon to enter the Misc menu. Select an option using the button, then touch the OK icon. Use Default Settings This option allows the user to reset all options to the factory default settings. -
Page 33: Playing Mp3 Discs
PLAYING MP3 DISCS Skipping Songs Use the Next () button on the remote control to move to the MP3 is a format for storing digital audio. An audio CD-quality next song. Use the Previous () button to move to the previous song can be compressed into the MP3 format with very little song. - Page 34 Repeat Mode The repeat function has 4 options: Off , Single, Folder, and All. The Mode function has 4 options: Normal, Shuffl e, Random and Move the cursor to the Repeat function and touch Music Intro. Move cursor to the Mode function area and touch OK icon.
- Page 35 Select Set “Select” to ON. Select the desired fi les from the fi le list on the The Select function enables or disables the program mode. left side of the screen. A check mark will appear next to the fi le. Touch “Program”...
-
Page 36: System Setup
SYSTEM SETUP PIX (Picture Control) When watching a DVD, the picture quality can be adjusted to System setup settings allow a user to adjust picture quality, turn suit a user’s preferences. Touch the PIX icon to bring up the the screen or infrared transmitter ON/OFF, or choose a default picture control display. - Page 37 Contrast Tint Touch the (contrast) icon to access the contrast Touch the (tint) icon to access the tint adjustment bar. adjustment bar. Touch the icon to increase or Touch the icon to adjust the tint. decrease the contrast. Picture Reset Color Touch the (reset) icon to access the reset adjustment...
-
Page 38: Screen Off
IRT (Infrared Transmitter) Screen Off Touch the “IRT” icon to access the IR Transmitter controls. Touch the “SCREEN OFF” icon to turn the LCD screen off . Touch the LCD screen to turn the screen back on. - Touch this icon to turn the IR transmitter on. Note: The LCD screen defaults to screen on when the system is - Touch this icon to turn the IR transmitter off... -
Page 39: Default Source
Default Source Back Touch the “SOURCE DEFAULT” icon to access the DEFAULT DVD Touch the icon to return to the Main Menu. SOURCE screen. - Touch this icon to allow the system to always default to the DVD source on power up. - Touch this icon to prevent the system from defaulting to the DVD source on power up. -
Page 40: Troubleshooting
TROUBLESHOOTING Problem Solution IR Sensor Inoperative (DVD Player • Verify that the batteries in the remote are fresh. Won’t Accept Commands From • Verify that the remote sensor eye is not obstructed. Remote Control) • Verify that monitor select M1 or monitor select M2 has been selected correctly on the Remote Control. - Page 41 TROUBLESHOOTING Problem Solution Power LED does not light. • Make sure the monitor is fully seated in the seat top dock. • Make sure power is applied to the unit. Place the vehicle in the ACC or ON mode using the power (ignition) switch.
-
Page 42: Specifications
SPECIFICATIONS Display Type TFT Active Matrix LCD Resolution 1440(W) x 234 (H) 480 (RGB) (W) x 234 (H) Pixels 336,960 Aspect Ratio 16:9 Back Light Edge Light Tube Backlight life 10,000 hours Power Source +12 VDC Power Consumption 35W For 2 Monitors + 2 DVD Operating Temperature -4°F ~ 149°F (-20°C ~ +65°C) Storage Temperature... -
Page 43: Fuse Replacement
FUSE REPLACEMENT Sienna Vehicles On Sienna vehicles, one (1) in-line fuse is located behind the passenger side kick panel (below the glove box). If this fuse is blown, the Seat Top DVD System can not be turned on. The fuse can be easily replaced by removing the kick panel to expose the fuse location as shown in fi... -
Page 44: Camry Vehicles
Camry Vehicles On Camry vehicles, there is one (1) in-line fuse located under the upper portion of the driver’s side fl oor carpet (next to the gas pedal and in front of the center console). If this fuse is blown, the Seat Top DVD System can not be turned on. The fuse can be easily replaced by pulling the carpet outward, exposing the fuse location as shown in fi... -
Page 45: Other Vehicle Applications
Other Vehicle Applications Audio Interface For other vehicle applications, one (1) in-line fuse is located Module under either the driver or passenger seat. If this fuse is blown, the Seat Top DVD System can not be turned on. To access the fuse, move the driver or passenger seat to the rearmost position. - Page 46 - 36 -...
-
Page 47: Owner's Notes
OWNER’S NOTES - 37 -... - Page 48 For Customer Service Call the Toll-Free Toyota Customer Assistance Center 1-800-331-4331 or Visit Our Website At www.toyota.com...
Need help?
Do you have a question about the RSE and is the answer not in the manual?
Questions and answers