Juniper ACX1000 Hardware Manual
Universal access router
Hide thumbs
Also See for ACX1000:
- Configuration manual (3270 pages) ,
- User manual (216 pages) ,
- Hardware manual (204 pages)

Related Manuals for Juniper ACX1000


Summary of Contents for Juniper ACX1000
-
Page 1: Hardware Guide
ACX1000 and ACX1100 Universal Access Router Hardware Guide Published: 2013-04-23 Copyright © 2013, Juniper Networks, Inc. - Page 2 Products made or sold by Juniper Networks or components thereof might be covered by one or more of the following patents that are owned by or licensed to Juniper Networks: U.S. Patent Nos. 5,473,599, 5,905,725, 5,909,440, 6,192,051, 6,333,650, 6,359,479, 6,406,312, 6,429,706, 6,459,579, 6,493,347, 6,538,518, 6,538,899, 6,552,918, 6,567,902, 6,578,186, and 6,590,785.
-
Page 3: Table Of Contents
LEDs on ACX1000 and ACX1100 Routers ....... . . 12... - Page 4 Parts Inventory (Packing List) for an ACX1000 and ACX1100 Router ..33 Unpacking an ACX1000 or ACX1100 Router ......34 Chapter 7 Installing the ACX1000 or ACX1100 Router Mounting Hardware .
- Page 5 Connecting an ACX1000 or ACX1100 Fiber-Optic Cable ....69 Replacing an ACX1000 or ACX1100 Transceiver ......71 Removing an ACX1000 or ACX1100 Transceiver .
- Page 6 ACX1100 AC Power Cord Specifications ....... . 124 ACX1000 and ACX1100 DC Power Specifications ......125...
- Page 7 Displaying ACX1000 and ACX1100 Components and Serial Numbers ..137 ACX1000 and ACX1100 Chassis Serial Number Label ..... 138 Contacting Customer Support .
- Page 8 ACX1000 and ACX1100 Universal Access Router Hardware Guide viii Copyright © 2013, Juniper Networks, Inc.
-
Page 9: List Of Figures
Figure 1: Front View of the ACX1000 Router ....... 4... - Page 10 Figure 35: Serial Number ID Label ........138 Figure 36: ACX1000 Chassis Serial Number Label ......138...
- Page 11 Chapter 1 ACX1000 and ACX1100 Router Description ......3 Table 3: CLI Equivalents of Terms Used in Documentation for ACX1000 Routers .
- Page 12 Appendix F ACX1000 and ACX1100 Cable Connector Pinouts ..... 131 Table 27: Alarm Contact Connector Pinouts ......131 Table 28: Management Port Connector Pinout Information .
-
Page 13: About The Documentation
Junos OS Release Notes. ® To obtain the most current version of all Juniper Networks technical documentation, see the product documentation page on the Juniper Networks website at http://www.juniper.net/techpubs/ Documentation Conventions Table 1 on page xiii defines the notice icons used in this guide. -
Page 14: Table 2: Text And Syntax Conventions
ACX1000 and ACX1100 Universal Access Router Hardware Guide Table 2: Text and Syntax Conventions Convention Description Examples Bold text like this Represents text that you type. To enter configuration mode, type theconfigure command: user@host> configure Fixed-width text like this Represents output that appears on the user@host>... -
Page 15: Documentation Feedback
7 days a week, 365 days a year. Self-Help Online Tools and Resources For quick and easy problem resolution, Juniper Networks has designed an online self-service portal called the Customer Support Center (CSC) that provides you with the following features: Find CSC offerings: http://www.juniper.net/customers/support/... -
Page 16: Opening A Case With Jtac
ACX1000 and ACX1100 Universal Access Router Hardware Guide Find product documentation: http://www.juniper.net/techpubs/ Find solutions and answer questions using our Knowledge Base: http://kb.juniper.net/ Download the latest versions of software and review release notes: http://www.juniper.net/customers/csc/software/ Search technical bulletins for relevant hardware and software notifications: https://www.juniper.net/alerts/... -
Page 17: Acx1000 And Acx1100 Universal Access Router Overview
PART 1 ACX1000 and ACX1100 Universal Access Router Overview ACX1000 and ACX1100 Router Description on page 3 ACX1000 and ACX1100 Hardware Components on page 9 ACX1000 and ACX1100 System Architecture Overview on page 21 Copyright © 2013, Juniper Networks, Inc. - Page 18 ACX1000 and ACX1100 Universal Access Router Hardware Guide Copyright © 2013, Juniper Networks, Inc.
-
Page 19: Acx1000 And Acx1100 Router Description
ACX1000 and ACX1100 Router Description ACX1000 and ACX1100 Universal Access Router Overview on page 3 ACX1000 and ACX1100 Routers Hardware and CLI Terminology Mapping on page 5 ACX1000 and ACX1100 Universal Access Router Overview The ACX1000 and ACX1100 Universal Access Routers are principally designed to provide superior management for rapid provisioning to the access network. -
Page 20: Acx1000 Router Description
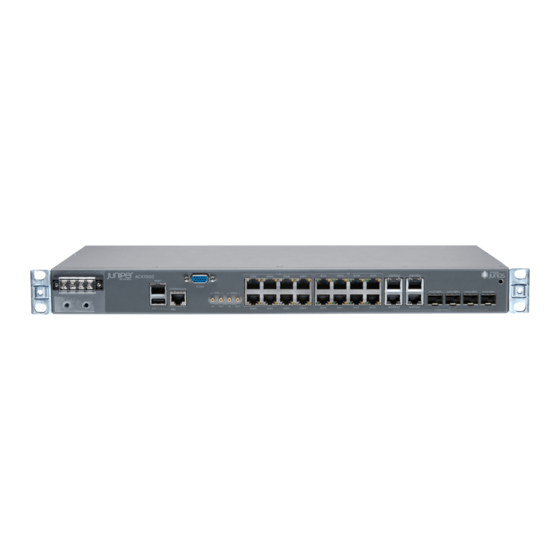
300-mm deep (or larger) enclosed cabinets, 19-in. equipment racks, or telco open-frame racks. ACX1000 Router Description The ACX1000 routers contain eight T1/E1 ports and twelve Gigabit Ethernet ports, eight of which are RJ-45 ports. The ports labeled provide an additional four COMBO PORTS RJ-45 ports or four Gigabit Ethernet SFP ports. -
Page 21: Acx1000 And Acx1100 Routers Hardware And Cli Terminology Mapping
Chapter 1: ACX1000 and ACX1100 Router Description Figure 4: Rear View of the ACX1100 Router Related ACX1000 and ACX1100 Routers Hardware and CLI Terminology Mapping on page 5 Documentation LEDs on ACX1000 and ACX1100 Routers on page 12 ACX1000 and ACX1100 Routers Hardware and CLI Terminology Mapping... -
Page 22: Acx1100 Routers Hardware And Cli Terminology Mapping
ACX1000 and ACX1100 Universal Access Router Hardware Guide Table 3: CLI Equivalents of Terms Used in Documentation for ACX1000 Routers (continued) Hardware Item (as Value (as displayed Description (as displayed in the in the CLI) displayed in the CLI) CLI) -
Page 23: Figure 6: Acx1100 Interface Port Mapping
GE 0/0/0-0/0/7 GE 0/1/0-0/1/3 0/0/4 0/0/5 0/0/6 0/0/7 0/1/2 0/1/3 CONSOLE/AUX 0/0/1 0/0/2 0/0/3 0/1/1 0/0/0 0/1/0 COMBO PORTS 0/1/0 0/1/1 0/1/2 0/1/3 Related ACX1000 and ACX1100 Universal Access Router Overview on page 3 Documentation Copyright © 2013, Juniper Networks, Inc. - Page 24 ACX1000 and ACX1100 Universal Access Router Hardware Guide Copyright © 2013, Juniper Networks, Inc.
-
Page 25: Acx1000 And Acx1100 Hardware Components
LEDs on ACX1000 and ACX1100 Routers on page 12 Uplink Ports on ACX1000 and ACX1100 Routers on page 14 Cooling System and Airflow in an ACX1000 and ACX1100 Router on page 16 ACX1000 and ACX1100 Power Overview on page 17... -
Page 26: Front Panel Of An Acx1100 Router
Related ACX1000 and ACX1100 Universal Access Router Overview on page 3 Documentation ACX1000 and ACX1100 Routers Hardware and CLI Terminology Mapping on page 5 LEDs on ACX1000 and ACX1100 Routers on page 12 Front Panel of an ACX1100 Router The front panel of an ACX1100 router consists of the following components (see... -
Page 27: Figure 8: Front Panel Of The Ac-Powered Acx1100 Router
Grounding terminals Related ACX1000 and ACX1100 Universal Access Router Overview on page 3 Documentation ACX1000 and ACX1100 Routers Hardware and CLI Terminology Mapping on page 5 LEDs on ACX1000 and ACX1100 Routers on page 12 Copyright © 2013, Juniper Networks, Inc. -
Page 28: Leds On Acx1000 And Acx1100 Routers
Router has reported an alarm. On steadily Router has failed. T1/E1 Port LEDs The front panel of the ACX1000 router has eight T1/E1 ports, each with one pair of port LEDs. Table 6 on page 12 describes the LEDs in more detail. -
Page 29: Ethernet Port Leds
Chapter 2: ACX1000 and ACX1100 Hardware Components Ethernet Port LEDs Each Gigabit Ethernet RJ-45 port on the front panel of the router has one pair of port LEDs. Table 7 on page 13 describes the LEDs in more detail. Table 7: Ethernet Port LEDs... -
Page 30: Uplink Ports On Acx1000 And Acx1100 Routers
Front Panel of an ACX1000 Router on page 9 Uplink Ports on ACX1000 and ACX1100 Routers on page 14 Uplink Ports on ACX1000 and ACX1100 Routers Unless otherwise specified, the information about uplink ports applies to both ACX1000 and ACX1100 routers. T1/E1 Ports on page 14... -
Page 31: Gigabit Ethernet Rj-45 Ports
E1 framing: ce1-0/0/0 through ce1-0/0/7 Gigabit Ethernet RJ-45 Ports Each ACX1000 and ACX1100 router has twelve Gigabit Ethernet RJ-45 ports. Table 11 on page 15 describes the ports in more detail. Table 11: RJ-45 Port Features Feature Description... -
Page 32: Gigabit Ethernet Sfp Ports
Related ACX1000 and ACX1100 Universal Access Router Overview on page 3 Documentation Front Panel of an ACX1000 Router on page 9 LEDs on ACX1000 and ACX1100 Routers on page 12 Cooling System and Airflow in an ACX1000 and ACX1100 Router... -
Page 33: Acx1000 And Acx1100 Power Overview
Maximum consumed by the router 65 W Related Connecting DC Power Cables to the ACX1000 or ACX1100 Router on page 43 Documentation ACX1000 and ACX1100 DC Power Electrical Safety Guidelines on page 104 ACX1000 and ACX1100 DC Power Specifications on page 125... -
Page 34: Alarm Contact Port On Acx1000 And Acx1100 Routers
A DE15 alarm cable is required to connect the ACX1000 and ACX1100 router to external alarm devices. Use the gauge wire appropriate for the external device that you are connecting. -
Page 35: Clocking Ports On The Acx1000 And Acx1100 Router
Input Alarm Contact 1 (NC) Contact 2 (REF) Related Alarm Contact Port Pinouts for ACX1000 and ACX1100 Routers on page 131 Documentation Clocking Ports on the ACX1000 and ACX1100 Router The clocking ports acquire the clock source and synchronize communication over time-division multiplexing (TDM) interfaces in the router. - Page 36 Timing input when configured as Ordinary Clock (OC) or Boundary Clock (BC) Timing output when configured as BC Related External Clocking Ports Specifications on the ACX1000 and ACX1100 Router on page 133 Documentation Connecting the ACX1000 or ACX1100 Router to External Clocking Devices on page 54...
-
Page 37: Acx1000 And Acx1100 System Architecture Overview
(By default, the classification is done based on the outer VLAN tag.) Eight queues per egress port support scheduling using the weighted deficit round-robin (WDRR) mechanism, a form of round-robin queue servicing. The supported priority levels Copyright © 2013, Juniper Networks, Inc. -
Page 38: Figure 14: Acx Series Router Packet Handling
Forwarding class and packet loss priority Scheduling and determine rewrite value shaping Related ACX1000 and ACX1100 Routers Hardware and CLI Terminology Mapping on page 5 Documentation Configuring CoS on ACX Series Universal Access Routers Copyright © 2013, Juniper Networks, Inc. -
Page 39: Setting Up The Acx1000 And Acx1100 Router
Installing the ACX1000 or ACX1100 Router Mounting Hardware on page 37 Installing the ACX1000 or ACX1100 Router on page 39 Grounding and Providing Power to the ACX1000 or ACX1100 Router on page 41 Connecting the ACX1000 or ACX1100 Router to Management Devices on page 47... - Page 40 ACX1000 and ACX1100 Universal Access Router Hardware Guide Copyright © 2013, Juniper Networks, Inc.
-
Page 41: Preparing The Site For Acx1000 And Acx1100 Router Installation
Preparing the Site for ACX1000 and ACX1100 Router Installation Site Preparation Checklist for ACX1000 and ACX1100 Routers on page 25 Rack Requirements for ACX1000 and ACX1100 Routers on page 26 Cabinet Requirements for ACX1000 and ACX1100 Routers on page 27... -
Page 42: Rack Requirements For Acx1000 And Acx1100 Routers
Plan the cable routing and management. Related Installing and Connecting an ACX1000 or ACX1100 Router Overview on page 31 Documentation General Site Guidelines for ACX Series Routers on page 30 Rack Requirements for ACX1000 and ACX1100 Routers You can mount the router on two-post racks or four-post racks. -
Page 43: Cabinet Requirements For Acx1000 And Acx1100 Routers
Documentation General Site Guidelines for ACX Series Routers on page 30 Installing and Connecting an ACX1000 or ACX1100 Router Overview on page 31 Cabinet Requirements for ACX1000 and ACX1100 Routers You can mount the router in a cabinet that contains a 19-in. (48.3 cm) rack. -
Page 44: Table 17: Cabinet Requirements And Specifications For The Acx1000 And Acx1100
ACX1000 and ACX1100 Universal Access Router Hardware Guide Table 17 on page 28 provides the cabinet requirements and specifications for the router. Table 17: Cabinet Requirements and Specifications for the ACX1000 and ACX1100 Router Cabinet Requirement Guidelines Cabinet size You can mount the router in a cabinet that contains a 19-in. -
Page 45: Clearance Requirements For Airflow And Hardware Maintenance On Acx1000 And Acx1100 Routers
Rack Requirements for ACX1000 and ACX1100 Routers on page 26 Cabinet Requirements for ACX1000 and ACX1100 Routers on page 27 General Site Guidelines for ACX Series Routers on page 30 Installing and Connecting an ACX1000 or ACX1100 Router Overview on page 31 Copyright © 2013, Juniper Networks, Inc. -
Page 46: General Site Guidelines For Acx Series Routers
Install the device in a secure area, so that only authorized personnel can access the device. Related General Safety Warnings for Juniper Networks Devices on page 80 Documentation General Safety Guidelines for Juniper Networks Devices on page 79 Installation Safety Warnings for Juniper Networks Devices on page 84... -
Page 47: Acx1000 And Acx1100 Router Installation Overview
Connecting ACX1000 or ACX1100 Routers to Management Devices on page 47 Connecting the ACX1000 or ACX1100 Router to an External Alarm-Reporting Device on page 53 Connecting the ACX1000 or ACX1100 Router to External Clocking Devices on page 54 Perform initial configuration of the router. See “Initially Configuring the ACX1000 or ACX1100 Router”... - Page 48 ACX1000 and ACX1100 Universal Access Router Hardware Guide Copyright © 2013, Juniper Networks, Inc.
-
Page 49: Unpacking An Acx1000 Or Acx1100 Router
Unpacking an ACX1000 or ACX1100 Router on page 34 Parts Inventory (Packing List) for an ACX1000 and ACX1100 Router The ACX1000 and ACX1100 routers are shipped in a cardboard carton, secured with foam packing material. The carton also contains an accessory box. -
Page 50: Unpacking An Acx1000 Or Acx1100 Router
Documentation Unpacking an ACX1000 or ACX1100 Router on page 34 Unpacking an ACX1000 or ACX1100 Router The ACX1000 and ACX1100 routers are shipped in a cardboard carton, secured with foam packing material. The carton also contains an accessory box. CAUTION: ACX1000 and ACX1100 routers are maximally protected inside the shipping carton. - Page 51 Save the shipping carton and packing materials in case you need to move or ship the router later. Related ACX1000 and ACX1100 Universal Access Router Overview on page 3 Documentation Site Preparation Checklist for ACX1000 and ACX1100 Routers on page 25 Copyright © 2013, Juniper Networks, Inc.
- Page 52 ACX1000 and ACX1100 Universal Access Router Hardware Guide Copyright © 2013, Juniper Networks, Inc.
-
Page 53: Installing The Acx1000 Or Acx1100 Router Mounting Hardware
Insert the four screws at the top and bottom of the bracket, and tighten each partially. Tighten the four screws completely. Repeat the procedure for the other bracket. Figure 16: Installing the Mounting Brackets to the Front of the ACX1000 or ACX1100 Router Copyright © 2013, Juniper Networks, Inc. -
Page 54: Figure 17: Installing The Mounting Brackets To The Rear Of The Acx1000 Or Acx1100
ACX1000 and ACX1100 Universal Access Router Hardware Guide Figure 17: Installing the Mounting Brackets to the Rear of the ACX1000 or ACX1100 Router Related Installing and Connecting an ACX1000 or ACX1100 Router Overview on page 31 Documentation Installing the ACX1000 or ACX1100 Router in the Rack on page 39... -
Page 55: Installing The Acx1000 Or Acx1100 Router
CHAPTER 8 Installing the ACX1000 or ACX1100 Router Installing the ACX1000 or ACX1100 Router in the Rack on page 39 Installing the ACX1000 or ACX1100 Router in the Rack NOTE: The router can be installed horizontally in a rack or cabinet. For additional installation options, contact JTAC. -
Page 56: Figure 18: Installing The Front-Mounted Router In The Rack
Site Preparation Checklist for ACX1000 and ACX1100 Routers on page 25 Documentation Installing and Connecting an ACX1000 or ACX1100 Router Overview on page 31 Installing the ACX1000 or ACX1100 Mounting Brackets on page 37 Connecting the ACX1000 or ACX1100 Router to Earth Ground on page 41... -
Page 57: Grounding And Providing Power To The Acx1000 Or Acx1100 Router
Connecting the ACX1000 or ACX1100 Router to Earth Ground on page 41 Connecting AC Power Cords to the ACX1100 Router on page 42 Connecting DC Power Cables to the ACX1000 or ACX1100 Router on page 43 Connecting the ACX1000 or ACX1100 Router to Earth Ground... -
Page 58: Connecting Ac Power Cords To The Acx1100 Router
Related Installing and Connecting an ACX1000 or ACX1100 Router Overview on page 31 Documentation Connecting DC Power Cables to the ACX1000 or ACX1100 Router on page 43 Preventing Electrostatic Discharge Damage to an ACX1000 or ACX1100 Router on page 82... -
Page 59: Connecting Dc Power Cables To The Acx1000 Or Acx1100 Router
Chapter 9: Grounding and Providing Power to the ACX1000 or ACX1100 Router AC power cords To connect AC power to the router: Locate the power cords, which should have a plug appropriate for your geographical location. See the “ACX1100 AC Power Cord Specifications” on page 124. - Page 60 ACX1000 and ACX1100 Universal Access Router Hardware Guide M3 screws and flat washers DC power source cables, minimum 14 AWG or as required by local code (not provided) Ring lugs, Molex 190700067 or equivalent (not provided) The DC power supply has four terminals on the front panel, covered by a clear plastic cover.
-
Page 61: Figure 21: Connecting Dc Power To The Router
Chapter 9: Grounding and Providing Power to the ACX1000 or ACX1100 Router screw is properly threaded into the terminal. Applying installation torque to the screw when improperly threaded may result in damage to the terminal. CAUTION: The maximum torque rating of the terminal screws on the DC power supply is 9 lb-in. - Page 62 ACX1000 and ACX1100 Universal Access Router Hardware Guide Copyright © 2013, Juniper Networks, Inc.
-
Page 63: Connecting The Acx1000 Or Acx1100 Router To Management Devices
Connecting the ACX1000 or ACX1100 Router to Management Devices Connecting ACX1000 or ACX1100 Routers to Management Devices on page 47 Connecting ACX1000 or ACX1100 Routers to Management Devices To connect external devices and cables to the router, you need the following tools:... -
Page 64: Connecting The Router To A Management Console Or Auxiliary Device
CONSOLE/AUX port Console Server Related Installing and Connecting an ACX1000 or ACX1100 Router Overview on page 31 Documentation General Site Guidelines for ACX Series Routers on page 30 Management Port Connector Pinout Information for ACX Series Routers on page 133 Initially Configuring the ACX1000 or ACX1100 Router on page 49 Copyright ©... -
Page 65: Configuring Junos Os
Initially Configuring the ACX1000 or ACX1100 Router on page 49 Initially Configuring the ACX1000 or ACX1100 Router The ACX1000 and ACX1100 routers ship with Junos OS preinstalled and ready to be configured when the router is powered on. One 4-GB internal NAND Flash memory device... - Page 66 ACX1000 and ACX1100 Universal Access Router Hardware Guide This procedure connects the router to the network but does not enable it to forward traffic. For complete information about enabling the router to forward traffic, including examples, see the Junos OS configuration guides.
- Page 67 (Optional) Display the configuration to verify that it is correct. [edit] root@# show system { host-name host-name; domain-name domain-name; backup-router address; root-authentication { authentication-method (password | public-key); name-server { address; interfaces { fxp0 { unit 0 { family inet { address address/prefix-length; Copyright © 2013, Juniper Networks, Inc.
- Page 68 When you have finished configuring the router, exit configuration mode. [edit] root@host# exit root@host> Related ACX1000 and ACX1100 Routers Hardware and CLI Terminology Mapping on page 5 Documentation Protocols and Applications Supported by the ACX Routers Copyright © 2013, Juniper Networks, Inc.
-
Page 69: Connecting The Acx1000 Or Acx1100 Router To External Alarm And Clocking Devices
Connecting the ACX1000 or ACX1100 Router to an External Alarm-Reporting Device on page 53 Connecting the ACX1000 or ACX1100 Router to External Clocking Devices on page 54 Connecting the ACX1000 or ACX1100 Router to an External Alarm-Reporting Device To connect the router to external alarm-reporting devices, attach wires to the ALARM relay contacts on the front panel of the router. -
Page 70: Connecting The Acx1000 Or Acx1100 Router To External Clocking Devices
Alarm Contact Port on ACX1000 and ACX1100 Routers on page 18 Documentation Alarm Contact Port Pinouts for ACX1000 and ACX1100 Routers on page 131 Connecting the ACX1000 or ACX1100 Router to External Clocking Devices The ACX1000 and ACX1100 routers support external clock synchronization for Synchronous Ethernet, T1 or E1 line timing sources, and external inputs. - Page 71 Chapter 12: Connecting the ACX1000 or ACX1100 Router to External Alarm and Clocking Devices Configure the port. See: Initially Configuring the ACX1000 or ACX1100 Router on page 49 Configuring External Clock Synchronization for ACX Series Routers Issue the show chassis synchronization command to check the status of the port.
- Page 72 ACX1000 and ACX1100 Universal Access Router Hardware Guide Copyright © 2013, Juniper Networks, Inc.
-
Page 73: Hardware Maintenance, Troubleshooting, And Replacement Procedures
PART 3 Hardware Maintenance, Troubleshooting, and Replacement Procedures Maintaining ACX1000 and ACX1100 Router Hardware Components on page 59 Troubleshooting ACX1000 and ACX1100 Hardware Components on page 63 Replacing ACX1000 and ACX1100 Hardware Components on page 67 Copyright © 2013, Juniper Networks, Inc. - Page 74 ACX1000 and ACX1100 Universal Access Router Hardware Guide Copyright © 2013, Juniper Networks, Inc.
-
Page 75: Maintaining Acx1000 And Acx1100 Router Hardware Components
Router Hardware Components Routine Maintenance Procedures for the ACX1000 and ACX1100 Router on page 59 Maintaining Cables That Connect to ACX1000 and ACX1100 Network Ports on page 59 Maintaining the ACX1000 and ACX1100 Uplink Ports on page 60 Routine Maintenance Procedures for the ACX1000 and ACX1100 Router Purpose For optimum router performance, perform preventive maintenance procedures. -
Page 76: Maintaining The Acx1000 And Acx1100 Uplink Ports
Use only an approved alcohol-free fiber-optic cable cleaning kit, such as the Opptex Cletop-S Fiber Cleaner. Follow the directions for the cleaning kit you use. Related Routine Maintenance Procedures for the ACX1000 and ACX1100 Router on page 59 Documentation Troubleshooting Resources for ACX1000 and ACX1100 Routers on page 63... - Page 77 Chapter 13: Maintaining ACX1000 and ACX1100 Router Hardware Components Related ACX1000 and ACX1100 Routers Hardware and CLI Terminology Mapping on page 5 Documentation Copyright © 2013, Juniper Networks, Inc.
- Page 78 ACX1000 and ACX1100 Universal Access Router Hardware Guide Copyright © 2013, Juniper Networks, Inc.
-
Page 79: Troubleshooting Acx1000 And Acx1100 Hardware Components
CHAPTER 14 Troubleshooting ACX1000 and ACX1100 Hardware Components Troubleshooting Resources for ACX1000 and ACX1100 Routers on page 63 Understanding Alarm Types and Severity Classes on ACX Series Routers on page 64 Verifying Active Alarms on page 65 Monitoring System Log Messages on page 66... -
Page 80: Understanding Alarm Types And Severity Classes On Acx Series Routers
ACX1000 and ACX1100 Universal Access Router Hardware Guide Link LEDs—Each network port has one pair of port LEDs that indicate the status of the ports. For more information on front panel LEDs, see “LEDs on ACX1000 and ACX1100 Routers” on page... -
Page 81: Verifying Active Alarms
Chapter 14: Troubleshooting ACX1000 and ACX1100 Hardware Components One or more hardware components have failed. One or more hardware components have exceeded temperature thresholds. An alarm condition configured on an interface has triggered a critical warning. Minor (blinking red)—Indicates a noncritical condition on the router that, if left unchecked, might cause an interruption in service or degradation in performance. -
Page 82: Monitoring System Log Messages
ACX1000 and ACX1100 Universal Access Router Hardware Guide Monitoring System Log Messages Purpose Use the monitoring functionality to view system log messages for ACX Series routers. Action To view events in the CLI, enter the show log command. For more information see Displaying a Log File from a Single-Chassis System. -
Page 83: Replacing Acx1000 And Acx1100 Hardware Components
CHAPTER 15 Replacing ACX1000 and ACX1100 Hardware Components Replacing an ACX1000 or ACX1100 Console or Auxiliary Cable on page 67 Replacing an ACX1000 or ACX1100 Management Ethernet Cable on page 68 Replacing an ACX1000 or ACX1100 Fiber-Optic Cable on page 69... -
Page 84: Installing An Acx1000 Or Acx1100 Console Or Auxiliary Cable
Console/Auxiliary Port Connector Pinout on ACX Series Routers on page 134 Documentation Replacing an ACX1000 or ACX1100 Management Ethernet Cable Removing an ACX1000 or ACX1100 Management Ethernet Cable on page 68 Installing an ACX1000 and ACX1100 Management Ethernet Cable on page 68 Removing an ACX1000 or ACX1100 Management Ethernet Cable... -
Page 85: Replacing An Acx1000 Or Acx1100 Fiber-Optic Cable
Chapter 15: Replacing ACX1000 and ACX1100 Hardware Components Replacing an ACX1000 or ACX1100 Fiber-Optic Cable To replace a fiber-optic cable: Disconnecting an ACX1000 or ACX1100 Fiber-Optic Cable on page 69 Connecting an ACX1000 or ACX1100 Fiber-Optic Cable on page 69 Disconnecting an ACX1000 or ACX1100 Fiber-Optic Cable ACX Series routers have field-replaceable unit (FRU) optical transceivers to which you can connect fiber-optic cables. -
Page 86: Figure 28: Connecting A Fiber-Optic Cable To An Optical Transceiver Installed In
(see “General Laser Safety Guidelines for Juniper Networks Devices” on page 90). To connect a fiber-optic cable to an optical transceiver installed in an ACX Series router:... -
Page 87: Replacing An Acx1000 Or Acx1100 Transceiver
Replacing an ACX1000 or ACX1100 Transceiver Small form-factor pluggable transceivers (SFPs) are optical transceivers that are installed in the front panel of the ACX1000 and ACX1100 router. Transceivers are hot-insertable and hot-removable. Removing an ACX1000 or ACX1100 Transceiver on page 71... -
Page 88: Installing An Acx1000 Or Acx1100 Transceiver
ACX1000 and ACX1100 Universal Access Router Hardware Guide Figure 29: Removing Transceivers Place a rubber safety cap over the transceiver. Place the removed transceiver on an antistatic mat or in an electrostatic bag. CAUTION: After removing a transceiver from the chassis, wait at least 30 seconds before reinserting it or inserting a transceiver into a different slot. - Page 89 Chapter 15: Replacing ACX1000 and ACX1100 Hardware Components WARNING: Do not look directly into a fiber-optic transceiver or into the ends of fiber-optic cables. Fiber-optic transceivers and fiber-optic cable connected to a transceiver emit laser light that can damage your eyes.
- Page 90 ACX1000 and ACX1100 Universal Access Router Hardware Guide Copyright © 2013, Juniper Networks, Inc.
-
Page 91: Appendixes
ACX1000 and ACX1100 Router Environmental Specifications on page 119 Power Guidelines, Requirements, and Specifications for the ACX1000 and ACX1100 Router on page 121 Cable and Wire Guidelines and Specifications for the ACX1000 and ACX1100 Router on page 127 ACX1000 and ACX1100 Cable Connector Pinouts on page 131... - Page 92 ACX1000 and ACX1100 Universal Access Router Hardware Guide Copyright © 2013, Juniper Networks, Inc.
-
Page 93: Acx1100 Router
APPENDIX A Safety and Regulatory Compliance Information for the ACX1000 and ACX1100 Router Definition of Safety Warning Levels on page 77 Safety Guidelines and Warnings on page 79 Agency Approvals and Compliance Statements on page 109 Definition of Safety Warning Levels... - Page 94 Documentation Installation Safety Warnings for Juniper Networks Devices on page 84 Maintenance and Operational Safety Warnings for Juniper Networks Devices on page 93 General Electrical Safety Warnings for Juniper Networks Devices on page 98 Copyright © 2013, Juniper Networks, Inc.
-
Page 95: Safety Guidelines And Warnings
Appendix A: Safety and Regulatory Compliance Information for the ACX1000 and ACX1100 Router DC Power Electrical Safety Warnings for Juniper Networks Devices on page 105 Safety Guidelines and Warnings General Safety Guidelines for Juniper Networks Devices on page 79 General Safety Warnings for Juniper Networks Devices on page 80... -
Page 96: General Safety Warnings For Juniper Networks Devices
Avoid touching uninsulated electrical wires or terminals that have not been disconnected from their power source. Such an action could cause electrical shock. Related General Safety Warnings for Juniper Networks Devices on page 80 Documentation General Safety Warnings for Juniper Networks Devices... -
Page 97: Restricted Access Area Warning
Appendix A: Safety and Regulatory Compliance Information for the ACX1000 and ACX1100 Router Restricted Access Area Warning WARNING: The hardware equipment is intended for installation in restricted access areas. A restricted access area is an area to which access can be... -
Page 98: Router
Installation Safety Warnings for Juniper Networks Devices on page 84 Documentation Maintenance and Operational Safety Warnings for Juniper Networks Devices on page 93 General Electrical Safety Warnings for Juniper Networks Devices on page 98 DC Power Electrical Safety Warnings for Juniper Networks Devices on page 105 Preventing Electrostatic Discharge Damage to an ACX1000 or ACX1100 Router Many router hardware components are sensitive to damage from static electricity. -
Page 99: Fire Safety Requirements For Juniper Networks Devices
Appendix A: Safety and Regulatory Compliance Information for the ACX1000 and ACX1100 Router Figure 30: ESD Point on ACX1000 and ACX1100 Routers T1/E1 ACX1000 0/0/4 0/0/5 0/0/6 0/0/7 0/1/4 0/1/5 0/1/6 0/1/7 0/2/2 (Cu) 0/2/3 (Cu) MGMT ALARM CONSOLE/AUX 1PPS... -
Page 100: Fire Suppression
To keep warranties effective, do not use a dry chemical fire extinguisher to control a fire at or near a Juniper Networks device. If a dry chemical fire extinguisher is used, the unit is no longer eligible for coverage under a service agreement. -
Page 101: Installation Instructions Warning
Appendix A: Safety and Regulatory Compliance Information for the ACX1000 and ACX1100 Router Installation Instructions Warning WARNING: Read the installation instructions before you connect the hardware equipment to a power source. Waarschuwing Raadpleeg de installatie-aanwijzingen voordat u het systeem met de voeding verbindt. - Page 102 ACX1000 and ACX1100 Universal Access Router Hardware Guide When mounting the chassis in a partially filled rack, load the rack from the bottom to the top, with the heaviest component at the bottom of the rack. If the rack is provided with stabilizing devices, install the stabilizers before mounting the chassis in the rack or servicing the hardware equipment.
- Page 103 Appendix A: Safety and Regulatory Compliance Information for the ACX1000 and ACX1100 Router Si cette unité est montée dans un casier partiellement rempli, charger le casier de bas en haut en plaçant l'élément le plus lourd dans le bas. Si le casier est équipé de dispositifs stabilisateurs, installer les stabilisateurs avant de monter ou de réparer l'unité...
- Page 104 ACX1000 and ACX1100 Universal Access Router Hardware Guide Ved montering av denne enheten i et kabinett som er delvis fylt, skal kabinettet lastes fra bunnen og opp med den tyngste komponenten nederst i kabinettet. Hvis kabinettet er utstyrt med stabiliseringsutstyr, skal stabilisatorene installeres før montering eller utføring av reparasjonsarbeid på...
-
Page 105: Ramp Warning
Appendix A: Safety and Regulatory Compliance Information for the ACX1000 and ACX1100 Router Om denna enhet installeras på en delvis fylld ställning skall ställningen fyllas nedifrån och upp, med de tyngsta enheterna längst ned på ställningen. Om ställningen är försedd med stabiliseringsdon skall dessa monteras fast innan enheten installeras eller underhålls på... -
Page 106: General Laser Safety Guidelines For Juniper Networks Devices
General Site Guidelines for ACX Series Routers on page 30 Documentation Installing and Connecting an ACX1000 or ACX1100 Router Overview on page 31 General Laser Safety Guidelines for Juniper Networks Devices Devices with single-mode optical interfaces are equipped with laser transmitters, which are considered a Class 1 Laser Product by the U.S. -
Page 107: Class 1 Laser Product Warning
Appendix A: Safety and Regulatory Compliance Information for the ACX1000 and ACX1100 Router Class 1 Laser Product Warning WARNING: Class 1 laser product. Waarschuwing Klasse-1 laser produkt. Varoitus Luokan 1 lasertuote. Attention Produit laser de classe I. Warnung Laserprodukt der Klasse 1. -
Page 108: Radiation From Open Port Apertures Warning
ACX1000 and ACX1100 Universal Access Router Hardware Guide Waarschuwing Niet in de straal staren of hem rechtstreeks bekijken met optische instrumenten. Varoitus Älä katso säteeseen äläkä tarkastele sitä suoraan optisen laitteen avulla. Attention Ne pas fixer le faisceau des yeux, ni l'observer directement à l'aide d'instruments optiques. -
Page 109: Devices
Appendix A: Safety and Regulatory Compliance Information for the ACX1000 and ACX1100 Router Avvertenza Quando i cavi in fibra non sono inseriti, radiazioni invisibili possono essere emesse attraverso l'apertura della porta. Evitate di esporvi alle radiazioni e non guardate direttamente nelle aperture. -
Page 110: Jewelry Removal Warning
ACX1000 and ACX1100 Universal Access Router Hardware Guide Varoitus Räjähdyksen vaara, jos akku on vaihdettu väärään akkuun. Käytä vaihtamiseen ainoastaan saman- tai vastaavantyyppistä akkua, joka on valmistajan suosittelema. Hävitä käytetyt akut valmistajan ohjeiden mukaan. Attention Danger d'explosion si la pile n'est pas remplacée correctement. - Page 111 Appendix A: Safety and Regulatory Compliance Information for the ACX1000 and ACX1100 Router Varoitus Ennen kuin työskentelet voimavirtajohtoihin kytkettyjen laitteiden parissa, ota pois kaikki korut (sormukset, kaulakorut ja kellot mukaan lukien). Metalliesineet kuumenevat, kun ne ovat yhteydessä sähkövirran ja maan kanssa, ja ne voivat aiheuttaa vakavia palovammoja tai hitsata metalliesineet kiinni liitäntänapoihin.
-
Page 112: Lightning Activity Warning
ACX1000 and ACX1100 Universal Access Router Hardware Guide Lightning Activity Warning WARNING: Do not work on the system or connect or disconnect cables during periods of lightning activity. Waarschuwing Tijdens onweer dat gepaard gaat met bliksem, dient u niet aan het systeem te werken of kabels aan te sluiten of te ontkoppelen. -
Page 113: Product Disposal Warning
Appendix A: Safety and Regulatory Compliance Information for the ACX1000 and ACX1100 Router Attention Pour éviter toute surchauffe des routeurs de la gamme router, ne l'utilisez pas dans une zone où la température ambiante est supérieure à 40 C. Pour permettre un flot d'air constant, dégagez un espace d'au moins 15,2 cm autour des ouvertures de ventilations. -
Page 114: General Electrical Safety Guidelines And Warnings
In Case of an Electrical Accident on page 103 ACX1100 AC Power Electrical Safety Guidelines and Warnings on page 103 ACX1000 and ACX1100 DC Power Electrical Safety Guidelines on page 104 DC Power Electrical Safety Warnings for Juniper Networks Devices on page 105... - Page 115 Appendix A: Safety and Regulatory Compliance Information for the ACX1000 and ACX1100 Router Grounded Equipment Warning WARNING: The network device is intended to be grounded. Ensure that the network device is connected to earth ground during normal use. Waarschuwing Deze apparatuur hoort geaard te worden Zorg dat de host-computer tijdens normaal gebruik met aarde is verbonden.
- Page 116 ACX1000 and ACX1100 Universal Access Router Hardware Guide Attention Lors de l'installation de l'appareil, la mise à la terre doit toujours être connectée en premier et déconnectée en dernier. Warnung Der Erdanschluß muß bei der Installation der Einheit immer zuerst hergestellt und zuletzt abgetrennt werden.
- Page 117 Appendix A: Safety and Regulatory Compliance Information for the ACX1000 and ACX1100 Router Avvertenza Questa unità ha più di una connessione per alimentatore elettrico; tutte le connessioni devono essere completamente rimosse per togliere l'elettricità dall'unità. Advarsel Denne enheten har mer enn én strømtilkobling. Alle tilkoblinger må...
-
Page 118: General Electrical Safety Guidelines And Electrical Codes For Juniper Networks Devices
Varning! Innan du arbetar med ett chassi eller nära strömförsörjningsenheter skall du för växelströmsenheter dra ur nätsladden och för likströmsenheter bryta strömmen vid överspänningsskyddet. Related DC Power Electrical Safety Warnings for Juniper Networks Devices on page 105 Documentation General Electrical Safety Guidelines and Electrical Codes for Juniper Networks Devices... -
Page 119: In Case Of An Electrical Accident
Appendix A: Safety and Regulatory Compliance Information for the ACX1000 and ACX1100 Router Related In Case of an Electrical Accident on page 103 Documentation In Case of an Electrical Accident If an electrical accident results in an injury, take the following actions in this order: Use caution. -
Page 120: Acx1000 And Acx1100 Dc Power Electrical Safety Guidelines
ACX1000 and ACX1100 Universal Access Router Hardware Guide Related ACX1100 AC Power Specifications on page 123 Documentation ACX1100 AC Power Cord Specifications on page 124 Connecting AC Power Cords to the ACX1100 Router on page 42 ACX1000 and ACX1100 DC Power Electrical Safety Guidelines... -
Page 121: Dc Power Electrical Safety Warnings For Juniper Networks Devices
Appendix A: Safety and Regulatory Compliance Information for the ACX1000 and ACX1100 Router The marked input voltage of –48 VDC for a DC-powered router is the nominal voltage associated with the battery circuit, and any higher voltages are only to be associated with float voltages for the charging function. - Page 122 ACX1000 and ACX1100 Universal Access Router Hardware Guide is. Om u ervan te verzekeren dat alle stroom UIT is geschakeld, kiest u op het schakelbord de stroomverbreker die het gelijkstroom circuit bedient, draait de stroomverbreker naar de UIT positie en plakt de schakelaarhendel van de stroomverbreker met plakband in de UIT positie vast.
- Page 123 Appendix A: Safety and Regulatory Compliance Information for the ACX1000 and ACX1100 Router Varning! Innan du utför någon av följande procedurer måste du kontrollera att strömförsörjningen till likströmskretsen är bruten. Kontrollera att all strömförsörjning är BRUTEN genom att slå AV det överspänningsskydd som skyddar likströmskretsen och tejpa fast överspänningsskyddets omkopplare...
-
Page 124: Site Electrical Wiring Guidelines For Acx Series Routers
Related General Safety Warnings for Juniper Networks Devices on page 80 Documentation General Electrical Safety Warnings for Juniper Networks Devices on page 98 Site Electrical Wiring Guidelines for ACX Series Routers Distance Limitations for Signaling on page 108 Radio Frequency Interference on page 108... -
Page 125: Agency Approvals And Compliance Statements
Appendix A: Safety and Regulatory Compliance Information for the ACX1000 and ACX1100 Router CAUTION: To comply with intrabuilding lightning and surge requirements, use grounded cables that are shielded at both ends when connecting to the intra-building ports (management and T1) on the equipment. - Page 126 ACX1000 and ACX1100 Universal Access Router Hardware Guide EN 60950-1 European Norm, Safety of Information Technology Equipment IEC 60950-1 Information Technology Equipment - Safety - Part 1: General Requirements (with country deviations) EN 60825-1 Safety of Laser Products - Part 1: Equipment Classification, Requirements and User's Guide EN 300 386 V1.3.3 Telecom Network Equipment - EMC Requirements...
-
Page 127: Compliance Statements For Nebs For Acx1000 And Acx1100 Routers
Appendix A: Safety and Regulatory Compliance Information for the ACX1000 and ACX1100 Router The router is designed to comply with the following standards: GR-63-Core: NEBS, Physical Protection GR-1089-Core: EMC and Electrical Safety for Network Telecommunications Equipment SR-3580 NEBS Criteria Levels (Level 3 Compliance) -
Page 128: European Community
ACX1000 and ACX1100 Universal Access Router Hardware Guide European Community This is a Class A product. In a domestic environment this product may cause radio interference in which case the user may be required to take adequate measures. Declaration of Conformity This topic shows the Declaration of Conformity for the router. -
Page 129: Figure 32: Acx1000 And Acx1100 Declaration Of Conformity
Appendix A: Safety and Regulatory Compliance Information for the ACX1000 and ACX1100 Router Figure 32: ACX1000 and ACX1100 Declaration of Conformity Copyright © 2013, Juniper Networks, Inc. -
Page 130: Israel
ACX1000 and ACX1100 Universal Access Router Hardware Guide Israel Class A מוצר זה הוא מוצר מוצר זה עלול לגרום הפרעות בתדר רדיו,ובמקרה זה ,המשתמש עשוי להידרש .לנקוט אמצעים מתאימים Translation from Hebrew—This product is Class A. The product may cause radio interference, and in such a situation, the user may be required to take adequate measures. -
Page 131: Japan
Appendix A: Safety and Regulatory Compliance Information for the ACX1000 and ACX1100 Router Japan Translation from Japanese—This is a Class A product. In a domestic environment this product may cause radio interference in which case the user may be required to take adequate measures. - Page 132 ACX1000 and ACX1100 Universal Access Router Hardware Guide Compliance Statements for EMC Requirements for ACX1000 and ACX1100 Routers on page 111 Compliance Statements for Environmental Requirements for Juniper Networks Devices on page 115 Copyright © 2013, Juniper Networks, Inc.
-
Page 133: Appendix Bacx1000 And Acx1100 Router Physical Specifications
Specifications Chassis Physical Specifications for ACX1000 and ACX1100 Routers on page 117 Chassis Physical Specifications for ACX1000 and ACX1100 Routers The ACX1000 and ACX1100 router is a rigid sheet-metal structure that houses the hardware components. Table 21 on page 117 summarizes the physical specifications of the ACX1000 and ACX1100 router. - Page 134 ACX1000 and ACX1100 Universal Access Router Hardware Guide Copyright © 2013, Juniper Networks, Inc.
-
Page 135: Appendix Cacx1000 And Acx1100 Router Environmental Specifications
APPENDIX C ACX1000 and ACX1100 Router Environmental Specifications ACX1000 and ACX1100 Router Environmental Specifications on page 119 ACX1000 and ACX1100 Router Environmental Specifications The router must be installed in a rack or cabinet housed in a dry, clean, well-ventilated, and temperature-controlled environment. - Page 136 Install the router only in restricted areas, such as dedicated equipment rooms and equipment closets, in accordance with Articles 110-16, 110-17, and 110-18 of the National Electrical Code, ANSI/NFPA 70. Related Chassis Physical Specifications for ACX1000 and ACX1100 Routers on page 117 Documentation Copyright © 2013, Juniper Networks, Inc.
-
Page 137: Power Guidelines, Requirements, And Specifications For The Acx1000
Power Guidelines, Requirements, and Specifications for the ACX1000 and ACX1100 Router ACX1000 and ACX1100 Router Grounding Specifications on page 121 ACX1100 AC Power Specifications on page 123 ACX1100 AC Power Cord Specifications on page 124 ACX1000 and ACX1100 DC Power Specifications on page 125... -
Page 138: Grounding Cable Lug Specifications
ACX1000 and ACX1100 Universal Access Router Hardware Guide Figure 33: Grounding Points on the ACX1000 and ACX1100 Router T1/E1 ACX1000 0/0/4 0/0/5 0/0/6 0/0/7 0/1/4 0/1/5 0/1/6 0/1/7 0/2/2 (Cu) 0/2/3 (Cu) MGMT ALARM CONSOLE/AUX 1PPS 10MHz 0/2/0 (SFP) 0/2/1 (SFP) -
Page 139: Grounding Cable Specifications
Appendix D: Power Guidelines, Requirements, and Specifications for the ACX1000 and ACX1100 Router CAUTION: The maximum torque rating of the grounding screws on the router is 4.34 lb-in. (0.49 Nm). The grounding screws may be damaged if excessive torque is applied. Use only a torque-controlled driver to tighten screws. Use an appropriately sized driver, with a maximum torque capacity of 5 lb-in. -
Page 140: Acx1100 Ac Power Cord Specifications
ACX1000 and ACX1100 Universal Access Router Hardware Guide ACX1100 AC Power Cord Specifications Each AC power supply has a single AC appliance inlet that requires a dedicated AC power feed. Most sites distribute power through a main conduit that leads to frame-mounted power distribution panels, one of which can be located at the top of the rack that houses the router. -
Page 141: Acx1000 And Acx1100 Dc Power Specifications
Documentation ACX1000 and ACX1100 DC Power Specifications The power supplies in ACX1000 and ACX1100 routers are built in along the front left panel of the chassis with DC power terminals to connect power to the router. The power supplies are labeled... - Page 142 Related ACX1000 and ACX1100 DC Power Electrical Safety Guidelines on page 104 Documentation DC Power Electrical Safety Warnings for Juniper Networks Devices on page 105 Copyright © 2013, Juniper Networks, Inc.
-
Page 143: Cable And Wire Guidelines And Specifications For The Acx1000 And Acx1100 Router
APPENDIX E Cable and Wire Guidelines and Specifications for the ACX1000 and ACX1100 Router Understanding Fiber-Optic Cable Signal Loss, Attenuation, and Dispersion on page 127 Calculating Power Budget and Power Margin for Fiber-Optic Cables on page 128 Understanding Fiber-Optic Cable Signal Loss, Attenuation, and Dispersion... -
Page 144: Calculating Power Budget And Power Margin For Fiber-Optic Cables
ACX1000 and ACX1100 Universal Access Router Hardware Guide significantly lower for optical fiber than for other media, it still occurs in both multimode and single-mode transmission. An efficient optical data link must have enough light available to overcome attenuation. Dispersion is the spreading of the signal in time. The following two types of dispersion can affect an optical data link: Chromatic dispersion—Spreading of the signal in time resulting from the different... -
Page 145: Calculating Power Margin For Fiber-Optic Cable
Appendix E: Cable and Wire Guidelines and Specifications for the ACX1000 and ACX1100 Router = –15 dBm – (–28 dBm) = 13 dB Calculating Power Margin for Fiber-Optic Cable After calculating a link's power budget you can calculate the power margin (P... - Page 146 ACX1000 and ACX1100 Universal Access Router Hardware Guide – LL = 13 dB – 2 km (1.0 dB/km) – 5 (0.5 dB) – 2 (0.5 dB) – 0.5 dB [HOL] – 1 dB [CRM] = 13 dB – 2 dB – 2.5 dB – 1 dB – 0.5 dB – 1 dB...
-
Page 147: Appendix Facx1000 And Acx1100 Cable Connector Pinouts
Pinouts Alarm Contact Port Pinouts for ACX1000 and ACX1100 Routers on page 131 External Clocking Ports Specifications on the ACX1000 and ACX1100 Router on page 133 Management Port Connector Pinout Information for ACX Series Routers on page 133 Console/Auxiliary Port Connector Pinout on ACX Series Routers on page 134... - Page 148 ACX1000 and ACX1100 Universal Access Router Overview on page 3 Documentation Front Panel of an ACX1000 Router on page 9 LEDs on ACX1000 and ACX1100 Routers on page 12 Alarm Contact Port on ACX1000 and ACX1100 Routers on page 18 Copyright © 2013, Juniper Networks, Inc.
-
Page 149: External Clocking Ports Specifications On The Acx1000 And Acx1100 Router
Appendix F: ACX1000 and ACX1100 Cable Connector Pinouts External Clocking Ports Specifications on the ACX1000 and ACX1100 Router The external clocking port on the ACX1000 and ACX1100 router contains four SMB connectors that support 10 MHz GPS and 1 pulse-per-second (PPS) signals. These signals are internally isolated and have surge protection. -
Page 150: Console/Auxiliary Port Connector Pinout On Acx Series Routers
Management Port Connector Pinout Information for ACX Series Routers on page 133 Documentation USB Port Specifications for ACX1000 and ACX1100 Routers The following Juniper Networks USB flash drives have been tested and are officially supported for the USB port on all ACX Series routers: RE-USB-1G-S... - Page 151 All USB Flash drives used on ACX Series routers must have the following features: USB 2.0 or later. Formatted with a FAT or MS-DOS file system. Related Front Panel of an ACX1000 Router on page 9 Documentation Initially Configuring the ACX1000 or ACX1100 Router on page 49 Copyright © 2013, Juniper Networks, Inc.
- Page 152 ACX1000 and ACX1100 Universal Access Router Hardware Guide Copyright © 2013, Juniper Networks, Inc.
-
Page 153: Hardware
Contacting Customer Support and Returning ACX1000 and ACX1100 Hardware Displaying ACX1000 and ACX1100 Components and Serial Numbers on page 137 ACX1000 and ACX1100 Chassis Serial Number Label on page 138 Contacting Customer Support on page 138 Returning a Hardware Component to Juniper Networks, Inc. on page 139... -
Page 154: Acx1000 And Acx1100 Chassis Serial Number Label
Returning a Hardware Component to Juniper Networks, Inc. on page 139 Contacting Customer Support You can contact Juniper Networks Technical Assistance Center (JTAC) 24 hours a day, 7 days a week in one of the following ways: On the Web, using the Case Manager link at: http://www.juniper.net/support/... -
Page 155: Returning A Hardware Component To Juniper Networks, Inc
Appendix G: Contacting Customer Support and Returning ACX1000 and ACX1100 Hardware Type of activity being performed on the platform when the problem occurred Configuration data using one or more of the show commands Related Returning a Hardware Component to Juniper Networks, Inc. on page 139 Documentation Returning a Hardware Component to Juniper Networks, Inc. -
Page 156: Packing The Acx Series Router For Shipment
To pack the router for shipment: Retrieve the shipping box and packing materials in which the router was originally shipped. If you do not have these materials, contact your Juniper Networks representative about approved packaging materials. On the console or other management device connected to the Routing Engine, enter CLI operational mode and issue the following command to shut down the router software. -
Page 157: Guidelines For Packing Router Components For Shipment
Appendix G: Contacting Customer Support and Returning ACX1000 and ACX1100 Hardware Guidelines for Packing Router Components for Shipment To pack and ship individual components: When you return components, make sure they are adequately protected with packing materials and packed so that the pieces are prevented from moving around inside the carton. - Page 158 ACX1000 and ACX1100 Universal Access Router Hardware Guide Copyright © 2013, Juniper Networks, Inc.
-
Page 159: Index
PART 5 Index Index on page 145 Copyright © 2013, Juniper Networks, Inc. - Page 160 ACX1000 and ACX1100 Universal Access Router Hardware Guide Copyright © 2013, Juniper Networks, Inc.
-
Page 161: Index
LED location...........9, types...................64 chassis overview................3 altitude, acceptable range..........119 chromatic dispersion in fiber-optic cable.....127 antistatic mat, using..............82 Class 1 laser warning...............91 approvals, agency..............109 Class 1 LED warning..............91 attenuation in fiber-optic cable........127 Copyright © 2013, Juniper Networks, Inc. - Page 162 ACX1000 and ACX1100 Universal Access Router Hardware Guide Class A electronic emission notice console port (for Routing Engine management) Canada................111 cable European Community..........112 connection during initial installation.....48 United States..............115 connector pinout (RJ-45).........134 cleaning instructions conventions fiber-optic transceivers..........59 notice icons..............xiii clearance, around rack............29...
- Page 163 SFP................13 mounting brackets............37 system................12 overview................31 T1/E1................12 router..................39 LED locations...............9, SFP..................72 port locations..............9, SFP+..................72 transceiver.................72 Gigabit Ethernet unpacking the router.............34 port description...............15 installation warning...............85 port location..............9, Gigabit Ethernet SFP ports location................10, Copyright © 2013, Juniper Networks, Inc.
- Page 164 ACX1000 and ACX1100 Universal Access Router Hardware Guide instructions management port (for Routing Engine cleaning See cleaning instructions management) maintenance See maintenance guidelines cable site preparation...............25 connection during initial installation....47 interface connector pinouts..........133 network................127 location................9, interference manuals electromagnetic............108 comments on..............xv radio frequency.............108...
- Page 165 DC electrical specifications........125 safety warnings...............80 power system See also warnings AC electrical specifications........123 seismic (earthquake)............119 DC electrical specifications........125 serial number power system, description............17 in output from show chassis hardware product disposal warning............97 command..............137 Copyright © 2013, Juniper Networks, Inc.
- Page 166 ACX1000 and ACX1100 Universal Access Router Hardware Guide T1/E1 ports description.................71 description.................14 installing................72 location.................9 removing................71 technical support replacing................71 SFP+ contacting JTAC...............xv description.................71 temperature, acceptable range........119 thermal output................119 installing................72 tolerances.................119 removing................71 traceroute command............63 replacing................71 transceiver show chassis alarms command........65 description.................71 show chassis fpc pic-status command......60...
- Page 167 (DC power)......107 wavelength ranges supported by fiber-optic cable..................127 weight..................117 width....................117 wiring electrical See electricity terminations warning (DC power)......107 Copyright © 2013, Juniper Networks, Inc.
- Page 168 ACX1000 and ACX1100 Universal Access Router Hardware Guide Copyright © 2013, Juniper Networks, Inc.
Need help?
Do you have a question about the ACX1000 and is the answer not in the manual?
Questions and answers