Table of Contents
Advertisement
1
2
3
4
5
10
10
10
10
10
8
8
8
8
8
6
6
6
6
6
4
4
4
4
4
2
2
2
2
2
0
0
0
0
0
13
14
15
16
17
1
2
3
4
5
10
10
10
10
10
8
8
8
8
8
6
6
6
6
6
4
4
4
4
4
2
2
2
2
2
0
0
0
0
0
USER'S MANUAL
6
7
8
9
10
10
10
10
10
10
8
8
8
8
8
6
6
6
6
6
4
4
4
4
4
2
2
2
2
2
0
0
0
0
0
18
19
20
21
22
SCENES
6
7
8
9
10
10
10
10
10
10
8
8
8
8
8
6
6
6
6
6
4
4
4
4
4
2
2
2
2
2
0
0
0
0
0
SCENE SETTER
11
12
REC STEP
DIMMER
SPEED TIME
FADE TIME
10
10
DOWN
8
8
6
6
BEAT REV
CHASE REV
4
4
2
2
DARK
MODE SELECT
0
0
REC SPEED
CHNS
A
Double
Preset
1-24
Single
Preset
23
24
MASTER
11
12
A
10
10
10
0
8
8
8
2
6
6
6
4
4
4
4
6
2
2
2
8
0
0
0
10
BLIND
Elation Professional
4295 Charter Street
Los Angeles CA. 90058
www.elationlighting.com
24 CH Dimmer Console
FOG MACHINE
888
Heating
Ready
UP
DELETE
INSERT
REV ONE
% OR 0-255
1
2
3
4
PAGE
ADD/KILL
REC/CLEAR
REC/EXIT
Single chase
SCENES
Mix chase
B
PARK
HOLD
STEP
5Min
10Min
B
FADE
SPEED
.1Sec
.1Sec
Instant
.2s
.2s
.2s
.5s
.5s
1s
1s
1s
2s
2s
2s
5s
5s
5s
10s
10s
10s
20s
30s
30s
1m
1m
1m
2m
2m
2m
5m
5m
5m
10m
MINS
MINS
10m
SHOW
SHOW
MODE
MODE
MINS
HOME
TAP SYNC
FULL-ON
EDIT
ALL REV
RECORD
SHIFT
AUDIO
AUDIO
LEVEL
10
8
6
4
2
0
BLACK OUT
R
Advertisement
Table of Contents

Related Manuals for Elation Elation Professional Scene Setter


Summary of Contents for Elation Elation Professional Scene Setter
- Page 1 SCENE SETTER 24 CH Dimmer Console FOG MACHINE REC STEP Heating Ready DIMMER SPEED TIME FADE TIME DOWN DELETE INSERT EDIT BEAT REV CHASE REV REV ONE % OR 0-255 ALL REV DARK MODE SELECT PAGE ADD/KILL RECORD REC SPEED REC/CLEAR REC/EXIT SHIFT...
-
Page 3: Table Of Contents
Contents Features 1 General Instructions 2 1. Overview 3 1.1 Front View 3 1.2 Rear View 6 2. Operation Guide 7 2.1 Begin Programming 7 2.1.1 Record Enable 7 2.1.2 Security for Your Programs 7 2.1.3 Program Scenes 8 2.2 Editing 11 2.2.1 Edit Enable 11 2.2.2 Erase a Program 12 2.2.3 Erase all Programs 13... -
Page 4: Features
Features Main Features - 24 Channel DMX Dimming Console - Easy programmability - 4580 programmable scenes - 48 recordable progams - Fog Machine trigger button - USITT DMX-512 protocol - MIDI In, Out & Through - 24 individual fader channels - Standard 2 scene operation(2x12) - Fade time &... -
Page 5: General Instructions
General Instructions Read the instruction in this manual carefully and thoroughly, as they give important information regarding safety during use and maintenance. Keep this manual with the unit, in order to consult it in the future. If the unit is sold or given to another operator, make certain that it always has its manual, to enable the new owner to read about its operation and re lative instructions. -
Page 6: Overview
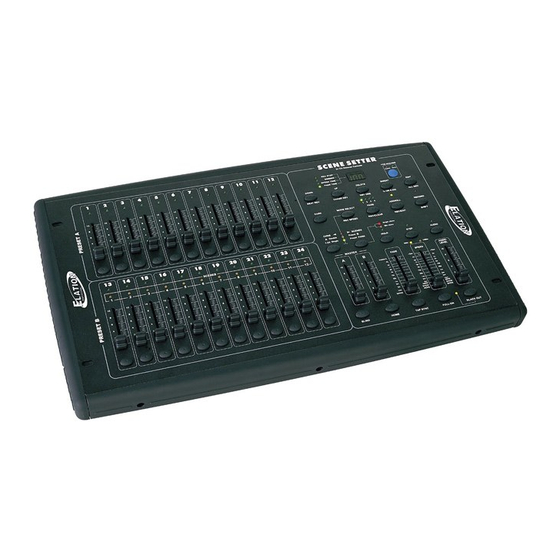
1. Overview 1.1 Front View... - Page 7 1. Overview 1.1 Front View 1. Preset A LEDs Show the current intensity of the relevant channel numbered from 1 to 12. 2. Channel Sliders 1-12 These 12 sliders are used to control and /or program the intensities of channels 1-12. 3.
- Page 8 1. Overview 1.1 Front View 16. Edit / All Rev Edit is used to activate Edit mode. All Rev is to reverse the chasing direction of all programs. 17. Add or Kill/ Rec Exit In Add mode, multiple scenes or Flash buttons will be on at a time.
-
Page 9: Rear View
1. Overview 1.2 Rear View POWER DC INPUT MIDI DMX OUT AUDIO REMOTE FOG MACHINE 1=Ground 1=Ground ON OFF 2=Data 2=Data + 1/4"stereo jack 3=Data + 3=Data LINE INPUT THRU Full on DC 12V~20V 100mV~1Vp-p Stand By 500mA min. DMX Polarity Select or Black Out This switch controls turning on or off of the power. -
Page 10: Operation Guide
2. Operation Guide 2.1 Begin Programming 2.1.1 Record Enable RECORD 1. Press and hold down the Record button. 2. While holding down the Record button, tap the Flash buttons 1, 6, 6 and 8 in sequence. 3. Release the Record button, the Record LED lights up, now you can begin programming your chase patterns. -
Page 11: Program Scenes
2. Operation Guide 2.1.2 Security for Your Programs 3. While holding the Record and Edit buttons, tap the desired Flash button to enter a new Record Code The Record Code consists of 4 Flash buttons(the same button or different buttons), be sure your new Record Code consists of 4 Flash buttons. - Page 12 2. Operation Guide 2.1.3 Program Scenes 3. Create a desired scene using Channel Sliders 1-24. At 0% or DMX 0, these sliders should be at 0 position, and at 100% or DMX 255, these sliders should be at 10 position. 4.
- Page 13 2. Operation Guide 2.1.3 Program Scenes 7. Press a Flash button between 13-24 while holding down the Record button. All LED RECORD will flash indicating the scenes have been programmed into memory. FLASH 13-24 8. You can continue programming or exit. To exit Program mode, tap the Exit button RECORD while holding down the Record button, the...
-
Page 14: Editing
2. Operation Guide 2.2 Editing 2.2.1 Edit Enable 1. Record enable. 2. Use the Page button to select the page the program you wish to edit is on. PAGE MODE 3. Tap the Mode Select button to select SELECT CHNS SCENES. -
Page 15: Erase A Program
2. Operation Guide 2.2.1 Edit Programs 5. While holding down the Edit button, tap the Flash button that corresponds to the program EDIT you wish to edit. FLASH 13-24 6. Release the Edit button, the relevant scene LED should light indicating you are in the Edit mode. -
Page 16: Erase All Programs
2. Operation Guide 2.2 Editing 2.2.3 Erase All Programs RECORD 1. Press and hold the Record button. 2. Tap the Flash buttons 1, 4, 2 and 3 in sequence while holding the Record button. All LEDs will flash, indicating all programs stored in memory have been erased. -
Page 17: Delete A Step Or Steps
2. Operation Guide 2.2 Editing 2.2.5 Delete a Step or Steps 1. Enter the Edit mode. 2. Tap the Step button to scroll to the step you STEP wish to delete. 3. Tap the Delete button when you reach to the DELETE step you wish to delete, all LEDs will flash briefly indicating the deletion of the step. -
Page 18: Insert A Step Or Steps
2. Operation Guide 2.2 Editing 2.2.5 Delete a Step or Steps EXAMPLE: Delete the third step of the program on Flash button 15 on Page 2. 1. Record enable. 2. Tap the Mode Select button to select CHNS SCENE mode. 3. - Page 19 2. Operation Guide 2.2.6 Insert a Step or Steps 4. Tap the Insert button to insert the step you've created before, all LEDs will flash, indicating INSERT the step is inserted. 5. Exit Edit mode. EXAMPLE: Insert a step with channels 1-12 fully on at a time between step 4 and step 5 of program 35.
-
Page 20: Modify A Step Or Steps
2. Operation Guide 2.2 Editing 2.2.7 Modify a Step or Steps 1. Enter Edit mode. 2. Tap the Step button to scroll to the step you wish STEP to modify. 3. Press and hold the Up button if you want to raise the intensity. -
Page 21: Running
2. Operation Guide 2.3 Running 2.3.1 Running Chase Programs MODE SELECT 1. Tap the Mode Select button to select CHNS SCENE mode indicated by the red LED. CHNS SCENES DOUBLE PRESET 1-24 SINGLE PRESET 2. Tap the Page button to select the correct page the program you wish to run is located. -
Page 22: Running A Program To Audio
2. Operation Guide 2.3.1 Running Chase Programs 4. Move the desired Channel slider (13-24) to its maximum position to trigger the program, and the program will fade in depending upon current fade time. You may press and hold down the relevant Flash button(13-24) to trigger the program. -
Page 23: Running A Program With The Speed Slider
2. Operation Guide 2.3.2 Running a Program To Audio AUDIO LEVEL 4. Use the Audio Level slider to adjust the music sensitivity. 5. To return to normal mode, tap the Audio button a second time causing its LED goes out, the AUDIO Audio mode is disengaged. -
Page 24: Running A Program With The Standard Beat
2. Operation Guide 2.3.3 Running a Program With the Speed Slider 5MIN 10MIN 4. Now you may move the Speed Slider to select SPEED .1SEC .1SEC your desired speed. MINS MINS SHOW SHOW MODE MODE NOTE: The step 3 is not necessary if the selected program is not recorded with the Standard Beat. -
Page 25: Change The Speed Mode Between 5 Minutes And 10 Minutes
2. Operation Guide 2.3.4 Running a Program With the Standard Beat 5. While pressing and holding down the Rec Speed button, tap the Flash button(13-24) that stores the program. REC SPEED 6. The program will then run with the set time or FLASH BUTTONS 13-24 beat when engaged. -
Page 26: Midi Operation & Dmx Channel Setup
3. MIDI Operation & DMX Channel Setup 3.1 Setting MIDI IN 1. Tap the Flash button 1 three times while holding down the Record button, the Segment Display RECORD reads "CHI" indicating MIDI IN channel setup is available. Flash button 1 Tap this button three times 2. -
Page 27: Exit Midi Setting
3. MIDI Operation & DMX Channel Setup 3.2 Setting MIDI OUT 2. Tap the Flash button numbered from 1-16 to assign MIDI OUT channel 1-16, the relevant channel LED lights indicating MIDI OUT channel is set. Flash buttons 1-16 3.3 Exit MIDI Setting Press and hold down the Record button. -
Page 28: Sending Midi File Dump
3. MIDI Operation & DMX Channel Setup 3.5 Sending MIDI File Dump Tap the Flash button 4 three times while holding RECORD down the Record button, the Segment Display reads "OUT" indicating the controller is ready to send a file. Flash button 4 Tap this button three times... - Page 29 3. MIDI Operation & DMX Channel Setup 3.6 Implementation 4. There are two types of file dump mode described as below: Open Loop Mode CONTROLLER RECEIVER MIDI OUT MIDI IN MIDI OUT MIDI IN Close Loop Mode CONTROLLER RECEIVER MIDI OUT MIDI IN MIDI OUT MIDI IN...
- Page 30 3. MIDI Operation & DMX Channel Setup 3.7 DMX Channel Setup 1. Be sure this unit has been in Record mode. Press and hold down Record button. RECORD 2. Tapping Flash 6 button three times while holding down Record button allows you to access DMX FLASH 6 RECORD channel setup.
-
Page 31: Manual, May Be Made At Any Time 3.8 Clear Of Dmx Channel Setup
3. MIDI Operation & DMX Channel Setup 3.8 Clear of DMX Channel Setup 1. Be sure this unit has been in Record mode. Press and hold down Record button. RECORD 2. Tapping Flash 7 button three times while holding down Record button allows you to clear DMX FLASH 7 RECORD channel setup and resume DMX channel to factory... -
Page 32: All Rights Reserved Brief Of Main Functions
4. Brief of Main Functions Reverse the direction of the scene 1. Reverse the direction of all the scenes: Press the ALL REV Button, all the scenes should change their directions. 2. Reverse the chasing direction of all the programs with speed control. Press the Chase Rev Button. - Page 33 4. Brief of Main Functions Single Mode 1. All programs will run in sequential order starting in the order of program number. 2. The Segment Display will read the running program number. 3. All programs will be controlled by the same Speed Slider . 4.
- Page 34 4. Brief of Main Functions Park 1. In CHNS SCENES Mode, press down the button you can change the chasing mode of programs between Single Mode and Mix Mode. 2.In Double Preset Mode, pressing down this button is equal to pushing Master Slider B to the top.
-
Page 35: Technical Specifications
Technical Specifications Power Input ..........DC 12~20V, 500 mA min. DMX Output ............3 pin female XLR MIDI Signal ..........5 pin standard interface Audio Input ..............100 mV~1Vpp Fuse(internal) ..........F0.5A 250V 5x20mm Dimensions .............. 482x264x85mm Weight(appro.) ................ 4.6 kg Attention! 1. - Page 36 Elation Professional A Division of the American DJ Group of Companies 4295 Charter Street Los Angeles, CA 90058 USA T el: 323-582-3322 Fax: 323-582-3311 Web: www.elationlighting.com 24-004-1261 E-mail: info@elationlighting.com Version 1.0 March, 2004...
Need help?
Do you have a question about the Elation Professional Scene Setter and is the answer not in the manual?
Questions and answers