Table of Contents
Advertisement
MODEL M1008/M1009
MILL
Model M1008
Model M1009
INSTRUCTION MANUAL
Phone: 1-360-734-3482 • On-Line Technical Support: tech-support@shopfox.biz
COPYRIGHT © OCTOBER, 2004 BY WOODSTOCK INTERNATIONAL, INC. REVISED OCTOBER, 2007.
WARNING: NO PORTION OF THIS MANUAL MAY BE REPRODUCED IN ANY SHAPE OR FORM WITHOUT
THE WRITTEN APPROVAL OF WOODSTOCK INTERNATIONAL, INC.
Printed in China
#6699TR
Advertisement
Table of Contents

Related Manuals for Shop fox Shop fox M1008


Summary of Contents for Shop fox Shop fox M1008
-
Page 1: Instruction Manual
INSTRUCTION MANUAL Phone: 1-360-734-3482 • On-Line Technical Support: tech-support@shopfox.biz COPYRIGHT © OCTOBER, 2004 BY WOODSTOCK INTERNATIONAL, INC. REVISED OCTOBER, 2007. WARNING: NO PORTION OF THIS MANUAL MAY BE REPRODUCED IN ANY SHAPE OR FORM WITHOUT THE WRITTEN APPROVAL OF WOODSTOCK INTERNATIONAL, INC. - Page 2 WARNING Some dust created by power sanding, sawing, grind- ing, drilling, and other construction activities con- tains chemicals known to the State of California to cause cancer, birth defects or other reproductive harm. Some examples of these chemicals are: • Lead from lead-based paints. •...
-
Page 3: Table Of Contents
M1008/M1009 Mill Contents INTRODUCTION ....................3 Woodstock Technical Support ................3 M1008 Specifications ..................4 M1009 Specifications ..................4 M1008 Controls and Features ................5 M1009 Controls and Features ................6 SAFETY ......................7 Standard Safety Instructions ................7 Additional Safety Instructions for Mills ..............9 ELECTRICAL .................... - Page 4 M1008/M1009 Mill General .....................29 Cleaning ....................29 Table and Base ....................29 Checking/Adding Coolant ................29 Lubrication ....................30 Changing Coolant ..................31 Maintenance Schedule ..................32 Maintenance Notes ..................32 SERVICE ......................33 General .....................33 Gibs ......................33 Belt Replacement ..................34 M1008 Wiring Box Identification ................36 M1008 110V Wiring Diagram ................37 M1008 220V Wiring Diagram ................38 M1009 Wiring Box Identification ................39 M1009 110V Wiring Diagram ................40...
-
Page 5: Introduction
We stand behind our machines! In the event that questions arise about your machine, parts are miss- ing, or a defect is found, please contact Woodstock International Technical Support at 1-360-734-3482 or send e-mail to: tech-support@shopfox.biz. Our knowledgeable staff will help you troubleshoot prob- lems and send out parts for warranty claims. -
Page 6: M1008 Specifications
M1008/M1009 Mill M1008 Specifications Vertical Motor ......2 HP, 110/220V (prewired 220V), Single-Phase, 1725 RPM, 20/10 Amps Table Size ....................9-1/2" x 31-1/2" Vertical Spindle Travel .................... 4-3/4" Maximum Distance Vertical Spindle to Column ..............22" Maximum Distance Vertical Spindle to Table ..............11" Table Travel, Longitudinal .................. -
Page 7: M1008 Controls And Features
M1008/M1009 Mill M1008 Controls and Features Figure 1. Please take time to become familiar with each term and its location on the machine. These terms will be used throughout the manual and knowing them is essential to understanding the instruc- tions, safety, and terminology used in this manual. -
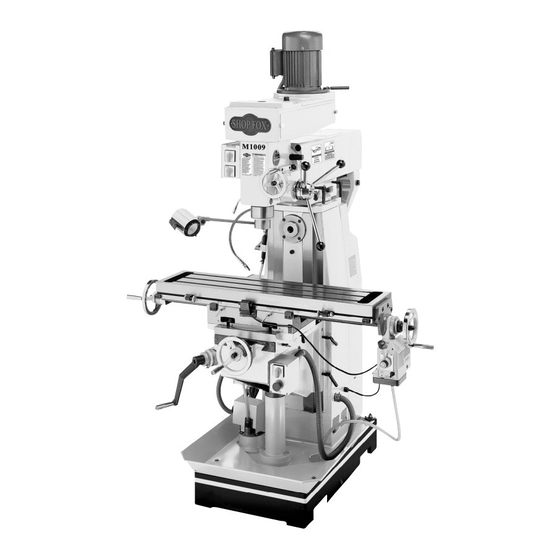
Page 8: M1009 Controls And Features
M1008/M1009 Mill M1009 Controls and Features Figure 2. Please take time to become familiar with each term and its location on the machine. These terms will be used throughout the manual and knowing them is essential to understanding the instruc- tions, safety, and terminology used in this manual. -
Page 9: Safety
M1008/M1009 Mill SAFETY READ MANUAL BEFORE OPERATING MACHINE. FAILURE TO FOLLOW INSTRUCTIONS BELOW WILL RESULT IN PERSONAL INJURY. Indicates an imminently hazardous situation which, if not avoided, WILL result in death or serious injury. Indicates a potentially hazardous situation which, if not avoided, COULD result in death or serious injury. - Page 10 M1008/M1009 Mill 12. Do not force tool. The machine will do a safer and better job at the rate for which it was designed. 13. Use correct tool. Do not force machine or attachment to do a job for which it was not designed. 14.
-
Page 11: Additional Safety Instructions For Mills
M1008/M1009 Mill Additional Safety Instructions for Mills READ and understand this USE this and other machinery with caution entire instruction manual and respect. Always consider safety first, before using this machine. as it applies to your individual working Serious personal injury conditions. -
Page 12: Electrical
M1008/M1009 Mill ELECTRICAL 220V Operation The SHOP FOX Model M1008/M1009 is prewired for ® 220 volt, single-phase operation. At 220V operation, the maximum amp draw from your new mill is 10 amps. For 220V operation, we recommend using a 6-15 plug Figure and receptacle (see For 220V operation, only connect your machine to a cir-... -
Page 13: Grounding
M1008/M1009 Mill Grounding This machine must be grounded! The electrical cord sup- plied with this machine does not come with a plug. Use a plug with a ground pin. If your outlet does not accom- This equipment must be grounded. modate a ground pin, have it replaced by a qualified Verify that any existing electrical out- electrician or have an appropriate adapter installed and... -
Page 14: Set Up
SHOP FOX Model M1008/M1009 has been care- ® fully packaged for safe transporting. If you notice the machine has been damaged, please contact Woodstock International Technical Support at 1-360-734-3482 or send e-mail to: tech-support@shopfox.biz Items Needed for Set Up The following items are needed, but not included, to... -
Page 15: Inventory
• 13/16" ..........1 • 7/8" .............1 If any parts are missing, find the part number in the back of this manual and contact Woodstock International, Inc. at 360-734-3482 or at tech- Figure 6. Tool box contents. support@shopfox.biz NOTICE When ordering replacement parts, refer to the parts list and diagram in the back of the manual. -
Page 16: Machine Placement
M1008/M1009 Mill Machine Placement Cleaning Machine • Floor Load: The Model M1008 weighs 1622 The table and other unpainted parts of your mill lbs. and has a 20-1/2" x 29-1/2" footprint. are coated with a waxy grease that protects The Model M1009 mill weighs 2054 lbs. them from corrosion during shipment. -
Page 17: Floor Mounting
M1008/M1009 Mill Floor Mounting We recommend mounting your new mill to the floor with 5/16" concrete anchor studs or lag screws, depending on your floor material and future space requirements. When mounting to your floor, you can use anchor studs (see Figure 9) or lag screws and lag shields (see Figure 10). -
Page 18: Way Cover
M1008/M1009 Mill Way Cover The way cover protects the back part of the cross ways. To install the way cover, do these steps: 1. Remove the four screws from the machine at the way cover mounting location (Figure 11). Note: The two screws located near the column use a nut and washer. -
Page 19: Operations
M1008/M1009 Mill OPERATIONS General The Model M1008/9 will perform many types of opera- tions that are beyond the scope of this manual. Many of these operations can be dangerous or deadly if performed incorrectly. The instructions in this section are written with the under- standing that the operator has the necessary knowledge and skills to operate this machine. - Page 20 M1008/M1009 Mill To tilt the spindle head, do these steps: 3rd Lock Nut on Opposite Side 1. Make sure the spindle is stopped and the work area is free from obstructions before proceeding. 1st Lock 2. Loosen the three nuts that lock the spindle in place (see Figures 14 &...
-
Page 21: M1009 Vertical/Horizontal Conversion
M1008/M1009 Mill M1009 Vertical/ Overarm Horizontal Conversion Rotated 180˚ To convert the Model M1009 from vertical spindle operation to horizontal, do these steps: 1. UNPLUG THE MACHINE! 2. Loosen the three nuts that lock the spindle in place (see Figures 14 & 15). Spindle Head Tilted to 90˚... -
Page 22: Table Travel
M1008/M1009 Mill Table Travel The table of the Model M1008/M1009 can be moved in 3 axes. Each of these axes are handwheel controlled, and all handwheels are graduated to accurately position of the workpiece in relation to the tool (see Figure 17 for Cross Feed Locks locations). -
Page 23: Rotating Table
M1008/M1009 Mill Rotating Table Table Nuts The mill table can be rotated 45º in either direction for positioning the workpiece. To rotate the mill table, do these steps: 1. Make sure the power is turned OFF. 2. Remove as many items from the mill table as pos- sible. -
Page 24: Quill Travel
M1008/M1009 Mill Quill Travel Quill Feed Control The quill feed is controlled by the quill feed handle and quill lock shown in Figures 24 & 25. The handle allows the mill to operate as a drill. Pull the handle towards you and the quill will feed down towards the workpiece. -
Page 25: Power Feed Controls
M1008/M1009 Mill Power Feed Controls The Model M1008/M1009 comes equipped with a power feed option on the longitudinal travel. The power feed has the following options (see Figure 26 for items A–D, and see Figure 27 for items E–G): A. Right/Left Feed Selector—Switch the lever to the left or the right for the desired travel direction. -
Page 26: Determining Needed Rpm
M1008/M1009 Mill Determining Needed RPM Before changing speeds, you must first determine the Cutting Speeds for High Speed Steel best RPM to use with the material and diameter of your (HSS) Cutting Tools* cutting tool. Using this determined RPM, you can then Workpiece Material Cutting Speed (SFM) reference the spindle speed chart on the mill and set the... -
Page 27: Setting Rpm
M1008/M1009 Mill Setting RPM Setting the RPM involves placing the V-belts on the pul- VERTICAL SPINDLE SPEED CHART leys as shown in the spindle speed chart on the machine. SPINDLE MOTOR CENTER Model M1009 Note: This model has separate spindle speed charts for both the vertical and horizontal spin- dles;... -
Page 28: Spindle Controls
M1008/M1009 Mill Spindle Controls The spindle switch allows you control which direction the spindle rotates, depending on your cutting tool direction of cut. Note: The spindle switch will only work when the main power is turned ON. • Figure 32 shows the location of the vertical spindle switch for both Model M1008/M1009. -
Page 29: Installing Tools
M1008/M1009 Mill Installing Tools To load a tool in the vertical spindle, do these steps: Drawbar at Top 1. UNPLUG THE MILL! of Spindle 2. Clean any debris from the spindle opening. 3. Insert the tool holder or a collet into the spindle. 4. -
Page 30: Removing Tools
M1008/M1009 Mill Removing Tools To remove cutting tools, do these steps: 1. UNPLUG THE MILL! 2. Remove any debris or chips from the tool and the tool holder/arbor. 3. Lock the spindle in place to keep it from rotating. (If you are removing tools from a vertical spindle, be sure to return the vertical quill to its upmost position first.) 4. -
Page 31: Maintenance
M1008/M1009 Mill MAINTENANCE General Regular periodic maintenance on your SHOP FOX ® mill will ensure optimum performance. Make a habit of inspecting your mill each time you use it. A thorough cleaning, on a regular basis, will increase the machine durability and efficiency by removing chips and grime that can gum up moving parts. -
Page 32: Lubrication
M1008/M1009 Mill Lubrication Power Feed The power feed uses SAE 40 oil and should not need to be changed unless the unit is being repaired. Ball Fittings Ball fittings are responsible for the majority of the machine lubrication. To lubricate ball fittings, depress the ball with the tip of an oil can nozzle and squirt a Figure 39. -
Page 33: Changing Coolant
M1008/M1009 Mill Right Side of Machine (Figures 43, 44, & 45): Column/Knee Intersection Cross Ways (Under Table) K. Table rotation (Front and Back) L. Quill Feed M. Horizontal Spindle (Model M1009) Changing Coolant The Model M1008/M1009 coolant tank holds approximate- ly 4 gallons of coolant. -
Page 34: Maintenance Schedule
M1008/M1009 Mill Maintenance Schedule Daily: • Safety Shutoffs • Check V-belt tension. • Clean machine to remove debris. • Make sure table/vise is clean and free of metal chips. • Clean spindle openings before inserting tools. • Check for any unsafe conditions. •... -
Page 35: Service
Always disconnect your machine from the power source before performing any service! If you have additional service questions, please contact Woodstock International Technical Support at (360) 734- 3482 or send e-mail to: tech-support@shopfox.biz. Knee Feed Gib Gibs Adjustment Screw Figure 48. -
Page 36: Belt Replacement
M1008/M1009 Mill Belt Replacement When a V-belt is worn, cracked, or broken, it needs to be 4 Screws replaced. The following instructions are for belt replace- ment. To replace vertical spindle belts (Model M1008/M1009), do these steps: 1. UNPLUG THE MILL! Center Motor Cover... - Page 37 M1008/M1009 Mill To replace the horizontal spindle V-belts (Model M1009 only), do these steps: Spindle Pulley 1. UNPLUG THE MILL! Upper 2. Open the horizontal spindle pulley access panel. Pulley 3. Loosen the bolt that holds the center pulley set Center in place (see Figure 52).
-
Page 38: M1008 Wiring Box Identification
M1008/M1009 Mill M1008 Wiring Box Identification Main Contactor Switch Vertical Spindle Relay Transformer Coolant Pump Relay Circuit Breaker Pump Capacitor Grounding Terminal Bar Main Terminal Bar -36-... -
Page 39: M1008 110V Wiring Diagram
M1008/M1009 Mill M1008 110V Wiring Diagram CODE NAME SPECIFICATIONS SINGLE-PHASE MOTOR (VERTICAL) YC1000L2-4 1PH 110V/220V 60HZ 2HP 1725 RPM V1 COOLANT PUMP YDB-12TH 40W 1PH 110V/220V 60HZ 12L/MIN 3M POWER FEED AS-235 AC 110V AC CONTACTOR CJX1-32/22 AC 24V 60HZ MAIN SWITCH HZ12-40/15 RELAY... -
Page 40: M1008 220V Wiring Diagram
M1008/M1009 Mill M1008 220V Wiring Diagram CODE NAME SPECIFICATIONS SINGLE-PHASE MOTOR (VERTICAL) YC1000L2-4 1PH 110V/220V 60HZ 2HP 1725 RPM V1 COOLANT PUMP YDB-12TH 40W 1PH 110V/220V 60HZ 12L/MIN 3M POWER FEED AS-235 AC 110V AC CONTACTOR CJX1-32/22 AC 24V 60HZ MAIN SWITCH HZ12-40/15 RELAY... -
Page 41: M1009 Wiring Box Identification
M1008/M1009 Mill M1009 Wiring Box Identification Contactor Main Switch Vertical Spindle Relay Transformer Horizontal Spindle Relay Circuit Breaker Grounding Terminal Bar Coolant Pump Relay Pump Main Capacitor Terminal Bar -39-... -
Page 42: M1009 110V Wiring Diagram
M1008/M1009 Mill M1009 110V Wiring Diagram CODE NAME SPECIFICATIONS SINGLE-PHASE MOTOR (VERTICAL) YC1000L2-4 1PH 110V/220V 60HZ 2HP 1725 RPM V1 SINGLE-PHASE MOTOR (HORIZONTAL) YC90L2-4 1PH 110V/220V 60HZ 1.5HP 1725 RPM B3 COOLANT PUMP YDB-12TH 40W 1PH 110V/220V 60HZ 12L/MIN 3M POWER FEED AS-235 AC 110V AC CONTACTOR... -
Page 43: M1009 220V Wiring Diagram
M1008/M1009 Mill M1009 220V Wiring Diagram CODE NAME SPECIFICATIONS SINGLE-PHASE MOTOR (VERTICAL) YC1000L2-4 1PH 110V/220V 60HZ 2HP 1725 RPM V1 SINGLE-PHASE MOTOR (HORIZONTAL) YC90L2-4 1PH 110V/220V 60HZ 1.5HP 1725 RPM B3 COOLANT PUMP YDB-12TH 40W 1PH 110V/220V 60HZ 12L/MIN 3M POWER FEED AS-235 AC 110V AC CONTACTOR... -
Page 44: Troubleshooting
M1008/M1009 Mill Troubleshooting This section covers the most common problems. WARNING! DO NOT make any adjust- ments until the mill is unplugged and all moving parts have come to a complete stop. SYMPTOM POSSIBLE CAUSE CORRECTIVE ACTION Motor will not start. 1. -
Page 45: Parts
M1008/M1009 Mill PARTS Column Breakdown ���� �� �� ���� ����� ���� �� �� �� �� �� �� �� �� �� � �� �� �� �� �� � �� �� �� �� �� � �� �� �� �� �� � � ��... -
Page 46: Column Parts List
M1008/M1009 Mill Column Parts List PART # DESCRIPTION PART # DESCRIPTION XPS96M PHLP HD SCR M10-1.5 x 8 (M1009) XPS08M PHLP HD SCR M5-.8 X 12 XPFH25M FLAT HD SCR M4-.7 X 12 (M1009) XM1008053 DUST COVER XM1009003 HINGE (M1009) 54 XM1008054 SUPPORT XM1009004... -
Page 47: Rotating Table Breakdown
M1008/M1009 Mill Rotating Table Breakdown ��� ��� ��� ��� ��� ��� ��� ��� ��� ��� ��� ��� ��� ��� ��� ��� ��� ��� ��� ��� ��� ��� ��� ��� ��� ��� ��� ��� ��� ��� ��� ��� ��� ��� ��� ���... -
Page 48: Rotating Table Parts List
M1008/M1009 Mill Rotating Table Parts List PART # DESCRIPTION PART # DESCRIPTION XM1008101 CONNECT TUBE XM1008126 SHAFT XPS05M PHLP HD SCR M5-.8 x 8 XM1008127 SHAFT MOUNT XM1008103 OIL COVER XM1008128 T BOLT M12-1.75 X 45 XPSB02M CAP SCREW M6-1 x 20 XPW06M FLAT WASHER 12MM XM1008105... -
Page 49: Headstock Breakdown
M1008/M1009 Mill Headstock Breakdown ����� ����� ����� ����� ��� ��� ����� ��� ��� ��� ��� ��� ��� ��� ��� ��� ��� ��� ��� ��� ��� ��� ��� ��� ��� ��� ��� ��� ��� ��� ��� ��� ��� ��� ��� ��� ���... -
Page 50: Headstock Parts List
M1008/M1009 Mill Headstock Parts List PART # DESCRIPTION PART # DESCRIPTION XM1008201 WEDGE SHIFTER XM1008245 SCALE XM1008202 DRILL CHUCK XM1008246 HANDLE COLLAR XM1008203 SPINDLE BAR XM1008247 HANDLE XM1008204 SPINDLE XM1008248 KNOB M12-1.75 XM1008205 DUST COVER XM1008249 HANDLE BAR XM1008206 BALL BEARING 50 X 80 X 20 XPB133M HEX BOLT M16-2 X 90 XM1008207... -
Page 51: M1009 Horizontal Spindle Breakdown
M1008/M1009 Mill M1009 Horizontal Spindle Breakdown ��� ��� ��� ��� ��� ��� ��� ��� ��� ��� ��� ��� ��� ��� ��� ��� ��� ��� ��� ��� ��� ��� ��� ��� ��� ��� ��� ��� ��� ��� ��� ��� ��� ��� ���... -
Page 52: M1009 Horizontal Spindle Parts List
M1008/M1009 Mill M1009 Horizontal Spindle Parts List PART # DESCRIPTION PART # DESCRIPTION XPVA80 V-BELT A800 XM1009331 PULLEY XPK43M KEY 8 X 8 X 45 XPR25M INT RETAINING RING 47MM XPSS04M SET SCREW M6-1 X 12 XM1009333 SPECIAL NUT M64 X 2 XM1009305 MOTOR WHEEL XPR11M... -
Page 53: Power Feed Breakdown
M1008/M1009 Mill Power Feed Breakdown ��� ��� ��� ��� ��� ����� ��� ��� ����� ����� ����� ����� ����� ����� ��� ����� ��� ����� ����� ��� ��� ����� ����� ��� ��� ����� ��� ��� ��� ��� ����� ����� ��� ����� ��� ���... -
Page 54: Power Feed Parts List
M1008/M1009 Mill Power Feed Parts List PART # DESCRIPTION PART # DESCRIPTION XM1008401 TOP HOUSING 501-5 XPS95M PHLP HD SCR M3-.5 X 30 XPN20M HEX NUT M32-2 501-6 XPN07M HEX NUT M3-.5 XPW20M FLAT WASHER 35MM 501-7 XM1008501-7 CAPACITOR XM1008404 BEVEL GEAR 502-1 XM1008502-1... - Page 55 M1008/M1009 Mill Power Feed Parts List (continued) PART # DESCRIPTION PART # DESCRIPTION 511-1 XM1008511-1 LIFTFORK 515-2 XM1008515-2 RAPID SWITCH HOUSING 511-2 XM1008511-2 LIFTFORK RING 515-3 XM1008515-3 SPRING FOR RAPID SWITCH 511-3 XM1008511-3 PIN, LIFTFORK RING 3 X 14 515-4 XPEC13M E-CLIP 5MM 512-1...
-
Page 56: M1008 Electrical Components Breakdown
M1008/M1009 Mill M1008 Electrical Components Breakdown ��� ��� ��� ��� ��� ��� ��� ��� ��� ����� ��� ��� ����� ����� ����� ��� ��� ��� ��� ��� ��� ��� ��� ��� ��� ��� ��� ��� ��� ��� ��� ��� ��� ��� ���... -
Page 57: M1008 Electrical Components Parts List
M1008/M1009 Mill M1008 Electrical Components Parts List PART # DESCRIPTION PART # DESCRIPTION XM1008601 HALOGEN LAMP XM1008618 VERT SPINDLE SWITCH M4D035 601-1 XM1008601-1 BULB XM1008619 COOLANT PUMP SWITCH M2C005 601-2 XM1008601-2 BULB COVER XM1008620 E-STOP BUTTON LAY3-02ZS/1 601-3 XM1008601-3 BULB COVER RETAINER XM1008621 MAIN WIRING BOX W/LATCH 601-4... -
Page 58: M1009 Electrical Components Breakdown
M1008/M1009 Mill M1009 Electrical Components Breakdown ��� ��� ��� ��� ��� ��� ����� ����� ��� ��� ����� ����� ��� ��� ��� ��� ��� ��� ��� ��� ��� ��� ��� ��� ��� ��� ��� ��� ��� ��� ��� ��� ��� ��� ���... -
Page 59: M1009 Electrical Components Parts List
M1008/M1009 Mill M1009 Electrical Components Parts List PART # DESCRIPTION PART # DESCRIPTION XM1008601 HALOGEN LAMP XM1008623 MAIN WIRING BOX W/LATCH 601-1 XM1008601-1 BULB XPW02M FLAT WASHER 5MM 601-2 XM1008601-2 BULB COVER XPLW01M LOCK WASHER 5MM 601-3 XM1008601-3 BULB COVER RETAINER XPSB33M CAP SCREW M5-.8 X 12 601-4... -
Page 60: Warranty
® with the provisions of any law or acts. In no event shall Woodstock International, Inc.'s liability under this warranty exceed the purchase price paid for the product, and any legal actions brought against Woodstock International, Inc. shall be tried in the State of Washington, County of Whatcom. We shall in no event be liable for death, injuries to persons or property or for incidental, contingent, special or consequential damages arising from the use of our products. -
Page 61: Warranty Registration
M1008/M1009 Mill WARRANTY REGISTRATION Name ___________________________________________________________________________________ Street __________________________________________________________________________________ City _________________________ State ___________________________Zip ________________________ Phone # ______________________ Email __________________________Invoice # ___________________ Model #_________Serial #______________Dealer Name_________________Purchase Date___________ The following information is given on a voluntary basis. It will be used for marketing purposes to help us devel- op better products and services. - Page 62 FOLD ALONG DOTTED LINE Place Stamp Here WOODSTOCK INTERNATIONAL INC. P.O. BOX 2309 BELLINGHAM, WA 98227-2309 FOLD ALONG DOTTED LINE TAPE ALONG EDGES--PLEASE DO NOT STAPLE...
Need help?
Do you have a question about the Shop fox M1008 and is the answer not in the manual?
Questions and answers