Table of Contents
Advertisement
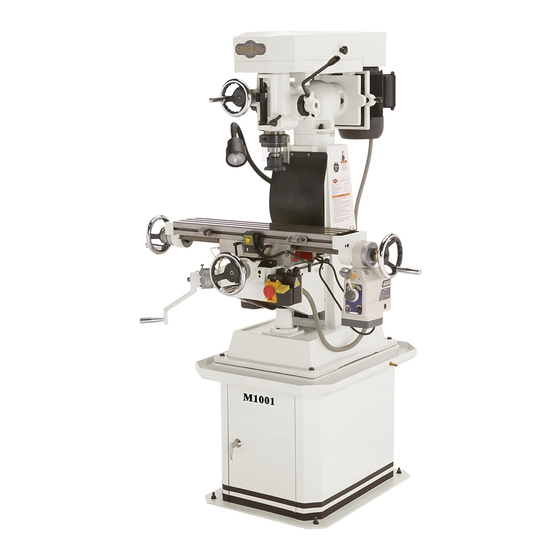
MODEL M1001
6" x 26" VERTICAL MILL
INSTRUCTION MANUAL
Phone: (360) 734-3482 • On-Line Technical Support: tech-support@shopfox.biz
COPYRIGHT © JANUARY, 2005 BY WOODSTOCK INTERNATIONAL, INC., REVISED MARCH, 2011 (TS)
WARNING: NO PORTION OF THIS MANUAL MAY BE REPRODUCED IN ANY SHAPE OR FORM WITHOUT
THE WRITTEN APPROVAL OF WOODSTOCK INTERNATIONAL, INC.
Printed in China
#6799PC
Advertisement
Table of Contents

Related Manuals for Shop fox SHOP FOX M1001


Summary of Contents for Shop fox SHOP FOX M1001
- Page 1 MODEL M1001 6" x 26" VERTICAL MILL INSTRUCTION MANUAL Phone: (360) 734-3482 • On-Line Technical Support: tech-support@shopfox.biz COPYRIGHT © JANUARY, 2005 BY WOODSTOCK INTERNATIONAL, INC., REVISED MARCH, 2011 (TS) WARNING: NO PORTION OF THIS MANUAL MAY BE REPRODUCED IN ANY SHAPE OR FORM WITHOUT THE WRITTEN APPROVAL OF WOODSTOCK INTERNATIONAL, INC. Printed in China #6799PC...
- Page 2 This manual provides critical safety instructions on the proper setup, operation, maintenance, and service of this machine/tool. Save this document, refer to it often, and use it to instruct other operators. Failure to read, understand and follow the instructions in this manual may result in fire or serious personal injury—including amputation, electrocution, or death.
-
Page 3: Table Of Contents
Table of Contents INTRODUCTION ........2 MAINTENANCE ........26 Woodstock Technical Support ....2 General .......... 26 About Your New 6" x 26" Vertical Mill ..2 Cleaning ......... 26 Machine Specifications ......3 Table and Base ........26 Lubrication ........27 SAFETY ..........7... -
Page 4: Introduction
We stand behind our machines! In the event that questions arise about your machine, parts are miss- ing, or a defect is found, please contact Woodstock International Technical Support at (360) 734-3482 or send e-mail to: tech-support@shopfox.biz. Our knowledgeable staff will help you troubleshoot prob- lems and send out parts for warranty claims. -
Page 5: Machine Specifications
M1001 6" x 26" Vertical Mill MODEL M1001 SHOP FOX® VERTICAL MILL 6" X 26" Motors Main Type................. TEFC Capacitor Start Induction Horsepower................... 1-1/2 HP Voltage....................110V/220V Prewired....................110V Phase....................Single-Phase Amps................. 16A at 110V, 8A at 220V Speed....................1725 RPM Cycle....................... - Page 6 M1001 6" x 26" Vertical Mill Table Info Table Length....................26 in. Table Width................... 6-1/8 in. Table Thickness..................1-3/4 in. Number of T-Slots..................... 3 T-Slots Width..................0.560 in. T-Slots Height..................0.850 in. T-Slots Centers..................1-9/16 in. Stud Size....................3/8 in. Spindle Info Spindle Taper....................
- Page 7 M1001 6" x 26" Vertical Mill Electrical Power Requirement............. 110V/220V, Single-Phase, 60 Hz Prewired Voltage....................110V Minimum Circuit Size..............20A at 110V, 15A at 220V Switch....................ON/OFF Switch Switch Voltage....................110V Cord Length....................... 6 ft. Cord Gauge....................14 Gauge Plug Included....................... Yes Included Plug Type..................
-
Page 8: Controls And Features
M1001 6" x 26" Vertical Mill Controls and Features A. Longitudinal Handwheel B. Worklight C. 3" Shell Mill D. Quill Micro-Feed Handwheel E. Quill Down Feed Lever F. Quill Lock G. Power Feed Stops H. Longitudinal Power Feed ON/OFF Buttons Cross Feed Handwheel K. -
Page 9: Safety
M1001 6" x 26" Vertical Mill SAFETY SAFETY For Your Own Safety, Read Manual Before Operating Machine The purpose of safety symbols is to attract your attention to possible hazardous conditions. This manual uses a series of symbols and signal words intended to convey the level of importance of the safety messages. - Page 10 M1001 6" x 26" Vertical Mill APPROVED OPERATION. Untrained operators STABLE MACHINE. Unexpected movement during can be seriously hurt by machinery. Only operations greatly increases the risk of injury allow trained or properly supervised people and loss of control. Verify machines are to use machine.
-
Page 11: Additional Safety Instructions For Vertical Mills
M1001 6" x 26" Vertical Mill Additional Safety Instructions for Vertical Mills READ and understand this USE this and other machinery with caution entire instruction manual and respect. Always consider safety first, before using this machine. as it applies to your individual working Serious personal injury conditions. -
Page 12: Electrical
M1001 6" x 26" Vertical Mill ELECTRICAL Availability Before installing the machine, consider the availability and proximity of the required power supply circuit. If an existing circuit does not meet the requirements for this machine, a new circuit must be installed. To minimize the risk of electrocution, fire, or equipment damage, installation work and electrical wiring must be done by a qualified electrician in accordance with all applicable... - Page 13 M1001 6" x 26" Vertical Mill Circuit Information Note: The circuit requirements listed in this manual apply to a dedicated circuit—where A power supply circuit includes all electrical equipment only one machine will be running at a between the breaker box or fuse panel in the building time.
-
Page 14: Voltage Conversion
M1001 6" x 26" Vertical Mill Grounding & Plug Requirements This machine MUST be grounded. In the event of certain GROUNDED 110V malfunctions or breakdowns, grounding reduces the risk of 5-15 RECEPTACLE electric shock by providing a path of least resistance for electric current. -
Page 15: Set Up
Power Feed Instruction Manual ......1 Figure 4. Toolbox contents. If any parts are missing, find the part number in the back of this manual and contact Woodstock International, Inc. NOTICE at (360) 734-3482 or at tech-support@shopfox.biz When ordering replacement parts, refer to the parts list and diagram in the back of the manual. -
Page 16: Machine Placement
M1001 6" x 26" Vertical Mill Machine Placement Cleaning Machine • Floor Load: Your vertical mill has a large The table and other unpainted parts of your Vertical Mill are coated with a waxy grease that weight load of 822 lbs. in a small footprint. We recommend placing this mill on a protects them from corrosion during shipment. -
Page 17: Mounting Mill On Shop Floor
M1001 6" x 26" Vertical Mill Mounting Mill on Shop Floor Although not required, it is recommend that you mount your new mill to the floor. Because this is an optional step and floor materials may vary, floor mounting hardware is not included. Generally, you can either bolt your machine to the floor or mount it on machine mounts. -
Page 18: Assembly
M1001 6" x 26" Vertical Mill Assembly The Model M1001 comes fully assembled from the factory with the exception of one of the longitudinal handwheels and the cross handwheel. The head has been rotated to reduce the overall dimension of the shipping crate. Nuts 2 &... -
Page 19: Spindle Controls
M1001 6" x 26" Vertical Mill Spindle Controls Figure 13 shows the location of the ON/OFF buttons and ON/OFF the SPINDLE DIRECTION toggle for the Model M1001. • The ON/OFF buttons control power to the spindle. Spindle Direction • The SPINDLE DIRECTION toggle will change the direction the spindle rotates. -
Page 20: Operations
M1001 6" x 26" Vertical Mill OPERATIONS General The Model M1001 will perform many types of operations that are beyond the scope of this manual. Many of these operations can be dangerous or deadly if performed incor- rectly. The instructions in this section are written with the under- standing that the operator has the necessary knowledge and skills to operate this machine. -
Page 21: Table Travel
M1001 6" x 26" Vertical Mill To rotate the spindle head horizontally, do these steps: Vertical Lock Nuts UNPLUG THE MILL! 2. Make sure the spindle is stopped and the work area is free from obstructions before proceeding. 3. Using a 17mm wrench, loosen the three locking nuts shown in Figure 14. -
Page 22: Graduated Dials
M1001 6" x 26" Vertical Mill Graduated Dials The table handwheels and the knee handle have graduated dials. Each mark represents 0.001" of movement and one full revolution equals 0.100" The graduated dials float and can be indexed or "zeroed" by loosening the knurled head thumb screw, rotating the graduated dial to "0", and securing the setting with the knurled head thumb screw (see Figure 17). -
Page 23: Quill Travel
M1001 6" x 26" Vertical Mill Quill Travel Quill Feed Control Pinch Bolt The quill feed is controlled by the quill feed handle shown in Figure 20. The handle allows the mill to operate as a drill. To use the quill feed handle, do these steps: 1. -
Page 24: Determining Needed Rpm
M1001 6" x 26" Vertical Mill Determining Needed RPM Before changing speeds, you must first determine the Cutting Speeds for High Speed Steel best RPM to use with the material and diameter of your (HSS) Cutting Tools* cutting tool. Using this determined RPM, you can then set Workpiece Material Cutting Speed (SFM) the mill to match that speed. -
Page 25: Setting Rpm
M1001 6" x 26" Vertical Mill Setting RPM Setting the RPM on the Model M1001 involves placing the V-belts on the pulleys as shown in the spindle speed chart below. Motor Release Lever To set the spindle speed, do these steps: 1. -
Page 26: Spindle Break-In Procedure
M1001 6" x 26" Vertical Mill Spindle Break-in Procedure Complete this process once you have familiarized 5. Turn ON the spindle in the forward rotation yourself with all instructions in this manual and let it run for a minimum of 10 minutes. and have made sure the machine is completely lubricated. -
Page 27: Installing Tools
M1001 6" x 26" Vertical Mill Installing Tools To load a tool in the spindle, do these steps: 1. UNPLUG THE MILL! Drawbar 2. Turn the mill OFF, allow it to come to a complete stop and unplug the mill. 3. -
Page 28: Maintenance
M1001 6" x 26" Vertical Mill MAINTENANCE General Regular periodic maintenance on your SHOP FOX ® mill will ensure optimum performance. Make a habit of inspecting your mill each time you use it. Check for the following conditions and repair or replace when necessary: •... -
Page 29: Lubrication
M1001 6" x 26" Vertical Mill Lubrication Power Feed The power feed uses SAE 40 oil and should not need to Knee Screw be changed unless the unit is being repaired. Single Shot Lubrication System Use the single shot lubrication system to oil the ways, the crossfeed screw, and the longitudinal screw by pumping the handle on the reservoir 2-4 times each day (see Figure 27). -
Page 30: Maintenance Schedule
M1001 6" x 26" Vertical Mill Maintenance Schedule Daily: • Pump handle of the one shot lubrication system 2-4 times. • Clean machine to remove debris. • Make sure table/vise is clean and free of metal chips. • Clean spindle openings before inserting tools. •... -
Page 31: Service
Always disconnect your machine from the power source before performing any service! If you require additional machine service not included in this section, please contact Woodstock International Technical Support at (360) 734-3482 or send e-mail to: tech-support@shopfox.biz. -
Page 32: Adjusting Backlash
M1001 6" x 26" Vertical Mill Adjusting Backlash Backlash is the amount of play found in a leadscrew. It can be found by turning the cross slide handwheel in one direction, and then turning the handwheel the Adjustment Cap Screws other direction. -
Page 33: Electrical Safety Instructions
These pages are current at the time of printing. However, in the spirit of improvement, we may make changes to the electrical systems of future machines. Study this diagram carefully. If you notice differences between your machine and these wiring diagrams, call Woodstock International Technical Support at (360) 734-3482. -
Page 34: Electrical Parts Identification
M1001 6" x 26" Vertical Mill Electrical Parts Identification DZ47LE C32 Contactor Read Page 31 STOP DZ47 Contactor Before Wiring Move wire to posi- tion A for 220V operation. Transformer Terminal Bar Wiring Box Figure 34. M1001 Electrical panel. -32-... -
Page 35: Wiring Diagram
M1001 6" x 26" Vertical Mill Wiring Diagram 265 VAC 150�F Capacitor Contactor 110V 110V (220V) (220V) Starter 24V ,40W Reverse Switch Motor 400 VAC 20 ±5 �F Capacitor Figure 37. M1001 Wiring schematic. Figure 35. Motor wiring box currently wired for 110V. -
Page 36: Troubleshooting
M1001 6" x 26" Vertical Mill Troubleshooting This section covers the most common problems. WARNING! DO NOT make any adjust- ments until the mill is unplugged and all moving parts have come to a complete stop. SYMPTOM POSSIBLE CAUSE CORRECTIVE ACTION Motor will not start. -
Page 37: Headstock Assembly
M1001 6" x 26" Vertical Mill Headstock Assembly 73-4 73-3 73-5 73-2 70 68 73-1 21 172 -35-... -
Page 38: Base Assembly
M1001 6" x 26" Vertical Mill Base Assembly 127 99 -36-... -
Page 39: Machine Parts Lists
M1001 6" x 26" Vertical Mill Machine Parts Lists PART # DESCRIPTION PART # DESCRIPTION XM1001001 VERTICAL MILLING HEAD XM1001050 COIL SPRING XM1001002 BELT HOUSING COVER XM1001051 COIL SPRING XM1001003 QUILL XM1001052 INT RETAINING RING 19MM XPR67M INT RETAINING RING 75MM XPSB28M CAP SCREW M6-1 x 15 XPLW15M... - Page 40 M1001 6" x 26" Vertical Mill PART # DESCRIPTION PART # DESCRIPTION XM1001095 CROSS LEAD SCREW XPK25M KEY 7 X 7 X 20 XM1001096 CROSS FEED NUT XM1001139 FLEXIBLE CONDUIT XM1001097 CROSS FEED BEARING BRACKET XM1001140 WIRE XM1001098 STOP BLOCK XM1001141 WIRING TERMINAL XM1001099...
-
Page 41: Machine Labels
MUST maintain the original location and readability of all labels on this machine. If any label is removed or becomes unreadable, REPLACE that label before allowing the machine to enter service again. Contact Woodstock International, Inc. at (360) 734-3482 or www. shopfoxtools.com to order new labels. -
Page 42: Warranty
Woodstock International, Inc. will repair or replace, at its expense and at its option, the Shop Fox machine or machine part, which in normal use has proven to be defective, provided that the original owner returns the product prepaid to a Shop Fox factory service center with proof of their purchase of the product within two years, and provides Woodstock International, Inc. -
Page 43: Warranty Registration
M1001 6" x 26" Vertical Mill Warranty Registration Name ___________________________________________________________________________________ Street __________________________________________________________________________________ City _________________________ State ___________________________Zip ________________________ Phone # ______________________ Email___________________________Invoice # ___________________ Model #_________Serial #______________Dealer Name__________________Purchase Date___________ The following information is given on a voluntary basis. It will be used for marketing purposes to help us develop better products and services. - Page 44 FOLD ALONG DOTTED LINE Place Stamp Here WOODSTOCK INTERNATIONAL INC. P.O. BOx 2309 BELLINGHAM, WA 98227-2309 FOLD ALONG DOTTED LINE TAPE ALONG EDGES--PLEASE DO NOT STAPLE...
Need help?
Do you have a question about the SHOP FOX M1001 and is the answer not in the manual?
Questions and answers