Table of Contents
Advertisement
Quick Links
MODEL M1036
MICRO MILL
OWNER'S MANUAL
Phone: (360) 734-3482 • On-Line Technical Support: tech-support@shopfox.biz
COPYRIGHT © NOVEMBER, 2005 BY WOODSTOCK INTERNATIONAL, INC.
WARNING: NO PORTION OF THIS MANUAL MAY BE REPRODUCED IN ANY SHAPE OR FORM WITHOUT
THE WRITTEN APPROVAL OF WOODSTOCK INTERNATIONAL, INC.
Printed in China
#7735EW
Advertisement
Table of Contents

Related Manuals for Shop fox SHOP FOX M1036


Summary of Contents for Shop fox SHOP FOX M1036
- Page 1 OWNER'S MANUAL Phone: (360) 734-3482 • On-Line Technical Support: tech-support@shopfox.biz COPYRIGHT © NOVEMBER, 2005 BY WOODSTOCK INTERNATIONAL, INC. WARNING: NO PORTION OF THIS MANUAL MAY BE REPRODUCED IN ANY SHAPE OR FORM WITHOUT THE WRITTEN APPROVAL OF WOODSTOCK INTERNATIONAL, INC.
- Page 2 WARNING Some dust created by power sanding, sawing, grind- ing, drilling, and other construction activities con- tains chemicals known to the State of California to cause cancer, birth defects or other reproductive harm. Some examples of these chemicals are: • Lead from lead-based paints. •...
-
Page 3: Table Of Contents
Contents INTRODUCTION ....................3 Woodstock Technical Support ................3 About Your New Micro Mill ................3 Specifications ....................3 Controls and Features ..................4 SAFETY ......................5 Standard Safety Instructions ................5 Additional Safety Instructions for Micro Mills ............7 ELECTRICAL ......................8 110V Operation ..................... - Page 4 MAINTENANCE ....................21 General .....................21 Cleaning ....................21 Table & Base ....................21 Lubrication ....................22 SERVICE ......................23 General .....................23 Gibs ......................23 Replacing Motor Brushes .................24 Fuse Replacement ..................24 Troubleshooting ...................26 PARTS ......................27 Parts List ....................28 USE THE QUICK GUIDE PAGE LABELS TO SEARCH OUT INFORMATION FAST!
-
Page 5: Introduction
We stand behind our machines! In the event that questions arise about your machine, parts are miss- ing, or a defect is found, please contact Woodstock International Technical Support at (360) 734-3482 or send e-mail to: tech-support@shopfox.biz. Our knowledgeable staff will help you troubleshoot prob- lems and send out parts for warranty claims. -
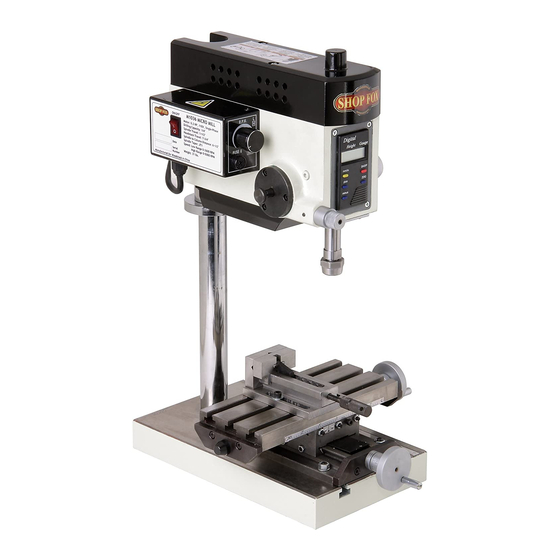
Page 6: Controls And Features
M1036 Micro Mill Controls and Features A. ON/OFF Switch B. RPM Control Knob C. Fuse Box D. Clutch Knob E. Micro Downfeed Knob F. Compound Slide Table G. Base H. Crossfeed Handwheel Collet Chuck (Optional Accessory) Longitudinal Handwheel K. Vise (Optional Accessory) L. -
Page 7: Safety
M1036 Micro Mill SAFETY READ MANUAL BEFORE OPERATING MACHINE. FAILURE TO FOLLOW INSTRUCTIONS BELOW WILL RESULT IN PERSONAL INJURY. Indicates an imminently hazardous situation which, if not avoided, WILL result in death or serious injury. Indicates a potentially hazardous situation which, if not avoided, COULD result in death or serious injury. - Page 8 M1036 Micro Mill 12. Do not force tool. The machine will do a safer and better job at the rate for which it was designed. 13. Use correct tool. Do not force machine or attachment to do a job for which it was not designed. 14.
-
Page 9: Additional Safety Instructions For Micro Mills
M1036 Micro Mill Additional Safety Instructions for Micro Mills READ and understand this USE this and other machinery with caution entire instruction manual and respect. Always consider safety first, before using this machine. as it applies to your individual working Serious personal injury conditions. -
Page 10: Electrical
M1036 Micro Mill ELECTRICAL 110V Operation The SHOP FOX Model M1036 is prewired for 110 volt ® operation. The motor supplied with your new Micro Mill is rated at 0.2 HP and will draw approximately 2 amps. A 5-15 plug is included for your machine and is intended to be plugged into a matching 5-15 receptacle. -
Page 11: Set Up
M1036 Micro Mill SET UP Unpacking READ and understand this SHOP FOX Model M1036 has been carefully pack- ® entire instruction manual aged for safe transporting. If you notice the machine has SHOP before using this machine. been damaged, please contact your authorized Serious personal injury dealer immediately. -
Page 12: Inventory
If any parts are missing, find the part number in the back of this manual and contact Woodstock International, Inc. at (360) 734-3482 or at tech-support@shopfox.biz -10-... -
Page 13: Machine Placement
M1036 Micro Mill Machine Placement Cleaning Machine The table and other unpainted parts of your • Workbench Load Bolt your machine Micro Mill are coated with a waxy grease that to a sturdy workbench that will not tip. protects them from corrosion during shipment. Some workbenches may require additional Clean this grease off with a solvent cleaner or reinforcement to support both the machine... -
Page 14: Mounting To Workbench
M1036 Micro Mill Mounting to Workbench Mounting the mill to the workbench provides maximum rigidity and prevents the mill from tipping. Mounting the mill should be done before installing the headstock for the best access to the mounting holes. When choosing a location for the mill, make sure the cross feed and the longitudinal handwheels extend out beyond the edge of the table surface. -
Page 15: Compound Slide Table
M1036 Micro Mill Compound Slide Table Installation of the compound slide table is not necessary when using the mill as a drill. The compound slide table can be moved in the X and Y axis for use with milling cutters. To install the compound slide table, do these steps: 1. -
Page 16: Test Run And Spindle Break-In
M1036 Micro Mill Test Run and Spindle NOTICE Break-in Failure to follow the break-in proce- dures included in this manual may lead Complete this process once you have familiarized yourself to shortened tool life and may void war- with all instructions in this manual and you have made ranty. -
Page 17: Operations
M1036 Micro Mill OPERATIONS General The Model M1036 will perform many types of operations that are beyond the scope of this manual. Many of these operations can be dangerous or deadly if performed incor- rectly. The instructions in this section are written with the under- standing that the operator has the necessary knowledge and skills to operate this machine. -
Page 18: Graduated Dials
M1036 Micro Mill Graduated Dials Each mark on the handwheel graduated dials (Figure 12) Graduated Dial represents 0.001" of movement. One full rotation of the handwheel is equal to 0.050". The graduated dials can be "zeroed" by grasping the knurled section and rotating the graduated dial to "0". -
Page 19: Downfeed Controls
M1036 Micro Mill Downfeed Controls Quill Feed Control The quill feed is controlled by the downfeed lever shown Downfeed in Figure 14. The handle allows the mill to operate as a Lever drill. To use the downfeed lever, do this step: 1. -
Page 20: Depth Stop
M1036 Micro Mill Depth Stop The depth stop allows the operator to make numerous holes that all are the same depth or to hold the mill at a specified depth. To set the depth stop, do these steps: 1. Use the micro downfeed knob to set the desired depth. -
Page 21: Drill Chuck
M1036 Micro Mill Drill Chuck The drill chuck will only accept bits with a maximum of ⁄ " shank. When installing a bit in the drill chuck, make sure it is tight enough that it will not come loose during operation. -
Page 22: Collets
M1036 Micro Mill Collets The collet chuck (an optional accessory) for the micro mill offers increased precision and rigidity compared to the drill chuck. Each collet will only fit tooling with a specific shaft diameter. This collet set includes ⁄ ", ⁄... -
Page 23: Maintenance
M1036 Micro Mill MAINTENANCE General SHOP FOX Regular periodic maintenance on your ® Model M1036 will ensure its optimum performance. Make a habit of inspecting your machine each time you use it. Check for the following conditions and repair or replace when necessary: •... -
Page 24: Lubrication
M1036 Micro Mill Lubrication Regular lubrication will ensure your mill performs at its highest potential. Place two to three drops of ISO 68 or SAE 20W non-deter- gent oil or similar lubricant directly on the following areas each time you use your mill (see Figure 26): •... -
Page 25: Service
If you require additional machine service not included in this section, please contact Woodstock International Technical Support at (360) 734-3482 or send e-mail to: tech-support@shopfox.biz. Gibs... -
Page 26: Replacing Motor Brushes
M1036 Micro Mill Replacing Motor Brushes After some period of time, the carbon brushes on the DC motor will need to be replaced. Always replace the brushes in pairs. To replace the motor brushes, do these steps: 1. UNPLUG THE MICRO MILL! 2. -
Page 27: Electrical Components
M1036 Micro Mill Electrical Components Circuit Board Fuse On/OFF Switch Variable Speed Switch Wiring Diagram ������������� � � � � �� �� �� ��� �� �� �� ���� �������� ����� ������ ����� ������ ������ � � ���������� ������ ������ -25-... -
Page 28: Troubleshooting
M1036 Micro Mill Troubleshooting This section covers the most common problems and corrections with this type of machine. WARNING! DO NOT make any adjustments until power is disconnected and moving parts have come to a complete stop! SYMPTOM POSSIBLE CAUSE CORRECTIVE ACTION Motor will not start. -
Page 29: Parts
M1036 Micro Mill PARTS ����� ���� ����� �� ����� ���� �� �� �� �� ���� ���� �� ����� ����� ����� ���� �� ���� ����� ����� ���� ����� ����� ����� ����� ����� ����� ���� �� �� ����� �� ����� ����� ����� ��... -
Page 30: Parts List
M1036 Micro Mill Parts List PART�# DESCRIPTION PART�# DESCRIPTION XPSS64M SET�SCREW�M6-1�X�14 XM1036039 SPACER XPR39M EXT�RETAINING�RING�8MM XPR20M INT�RETAINING�RING�28MM XM1036003 GEAR XM1036041 XM1036004 SPECIAL�WASHER XM1036042 GEAR XPS12M PHLP�HD�SCR�M3-.5�X�6 XM1036043 COVER XM1036006 ROUND�PIN�4�X�10 XM1036044 ROUND�PIN�3�X�10 XM1036007 DIAL�RING XM1036045 ELECTRICAL�BOX�(I) XPSS31M SET�SCREW�M5-.8�X�8 XM1036046 FLAT�HD�SCR�M2-.4�X�6 XM1036009 HANDLE�SEAT XM1036047... - Page 31 M1036 Micro Mill PART�# DESCRIPTION PART�# DESCRIPTION XM1036075 FLAT�WASHER�24MM 99-10 XPW02M FLAT�WASHER�5MM XM1036076 BASE 99-11 XM1036099-11 END�COVER XM1036077 COLUMN 99-12 XPN06M� HEX�NUT�M5-.8 XPSB33M CAP�SCREW�M5-.8�X�12 99-13 XM1036099-13 POSITION�GUAGE XM1036079 PARALLEL�BAR 99-14 XM1036099-14 RIVET XPSS26M SET�SCREW�M5-.8�X�6 99-15 XM1036099-15 LONGITUDINAL�LEADSCREW�NUT XM1036081 SMALL�WHEEL 99-16 XPSB80M CAP�SCREW�M3-.5�X�8 XM1036082...
- Page 32 ® with the provisions of any law or acts. In no event shall Woodstock International, Inc.'s liability under this warranty exceed the purchase price paid for the product, and any legal actions brought against Woodstock International, Inc. shall be tried in the State of Washington, County of Whatcom. We shall in no event be liable for death, injuries to persons or property or for incidental, contingent, special or consequential damages arising from the use of our products.
-
Page 33: Warranty Registration
M1036 Micro Mill Warranty Registration Name ___________________________________________________________________________________ Street __________________________________________________________________________________ City _________________________ State ___________________________Zip ________________________ Phone # ______________________ Email __________________________Invoice # ___________________ Model #_________Serial #______________Dealer Name__________________Purchase Date___________ The following information is given on a voluntary basis. It will be used for marketing purposes to help us develop better products and services. - Page 34 FOLD ALONG DOTTED LINE Place Stamp Here WOODSTOCK INTERNATIONAL INC. P.O. BOX 2309 BELLINGHAM, WA 98227-2309 FOLD ALONG DOTTED LINE TAPE ALONG EDGES--PLEASE DO NOT STAPLE...
Need help?
Do you have a question about the SHOP FOX M1036 and is the answer not in the manual?
Questions and answers