Table of Contents
Advertisement
Quick Links
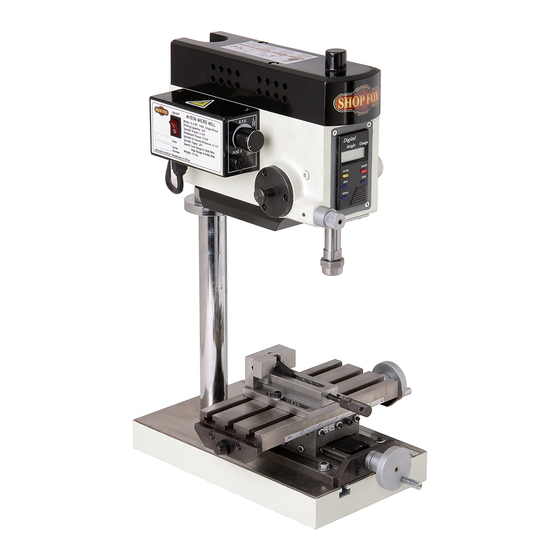
Model M1036
***IMPORTANT UPDATE***
Applies to Models Mfd. Since 5/19
and Owner's Manual Revised 7/13
Phone #: (360) 734-3482 • Tech Support: techsupport@woodstockint.com • Web: www.woodstockint.com
We made the following changes to this machine since the manual was printed:
•
Changed size of motor pulley and drive belt.
Aside from the information contained in this update, all other content in the owner's manual is
applicable and MUST be read and understood for your own safety.
IMPORTANT: Keep this update with the owner's manual for future reference. If you have any further
questions, contact our Technical Support.
Revised Parts
32V2
33
34
35
REF PART #
DESCRIPTION
28V2 XM1036028V2 MOTOR PULLEY 16MM V2.05.19
32V2 XM1036032V2 POLY V-BELT 3V X 28.5L V2.05.19
COPYRIGHT © SEPTEMBER, 2019 BY WOODSTOCK INTERNATIONAL, INC.
WARNING: NO PORTION OF THIS MANUAL MAY BE REPRODUCED IN ANY SHAPE OR FORM WITHOUT
#20625AI
READ THIS FIRST
29
28V2
27
THE WRITTEN APPROVAL OF WOODSTOCK INTERNATIONAL, INC.
REF PART #
Printed in China
Advertisement
Table of Contents

Related Manuals for Shop fox M1036


Summary of Contents for Shop fox M1036
- Page 1 READ THIS FIRST Model M1036 ***IMPORTANT UPDATE*** Applies to Models Mfd. Since 5/19 and Owner's Manual Revised 7/13 Phone #: (360) 734-3482 • Tech Support: techsupport@woodstockint.com • Web: www.woodstockint.com We made the following changes to this machine since the manual was printed: •...
- Page 2 MODEL M1036 MicRO MiLL OWNER'S MANUAL (FOR MODELS MANUFACTURED SINCE 11/05) Phone: (360) 734-3482 • Online Technical Support: tech-support@shopfox.biz cOPYRiGHT © NOVEMBER, 2005 BY WOODSTOcK iNTERNATiONAL, iNc. REViSED JULY, 2013 (DM) WARNiNG: NO PORTiON OF THiS MANUAL MAY BE REPRODUcED iN ANY SHAPE OR FORM WiTHOUT THE WRiTTEN APPROVAL OF WOODSTOcK iNTERNATiONAL, iNc. #7735EW Printed in cHiNA...
- Page 3 This manual provides critical safety instructions on the proper setup, operation, maintenance, and service of this machine/tool. Save this document, refer to it often, and use it to instruct other operators. Failure to read, understand and follow the instructions in this manual may result in fire or serious personal injury—including amputation, electrocution, or death.
-
Page 4: Table Of Contents
TABLE.OF.CONTENTS INTRODUCTION........2 MAINTENANCE........26 Woodstock Technical Support ....2 General .......... 26 Controls and Features ......5 Cleaning ......... 26 Table & Base ........26 SAFETY..........6 Lubrication ........27 Standard Machinery Safety Instructions ..6 SERVICE..........28 Additional Safety for Milling Machines ..8 General .......... -
Page 5: Introduction
M1036 Micro Mill INTRODUCTION Woodstock.Technical.Support Woodstock International, Inc. is committed to customer satisfaction. Our intent with this manual is to include the basic information for safety, setup, operation, maintenance, and service of this product. In the event that questions arise about your machine, please contact Woodstock International Technical Support at (360).734-3482 or send e-mail to: tech-support@shopfox.biz. - Page 6 Vertical Head Travel (Z-Axis)............... 7-3/4 in. Turret or Column Swivel (Left /Right)............360 deg. Drilling Capacity for Steel................1/4 in. Spindle Info Spindle Taper....................JT#1 Range of Vertical Spindle Speeds............. 0 – 5000 RPM Model M1036 Machine Specifications, Page 1 of 2...
- Page 7 Warranty ....................... 2 Years Approximate Assembly & Setup Time ..............30 Minutes ISO 9001 Factory ....................Yes CSA Certified ....................... No Features Digital depth readout Compound slide table Variable speed, 0-5000 RPM Model M1036 Machine Specifications, Page 2 of 2...
-
Page 8: Controls And Features
F. Compound Slide Table G. Base H. Crossfeed Handwheel Collet Chuck (Optional Accessory) Longitudinal Handwheel K. Vise (Optional Accessory) L. Drill Chuck M. Headstock N.. Digital Height Gauge O. Downfeed Lever P. Column Lock Knob Q.. Pulley Cover Figure.1..M1036 Controls and features. -
Page 9: Safety
M1036 Micro Mill SAFETY SAFETY For.Your.Own.Safety, Read.Manual.Before.Operating.Machine The. purpose. of. safety. symbols. is. to. attract. your. attention. to. possible. hazardous. conditions.. This. manual.uses.a.series.of.symbols.and.signal.words.intended.to.convey.the.level.of.importance.of.the. safety.messages..The.progression.of.symbols.is.described.below..Remember.that.safety.messages.by. themselves. do. not. eliminate. danger. and. are. not. a. substitute. for. proper. accident. prevention. mea- sures—this.responsibility.is.ultimately.up.to.the.operator! Indicates.an.imminently.hazardous.situation.which,.if.not.avoided,. - Page 10 M1036 Micro Mill WEARING.PROPER.APPAREL..Do not wear FORCING.MACHINERY..Do not force machine. It clothing, apparel, or jewelry that can become will do the job safer and better at the rate for entangled in moving parts. Always tie back which it was designed.
-
Page 11: Additional Safety For Milling Machines
M1036 Micro Mill Additional.Safety.for.Milling.Machines UNDERSTANDING.CONTROLS..The mill is a STOPPING.SPINDLE. To reduce the risk of hand complex machine that presents severe cutting injuries or entanglement hazards, DO NOT or amputation hazards if used incorrectly. Make attempt to stop the spindle with your hand or a sure you understand the use and operation of all tool. -
Page 12: Electrical
M1036 Micro Mill ELECTRICAL Circuit.Requirements This machine must be connected to the correct size and The. machine. must. be. properly. set. up. type of power supply circuit, or fire or electrical damage before. it. is. safe. to. operate.. DO. NOT. -
Page 13: Grounding Requirements
M1036 Micro Mill Grounding.Requirements GROUNDED 110V 5-15 RECEPTACLE This machine MUST be grounded. In the event of certain types of malfunctions or breakdowns, grounding provides Grounding Prong a path of least resistance for electric current to travel—in order to reduce the risk of electric shock. -
Page 14: Setup
M1036 Micro Mill SETUP Unpacking This machine has been carefully packaged for safe transportation. If you notice the machine has been damaged during shipping, please contact your authorized Shop Fox dealer immediately. Items.Needed Keep. machine. disconnected. from. The following items are needed, but not included, to power.until.instructed.otherwise. -
Page 15: Inventory
M1036 Micro Mill Inventory The following is a description of the main components shipped with the Model M1036. Lay the components out to inventory them. Note: If you can't find an item on this list, check the mounting location on the machine or examine the packaging materials carefully. -
Page 16: Cleanup
M1036 Micro Mill Cleanup Site.Considerations Workbench Load The unpainted surfaces of your machine are coated with a heavy-duty rust preventative that Refer to the Machine.Data.Sheet for the weight prevents corrosion during shipment and storage. and footprint specifications of your machine. -
Page 17: Mounting To Workbench
M1036 Micro Mill Mounting.to.Workbench Mounting the mill to the workbench provides maximum rigidity and prevents the mill from tipping. Mounting the mill should be done before installing the headstock for the best access to the mounting holes. When choosing a... -
Page 18: Compound Slide Table
M1036 Micro Mill Compound.Slide.Table Installation of the compound slide table is not necessary when using the mill as a drill. The compound slide table can be moved in the X and Y axis for use with milling cutters. Cap Screws To.install.the.compound.slide.table,.do.these.steps:... -
Page 19: Test Run And Spindle Break-In
M1036 Micro Mill Test.Run.and.Spindle. NOTICE Break-in Failure. to. follow. the. break-in. proce- Complete this process once you familiarize yourself with dures.included.in.this.manual.may.lead. all instructions in this manual and make sure the machine to.shortened.tool.life.and.may.void.war- is completely lubricated as described in Lubrication.on ranty. -
Page 20: Operations
M1036 Micro Mill OPERATIONS General This machine will perform many types of operations that are beyond the scope of this manual. Many of these operations can be dangerous or deadly if performed incorrectly. The instructions in this section are written with the understanding that the operator has the necessary To.reduce.your.risk.of.serious.injury,. -
Page 21: Graduated Dials
M1036 Micro Mill Table.Travel The table can be moved in 2 axes. Each axis is independently controlled by a crank handle. Each handle Longitudinal Feed has a graduated dial to accurately position the workpiece Control in relation to the cutting tool (see Figure.12). Each axis has the ability to be locked in position. -
Page 22: Backlash
M1036 Micro Mill Backlash When changing table direction in either axis, the handwheel will rotate a few degrees before the table begins to move and the graduated dial must be adjusted. This is backlash. To.correct.for.backlash,.do.these.steps: 1. Turn the handwheel in the opposite direction of your next operation. -
Page 23: Downfeed Controls
M1036 Micro Mill Downfeed.Controls Quill.Feed.Control The quill feed is controlled by the downfeed lever shown Downfeed in Figure.15. The handle allows the mill to operate as a Lever drill. To.use.the.downfeed.lever,.do.this.step: 1. Pull the quill downfeed lever (Figure.15) forward to feed the quill down towards the workpiece. -
Page 24: Digital Height Gauge
M1036 Micro Mill Digital.Height.Gauge The digital height gauge (Figure.17) provides accurate height measurements, zeroing at any height, and incremental readout adjustments. ON/OFF.button:.Turns the digital height gauge ON or OFF. This gauge does not automatically turn OFF, so the Battery batteries will die if the gauge is left ON. -
Page 25: Depth Stop
M1036 Micro Mill Depth.Stop The depth stop allows the operator to make numerous holes that all are the same depth or to hold the mill at a specified depth. To.set.the.depth.stop,.do.these.steps: 1. Use the micro downfeed knob to set the desired depth. -
Page 26: Drill Chuck
M1036 Micro Mill Drill.Chuck The drill chuck will only accept bits with a maximum of ⁄ " shank. When installing a bit in the drill chuck, make sure it is tight enough that it will not come loose during operation. -
Page 27: Collets
M1036 Micro Mill Collets The collet chuck (an optional accessory) for the micro mill offers increased precision and rigidity compared to the drill chuck. Each collet will only fit tooling with a specific shaft diameter. This collet set includes ⁄... -
Page 28: Accessories
M1036 Micro Mill ACCESSORIES The following mill machine accessories may be available through your Woodstock International Inc. Dealer. If you do not have a dealer in your area, these products are also available through online dealers. Please call or e-mail Woodstock International Inc. Customer Service to get a current listing of dealers at: 1-800-840-8420 or at sales@woodstockint.com. -
Page 29: Maintenance
M1036 Micro Mill MAINTENANCE General Regular periodic maintenance on your machine will ensure its optimum performance. Make a habit of inspecting your machine each time you use it. Check.for.the.following.conditions.and.repair.or. replace.when.necessary: • Loose mounting bolts. • Worn switch. • Worn or damaged cords and plugs. -
Page 30: Lubrication
M1036 Micro Mill Lubrication Since all bearings are sealed and permanently lubricated, simply leave them alone until they need to be replaced. Do not lubricate them. This machine does need lubrication in other places. Lubricate.the.following.areas.every.six.to.twelve. months.according.to.frequency.of.use: •. Blade.angling.trunnions. These should be lubricated with 6 or 7 drops of light machine oil. -
Page 31: Service
M1036 Micro Mill SERVICE General This section covers the most common service adjustments or procedures that may need to be made during the life of your machine. If you require additional machine service not included in this section, please contact Woodstock International Technical Support at (360) 734-3482 or send e-mail to: tech-support@shopfox.biz. -
Page 32: Replacing Motor Brushes
M1036 Micro Mill Replacing.Motor.Brushes After some period of time, the carbon brushes on the DC motor will need to be replaced. Always replace the brushes in pairs. To.replace.the.motor.brushes,.do.these.steps: 1.. UNPLUG THE MICRO MILL! 2. Remove the lower motor cover (see Figure.32) to expose the motor. -
Page 33: Electrical Components
M1036 Micro Mill Electrical.Components Circuit Board Fuse On/OFF Switch Variable Speed Switch Wiring.Diagram CIRCUIT BOARD FUSE VARIABLE SPEED ON/OFF MOTOR SWITCH SWITCH 110V POWER GROUND SOURCE -30-... -
Page 34: Troubleshooting
M1036 Micro Mill Troubleshooting This section covers the most common problems and corrections with this type of machine. WARNING!.DO.NOT.make.any.adjustments.until.power.is.disconnected.and. moving.parts.have.come.to.a.complete.stop! SYMPTOM POSSIBLE.CAUSE CORRECTIVE.ACTION Motor will not start. 1. Blown system fuse. 1. Replace fuse. 2. Tripped circuit breaker inside 2. Reset circuit breaker by flipping switch on then off power source breaker box. -
Page 35: Parts
M1036 Micro Mill PARTS 99-10 99-9 99-11 99-12 99-8 99-7 99-6 99-13 99-34 99-14 99-4 99-3 99-36 99-15 99-2 99-35 99-16 99-17 99-18 99-33 99-19 99-1 99-32 99-20 99-31 99-21 99-24 99-30 99-23 99-22 99-25 99-26 99-29 99-27 99-5 99-28... -
Page 36: Parts List
M1036 Micro Mill Parts.List PART # DESCRIPTION PART # DESCRIPTION XPSS64M SET SCREW M6-1 X 14 XM1036039 SPACER XPR39M EXT RETAINING RING 8MM XPR20M INT RETAINING RING 28MM XM1036003 GEAR XM1036041 XM1036004 SPECIAL WASHER XM1036042 GEAR XPS12M PHLP HD SCR M3-.5 X 6 XM1036043 COVER XM1036006 ROUND PIN 4 X 10 XM1036044 ROUND PIN 3 X 10 XM1036007 DIAL RING XM1036045 ELECTRICAL BOX (I) XPSS31M SET SCREW M5-.8 X 8 XM1036046 FLAT HD SCR M2-.4 X 6 XM1036009 HANDLE SEAT... - Page 37 M1036 Micro Mill PART # DESCRIPTION PART # DESCRIPTION XM1036075 FLAT WASHER 24MM 99-11 XM1036099-11 END COVER XM1036076 BASE 99-12 XPN06M HEX NUT M5-.8 XM1036077 COLUMN 99-13 XM1036099-13 POSITION GUAGE XPSB33M CAP SCREW M5-.8 X 12 99-14 XM1036099-14 RIVET XM1036079...
- Page 38 M1036 Micro Mill...
- Page 39 FOLD ALONG DOTTED LINE Place Stamp Here WOODSTOCK.INTERNATIONAL.INC.. P.O..BOX.2309. BELLINGHAM,.WA..98227-2309 FOLD ALONG DOTTED LINE TAPE ALONG EDGES--PLEASE DO NOT STAPLE...
-
Page 40: Warranty
Woodstock International, Inc. will repair or replace, at its expense and at its option, the Shop Fox machine or machine part, which in normal use has proven to be defective, provided that the original owner returns the product prepaid to a Shop Fox factory service center with proof of their purchase of the product within two years, and provides Woodstock International, Inc. - Page 41 High Quality Machines and Tools Woodstock International, Inc. carries thousands of products designed to meet the needs of today's woodworkers and metalworkers. Ask your dealer about these fine products:...
Need help?
Do you have a question about the M1036 and is the answer not in the manual?
Questions and answers