Table of Contents
Advertisement
Available languages
Available languages
Quick Links
Advertisement
Chapters
Table of Contents

Subscribe to Our Youtube Channel
Related Manuals for Fagor Built-In Coffee Machine MQC-A10 US


Summary of Contents for Fagor Built-In Coffee Machine MQC-A10 US
-
Page 2: Table Of Contents
I t a l i a n o I t a l i a n o 1 DESCRIZIONE MACCHINA • Vista frontale e totale • Vista laterale e comandi • Indicazioni per la sicurezza ed avvertenze • Corretto impiego • Sicurezza tecnica •... -
Page 3: Descrizione Macchina
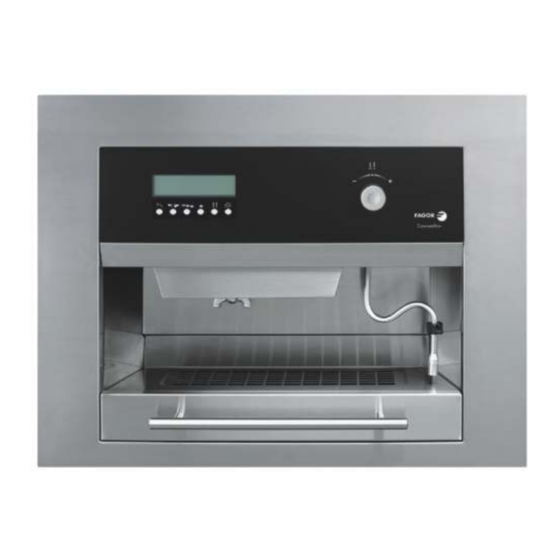
1 DESCRIZIONE MACCHINA 1 DESCRIZIONE MACCHINA VISTA FRONTALE E TOTALE 01. Illuminazione 02. Manopola per vapore 03. Erogatore acqua calda/vapore 04. Maniglia cassetto 05. Erogatore del caffè 06. Serbatoio acqua 07. Griglia di sgocciolamento 08. Contenitore per chicchi di caffè 09. -
Page 4: Indicazioni Per La Sicurezza Ed Avvertenze
I t a l i a n o I t a l i a n o INDICAZIONI PER LA SICUREZZA ED AVVERTENZE Questa macchina corrisponde alle vigenti prescrizioni di sicurezza. L’uso scorretto della macchina può causare danni a persone e a cose. -
Page 5: Funzionamento
2 DESCRIZIONE E FUNZIONAMENTO 2 DESCRIZIONE E FUNZIONAMENTO La macchina del caffè dispone di due caldaie, una per il riscalda- mento dell’acqua, una per il caffè. E’ possibile preparare acqua bollente (per il tè), oppure utilizzare il vapore (per il cappuccino) e preparare il caffè... -
Page 6: Installazione
I t a l i a n o I t a l i a n o 3 INSTALLAZIONE DELLA MACCHINA 3 INSTALLAZIONE DELLA MACCHINA IMPORTANTE: l’installazione dell’apparecchiatura deve essere effettuata esclusi- vamente da personale qualifi cato in accordo alle normative vigenti. Considerando l’elevato peso della macchina, è... - Page 7 F ig . 2B F ig . 2 B I C T- 0 1 I C T- 0 1 I t a l i a n o I t a l i a n o...
- Page 8 I t a l i a n o I t a l i a n o 2. Smontare la macchina dal basamento sganciandola dalle gui- de laterali agendo sulle leve (fi g. 3). Lo sganciamento avviene sollevando la leva della guida destra e abbassando quella della guida sinistra (1) 3.
-
Page 9: Importanti Istruzioni Per Il Primo Utilizzo
4 IMPORTANTI ISTRUZIONI PER IL PRIMO UTILIZZO! 4 IMPORTANTI ISTRUZIONI PER IL PRIMO UTILIZZO! Istruzioni aggiuntive al libretto istruzioni che va comunque letto prima di utilizzare la macchina. Il produttore declina ogni responsabilità per danni causati da im- piego improprio, uso errato e la non completa osservanza del li- bretto istruzioni e quanto esposto qui di seguito. -
Page 10: Rimozione Dei Fondi Di Caffe' E Acqua
I t a l i a n o I t a l i a n o 6 RIMOZIONE DEI FONDI DI CAFFE’ E ACQUA 6 RIMOZIONE DEI FONDI DI CAFFE’ E ACQUA Dopo venti caffè, sul display appare la scritta “SVUOTARE FONDI”. Occorre svuotare il contenitore. - Page 11 Dopo aver impostato l’ora premere il tasto Successivamente lampeggiano i due numeri relativi ai minuti, im- postare i minuti premendo i tasti ACCENSIONE AUTOMATICA Premere il tasto comparirà: AUTO ON 07.30 Mediante i tasti si imposta l’ora nella quale la macchi- na si deve accendere automaticamente.
-
Page 12: Impostazione Macinatura
I t a l i a n o I t a l i a n o Mediante i tasti si può variare e impostare la quantità di caffè macinato per rendere più o meno forte il gusto del caffè. La scala di variazione va da -5 a +5 (0.1 sec.). -
Page 13: Preparazionedelle Bevande
8 PREPARAZIONE DELLE BEVANDE 8 PREPARAZIONE DELLE BEVANDE LAVAGGIO E PRERISCALDAMENTO Prima o dopo un lungo periodo di inattività è consigliabile effettua- re un ciclo di lavaggio del gruppo. • Tenendo premuto per 2 sec. il tasto lavaggio del gruppo facendo passare solo acqua nel circuito. PREPARARE IL CAFFÈ... -
Page 14: Decalcificazionedella Macchina
I t a l i a n o I t a l i a n o 10 DECALCIFICAZIONE DELLA MACCHINA 10 DECALCIFICAZIONE DELLA MACCHINA Quando a macchina spenta, sul display appare la scritta “DE- CALCIFICAZIONE” è indispensabile decalcifi care la Vostra macchina con prodotti specifi... -
Page 15: Dati Tecnici
12 DATI TECNICI 12 DATI TECNICI • Dimensioni esterne: mm H.458 x L.595 x P.320 • Dimensioni incasso: mm H.450 x L.568 x P.315 • Tensione di esercizio 220-240 V~ 50/60Hz, 110V~60Hz • Pressione pompa 15 bar • Potenza Pompa: 48 Watt •... - Page 16 E n g l i s h E n g l i s h 1 MACHINE DESCRIPTION • Front view and overall view • Control buttons and Display panel • Safety instructions and precautions • Correct use • Technical safety •...
-
Page 17: Machine Description
1 MACHINE DESCRIPTION 1 MACHINE DESCRIPTION FRONT AND OVERALL VIEW 01. Lighting 02. Steam knob 03. Hot water/steam dispenser 04. Drawer handle 05. Coffee dispenser 06. Water tank 07. Drip grille 08. Container for coffee beans 09. On/Off button CONTROL BUTTONS AND DISPLAY PANEL I C T- 0 1 I C T- 0 1 10. -
Page 18: Safety Instructions And Warnings
E n g l i s h E n g l i s h IMPORTANT SAFEGUARDS IMPORTANT SAFEGUARDS SAFETY INSTRUCTIONS AND WARNINGS This machine complies with current safety regulations. Incorrect use of the machine may cause harm. Read these instructions carefully before using the machine. They contain important information on safety, use and maintenance, to provide protection and to avoid damages to the machine. -
Page 19: Save These Instructions
• Boiling water and steam may cause burning, so these functions should be performed with the utmost care. Never direct the steam dispenser towards parts of the body. It may cause burning! • Always ensure that the steam selector is disconnected when no steam is required, otherwise, steam may escape unintentionally. -
Page 20: Description And Operation
E n g l i s h E n g l i s h 2 DESCRIPTION AND OPERATION 2 DESCRIPTION AND OPERATION The coffee machine has two water heaters, one for the water and one for the coffee. This makes it possible to prepare boiling water for tea, or use the steam for cappuccino and prepare the espresso. -
Page 21: Installation
3 INSTALLATION 3 INSTALLATION IMPORTANT NOTE: The installation of the appliance must be carried out exclusively by qualifi ed personnel in compliance with the regulations in force. Considering the heavy weight of the machine, it is essential that the furniture unit be suitably secured to the wall. 1. - Page 22 E n g l i s h E n g l i s h F ig . 2B F ig . 2 B I C T- 0 1 I C T- 0 1...
- Page 23 2. Remove the machine from the base by unhooking it from the lateral guides using the levers (Fig. 3), raising the lever of the ri- ght-hand guide and lowering the lever of the left-hand guide (1). 3. Slide the base of the machine into the unit all the way back (2). 4.
-
Page 24: Important Instructions For First Time Use
E n g l i s h E n g l i s h 4 IMPORTANT INSTRUCTIONS FOR FIRST TIME USE! 4 IMPORTANT INSTRUCTIONS FOR FIRST TIME USE! Instructions additional to the instruction booklet, which must be read prior to using the machine. The manufacturer declines all responsibility for damage caused by improper or incorrect use and failure to follow the instructions provided in the instruction booklet and given here below. -
Page 25: Removing Coffee Grounds And Water
6 REMOVING COFFEE GROUNDS AND WATER 6 REMOVING COFFEE GROUNDS AND WATER After twenty coffees have been made, the message “COFFEE GROUNDS” will appear on the display. The container should be emptied. After this message appears, the machine will allow 5 more coffees to be prepared and then it stops. IMPORTANT: The container must be emptied regularly to prevent the forma- tion of mould and bacteria. - Page 26 E n g l i s h E n g l i s h After setting the hour, press the key The two digits related to the minutes fl ash. Set the minutes by pressing the keys AUTOMATIC SWITCH-ON Press the key and the display panel shows: AUTO ON 07.30...
-
Page 27: Setting The Grind
Using the keys you can change and set the quantity of ground coffee to make the fl avour of the coffee the desired stren- gth. The scale of variation ranges from -5 to +5 (0.1 sec.). The 0 position corresponds to the optimal factory setting. COFFEE TEMPERATURE Press the key and the display panel shows:... -
Page 28: Preparing The Beverages
E n g l i s h E n g l i s h 8 PREPARING THE BEVERAGES 8 PREPARING THE BEVERAGES CLEANING Before or after a long period of inactivity, it is recommended to carry out a washing cycle on the unit. •... -
Page 29: Descaling The Machine
10 DESCALING THE MACHINE 10 DESCALING THE MACHINE When the message “DESCALING” appears on the display with the machine off, it is time to descale your machine using specifi c products that are appropriate for coffee machines. Attention – Very Important! Do not use lemon-based products for descaling. -
Page 30: Technical Data
E n g l i s h E n g l i s h 12 TECHNICAL DATA 12 TECHNICAL DATA • External dimensions: H.458 x L.595 x D.320 mm • Flush-mount dimensions: H.450 x L.568 x D.315 mm • Operating voltage: 220-240 V~ 50/60Hz, 110V~60Hz •... - Page 31 1 BESCHREIBUNG DER MASCHINE • Frontal und Gesamtansicht • Seitenansicht und Befehle • Sicherheitsanweisungen und Warnungen • Bestimmungsgemäße Benutzung • Technische Sicherheit • Gebrauch 2 FUNKTION 3 INSTALLATION 4 WICHTIGE ANWEISUNGEN FÜR DEN ERSTEN GEBRAUCH! Seite 18 5 EINFÜLLEN VON WASSER UND KAFFEE •...
-
Page 32: Beschreibung Der Maschine
Deutsch Deutsch BESCHREIBUNG DER MASCHINE BESCHREIBUNG DER MASCHINE FRONTAL UND GESAMTANSICHT 01. Beleuchtung 02. Dampfdrehknopf 03. Heiß Wasser / Dampf Spender 04. Ladengriff 05. Kaffeedüse 06. Wassertank 07. Abtropfgitter 08. Kaffeebohnenbehälter 09. Ein-, und Ausschalter 10. Wählschalter 1 oder 2 Tasten 11. -
Page 33: Sicherheitshinweise Und Warnungen
SICHERHEITSHINWEISE UND WARNUNGEN Diese Maschine entspricht den geltenden Sicherheitsrichtlinien. Der Nicht-Korrekte Umgang mit der Maschine kann zu Schäden an Personen und Gegenständen führen Bevor Sie diese Maschine benutzen, lesen Sie aufmerksam diese Bedienungsanleitung durch, sie enthält wichtige Hinweise bezügli- ch ihrer Sicherheit, ihrem Gebrauch und ihrer Wartung. Auf diese Weise schützen Sie sich selbst und vermeiden eine Beschädigung der Maschine. -
Page 34: Funktion
Deutsch Deutsch BESCHREIBUNG UND FUNKTION BESCHREIBUNG UND FUNKTION Die Kaffeemaschine verfügt über 2 Heizbehälter, einen zur Erwär- mung des Wassers, der andere für den Kaffee. Man kann sowohl, kochendes Wasser (für Tee) zubereiten, sowie Dampf (für Cappuc- cino) benutzen oder einen Espresso zubereiten. In dieser Kaffemaschine, im Unterschied zu anderen, kann man die Bohnen im Moment der Zubereitung mahlen und nur wenn man sie benötigt. -
Page 35: Installation Der Maschine
INSTALLATION DER MASCHINE INSTALLATION DER MASCHINE WICHTIG: Die Installation des Gerätes darf nur von Fachpersonal, unter Bea- chtung der geltenden Richtlinien, durchgeführt werden. Auf Grund des hohen Gewichts der Maschine, ist es unvermeidlich, diese auf geeignete Weise an der Wand zu befestigen. 1. - Page 36 Deutsch Deutsch ABBI LDU N G 2A A BB I L DU N G 2 A I C T- 0 1 I C T- 0 1...
- Page 37 2. Entfernen Sie die Maschine von der Grundplatte und haken Sie sie durch Bewegung der Hebel aus den seitlichen Führungen aus (Abb. 3). Um die Maschine auszuhaken, hebt man den Hebel der rechten Führung und senkt den der linken Führung (1) 3.
-
Page 38: Wichtige Anweisungen Für Den Ersten Gebrauch
Deutsch Deutsch WICHTIGE ANWEISUNGEN FÜR DEN ERSTEN GEBRAUCH! WICHTIGE ANWEISUNGEN FÜR DEN ERSTEN GEBRAUCH! Zusatzhinweise zum Handbuch, das vor dem Gebrauch der Ma- schine gelesen werden muss. Der Hersteller lehnt jede Verantwortung für Schäden, die durch nicht bestimmungsgemäße Verwendung, durch nicht korrekte Be- nutzung oder durch nicht vollständige Beachtung der Bedienanlei- tung und folgenden Punkten, entstanden sind. -
Page 39: Entfernung Des Kaffeesatzes Und Des Wassers
ENTFERNUNG DES KAFFEESATZES UND DES WASSERS ENTFERNUNG DES KAFFEESATZES UND DES WASSERS Nach ungefähr 20 Kaffee erscheint auf dem Display, folgender Schrif- tzug “SATZ ENTFERNUNG”. Der Behälter muss geleert werden. Ab dem Erscheinen des Schriftzugs kann man noch 5 Kaffee zube- reiten, dann blockiert die Maschine. - Page 40 Deutsch Deutsch Nach Einstellen der Stunde, diese Taste drücken: Danach blinken die Minutenzahlen, stellen Sie diese ein, durch Drücken der Tasten: AUTOMATISCHES EINSCHALTEN Drückt man die Taste erscheint: AUTO ON 07.30 Mit den Tasten stellt man die Uhrzeit ein, bei der sich die Maschine automatisch einschalten soll.
-
Page 41: Mahl-Einstellung
Mit den Tasten kann man die Menge des gemahlenen Kaffee verändern und einstellen, je nachdem ob man einen stärke- ren oder schwächeren Kaffee möchte. Die Änderungsskala geht von -5 bis +5 (0.1 Sek.). Die Position 0 entspricht der optimalen Einstellung ab Werk. KAFFEE TEMPERATUR Drückt man die Taste erscheint:... -
Page 42: Den Kaffe Zubereiten
Deutsch Deutsch ZUBEREITUNG DER GETRÄNKE ZUBEREITUNG DER GETRÄNKE REINIGUNG UND VORHEIZEN Vor oder nach einem langen Stillstand der Maschine, ist es ratsam einen Reinigungszyklus der Gruppe durchzuführen. • Drückt man 2 Sekunden lang, die Taste eine Reinigung der Gruppe durch, in dem Sie Wasser durch den Kreislauf spült. -
Page 43: Entkalkung Der Maschine
10 ENTKALKUNG DER MASCHINE 10 ENTKALKUNG DER MASCHINE Wenn bei abgeschalteter Maschine der Schriftzug “EN- TKALKUNG” erscheint, muss die Maschine mit, für ihre Kaf- feemaschine spezifi schen Mittel gereinigt werden. Achtung - Sehr Wichtig! Benutzen Sie zur Entkalkung keine Mittel auf Zitronenbasis. Diese Produkte enthalten Zitronensäure, die im Kontakt mit Kalk, bei hohen Temperaturen eine chemische Reaktion au- slösen. -
Page 44: Technische Daten
Deutsch Deutsch 12 TECHNISCHE DATEN 12 TECHNISCHE DATEN • Außenmaße mm Höhe 458 x Länge 595 x Tiefe 320 • Gehäuse Ausmaße mm Höhe 450 x Länge 568 x Tiefe 315 • Betriebsspannung 220-240 V~ 50/60Hz, 110V~60Hz • Pumpendruck 15 bar •... - Page 45 1 DESCRIPTION MACHINE • Vue frontale et entière • Vue latérale et commandes • Indications pour la sécurité et mises en garde • Utilisation correcte • Sécurité technique • Utilisation 2 FONCTIONNEMENT 3 INSTALLATION 4 INSTRUCTIONS IMPORTANTES POUR LA PREMIERE UTILISATION! 5 AJOUT D’EAU ET DE CAFE •...
-
Page 46: Description Machine
F r a n ç a i s F r a n ç a i s 1 DESCRIPTION MACHINE 1 DESCRIPTION MACHINE VUE FRONTALE ET ENTIÈRE 01. Eclairage 02. Manette pour la vapeur 03. Distributeur eau chaude/vapeur 04. Poignée tiroir 05. -
Page 47: Utilisation Correcte
INDICATIONS POUR LA SÉCURITÉ ET MISES EN GARDE Cette machine est conforme aux prescriptions de sécurité en vi- gueur. L’utilisation incorrecte de la machine peut causer des dom- mages aux personnes et aux choses. Lire attentivement les instructions d’utilisation avant de mettre la machine en marche. -
Page 48: Description Et Fonctionnement
F r a n ç a i s F r a n ç a i s 2 DESCRIPTION ET FONCTIONNEMENT 2 DESCRIPTION ET FONCTIONNEMENT La machine à café dispose de deux chaudières, une pour chauffer l’eau et une pour le café. Il est possible de préparer de l’eau bouil- lante (pour le thé) ou d’utiliser la vapeur (pour le cappuccino) et de préparer du café... -
Page 49: Installation De La Machine
3 INSTALLATION DE LA MACHINE 3 INSTALLATION DE LA MACHINE IMPORTANT: L’installation de l’appareil ne doit être effectuée que par du person- nel qualifi é conformément aux normes en vigueur. Etant donné le poids élevé de la machine, il est indispensable que le meuble soit adéquatement fi... - Page 50 F r a n ç a i s F r a n ç a i s F ig . 2B F ig . 2 B I C T- 0 1 I C T- 0 1...
- Page 51 2. Démonter la machine du bâti en la décrochant des guides latéraux au moyen des leviers (fi g. 3). Le décrochage s’effectue en soulevant le levier du guide droit et en abaissant celui du guide gauche (1). 3. Insérer le bâti de la machine dans le meuble jusqu’à arriver en butée (2).
-
Page 52: Remplir Le Réservoir D'eau
F r a n ç a i s F r a n ç a i s 4 INSTRUCTIONS IMPORTANTES POUR LA PREMIERE UTILISATION! 4 INSTRUCTIONS IMPORTANTES POUR LA PREMIERE UTILISATION! Instructions supplémentaires au manuel d’instructions qui doit de toute façon être lu avant d’utiliser la machine. Le fabricant décline toute responsabilité... -
Page 53: Fonctionnement Et Utilisation
6 ENLEVEMENT DES FONDS DE CAFE ET EAU 6 ENLEVEMENT DES FONDS DE CAFE ET EAU Après vingt cafés, sur l’écran apparaît le texte “VIDER FONDS”. Il faut vider le conteneur. A partir de cet avertissement, la machine permet de préparer 5 autres cafés et ensuite elle se bloque. IMPORTANT: Le conteneur doit être vidé... - Page 54 F r a n ç a i s F r a n ç a i s Après avoir confi guré l’heure, appuyer la touche Ensuite les deux numéros correspondants aux minutes clignotent, confi gurer les minutes en appuyant les touches ALLUMAGE AUTOMATIQUE Appuyer la touche apparaîtra:...
-
Page 55: Réglage De La Longueur Du Café
Les touches spermettent de modifi er et de confi gurer la quantité de café moulu pour rendre le goût du café plus ou moins fort. L’échelle de variation va de -5 à +5 (0.1 sec.). La position 0 correspond à la confi guration optimale d’usine. TEMPERATURE CAFE Appuyer la touche apparaîtra:... -
Page 56: Eau Chaude
F r a n ç a i s F r a n ç a i s 8 PREPARATION DES BOISSONS 8 PREPARATION DES BOISSONS LAVAGE ET PRÉCHAUFFAGE Avant ou après une longue période d’inactivité, nous conseillons d’effectuer un cycle de lavage du groupe. •... -
Page 57: Anomalies De Fonctionnement
10 DETARTRAGE DE LA MACHINE 10 DETARTRAGE DE LA MACHINE Quand, avec la machine éteinte, le texte “DETARTRAGE” ap- paraît sur l’écran, il est indispensable de détartrer votre ma- chine avec des produits spécifi ques appropriés pour machi- nes à café. Attention - Très important! Pour le détartrage, ne pas utiliser de produits à... -
Page 58: Donnees Techniques
F r a n ç a i s F r a n ç a i s 12 DONNEES TECHNIQUES 12 DONNEES TECHNIQUES • Dimensions extérieures: mm H.458 x L.595 x P.320 • Dimensions encastrement: mm H.450 x L.568 x P.315 •... - Page 59 1 DESCRIPCIÓN DE LA MÁQUINA • Vista frontal y total • Vista lateral y mandos • Indicaciones para la seguridad y advertencias • Correcta utilización • Seguridad técnica • Uso 2 FUNCIONAMIENTO 3 INSTALACIÓN 4 PARA LA PRIMERA UTILIZACIÓN! 5 AÑADIDURA DE AGUA Y DE CAF •...
-
Page 60: Descripción De La Máquina
E s p a ñ o l E s p a ñ o l 1 DESCRIPCIÓN DE LA MÁQUINA 1 DESCRIPCIÓN DE LA MÁQUINA VISTA FRONTAL Y TOTAL 01. Iluminación 02. Manivela para vapor 03. Erogador de agua caliente/vapor 04. Asa del cajón 05. -
Page 61: Indicaciones Para La Seguridad Y Advertencias
INDICACIONES PARA LA SEGURIDAD Y ADVERTEN- CIAS Esta máquina está en conformidad con las prescripciones vigen- tes de seguridad. El uso incorrecto de la máquina puede causar daños a personas o cosas. Leer atentamente la instrucciones de uso antes de poner en fun- cionamiento la máquina, éstas contienen indicaciones importantes acerca de la seguridad, el uso y el mantenimiento de la máquina. -
Page 62: Descripción Y Funcionamiento
E s p a ñ o l E s p a ñ o l 2 DESCRIPCIÓN Y FUNCIONAMIENTO 2 DESCRIPCIÓN Y FUNCIONAMIENTO La máquina para café está equipada con dos calderas, una para el calentamiento del agua, y otra para el café. Es posible preparar agua hirviente (para el té), o utilizar el vapor (para el capuchino) y preparar el café... -
Page 63: Instalación De La Máquina
3 INSTALACIÓN DE LA MÁQUINA 3 INSTALACIÓN DE LA MÁQUINA IMPORTANTE: la instalación del equipo debe ser efectuada exclusivamente por personal cualifi cado en conformidad con las normativas vigentes. Teniendo en cuenta el peso elevado de la máquina, es indispensa- ble que el mueble sea sujetado adecuadamente a la pared. - Page 64 E s p a ñ o l E s p a ñ o l F ig . 2B F ig . 2 B I C T- 0 1 I C T- 0 1...
- Page 65 2. Quitar la máquina de la base, y desengancharla, por medio de las palancas, de las guías laterales (fi g. 3). El desenganche se efectúa levantando la palanca de la guía derecha y bajando aquella de la guía izquierda (1) 3.
-
Page 66: Llenar El Depósito De Agua
E s p a ñ o l E s p a ñ o l 4 INSTRUCCIONES IMPORTANTES PARA LA PRIMERA TILIZACIÓN! 4 INSTRUCCIONES IMPORTANTES PARA LA PRIMERA TILIZACIÓN! Instrucciones adicionales al manual de instrucciones que debe ser sin embargo leído antes de utilizar la máquina. El productor se exime de cualquiera responsabilidad por daños causados por la utilización impropia, incorrecta y la observancia parcial del manual de instrucciones y de lo que se menciona a... -
Page 67: Eliminación De Los Fondos De Café Y Del Agua
6 ELIMINACIÓN DE LOS FONDOS DE CAFÉ Y DE AGUA 6 ELIMINACIÓN DE LOS FONDOS DE CAFÉ Y DE AGUA Después de veinte cafés en el visualizador aparece la indicación “VACIAR FONDOS”. Se debe vaciar el recipiente. Después de dicha indicación, la máqui- na permite preparar otros 5 cafés y luego se para IMPORTANTE: El recipiente debe ser vaciado regularmente para evitar que se... - Page 68 E s p a ñ o l E s p a ñ o l Después de haber confi gurado la hora pulsar la tecla: Sucesivamente comienzan a parpadear los dos números de los minutos, confi gurar los minutos pulsando las teclas: ENCENDIDO AUTOMÁTICO Pulsar la tecla aparecerá:...
-
Page 69: Elección Del Tipo De Café
Mediante las teclas se puede modifi car y programar la cantidad de café molido para volver el gusto del café más o menos fuerte. La escala de variación va de -5 a +5 (0.1 sec.). La posición 0 corresponde a la programación optimal de fabricación. TEMPERATURA CAFÉ... -
Page 70: Preparación De Las Bebidas
E s p a ñ o l E s p a ñ o l 8 PREPARACIÓN DE LAS BEBIDAS 8 PREPARACIÓN DE LAS BEBIDAS LAVADO Y CALENTAMIENTO PREVIO Es aconsejable, antes o después de un largo período de inactivi- dad, efectuar un ciclo de lavado del grupo. •... -
Page 71: Descalcificación De La Máquina
10 DESCALCIFICACIÓN DE LA MÁQUINA 10 DESCALCIFICACIÓN DE LA MÁQUINA Cuando, con la máquina apagada, en el visualizador aparece la indicación “DESCALCIFICACIÓN”, es indispensable de- scalcifi car su máquina con productos específi cos adecuados para máquinas de café. Atención - Muy importante! No utilizar para la descalcifi... -
Page 72: Datos Técnicos
E s p a ñ o l E s p a ñ o l 12 DATOS TÉCNICOS 12 DATOS TÉCNICOS • Dimensiones exteriores mm H.458 x L.595 x P.320 • Dimensiones empotrado mm H.458 x L0,568 x P.320 • Tensión de ejercicio 220-240 V~ 50/60Hz, 110V~60Hz •... -
Page 73: Product Warranty
Fagor America Inc. will replace parts and provide labor to correct defects in materials or workmanship. Service has to be provided by a Fagor America Inc. designated service company. Please contact Fagor America at 1 877 743 2467 or by email at fagor@adcoservice.com... - Page 74 PLACE STAMP HERE FAGOR AMERICA APPLIANCES DIVISION P.O. BOX 94 LYNDHURST, NJ 07071...
Need help?
Do you have a question about the Built-In Coffee Machine MQC-A10 US and is the answer not in the manual?
Questions and answers