Table of Contents
Advertisement
Advertisement
Table of Contents

Related Manuals for John Lewis JLBIDW1200


Summary of Contents for John Lewis JLBIDW1200
- Page 1 JLBIDW1200 Dishwasher Instruction manual...
-
Page 2: Important Safety Information
Contact your local repair agent, in order to avoid hazard. • All sides of the dishwasher must never be drilled to prevent damage to hydraulic and electric components. -
Page 3: Ecological Hints
• This dishwasher is only intended for washing household utensils suitable for machine washing. • Do not put any solvents in the dishwasher. This could cause an explosion. • Knives and other items with sharp points must be loaded in the cutlery basket with their points down or placed in a horizontal position in the upper basket. -
Page 4: Environmental Information
• Do not use more detergent, dishwasher salt and rinse aid than is recommended in these operating instructions and by the manufacturer of the respective product. • Delay start: When possible programme your dishwasher to run over night, to enable, for example, the use of economical overnight electricity tariffs. -
Page 5: Table Of Contents
The control panel The digital display Function buttons (A, B, C, D and E) Audible signals Washing programmes When the dishwasher is first installed The water softener Filling with dishwasher salt Filling with rinse aid Adjusting the rinse aid dosage... -
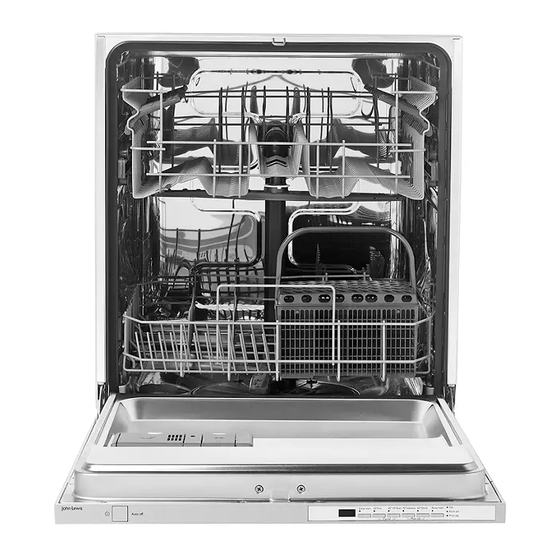
Page 6: Description Of The Appliance
Description of the appliance 1. Upper basket 2. Water hardness dial 3. Salt container 4. Detergent dispenser 5. Rinse aid dispenser 6. Rating plate 7. Filters 8. Lower spray arm 9. Upper spray arm Optical signal Once the washing programme starts, a point- shaped optical signal shows on the floor beneath the appliance door. -
Page 7: The Control Panel
In addition to the programme indicator lights that allow you to see which programme is running or has been selected, other indicator lights will help you in the use and maintenance of your dishwasher. Indicator lights Comes on when the special salt Salt has run out. -
Page 8: Setting Mode
It is possible to deactivate the audible signals, using the function buttons on the control panel. 1. Press the On/Off button. The dishwasher must be in setting mode. 2. Simultaneously press and hold function buttons B and C, until the lights of function buttons A, B and C start flashing. -
Page 9: Washing Programmes
45°C and 70°C. 5) Ideal for washing a partially loaded dishwasher. This is the perfect daily programme, made to meet the needs of a family of 4 persons who only wish to load breakfast and dinner crockery and cutlery. -
Page 10: When The Dishwasher Is First Installed
When the dishwasher is first installed Before using your dishwasher for the first time: • Ensure that the electrical and water connections comply with the installation instructions • Remove all packaging from inside the appliance • Set the water softener level •... -
Page 11: Setting Manually
3. Turn the water hardness dial to position 1 or 2 (see table above). 4. Replace the lower basket. Setting electronically The dishwasher is factory set at level 1. Press the On/Off button. The dishwasher must be in setting mode. Adjusting the water hardness... -
Page 12: Filling With Dishwasher Salt
Warning! Only use salt specifically designed for use in dishwashers. All other types of salt not specifically designed for use in a dishwasher, especially table salt, will damage the water softener. Only fill with salt just before starting one of the complete washing programmes. -
Page 13: Adjusting The Rinse Aid Dosage
2. Add the rinse aid in the container. The maximum level for filling is indicated by "max". The dispenser holds about 110 ml of rinse aid, which is sufficient for between 16 and 40 dishwashing cycles, depending upon the dosage setting. 3. -
Page 14: Daily Use
• Before loading the dishes, you should: – Remove all left over food and debris. – Soften remnants of burnt food in pans For washing in the dishwasher the following cutlery and dishes are not suitable: • Cutlery with wooden, horn, china or mother- of-pearls handles. -
Page 15: The Lower Basket
The lower basket The lower basket is designed to take saucepans, lids, plates, salad bowls, cutlery, etc. Serving dishes and large lids should be arranged around the edge of the basket, ensuring that the spray arms can turn freely. The two rows of prongs in the lower basket can lie flat to allow you to load pots, pans and bowls. -
Page 16: The Upper Basket
If the handles protrude from the bottom of the basket, obstructing the lower spray arm, load the cutlery with the handles facing upwards. Mix spoons with other cutlery to prevent them from sticking together. For best results we recommend you use the cutlery grids. -
Page 17: Use Of Detergent
Maximum height of the dishes in the lower basket With upper basket raised With upper basket lowered To move to the higher position proceed as follows: 1. Pull out the basket until it stops. 2. Carefully lift both sides upwards until the mechanism is engaged and the basket is stable. -
Page 18: Detergent Tablets
20 = approximately 20 g of detergent 30 = approximately 30 g of detergent 3. All programmes with prewash need an additional detergent dose (5/10 g) that must be placed in the prewash detergent chamber (2). This detergent will be used during the prewash phase. -
Page 19: Multi Tab Function
Multi tab function active. Activation/deactivation of the rinse aid dispenser 1. Press the On/Off button. The dishwasher must be in setting mode. 2. Simultaneously press and hold function buttons B and C, until the lights of function buttons A, B and C start flashing. -
Page 20: Select And Start A Washing Programme
2. Check that the water tap is opened. 3. Press the On/Off button. The dishwasher must be in setting mode. 4. Press the button corresponding to the required programme (see "Washing programmes"... -
Page 21: Interrupt A Washing Programme In Progress
1. Open the dishwasher door. The indicator light of the programme just ended remains illuminated. 2. Switch off the dishwasher by pressing the On/Off button. 3. Leave the dishwasher door ajar and wait a few minutes before removing the dishes;... -
Page 22: Maintenance And Cleaning
1. Open the door, remove the lower basket. 2. The dishwasher filter system comprises a coarse filter (A), a microfilter (B) and a flat filter. Unlock the filter system using the handle on the microfilter. -
Page 23: External Cleaning
During this process ensure that the flat filter does not protrude above the base of the washing compartment. NEVER use the dishwasher without filters. Incorrect repositioning and fitting of the filters will produce poor washing results and will result in damage to the appliance. - Page 24 • Close the water tap and contact our extended warranty administrators, refer to Repairs-After Sales Service on the following pages. Possible cause and solution • The dishwasher door has not been properly closed. Close the door. • The main plug is not plugged in. Insert the main plug.
- Page 25 The dishes are not clean The dishes are wet and dull There are streaks, milky spots or a bluish coating on glasses and dishes Water drops have dried onto glasses and dishes The wash results are not satisfactory • The wrong programme has been selected. •...
-
Page 26: Technical Data
Width Height Depth Information on the electrical connection is given on the rating plate on the inner edge of the dishwasher door. Minimum Maximum Warning! Carefully follow the instructions on the enclosed template for building in the appliance and fitting the furniture panel. -
Page 27: Levelling
2. To a stand pipe provided with venthole, minimum internal diameter 4 cm. max 85 cm min 40 cm The drain hose can face either to the right or left of the dishwasher. - Page 28 (A) must be removed. Failure to remove all the membrane will result in food particles building up over time eventually blocking the dishwasher drain hose spigot. Our appliances are supplied with a security device to protect against the return of dirty water back into the machine.
-
Page 29: Electrical Connection
Electrical connection Warning! Safety standards require the appliance to be earthed. Prior to using the appliance for the first time, ensure that the rated voltage and type of supply on the rating plate match that of the supply where the appliance is to be installed. -
Page 30: Spare Parts
S.No. : ........Your dishwasher is covered by a 3 year parts and labour guarantee (see separate details given at point of sale). - Page 32 John Lewis Partnership 171 Victoria Street London SW1E 5NN www. johnlewis.com 117963430 - 00 - 072007 - Subject to change without notice...
Need help?
Do you have a question about the JLBIDW1200 and is the answer not in the manual?
Questions and answers