Table of Contents
Advertisement
Quick Links
Advertisement
Table of Contents

Related Manuals for DigiTech GNX4


Summary of Contents for DigiTech GNX4
- Page 4 IMPORTANT SAFETY INSTRUCTIONS WARNING FOR YOUR PROTECTION PLEASE READ THE FOLLOWING: KEEP THESE INSTRUCTIONS HEED ALL WARNINGS FOLLOW ALL INSTRUCTIONS DO NOT USE THIS APPARATUS NEAR WATER CLEAN ONLY WITH A DRY CLOTH. The symbols shown above are internationally accepted symbols that warn of potential hazards with electrical DO NOT BLOCK ANY OF THE VENTILATION OPENINGS.
- Page 5 Sandy, Utah 84070, USA interference, and Date: March 15, 2004 • this device must accept any interfer- European Contact: Your local DigiTech Sales and ence received, including interference Service Office or that may cause undesired operation. Harman Music Group 8760 South Sandy Parkway...
- Page 6 Warranty We at DigiTech are very proud of our products and back-up each one we sell with the following warranty: 1.The warranty registration card must be mailed within ten days after purchase date to validate this warranty. 2. DigiTech warrants this product, when used solely within the U.S., to be free from defects in materials and workmanship under normal use and service.
-
Page 7: Table Of Contents
Envelope Filter ......42 About the GNX4 ......21 Detune . - Page 8 Punching In/Punch Outing ....84 GNX4 MP3 Demo (Internal) ....63 Hands-Free Recording with the GNXFC .
- Page 9 Re-Amping a Guitar Track ....97 GNX4 Drums and MIDI .....98 Recording the GNX4 Drums as Audio .
-
Page 11: Introduction
However, if you find anything missing, please contact the factory at once. Please take a moment to fill out the warranty card. It is your safeguard in the unlikely event that the GNX4 develops a problem. -
Page 12: Quick Start
The GNX4 is equipped with SPEAKER COMPENSATION filtering that can be used with its 1/4”, XLR, and HEADPHONE OUTPUTS. 1. If you are using the GNX4 with headphones or connecting it directly to a mixer via the XLR OUTPUTS, switch the XLR OUTPUTS’ SPEAKER COMPENSATION on. The switch is located to the right of the XLR jacks on the rear panel. -
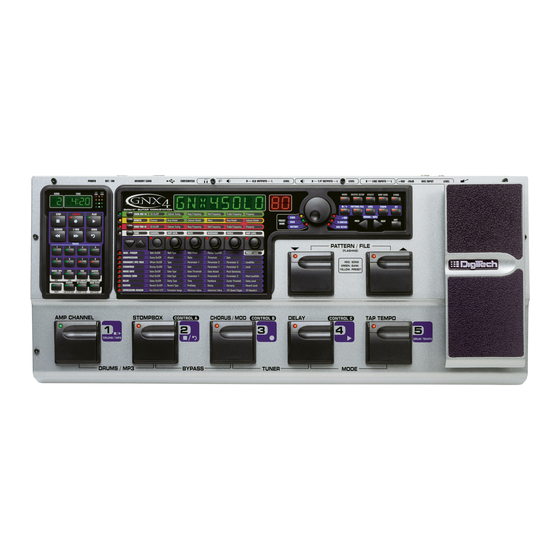
Page 13: A Guided Tour Of The Gnx4
2. Recorder Control and USB/Signal Routing Panel This control panel operates the GNX4’s onboard digital recorder, USB audio routing, and mass storage functions. (See page 68 for more details regarding the Recorder Control and USB/Signal Routing Panel.) - Page 14 The Effects Matrix displays the effects parameters available for editing in each preset. 9. Displays The Displays give feedback of the various functions that are being used in the GNX4, including preset name, editing functions, tuner, utility menus, drum machine and recorder settings.
- Page 15 AMP SAVE - This button stores Amp and Cabinet changes (tone, gain, level, amp type, cabinet type, warp, or cabinet tuning) as HyperModels. STORE - This button is used to save Preset edits to the GNX4’s User Presets or to an optional Compact Flash card.
-
Page 16: The Rear Panel
6. Left/Right Balanced Line Inputs Connect line level sources to these jacks for recording or live performance mixing into the GNX4. Line signals can remain dry or be processed through the GNX4’s effects for live and recording applications. - Page 17 MIDI devices connected to the MIDI In jack can be used to control the GNX4 and its presets parameters. When the GNX4 is connected to the computer via USB, the MIDI In can be used as a MIDI interface for recording any MIDI data in Pro Tracks Plus ™...
- Page 18 21. Compact Flash Memory Card Slot (Optional ) Insert an optional Compact Flash (CF) card in this slot for use with the GNX4’s on board recorder. Songs, Presets, MIDI files, and MP3 files can be saved and retrieved from the CF card as well.
-
Page 19: Audio Routing Setups
Audio Routing Setups Setups Introduction The GNX4 is equipped with four inputs and four outputs that can be configured several different ways for both live and recording applications. These settings determine which pair of outputs the mic, line, and guitar processing are routed to and how the mic or line inputs are routed through the GNX4’s effects... - Page 20 Audio Routing Setups - All input sources (guitar, mic, line, drums, onboard 8-track recorder playback and USB playback) are routed to both output pairs in mono. Speaker Compensation can be turned on and off independently for either the 1/4" or XLR outputs using the Speaker Compensation switch associated with each pair on the rear panel.
- Page 21 Audio Routing Setups Output mode routes guitar signal to the 1/4” outputs while the mic, line input sources, drums, and audio playback from the onboard 8-track recorder and the computer are routed out the XLR outputs. is the same as but the guitar signal with Speaker Compensation is also routed out the XLR outputs.
-
Page 22: Mic And Line Setups
The Mic and Line Setups are configurations for the mic and line inputs designed for both live performance and recording applications. The GNX4 acts as a mixing device for mic and line sources, and can eliminate the need for a mixer when the GNX4’s outputs are to be plugged directly into a full-range powered speaker system. -
Page 23: Optimizing The Mic Input Level
0 dB clip point on the REC LEVEL meter. Utilize the -20 dB pad switch also located on the GNX4’s rear panel if the level is too high to provide proper headroom. -
Page 24: Making Connections
Making Connections For Live Performance The GNX4 was designed to be extremely flexible to meet any of your application needs. For many GNX4 users, its primary purpose will be for use in live performances. Whether you are a solo performer who spends weekends playing at a small club or the power-user playing the largest venues each night, the GNX4 has just what you need to do the gig right. -
Page 25: Large Stage Setup (Stereo Amp/Cabinet Rig)
Another great idea is to run the GNX4’s XLR outputs directly into the house P.A. and have the sound engineer control your front of house volume in the overall mix. Then if you need to turn up your stage volume, you won’t upset him by trying to rebalance your guitar volume in the house mix. -
Page 26: Talker ™ Performance Setup
“ as the output mode using the DATA WHEEL. 6. Use the Mic Level control knob located next to the Mic Input on the GNX4’s rear panel to adjust the microphone output level. To adjust your microphone input level for optimal use see Optimizing the... -
Page 27: Coffee House/Solo Performance Setup
CD audio tracks into MP3s and place these in the MP3 folder created by the GNX4 on the compact flash card. If you need a mic for vocals or an acoustic instrument, just plug it into the GNX4’s mic input. -
Page 28: For Recording
Never again thanks to the GNX4’s onboard recorder and its ability to remotely capture that idea forever. Just plug a mic into the GNX4’s mic input, or if you have multiple mics and a mixer, use the stereo output of the mixer into the GNX4’s Line Inputs. Use the Shift>CF/USB 1-2 Source buttons located on the GNX4’s Recorder Panel to set the output routing to... -
Page 29: Computer Recording Application
1. Connect your guitar (or bass guitar) to the GNX4’s Guitar Input. 2. Connect a microphone to the GNX4’s Mic Input and use the Mic Level control knob located next to the Mic Input on the GNX4’s rear panel to adjust the microphone output level. To adjust your microphone input level for optimal use see Optimizing the Mic Input Level on page 13. -
Page 30: Applying Power
2. Pull the mixer’s master faders all the way down. 3.Turn the GNX4’s Output Level knobs all the way down (fully counter-clockwise). 4. Connect the plug of the PSS3 power supply to the GNX4’s Power Jack. Connect the other end of the PSS3 power supply to an AC outlet. -
Page 31: About The Gnx4
About the GNX4 Presets A preset is a named and numbered location of a programmed sound that resides in the GNX4. Presets can be recalled with the Footswitches or the DATA WHEEL. The GNX4 comes with 80 Factory and 80 User presets. -
Page 32: Preset Bounceback
Stompbox/Control Mode is another mode of operation that can be used during a performance. When Stompbox/Control Mode is active, the UP/DOWN footswitches are used to select the GNX4’s presets. Footswitches 1-4 turn the effects on and off. Footswitch 5 is used as a Tap-Tempo switch for setting the delay time during a live performance. -
Page 33: Bypass
Tuner The Tuner in the GNX4 lets you quickly tune or check the tuning on your guitar. Press Footswitches 3 and 4 simultaneously to access the Tuner. The display briefly flashes . To begin tuning, play a note on your guitar (a harmonic at the 12th fret usually works best).The red numeric display shows the note being played,... -
Page 34: Gnx4 Matrix Functions
GNX4 Matrix Functions The GNX4 Matrix The main panel of the GNX4 is the Matrix. The Matrix is comprised of two main sections, Amp/Cabinet and Effects. It is used to navigate through the GNX4’s amp/cabinet modeling and effects parameters. Upon power up, the GNX4 defaults to the TONE amp control row in the Amp/Cabinet section and any effects that are enabled within a preset will have their corresponding LEDs lit in the Effects section of the Matrix. -
Page 35: Viewing/Editing Effect Parameter Values
GNX4 Matrix Functions Viewing/Editing Effect Parameter Values To view or edit an effect parameter’s current value, you must first select the row in which the desired parameter resides by using the Effect Select Buttons. They are located to the left of the Status Button. -
Page 36: Genetx Row
GNX4 Matrix Functions GENETX Row GENETX ROW STATUS KNOB KNOB KNOB KNOB KNOB BUTTON The GENETX row is where amp and cabinet models are selected for the current preset. It is also where the Warp function resides allowing GeNetX ™... -
Page 37: Chan One Eq And Chan Two Eq Rows
GNX4 Matrix Functions CHAN ONE EQ and CHAN TWO EQ Rows CHAN ONE EQ & CHAN TWO EQ ROWS STATUS KNOB KNOB KNOB KNOB KNOB BUTTON The CHAN ONE EQ and CHAN TWO EQ rows are used for modifying the center frequencies of the Bass, Midrange, and Treble controls of that reside within the TONE Row. - Page 38 GNX4 Matrix Functions Here is an example of how the CHAN ONE EQ row would function when the button is pressed: Warped Amp Sound being heard: If the sound being heard is a Warped sound of both amp models, pressing the CHAN ONE EQ button selects the knobs to control the CHAN ONE EQ’s row of parameters.
-
Page 39: Tone Row
GNX4 Matrix Functions TONE Row TONE ROW STATUS KNOB KNOB KNOB KNOB KNOB BUTTON The TONE row is where the amp tone controls are located for Channel 1 or Channel 2. The sound that you hear while adjusting these parameters will depend on the channel status (see chart below). -
Page 40: Amp/Cabinet Modeling
Modeling applies the tone of one of several vintage or modern Amp Models and Cabinet Types to your guitar signal. The GNX4 includes accurate emulations of 15 guitar Amp Models, 10 Bass Amp Models, one Acoustic Guitar Simulation, and 22 Speaker Cabinet Types.Your choices include:... -
Page 41: Cabinet Types
Editing Amp Models and Cabinet Types Each GNX4 preset has three channels, Channel 1 (green), Channel 2 (red), and Warp (yellow). Amp channels 1 and 2 have selectable amps and cabinets. Each channel has independent controls for gain, level, EQ, and cabinet tuning. -
Page 42: Selecting Amp Models And Cabinet Types
Amp/Cabinet Modeling Selecting Amp Models and Cabinet Types The first step to editing an Amp, Cabinet Type, or creating your own HyperModel is to select the Amp and Cabinet types for Channel 1 and Channel 2 in your preset. The procedure for selecting Amps or Cabinets is as follows: 1. -
Page 43: Storing Amp Parameter Edits
4. Repeat steps 2 and 3 you have finished naming the new HyperModel. 5. Press the AMP SAVE button again to select one of the 9 User HyperModel locations. If the GNX4 has any unused HyperModel locations available, the display will read . -
Page 44: Effects And Parameters
Effects and Parameters Effects and Parameters The GNX4 features a comprehensive set of effects for creating just the sound you need for any musical application. These effects are connected in a standard effects chain with pickup simulator, wah, compressor, Whammy™/IPS, and distortion stompbox effects placed before the amps. Effects placed post amp are those that typically sound best when heard in stereo like modulation effects, delay and reverb. -
Page 45: Effect Definitions
GNX4 works. Preset Levels The GNX4 presets each have an independent level control for quick balancing of the levels between presets. Preset Level is accessed by selecting the Wah – Pickup row of the Matrix using the Effect Select buttons and then adjusting Knob 5. -
Page 46: Whammy /Ips/Talk
Effects and Parameters better dynamics. Ratio settings are: 1.2:1 ( ), 1.5:1 ( ), 1.8:1 ( ), 2:1 ( ), 2.5:1 ), 3:1 ( ), 4:1 ( ), 5:1 ( ), 8:1 ( ), 10:1 ( ), 20:1 ( ), and Infinity:1 Threshold - Knob 3 selects the Threshold ( ). -
Page 47: Intelligent Pitch Shifting (Ips)
The Talker is an effect that lets your instrument’s signal be manipulated by your voice. The Talker requires a microphone be connected to the Mic Input on the rear panel of the GNX4. As you speak into the microphone, your instrument mimics what you say. There are five Talker types. -
Page 48: Stomp Box Modeling
Talker will have trouble tracking. If the input is too strong, the Talker will clip making the words unintelligible. Adjust the mic level on the GNX4’s rear panel so that the LEDs light, but stay below the the clip level. (See Optimizing the Mic Input Level on page 13 for more information regarding mic level adjustment.) The mic level sensitivity ranges are from... -
Page 49: Noise Gate
A Noise Gate is designed to eliminate hiss and ambient noise while you are not playing. A Noise Gate can also be used to create an automatic swell in volume. The GNX4 includes two different types of Noise Gates: Silencer ™... -
Page 50: Flanger
Effects and Parameters Flanger A Flanger uses the same principle as a Chorus but has a shorter delay time and adds regeneration (or repeats) to the modulating delay. This results in an exaggerated up and down sweeping motion to the effect. -
Page 51: Tremolo
Effects and Parameters Parameter 3 - Knob 4 selects the Phaser sweep starting point ( ). Ranges from (bottom of the sweep point) to (top of the sweep point). Mod Mix - Knob 5 controls the mix ( ) of wet and dry signal. Ranges from (all dry) to (all wet). -
Page 52: Autoya
(all wet). SynthTalk ™ SynthTalk is another effect exclusive to DigiTech. It makes your guitar appear to speak based upon the dynamics of your playing style. Parameter 1 - Knob 2 adjusts the Attack ( )of the synthesized voice. Ranges from Parameter 2 - Knob 3 adjusts the Release ( ) of the synthesized voice. -
Page 53: Detune
(that turns off the input to the Delay and lets you play over the top of a passage in the Delay loop). The Delay in the GNX4 also includes a Ducker Threshold that lets you set the signal strength required before the Delay records. -
Page 54: Reverb
Reverb On/Off - The Status button turns the Reverb ( ) on and off. Reverb Type - Knob 1 selects the type of Reverb or acoustic environment. The GNX4 provides ten different environments to choose from including: = Studio... -
Page 55: Expression Pedal Assignment
Expression Pedal The Expression Pedal on the GNX4 can control up to 3 parameters in real time. Each parameter assigned to the Expression Pedal can have specific ranges of how much the parameter is controlled by using the minimum and maximum controls. -
Page 56: Amp Channel Footswitch
From the factory, the Amp Channel Footswitch selects between the Channel 1 Amp, Channel 2 Amp, and the Warped Amp state when the GNX4 is in Stompbox/Control mode. However, you can configure the function of the Amp Channel Footswitch within a preset. -
Page 57: Lfos
A minimum and maximum value can be assigned. For instance: if the Amp Gain was assigned to LFO1, and the minimum value was set at 1 and the maximum value was set at 99, the GNX4 would automatically sweep the amount of distortion from clean to distorted and back to clean. Individual LFO speeds can also be assigned. -
Page 58: Expression Parameter Assignment List
Expression Pedal Assignment Expression Parameter Assignment List The following parameters can be assigned to any of the 3 Expression Pedal, Control A, B, C footswitches, or LFO 1 and LFO 2. (No Link) No Parameter is assigned (Amp Channel) Switches Amp Channels (Amp Warp) Warps the Channel 1 and Channel 2 Amp Models (Cabinet Warp) -
Page 59: Modulation Effects Parameters
Expression Pedal Assignment (Noise Gate On/Off) Turns the Noise Gate on and off (Noise Gate Threshold) Controls the Noise Gate’s Threshold (Noise Gate Attack) Controls the Noise Gate’s Attack time (Noise Gate Pluck) Controls the Noise Gate’s Pluck Sensitivity (Chorus/Mod On/Off) Turns the Chorus/Mod module on and off Modulation Effects Parameters Active Effect... -
Page 60: Creating A Preset
HyperModel with a preset that gives your single coil pickup a humbucker sound, uses no Compression, has a Noise Gate that opens quickly, a subtle Chorus effect, no Delay, and a little bit of a Hall reverb.The following guide steps you through the process of creating just that preset in the GNX4. Selecting a Preset The first step to create a custom preset of your own is to select a starting point. -
Page 61: Adjust The Channel 1 Parameters
Creating a Preset Adjust the Channel 1 Parameters The Tweed amp that we selected for our Channel 1 assignment uses the factory default settings for the Gain, EQ, and Level Parameters.Therefore, you may want to change the settings. To access the Parameters for Channel 1, do the following: 1. -
Page 62: Adjust The Eq/Tune The Cabinets
Creating a Preset Adjust the EQ/Tune the Cabinets As an option, you may also want to modify each channel’s EQ center frequencies (Bass, Midrange, and Treble found in the TONE row) and adjust the resonance for the American 2x12 and the British 4x12 Cabinets. -
Page 63: Warping Amp Channels Together
(Empty) and the red numeric display should read if this is the first HyperModel stored to your GNX4. 6. Press the AMP SAVE button again to save to this Amp location. The display briefly reads (Amp Saved) and then returns to the name of the selected preset. -
Page 64: Select Models For The Preset's Channels
Creating a Preset Select Models for the Preset’s Channels In the previous steps, we selected a Tweed amp model for the Channel 1 amp and a Rectified amp model for the Channel 2 amp. Then we warped the two together to create our HyperModel ™... -
Page 65: Select The Pickup Type
Creating a Preset Select the Pickup Type In our example preset we use a single coil pickup, but want it to sound like a double coil humbucker. 1. With the Wah-Pickup LED lit, rotate Knob 3 until the display reads . -
Page 66: Adjust The Noise Gate
1. Press the AMP FOOTSWITCH to select the Channel 2 Amp ( ), our high gain model. (The GNX4 must be in Stompbox/Control mode to complete this function.) 2. Press the EFFECT SELECT DOWN button and the Noise Gate’s LED lights. -
Page 67: Select And Adjust The Reverb
Store the Preset The last step is to store our changes to a User Preset. If we changed presets or turned the GNX4 off without storing these settings, it would forget what we had done and revert back to the original preset. -
Page 68: Storing/Copying A Preset
Storing/Copying a Preset Storing a Preset Once you have modified the Amp Models, Cabinet Types, and Effect Parameters, the Store Button LED flashes indicating you have changed a parameter and need to store the changes to a User Preset location or to a Compact Flash Card Preset location in order to recall them later. -
Page 69: Footswitch Functions For Modes
Pressing and holding both the Bank Up and Bank Down Footswitches together will temporarily enable both footswitches to navigate through the GNX4’s drum patterns or user MIDI files and MP3s stored on an optional CF card. Bank Down Footswitch - Selects the previous bank of presets. Pressing and holding this footswitch scrolls down through banks. -
Page 70: Stompbox/Control Mode - Yellow
Pressing and holding both the Preset Up and Preset Down Footswitches together will temporarily enable both footswitches to navigate through the GNX4’s drum patterns or user MIDI files and MP3s stored on an optional CF card. Preset Down Footswitch - Selects the previous preset. Pressing and holding this footswitch scrolls down through presets. -
Page 71: Recorder Mode - Red
Song Up Footswitch - Selects the next song. Pressing and holding both the Song Up and Song Down Footswitches simultaneously will temporarily enable these footswitches to navigate through the GNX4’s drum patterns or user MIDI files and MP3s stored on an optional CF card. -
Page 72: Drum Machine/Mp3 Player
Press this button to select the Pattern/File library. Use the DATA WHEEL or PREV and NEXT buttons to select one of the GNX4’s internal drum patterns. If a CF card is present in the memory card slot and MP3s and MIDI files are resident on the card, you can select these files for playback as well. -
Page 73: Footswitch Operation
(not on a Compact Flash card). To start the demo, remove the Compact Flash card (if one is installed in your GNX4). Press the PLAY button located on the GNX4’s Recorder Panel and the demo will start playing. At the end of the song it will automatically loop and playback until you press the Recorder Panel STOP button. -
Page 74: Audio Routing For Recording
GNX4 Inputs and Recorder Routing The GNX4’s has four audio inputs, the Guitar Input, Mic Input, and Left/Right Line Inputs. It also has a MIDI input. Each of these inputs can be used to record audio and each has multiple different routing configurations available. -
Page 75: Usb 3-4 Source
- Dry mic signal is sent up the USB 3 channel. Nothing is sent up the USB 4 channel. - GNX4 drum playback is sent stereo up the USB 3 and 4 channels. - GNX4 drum playback is sent mono up the USB 3 channel. Nothing is sent up the USB 4 channel. -
Page 76: Guitar Signal Routing
Path A taps the guitar signal off at the input and sends unprocessed signal to the GNX4’s recorder and up the USB port. Path C taps the guitar signal at the output of the GNX4 and can include any effects processing that may be used. Below is a matrix to show where the signal is tapped based on how the CF/USB 1-2 Source and the USB 3-4 Source settings are configured. -
Page 77: Line Signal Routing
USB port. Path C taps the signal at the output of the GNX4 and can include any effects processing that may be used. Below is a matrix to show where the signal is tapped based on how the Mic, CF/USB 1-2 Source, and USB 3-4 Source settings are configured. -
Page 78: The Gnx4'S 8-Track Recorder
Since there is no onboard recording memory, you must first insert an optional Compact Flash (CF) memory card into the card slot on the rear panel to begin recording tracks. The GNX4 supports most CF cards but obviously, the larger the card size, the more recording time is available. (See the Using Compact Flash Memory Cards section on page 75 for memory specifications.) - Page 79 They include STOP, RECORD, PLAY, REWIND, FAST FORWARD, and UNDO. 4.TRACKS – A Track is an individual memory location in a song that you record audio to. The GNX4 has eight individual tracks that can be recorded to.
-
Page 80: Song Setup
Control Panel when the PLAY button is pressed on the recorder. To select a pattern or file that you would like played back with a song, follow these steps: 1. Press the SONG SETUP button once and the GNX4’s main display will show one of the drum patterns. For example, the 8th Beat pattern will display as 2. -
Page 81: Song Tempo
Song Tempo The Song Tempo setup sets the tempo used by the recorder’s Click Track and the GNX4’s drum machine during the recording and playback of a song. This tempo should be set before any audio is recorded if the Click Track or drum machine is to be used as a metronome during recording. -
Page 82: Drum Kit
MP3 is selected. To select a Drum Kit, follow these steps: Begin with the recorder stopped. 1. Press the SONG SETUP button until the GNX4’s main display shows the currently selected drum kit being used by the drum machine. -
Page 83: Pre-Roll
Pre-Roll can also be used as a count in cue, indicating when the very beginning of the song starts. The GNX4’s Pre-Roll has five settings Off, 3, 4, 8, or 16 counts. To setup the Pre-Roll function, follow these steps: Begin with the recorder stopped. -
Page 84: Auto Stop
Quantize function creates perfectly timed loops to the nearest eighth note of a given tempo. Therefore, if you set a loop length just a little too long to sync with the recorder click track or the GNX4’s drum machine, the quantize function pulls in the actual loop length to make it sync up exactly with the tempo you have selected. -
Page 85: Format
2000 or XP but you MUST select the File System to be FAT (meaning FAT16) instead of FAT32 and enable the Quick Format option. If a card is formatted using FAT32 and installed into the GNX4 you will be prompted to format it ( ). -
Page 86: Let's Start Recording
Selecting an Input Source To begin recording on the GNX4, it is important to select the source input using the CF/USB 1-2 SRC button. There are multiple input sources to select from which are outlined in the GNX4 Inputs and Recorder Routing section on page 64. -
Page 87: Using The Gnx4'S Recorder Panel For Recording
Using the GNX4’s Recorder Panel for Recording Recording a Track When the GNX4 is powered up and you have installed a Compact Flash card, select the Recorder mode (Red) using the MODE button found on the Control Panel or by pressing Footswitches 4 and 5 simultaneously. -
Page 88: Playing Back A Recorded Track
2. Press the PLAY button. The newly recorded track is automatically armed in PLAY status (the track button is lit green) and the track begins playing back. ATTENTION: Do not remove your CF card or turn the GNX4’s power off while playing back a track or you may lose files. -
Page 89: Setting Each Track's Playback Level
Meter will reach clipping much easier which will cause distortion in the audio being played back. To compensate for this, the GNX4 recorder has a Master Level to control the overall playback level of the internal recorder. To adjust the Master playback level, follow these steps: 1. -
Page 90: Undoing/Erasing A Track
Undoing/Erasing a Track Every track you record may not be a take you want to keep. The GNX4’s recorder features an UNDO button, that erases the contents of a track. You can undo a track even while recording is in progress, thus eliminating having to stop and start all the recording procedures again. -
Page 91: Changing Track Status
The GNX4’s 8-Track Recorder Changing Track Status Each recorded track can be in 1 of 4 states; playback, record, merge, or off. Tracks with recorded material can be turned on for playback (TRACK button is lit green), armed for recording (TRACK button is lit red), armed for merging other recorded tracks to it (TRACK button is lit yellow) or turned off (button is not lit). -
Page 92: Re-Amping Using The Gnx4'S Recorder
GNX4’s processing. This lets you get the feel of hearing the guitar through the amp and effects while tracking, while only recording the dry guitar. To re-amp a guitar track, follow these steps: 1. -
Page 93: Hands-Free Recording
Control Panel or press Footswitches 4 and 5 simultaneously (until they light red) to select Recorder mode. This turns your GNX4’s pedalboard into a hands-free remote control for the recorder and tracks are armed automatically for recording and playback. -
Page 94: Using The Undo Footswitch
Using the UNDO Footswitch to Erase a Track If you are not happy with a track you just recorded, no problem. You can easily delete, or Undo the last recorded track using the GNX4’s footswitches. To Undo a track that was just recorded, follow these steps: Using Undo While the Recorder is Stopped 1. -
Page 95: Hands-Free Recording With The Gnxfc
The GNX4’s 8-Track Recorder Hands-Free Recording with the GNXFC The GNX4 is equipped with a footswitch jack that allows you to connect an optional GNXFC for controlling the GNX4’s recorder. This 3-button footswitch features functions for STOP/UNDO, RECORD, and PLAY. The GNXFC is also an ideal companion for JamMan ™... -
Page 96: Using The Gnxfc To Undo/Erase A Track
Using the GNXFC to Undo/Erase a Track If you are not happy with a track you just recorded, no problem. You can easily delete, or Undo the last recorded track using the GNX4’s footswitches. To Undo a track that was just recorded, follow these steps: Using Undo While the Recorder is Stopped 1. -
Page 97: Using The Gnx4'S Jamman Delay Looper
To use the JamMan feature of the GNX4 you must first have the footswitches in Recorder mode. To do this, press Footswitches 4 and 5 simultaneously until the DOWN/UP footswitches are lit red. If you have songs already in memory, you must select a new Song to record your loop to. -
Page 98: Recording Layered Overdubs To Your Loop
Sometimes our timing may not be perfect when pressing the PLAY footswitch to set the length. The GNX4 provides a Quantize feature that corrects these timing problems to the nearest eighth note. Quantize looks at the point where you pressed the PLAY footswitch in relation to the tempo you are using for your loop. -
Page 99: Using The Gnxfc For Looping
To begin recording a loop is no different than when you are doing multi-track recording. You must begin with a new song in order to create a loop. Press the GNX4’s UP Footswitch (the GNX4’s footswitches must be in Recorder mode first) or the FFWD button on the Recorder Panel to select a new song that has not been recorded on. -
Page 100: Drum Machine Recorder Operation
• MP3s and MIDI files must be located in their specific folders within the GNX4 folder on the Compact Flash card. This will ensure that all .mid and .mp3 files can be located and appended to the end of the factory PATTERN/FILE list. -
Page 101: Midi And Recording
MIDI recording software applications via USB. NOTE: There is no recording of MIDI to the Compact Flash card. 5. MIDI Out can be used for Sysex preset and bulk dumps to another GNX4 or a MIDI data recording device. -
Page 102: Computer Recording Via Usb
1. Begin with the power turned off on the GNX4. 2. Plug the small end of the USB cable in to the USB jack on the back of the GNX4. 3. Plug the large flat end of the USB cable into an available USB port on your computer. -
Page 103: Using Pro Tracks Plus
GNX4 as the hardware you want to use. These procedures must be followed to ensure you will be able to record audio through all of the GNX4’s inputs and to enable the hands-free recording capabilities the GNX4 offers. -
Page 104: Setting Up Pro Tracks Plus
1. From the Pro Tracks Plus menu bar, select Options>Audio. The Audio Options window will appear. Click the Drivers tab. 2. Under the Input Drivers settings, select DigiTech USB 1-2 In/Out and DigiTech USB 3-4 In Only and deselect all other options. -
Page 105: Using The Gnx4'S Footswitches For Hands-Free Computer Recording
3. From the New Project File window, select Normal - Hands-Free Session. 4. Put the GNX4 into Recorder mode by pressing the MODE button located on the Control Panel or by pressing FOOTSWITCHES 4 and 5 simultaneously until the display flashes 5. -
Page 106: Using The Undo Footswitch To Erase A Track
Using the GNXFC for Hands-Free Computer Recording Functions The GNX4 is equipped with a footswitch jack that lets you connect an optional GNXFC for controlling the GNX4’s recorder. This 3-button footswitch features functions for STOP/UNDO, RECORD, and PLAY. The GNXFC is an ideal companion for recording as it lets you leave your GNX4 footswitches setup for changing presets and switching amp channels while the GNXFC is used specifically for controlling the Pro Tracks Plus recording software. -
Page 107: Re-Amping A Guitar Track
To re-amp a track back through the GNX4, follow these steps: 1. Put the GNX4 into Recorder Mode by pressing the MODE button located on the Control Panel or by pressing FOOTSWITCHES 4 and 5 simultaneously until the display flashes 2. -
Page 108: Gnx4 Drums And Midi
Recording the GNX4 Drums as MIDI You can use MIDI drum files for playing the GNX4 drum samples as long as the events are mapped to the MIDI notes shown above. The drum samples of the GNX4 only respond to MIDI messages transmitted on MIDI channel 10, which is the default channel for General MIDI drums. -
Page 109: Usb Playback Mix
Computer Recording via USB USB Playback Mix The DATA WHEEL is an easy way to balance the GNX4’s processing with playback from the Pro Tracks Plus software using a single control. This function is only available when the GNX4 is connected to the computer via USB and Pro Tracks Plus is up and running. -
Page 110: Using Bias ® Deck ™ Se
Once you have installed BIAS Deck SE and launched the program, you will have to configure the Audio Settings to recognize the GNX4 as the hardware you want to use. To configure BIAS Deck SE’s Audio Settings for use with the GNX4 follow the steps outlined below: 1. -
Page 111: Compact Flash File Functions
MIDI This is the folder in which you will place any Type 0 MIDI (.mid) files that are to be played by the GNX4’s DRUMS/MP3 player. The GNX4 plays any MIDI file that appears in this folder both to the internal drum machine and out the GNX4’s MIDI output jack. -
Page 112: Compact Flash Storage/File Transfer
Compact Flash Storage/File Transfer Since the GNX4 is equipped with both a compact flash (CF) d USB, it can act as a card reader for transferring any files that may reside on a card to and from any USB equipped computer. To enable the card reader function, follow these steps: 1. -
Page 113: Memory Card/Computer File Format
The GNX4 uses a specific song and track file naming convention that needs to be maintained when exchanging files with a computer. When a card is inserted into the GNX4, the songs appear in the Songs folder named: SONG01, SONG02, etc… The number of songs can change depending on how many songs or loops are saved on the memory card. -
Page 114: Utilities
The Utility section contains all of the menus for assigning global functions to the GNX4. Global functions affect the GNX4 in its entirety rather than on a per preset basis.The Utility menus include: Volume Pedal Update,V-Switch Threshold, Expression Pedal Calibration, Bounce-Back, Bank Naming, MIDI Channel, MIDI Sysex Dumps, Amp Dumps, MIDI Mapping, MIDI Merge, and Factory Reset. -
Page 115: Preset Bounceback
Bank Names The GNX4 lets you customize the names of the 16 User Banks where the 80 User Presets reside as well as the 16 Card Banks where the 80 Card Presets reside when a Compact Flash card is installed. -
Page 116: Midi Channel
This is useful for making a backup copy of customized presets, or copying your presets into another GNX4. The procedure for performing a Sysex Preset Dump is as follows: 1. Connect a MIDI cable from the GNX4 MIDI Out to the the MIDI In of a MIDI recording device or the MIDI in of another GNX4. -
Page 117: Midi Mapping
MIDI unit to change to Program 10, but you may want the GNX4 to change to User Preset 27. You can remap the GNX4 so when it receives MIDI Program change 10, it calls up User Preset 27. The Procedure for mapping MIDI program changes is as follows: 1. -
Page 118: Default Drum Kit
Default Drum Kit Each drum machine pattern in the GNX4’s drum machine has a default drum kit assigned to it when the pattern is played. This default kit can be disabled so that all patterns may be auditioned with the same kit without having to re-select the kit each time the pattern is changed. -
Page 119: Trouble Shooting Guide
My computer does not recognize my GNX4. • If after turning on and initializing the GNX4 the USB Active led does not stay lit, the computer may not have correctly enumerated the GNX4 USB connection. The computer may give you message stating that a USB Device is not recognized. - Page 120 • The hardware has been profiled incorrectly. Run Wave Profiler and delete the aud.ini file then reprofile the hardware. • Verify the driver setup on the driver tab. • Make sure the GNX4 is set as the timing master for recording and playback. • Make sure Service Pack 1A or later (Windows XP ®...
- Page 121 • Make sure when you export the audio that you choose 16 bit not 24. Using a Mac to receive audio stream from the GNX4, the Mac USB input and output is visible, but so is the PC selection. Can these be removed? •...
-
Page 122: Appendix
Appendix Preset List BANK 1 BANK 5 BANK 9 BANK 13 1. HYBRID 21. MOD BASS 41. PICKEN 61. TWEEDY 2. CLNCHRS 22. GTR>BASS 42. PDLSTEEL 62. MDRNBRIT 3. DUAL AMP 23. ROCKIN 43. A MIXLDN 63. JC-JAZZ 4. BAD BASS 24. -
Page 123: Midi Cc List
Appendix MIDI CC List Parameter Parameter Pickup Type/On/Off Noise Gate Attack CC61 Pickup Type/Type Noise Gate Pluck Sensitivity CC62 Expression Pedal Chorus/Mod On/Off CC65 Volume Post Chorus/Mod Type CC66 Volume Pre Chorus/Mod Level CC67 Wah On/Off Chorus/Mod Param1 CC68 Wah Type Chorus/Mod Param2 CC69 Wah Pedal... -
Page 124: General Midi Drum Sample List
Appendix General MIDI Drum Sample List Sample Name Sample Name Acoustic Bass Drum Ride Cymbal 2 Bass Drum 1 Hi Bongo Side Stick Low Bongo Acoustic Snare Mute Hi Conga Hand Clap Open Hi Conga Electric Snare Low Conga Low Floor Tom High Timbale Closed Hi-Hat Low Timbale... -
Page 125: Specifications
Compact Flash Memory Card Interface: Type 1 (solid state cards) 32 MB up to 2 GB FAT 16 File Format Only *Note: GNX4 is NOT compatible with Type II cards or IBM/Hitachi ™ Microdrives Analog Input Connections: Guitar Input: 1/4" Unbalanced (Tip-Sleeve) - Page 126 Appendix Analog Inputs to Analog Outputs: Guitar Input to 1/4” Outputs S/N ratio: > 106 dB A-weighted; ref = max signal @ 1kHz, 22kHz measurement bandwidth Frequency Response: 20 Hz - 17 kHz (+0 / - 3 dB) THD+N: < 0.0018% typical at -4 dBu, 1 kHz, 0 dB input gain Guitar Input to XLR Outputs S/N ratio: >...
- Page 127 240 VAC, 50 Hz Adapter: PSS3-240 Power Consumption: 21.0 Watts Dimensions: 21.5” Length x 9” Width x 3.25” Height Unit Weight: 10 lbs. DigiTech engineers are constantly working to improve the quality of our products. Specifications are therefore subject to change without notice.
- Page 128 Notes...
- Page 129 Notes...
- Page 132 PH (801) 566-8800 FAX (801) 566-7005 DigiTech, GeNetX, Audio DNA, Guitar Workstation, and GNX4 are trademarks of Harman Music Group Inc. Copyright Harman Music Group Printed in the USA 5/2004 GNX4 Owner’s Manual 18-0449-A Please visit DigiTech on the World Wide Web at: http://www.digitech.com http://www.guitarworkstation.com...
Need help?
Do you have a question about the GNX4 and is the answer not in the manual?
Questions and answers
How long does it take the gnx4 to recalibrate and reset
The exact time it takes for the DigiTech GNX4 to recalibrate and reset is not specified. However, the process involves several manual steps including pressing buttons and rocking the Expression Pedal, so it typically takes a few minutes to complete.
This answer is automatically generated
i cant get any sound out of my gnx4 work station what am i doing wronge
Possible issues causing no sound from the DigiTech GNX4 workstation include:
1. Incorrect output routing – Ensure "Stereo All" or "FX" is selected in the Output Setup.
2. Playback only available on USB 1-2 – If using USB 3-4, no playback will occur.
3. Mono/Stereo mismatch – Set tracks to mono or stereo correctly in the track settings.
4. Line inputs not selected properly – Ensure correct input source is selected using the DATA WHEEL.
5. Phantom power issues – If using a mic that doesn’t need phantom power, turn off +48V to avoid problems.
6. Audio conflict – Disable theater audio driver in the video card if there's a conflict.
7. System not rebooted – A reboot may be required to resolve device recognition or routing issues.
This answer is automatically generated
востановить заводские настройки
To restore factory settings on the DigiTech GNX4:
1. Press the UTILITY button (its LED will light up).
2. Use the NEXT button to select RESET?, and the STORE button will start flashing.
- To cancel, press the EXIT button.
3. Press the STORE button once; the display will show CONFIRM?.
4. Press the STORE button again. The display will show FACRESET and then TOE DOWN.
5. When the display reads TOE DOWN, push the Expression Pedal forward (toe down) and press the flashing Footswitch 4.
6. When the display reads TOE UP, continue with recalibration.
This process erases all user-programmed data but does not affect content on a Compact Flash card if installed.
This answer is automatically generated