Table of Contents
Advertisement
Quick Links
Advertisement
Table of Contents

Related Manuals for DigiTech GENESIS3


Summary of Contents for DigiTech GENESIS3
- Page 1 Users Guide UITAR ROCESSOR...
-
Page 3: Declaration Of Conformity
DigiTech 8760 S. Sandy Parkway Sandy, Utah 84070, USA Date: May 4, 2001 European Contact: Your local DigiTech Sales and Service Office or Harman Music Group 8760 South Sandy Parkway Sandy, Utah 84070 USA Ph: (801) 566-8800 Fax: (801) 568-7573... -
Page 4: Warranty
1.The warranty registration card must be mailed within ten days after purchase date to validate this war- ranty. 2. DigiTech warrants this product, when used solely within the U.S., to be free from defects in materials and workmanship under normal use and service. -
Page 5: Table Of Contents
Save the HyperModel™..............24 S/PDIF Digital Set Up ................7 Select Models for the Preset Channels ........24 Applying Power ..................7 Edit the Preset ..................25 About the Genesis3 ................7 Select the Pickup Type ..............25 Performance Mode ................7 Turn the Wah Off ................25 The Presets..................7 Turn the Compressor Off..............25... -
Page 6: Congratulations
There is no other direct recording device quite like the Genesis3 in the world. Sure the Genesis3 includes 16 of the most popular guitar amp models, an acoustic guitar model, and a library full of different effects to choose from, but it goes far beyond modeling and processing. -
Page 7: Quick Start
Turn the OUTPUT LEVEL knob on the rear panel of the Genesis3 all the way down (counter clockwise). Connect the plug of the power supply to the power jack on the Genesis3. Connect the other end of the power supply to an AC outlet. -
Page 8: A Guided Tour
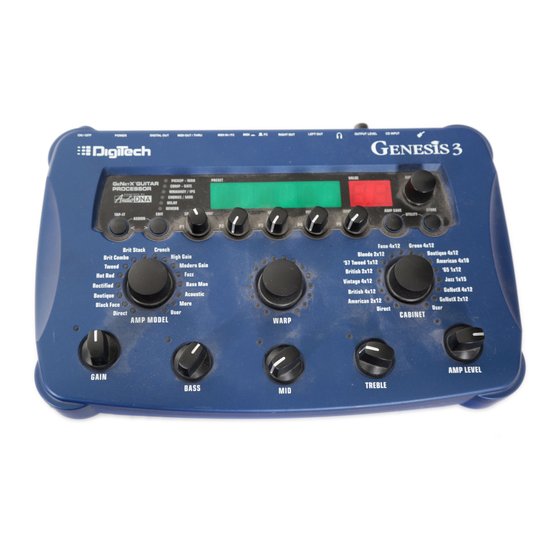
Introduction Guided Tour Front Panel PICKUP - WAH PRESET VALUE DATA / PRESET COMP - GATE WHAMMY / IPS CHORUS / MOD DELAY REVERB TAP-IT EDIT SPEED / AMOUNT DEPTH MOD LEVEL DELAY LEVEL REVERB LEVEL AMP SAVE STORE ASSIGN UTILITY 1. - Page 9 Introduction c. Mod Level/P3 - In Performance mode, this knob adjusts the Modulation level or mix. In Edit mode, this knob adjusts the third parameter of the selected effect. d. Delay Level/P4 - In Performance mode, this knob adjusts the Delay level of the selected preset. In Edit mode, this knob adjusts the fourth parameter of the selected effect.
-
Page 10: The Rear Panel
Utility menu. See page 35 for more information. 9. S/PDIF Digital Output - This is the digital output from the Genesis3.The signal at this output is in a stereo digital format, and is to be connected to a digital S/PDIF input found on digital recording devices or digital mixers. -
Page 11: Getting Started
Getting Started Making Connections Before connecting the Genesis3 to external equipment, make sure that the amplifier powering your speakers is turned off, and that the power switch on the Genesis3 is off. There are several different connection options available when using the Genesis3.You may run mono into one channel, stereo into two channels, connect digitally to the input of a digital recorder or mixer, or a combination of these.The... -
Page 12: S/Pdif Digital Set Up
Performance Mode When you first turn on the Genesis3, it will power up in Performance mode.This is the top level mode and the mode used while you are performing.While in Performance mode, the display will show the currently selected preset name and number and the 5 knobs directly beneath the display adjust the parameters labeled directly above them. -
Page 13: Cd In (Jam-Along™)
CD In (Jam-Along™) The CD input allows you to connect a Tape, CD, or MP3 player to the Genesis3, and jam with your favorite artists.The signal from your player is output through the left and right, and headphone outputs of the Genesis3. To use the CD INPUT feature, do the following: 1. -
Page 14: Editing/Creating A Preset
Editing Functions Editing/Creating a Preset The Genesis3 was designed to make the process of sound creation easy and intuitive. Because the Genesis3 provides both Amp Modeling and Effects Processing, the editing functions have been divided into the Amp/Cabinet Modeling section and the Effects section.The GeNetX™ technology contained in the Genesis3 allows you to go much further than mere Amp Modeling. -
Page 15: Editing Amp Models And Cabinet Types
Editing Amp Models and Cabinet Types Each Preset in the Genesis3 is equipped with a Green, Red, and Yellow (Warped) Amp Channel.The Green and Red Amp Channels include individually assignable Amp Models, Cabinet Types, Gain, EQ, and Level settings. Each Green and Red Cabinet can also be tuned, meaning that you can select the Cabinet’s resonant frequency. -
Page 16: Cabinet Tuning/Eq Frequencies
Editing Functions Cabinet Tuning/EQ Frequencies The resonant frequency of the selected speaker cabinets can also be individually tuned. Cabinet Tuning ranges from -1™0 (one octave below) to 1™0 (one octave above). You can change the center frequencies of the amp EQ for the selected amp channel. -
Page 17: Saving Hypermodels
4. Repeat steps 2 and 3 until the desired Hypermodel™ name is shown in the Display. 5. Press the AMP SAVE button again to select one of the 9 User HyperModel™ locations. If the Genesis3 has any unused HyperModel™ locations available, the Display will read EMPTY U1.The U1 will be flashing indicating that this is the first available location for your new creation to be stored. -
Page 18: Editing The Effects
Editing Functions Editing the Effects The Genesis3 contains a comprehensive library of fully programmable, studio quality Effects. The Effects section is accessed with the EDIT button. Successive presses of the EDIT button will advance through all available effects in a Preset.The effect LEDs will light one at a time to indicate the selected Effect.When you have selected the desired... -
Page 19: Storing/Copying A Preset
User Preset location.The following steps outline the procedure for storing a Preset: 1. Press the STORE button once and the Genesis3 will enter a naming mode.The first letter of the currently loaded Preset name will begin to flash. -
Page 20: About The Effects
Effects About the Effects The Genesis3 can be thought of as several different “virtual” amps combined with a studio full of high quality effects. The following chart shows the order of the effects and Amp Modeling in the Genesis3. Effect Definitions Each Effect within the Genesis3 is fully programmable to suit your personal tastes and application. -
Page 21: Noise Gate
Gain - The P4 knob adjusts the Output Gain from the Compressor.This parameter should be used to balance the level of the Compressor in order to achieve unity gain. It is possible to clip other effects in the Genesis3 by setting the Compressor Gain too high. -
Page 22: Chorus/Mod
Effects IPS Amount - The P2 knob selects the Amount or interval of the shifted pitch. Interval choices include: OCTDN (octave down) 2NDUP (a second above) 7THDN (a seventh below) 3RDUP (a third above) 6tHDN (a sixth below) 4THUP (a fourth above) 5tHDN (a fifth below) 5THUP (a fifth above) 4tHDN (a fourth below) -
Page 23: Phaser
Effects Phaser (PHaseR) A Phaser splits the incoming signal, and then changes the phasing of the signal.This signal is then taken in and out of phase and mixed back in with the original signal. As the phasing changes, different frequencies get canceled resulting in a warm sort of twisting sound. -
Page 24: Vibrato
Mod Mix - The P5 knob controls the mix of wet and dry signal. Ranges from 0 (all dry) to 99 (all wet). SynthTalk™ (syNtLK) SynthTalk is an effect exclusive to DigiTech. It makes your guitar seem to speak based upon the dynamics of your playing style. -
Page 25: Envelope Filter
(which turns the input to the Delay off and allows you to play over the top of a passage in the Delay loop). The Delay in the Genesis3 also includes a Ducker Threshold which allows you to set the signal strength required before the Delay will record.This feature allows you to control the... -
Page 26: Reverb
Reverb On/Off - The DATA knob turns the Reverb on and off. Reverb Type - The P1 knob selects the Type of Reverb or acoustic environment.The Genesis3 provides ten different environments to choose from including:... -
Page 27: Guided Example
For this example, we are going to use a vintage Tweed amp with an Blonde 2x12 Cabinet, and warp it with a Rectified Amp using a Marshall 4x12 cabinet. After selecting Preset 40, the Genesis3 will be ready to select the Amp Models. -
Page 28: Select The Red Channel Amp And Cabinet
Tutorial Select the Red Channel Amp and Cabinet Press the WARP knob until the LEDs next to the Amp Parameter knobs are red indicating that the Red Channel has been selected for editing. Rotate the AMP MODEL knob until the Display reads RECTIF (Rectified).The LED next to the word “Rectified”... -
Page 29: Warp The Green And Red Channels Together
9 User HyperModel™ locations.The alpha-numeric Display should read EMPTY (Empty) and the red numeric Display should read U1 because this is the first HyperModel™ stored to your Genesis3. Press the AMP SAVE button again to store this new creation to this Amp location.The Display will briefly read AMPSVD (Amp Saved) and then return to showing the name of the currently selected Preset. -
Page 30: Edit The Preset
Tutorial Edit the Preset The next step to creating our example Preset is to enter the Effect Edit mode.To do this, press the Edit Button once. At this point only the Wah-Pickup LED should light.The Display will briefly show EDIT and then cycle between show- ing the status of the Pickup simulator Effect. -
Page 31: Adjust The Noise Gate
Tutorial Adjust the Noise Gate For our example, we wanted our Noise Gate to open quickly with a relatively weak signal.This type of gate would use the Silencer™ with a low Threshold and short Attack Time. Press the EDIT button again and the Noise Gate LED will OF), rotate the DATA knob until the Display reads light. -
Page 32: Select And Adjust The Reverb
The last step that we need to do is to store our changes to a User Preset. If we changed Presets or turned the Genesis3 off without storing these settings, it would forget what we had done and revert back to the original Preset. -
Page 33: Busy" Display
Expression Pedal The Expression Pedal on the Control X can be assigned to control up to 3 Genesis3 Parameters in real time including the Volume,Whammy,Ya Ya, or just about any other parameter.. When a parameter has been assigned to the Expression Pedal, the minimum and maximum values the assigned Parameter will reach can also be programmed.The... -
Page 34: Lfos
For instance: if the Amp Gain was assigned to LFO1, and the minimum value was set at 1 and the maximum value was set at 99, the Genesis3 would automatically sweep the amount of distortion from a fully clean sound to a fully distorted sound. - Page 35 Other Functions A WARP (Amp Warp) - Warps the Green and Red Amp Models. C WARP (Cabinet Warp) - Warps the Green and Red Cabinet types. WARP (Warp) - Warps the Green and Red Channels. G GAIN (Green Gain) - Controls the Amp Gain for the Green Channel. G LEVL (Green Level) - Controls the Volume of the Green Channel.
-
Page 36: Utilities
Utility menu and return the Genesis3 to the previous mode. Tuner Mode The Tuner in the Genesis3 allows you to accurately tune your instrument prior to a recording session.The Tuner can be instantly accessed from the Control X Foot controller, or through the Utility menu in the Genesis3 processor.The following steps outline the procedure for entering the Tuner from the Genesis3 front panel: 1. -
Page 37: Output Mode
Output Mode The output mode is used to select whether the Genesis3 will produce a stereo image or a mono signal at the left and right outputs. Setting the Output mode to Stereo will produce a Stereo image. Setting it to Mono will produce a mono signal.The procedure for selecting the Output Mode is as follows:... -
Page 38: Expression Pedal Calibration
Bank Names The Genesis3 provides the ability to customize the names of each of the 16 User Banks where the 48 User Presets reside. Customized Bank names aid in quickly identifying the User Bank containing the Presets you may need for a par- ticular song or set.The procedure for naming the User Banks is as follows:... -
Page 39: Midi
Bulk Dump The Sysex Bulk Dump menu allows up loading of all the Genesis3 Presets and Utility data to a sysex librarian, or MIDI recording device.This is useful for making a backup copy of all your customized settings.The procedure for performing a Bulk Dump is as follows: 1. -
Page 40: Hypermodel Amp Dump
HyperModels™ into another Genesis3.The procedure for performing a Sysex Preset Dump is as follows: 1. Connect a MIDI cable from the Genesis3 MIDI Out to the the MIDI In of a MIDI recording device or the MIDI in of another Genesis3. -
Page 41: Digital Output Level
NOTE: Performing this function will erase all user-programmed data. All such data will be lost forever! Be sure you want to erase the memory and start fresh before continuing with this procedure. 1. Disable the DigiTech Control X foot controller (if connected) by switching the FC/MIDI switch on the rear panel to the MIDI position. -
Page 42: Foot Controller Options
Parameter including Volume,Whammy, and Wah.The Control X connects to the MIDI In/FC jack on the rear panel of the Genesis3, and is phantom powered from the Genesis3. A switch on the rear panel of the Genesis3 is used to select whether the jack will be used with the Control X and provide the phantom power, or as a MIDI input. -
Page 43: Preset List
Appendix Appendix Preset List Bank 1 (SHOCAS) Bank 9 (METAL) 1. HYBRID 25. RECTFY 2. CLNCHO 26. SOLO 3. 2CHUNK 27.WHAMMY Bank 2 (GENETX) Bank 10 (STUDIO) 4.WARPME 28. STACKD 5. BLKBAS 29.VOLSWL 6. MEAT2X 30. BIGDUK Bank 3 (STARS) Bank 11 (JAZZ) 7. -
Page 44: Continuous Controllers (Cc)
™ software to control or program the Genesis3. Every Parameter in the Genesis3 is assigned an individual CC number. Sending value changes on these CC numbers will change the Parameter setting in real time. Conversely, changing the values on the Genesis3’s front panel will display changes on the G ™... -
Page 45: Midi Implementation
Appendix MIDI Implementation... -
Page 46: Specifications
Appendix Specifications A/D Converter: 24 bit D/A Converter: 24 bit Sampling Frequency: 44.1 kHz DSP Section: Dual DSP architecture with true 24-Bit stereo processing @ 128 Million Instructions Per Second (MIPS) Connections: Guitar Input and Outputs: 1/4" TS Headphone: 1/8" Stereo TRS CD Input 1/8"... - Page 47 DigiTech, GeNetX™, and Genesis 3 are trademarks of the Harman Music Group Incorporated Copyright 2001 the Harman Music Group Incorporated Printed in USA 6/01 Manufactured in the USA Genesis 3 Manual 18-0430-B Please Visit DigiTech on the World Wide Web at: http://www.digitech.com...
Need help?
Do you have a question about the GENESIS3 and is the answer not in the manual?
Questions and answers