Unitree Go2 Manual
- User manual (20 pages) ,
- User manual (19 pages) ,
- User manual (10 pages)
Advertisement
Product Overview
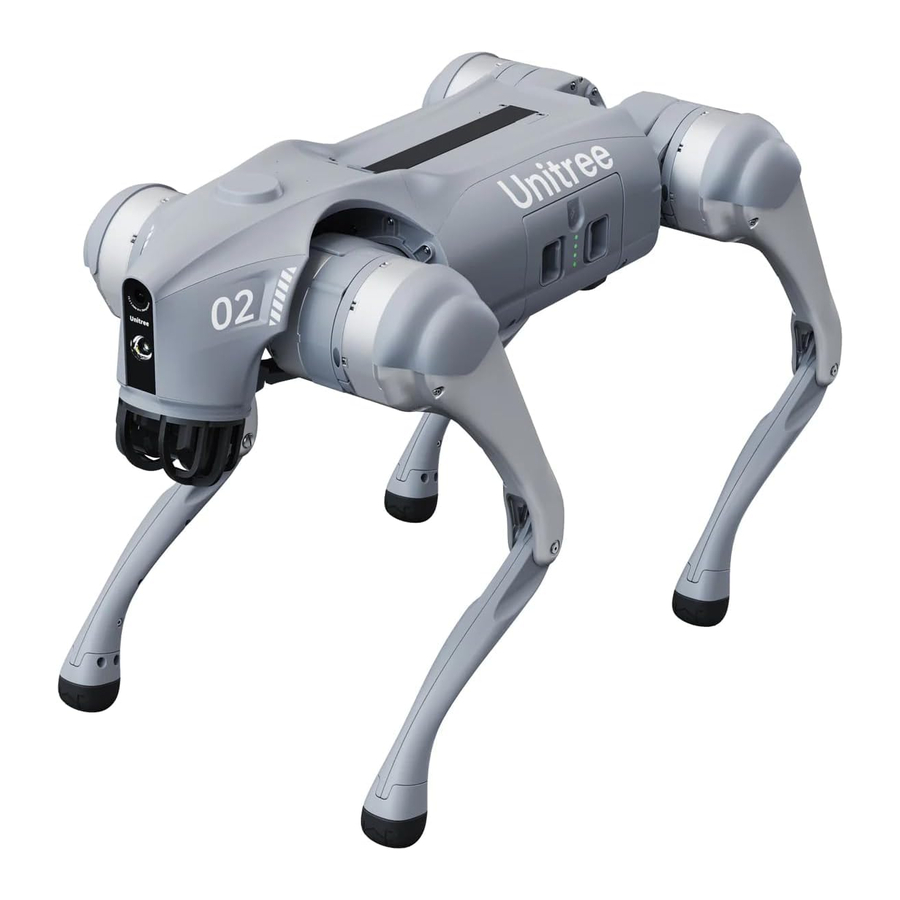
Complete Machine

Accessory

 Please carefully check if the items in the luggage are complete and intact. All pictures in this manual are for reference only. If the actual items do not match the manual, please refer to the actual item. Accessories of different models may vary, please refer to the actual model for details. To obtain specific model specifications and parameter information, please visit the official website of Yushu Unitree at www.unitree.com.
Function Introduction
Unitree's new upgrade interactive bionic quadruped robot Go2 has 12 degrees of freedom (composed of 12 aluminium alloy precision joint motors), and employs force-control technology to provide composite control of force and position for each joint, in order to achieve force-control of the whole machine to achieve excellent motion performance. The whole robot is made of aluminium alloy and high-strength engineering plastics, which greatly improves the stability and reliability of the machine dog; the maximum running speed can reach 5m/s (measured in the laboratory).Equipped with 4D LIDAR L1 with 360° × 90° hemispherical super wide-angle sensing, which can help Go2 to achieve no blind area coverage. It reaches the leading level at home and abroad both in terms of structure, motion performance, environment perception, and side following.
Explanation: The radar here uses LiDAR technology, which is infrared emission rather than radio wave emission
Parts Name:

Back load mounting hole position diagram:

- Status Indication
Go2's head indicator light can emit different lights to show the current working status of the robot and the current operating system, please refer to the following table to learn more about the operating status indicated by different flashing modes and colors:Color and Flashing Meaning Low flash rate in red System abnormality, boot failure, hardware failure, need to contact after-sales service. Fast flash rate in red Motor & IMU calibration failed Permanently on in green Powered on Flash in green Switching on Low flash rate in blue Motor & IMU calibration in progress Low flash rate in yellow Low battery warning, will automatically crouch down within 10 minutes Permanently on in white Head indicator light
- Intelligent Avoidance
Equipped with Unitree's self-developed 4D LiDAR L1 with 360° × 90° hemispherical ultra-wide-angle perception, boasting ultra-low blind spot, the minimum detection distance is as low as 0.05m, which can help Go2 to achieve a blind spot-free coverage, real-time access to three-dimensional information about the surrounding environment, and in the process of travelling according to the radar data to carry out intelligent avoidance (only support forward obstacle avoidance), to avoid collision and ensure the safety of the robot and the surrounding environment.
- Intelligent Side-follow System 2.0 (ISS2.0)
By adopting the new wireless vector positioning and control technology, the positioning accuracy is technically upgraded by 50%, the remote control distance is over 30m, and combined with the optimised obstacle avoidance strategy, it can make the robot better traverse complex terrain. - Voice Interaction
Supports voice interaction and commands and built-in voice recognition module, and converts human language into computer language to communicate with the main chip, so as to control the robot and achieve human-machine language interaction. Reaches voice interaction response at millisecond level, using the industry's advanced voice recognition technology with high recognition accuracy, fast literacy. - App remote image transmission
With the new Unitree Go App, it provides omni-directional ultra-wide image transmission, real-time viewing of shooting images, built-in 4G and eSIM for more stable connection and remote control. It intelligent OTA upgrades, which makes the operation in ultra-vision range as simple and convenient as being in the field. - Foot Force Sensor
The EDU version features an foot force sensor. The movement of the robot dog will compress the air inside the foot pad, and transmit the pressure signal to the shoulder force sensor through the air tube, so as to judge its surroundings, and adjust the movement of the robot dog accordingly. - Autonomous Charging
The EDU version supports charging at charging piles. Combined with visual recognition, 3D mapping and other technologies, it can autonomously plan charging routes and realise autonomous charging, which can provide a strong guarantee for 24-hour operation.
Charging
Due to reasons such as self-consumption of the battery during transport and storage, it is normal to have a low or empty battery when using it for the first time, and charging can be done in the following way.
- Charge the battery
Remove the battery from the body (Press the two snaps of the battery pack)
![]()
Connect the Go2 battery
![]()
Charger input AC power (100-240V, 50/60Hz)
![]()
Manually disconnect the power when fully charged
![]()


- Companion Remote Control
When the battery indicator light of the companion remote control shows that the battery is low, you should connect the companion remote control to the charger as shown in the figure below:
AC Power 100-240V USB Charger
![]()

- We recommend you to use a 5V/1A USB charger which meets FCC/CE standard.
- The power indicator light will flash at 1Hz (1 second/time) in charging status and indicate the current power level.
- When the power indicator light is all off it means the battery pack is full, please remove the charger to finish charging.
- How to charge handheld remote control
When the battery indicator light of the companion remote control shows that the battery is low, you should connect the companion remote control to the charger as shown in the figure below:
![]()

- We recommend you to use a 5V/1A USB charger which meets FCC/CE standard.
- Ensure that handheld remote control is switched off before charging it.
- The power indicator light will flash at 1Hz (1 second/time) in charging status and indicate the current power level.
- When the power indicator light is all off it means the battery pack is full, please remove the charger to finish charging. .
Using Your Robot
Transport Box Description
The picture is only used to illustrate the placement of parts, please refer to the received content. The accessories of different models will be different, please refer to the actual model.

Unpacking
Place the box face up on a flat surface, then open the upper box. Lift the robot out of the box by using the strap, and remove the accessories from the box in order. After learning how to use the robot correctly, place the quadruped robot flat on a level surface and prepare it for power-up.
Packing
Preparation for packing: Rotate the legs of the quadruped robot to the position shown in the picture (rear leg retracted step: rotate the rear leg hip motors so that the rear thighs are placed in the position as the picture shows, and at the same time retract the rear lower legs to the position shown in the picture.

After completing the preparatory work fpr packing, load the quadruped robot into the lower box in the direction shown in the picture (pay attention to the head of the quadruped robot to be stuck into the head placement in the process). After the quadruped robot is loaded, put the battery and charger that come with the shipment into the corresponding positions in the transport box to ensure that none of the above parts will fall off when the upper box is closed.
Preparation before use
- Only Use Unitree Robotics authentic parts and ensure that all parts are in good working condition.
- Ensure that the firmware has been updated to the latest version.
- The users ensures that he or she is not operating the robot while intoxicated, under the influence of drugs, and unable to concentrate.
- Be familiar with the characteristics of each gait mode. Be familiar with the emergency braking method of therobot in case of instability / loss of control.
- Ensure that there are no foreign matters (such as water, oil, sand, soil, etc.) inside the robot and its components.
- Ensure that the surface of the robot's camera and LIDAR are free of dust and are not surrounded by obstructions.
Preparation before Power on
- Installing Battery Packs
Lay Go2 on a flat surface, insert the battery pack into the battery packs from the side of the robot, pay attention to the direction of installation, with the power switch button facing upwards. If the battery pack cannot be fully inserted, please adjust the direction of the battery packs and do not press forcibly to avoid damage to the battery interface and buckle. When you hear a "click" sound, the battery pack installation is complete.
![]()
- Body Placement
![]()
Horizontal start-up: Please make sure that the robot is placed on a flat surface before start-up, that the robot's abdominal support pad is flat on the ground, that the robot's body is lying on the ground horizontally without any tilting, that the robot's lower legs are in a fully retracted state (as shown in the picture below), and that all four joints and the ends of the feet are placed on the ground flatly to make sure that the robot's thighs and lower legs are not pressed down by the robot's body.
![]()


Start up Go2
After the robot is placed according to the requirements, start it up according to the following steps: Firstly, press the Go2 power switch button briefly for 1 time, then press the power switch button for 2 seconds or more, then Go2 can be started up During the startup process, the Go2 head indicator light flashes in green. And wait for 2 minutes, the head indicator light is in green permenantly, and the body is parallel to the ground, then the robot is started up.

- If the start-up fails, please check the body placement carefully.
- The Go2 may fail to start up if the legs are stretched outwards or if the legs are pressed inwards.
- Hand may be pinched at the motion joints, please be careful!
Switching off Go2
Before switching off, please make sure that the robot is standing on a flat surface, and make sure that the robot is in a static standing state (the robot body position is in the initial state on the power-up, the body is horizontal, and the state is in the static standing state.
- Operate the robot into the prone state;
- After the robot enters the prone state, short press the power button then long press the power button for 2 seconds to switch off the robot.
After switching off the robot, please follow the body placement requirements and position Go2's big and small legs and hip joints to prepare for the next start-up. If you do not use Go2 for a long time, please remove the battery pack and follow the packing steps to put Go2 into the dedicated luggage.
- Please make sure that the robot turned off in a damping state, otherwise the robot will fall heavily on the ground after it is turn down and powered off, which may cause damage to the robot body and certain potential hidden dangers! If the power on fails, please check if the robot body is placed correctly.
Activate your Go2
The robot requires activation for first time use, please scan the QR code on the left side to install Unitree Go App, and follow the App prompts to activate Go2 and complete the inbuilt teaching. During the activation process, please turn on your bluetooth on your mobile phone and bring your phone close to Go2 to ensure real-time bluetooth communication. After successful bonding, you can start to use the robot.

- Please sign up / log in after installing the App
![]()

- Start up Go2: head indicator green perma-nently, body parallel to the ground
![]()

- Add robot: Home page -add robot-open Bluetooth to connect your Go2-set robot information.
![]()

- Bind the robot: you can choose AP router mode and Wi-Fi connection mode to connect, you can learn the built-in tutorial to quickly master the operation skills after successful connection.
![]()
![]()


How to change the account binding?
Home page- Settings - Robot Settings - Switch Connection, choose to click Unbind, you can unbind the bound robot dog. After the robot dog is unbound, it can be bound by other users.

- Please keep your mobile phone's bluetooth on during connection!
- Bluetooth connection error: Unitree Go App needs to get Bluetooth permissions, please open Unitree Go Bluetooth permissions in the App.
- If you forget your bound account, or if you lose your account, please contact the relevant Unitree staff!
Operate your Go2
- Use the Unitree Go App to control your Go2
After completing the built-in tutorial in the Unitree Go App, you can use the app to control your Go2 as you want.
![]()
- Use voice control Go2
At present, Go2 offline voice only supports Chinese conversations. If users want to have conversations in English, they can guide them to use App Benben Dog. By changing the phone system to English, the app can communicate with Benben Dog in English and issue commands. - Use the companion remote control to control Go2
Before powering on, the companion remote control should be fixed in the position as shown in the picture. After the robot is powered on successfully, you can use the companion remote control to control Go2, the operation steps are as follows:- Turn on the ISS in the mobile phone App
- Open Unitree Go App to connect Go2.
- Open the manipulation interface -settings on upper right corner - motion status adjustment - side following.
- Press OFF to turn on the side-following function.
- Wear and start the companion remote control.
- Buckle the remote control to the right side of the human body on the belt, stand on the left side of the robot, and keep your torso facing the same direction as the robot.
- Short press the power button of the companion remote control, when the indicator light is on steadily the startup is finished, at this time the remote control is in rocker mode.
- Start the side-following mode (Important step)
- Short press the M button twice to start the slow auto-following mode, the maximum speed at 1.5m/s.
- In slow auto-following mode, short press M button twice to enter fast auto following mode with maximum speed at 3.0m/s
- Turn on/off obstacle avoidance function
Short press L2 button twice to turn on the obstacle avoidance; short press once to turn off the obstacle avoidance. - Switch off the auto-following function
- Short press M button once: stop following and enter the rocker control mode.
- Switch on the rocker: Toggle the rocker to stop the follow mode immediately and enter the rocker mode.
- Switch off: Long press the power button of the companion remote control for 2 seconds to switch off.
- Horizontal Placement: Place the companion remote control horizontally.
- Turn on the ISS in the mobile phone App

Other operating instructions (For adjusting the machine)
- Rocker control: When the companion remote control enters the rocker mode, the robot movement can be controlled by the rocker. Using the rocker control mode, the remote control can be taken off the belt for control. If you need to continue to use auto-follow after the remote control is taken off, you need to put the remote control on and then turn on the accompaniment.
- Stand up, Down, Damped Mode: Short press P button 2 times consecutively, the robot switches cyclically between Down, Damped and Stand up modes.
- Side roll: When the robot rolls over on its side, press P button and hold for 1 second to resume standing.
 Auto following precautions: Auto following precautions:
|
- Use handheld remote control to control Go2
For the first time to use handheld remote control, you need to bind it on Unitree Go App, [Settings] -> [Remote Control Settings] - turn on the remote control switch, enter the corresponding remote control code, and then you can bind it with the digital transmission module on the robot dog.
![]()

The digital signal lights on the left side of the two-handed remote control are all on, which means that the connection is successful. Then you can use the remote control to control the robot dog to complete the corresponding action. When using the official control program of Unitree, the operating instructions provided by the official correspond to the actions of the robot dog. When users run their own programs in the developer mode: the remote control commands are still valid in the high level (application level) programming. Remote control commands are invalid during low level programming. If the high level API commands and the remote control commands are sent to the robot dog together, both commands will be executed by the robot dog, which may lead to the instability of the robot dog. Please make sure that whether you need to use the remote control control or not based on the running situations of the robot dog. Remote control commands are invalid during low level programming.
To obtain the latest instructions for your handheld remote control, simply access the Unitree Go App! Please visit Unitree Go App to trigger more athletic modes!
Explanation of abnormalities
When using Go2 quadruped robot, robot abnormalities may occur. Most of the abnormalities are controllable (with solutions), customers should not panic when encountering these problems, read the following content and follow the following steps to solve the problem.
If you have any questions, please contact Unitree Robotics official technical support: support@unitree.cc.
- Go2 does not stand up after switching on with head flashing red light
Go2 head red light flashing slowly, this means power on failure, carefully check the robot power on placement, reposition and then reboot. If the robot still fails to stand up, there may be system abnormality or hardware failure, then you need to contact Unitree official technical support to troubleshoot the problems. - App connectionerror error
If using AP connection mode, please check whether the mobile phone is connected to the AP hotspot issued by Go2.
If using Wi-Fi connection mode, please check whether the connected Wi-Fi network is normal and can connect to the external network.
If using 4G connection mode, please check the current traffic situation under [Settings]->[Mobile Network] of the App to ensure that the 4G IoT card connects to the external network. - Can't use the App to control Go2?
Go2 cannot be controlled by companion remote control and App can't control Go2 at the same time. If you want to use App to control Go2, please exit the side-following mode first. Press the power button for 2 seconds to switch off the remote control. Then you can use the App to control Go2. - Abnormal standing posture after switching on
After Go2 is switched on, if walking posture is abnormal and it is easy to fall down, etc, and restarting the robot cannot solve the problem, at this time, you need to re-calibrate the robot joints according to the relevant steps in Unitree Go App.
Note: Go2 has been calibrated in factory default settings, please do not calibrate the joints for normal use! Please consult Unitree's official technical support to determine whether you need to re-calibrate the joints after Go2 has an abnormal situation!
App joint calibration entrance is [Settings]->[Data]->[Machine Dog]->[imu Information]->[Cali-bration]. - Radar stops rotating when meet external force
Normally, when relieving external force, the radar will automatically resume rotation. If it still can't work, you can try to make the radar roll by fiddling with your hand. If the problem still remain unsolved, please try to restart Go2. If it can't be solved after restarting, you can check the malfunction details on the app, and consult with Unitree's official technical support. - The radar point cloud has obvious smudges?
If the radar emitting area is contaminated (e.g. dust, mud, etc.), it may affect the quality of the data generated by the radar after scanning the object, and the radar needs to be cleaned in this case.
Please clean the radar in the following way: firstly, gently wipe the optical window with a clean lens cleaning cloth. If the smudges remain, then gently wipe the window with a small amount of alcohol using a cleaning cloth.

- Please make sure that the robot is lying down for switching off, otherwise the robot will fall heavily on the ground after switching off and powering off, which may cause damage to the body and remain certain hidden safety hazards!
- When standing up, when the ground friction is insufficient or the robot's feet are not reliably supported, please do not operate the robot strenuously to adjust its posture (including pitching, rolling, yawing, fuselage height adjustments, etc.), otherwise it may cause the robot to fall down.
- Please walk the robot on flat terrain. If you are walking on ground with low friction, do not operate the robot strenuously, otherwise it may cause the foot end to slip and fall.
- The rated endurance of the robot is about 2-4 hours with no load static standing and upright walking alternately. It depends on the actual operating conditions of the robot, such as walking at a faster speed for a longer period of time, drastically adjusting the body attitude for a longer period of time while the robot is standing, standing with the robot legs bent, running with a load, walking at a lower body height, and terrain with appropriate undulations and slopes, etc., which will reduce the endurance time. (Lower body height and more knee bends place a greater burden on the motors and therefore increase power consumption significantly earlier and are accompanied by motor heating).
- Because the levels of proficiency of the operator are different. To safety reasons, it is not currently recommended that robot walk stairs higher than 16cm, otherwise it is likely to trip over the foot due to improper operation. When encountering undulating ground, the operator should also be careful and reduce the speed of the robot.
- Go2 is rated for a positive climbing angle of less than or equal to 40°. When a larger climbing angle is used (approximately equal to or greater than 40°), the robot body is likely to drift sideways, and direct turns on slopes with a large gradient are likely to destabilise the robot; reduce walking speed when climbing; proper control by the operator is required.
- Go2 can reach a maximum speed of 3.7m/s on flat terrain.
- The robot foot end is a consumable item and a spare foot end will be included with the delivery.
Especially walking on relatively rough ground, it will be worn out seriously. If there is obvious foot pad abrasion, damage, or loud noise when the robot walking on the ground, please replace the foot end in a timely manner, so as to avoid the damage to foot and malfunction of the robot movement. - It is forbidden to use the robot on the occasions where the terrain is complicated, the ground is wet, there are sundries on the ground, the terrain is undulating (steps higher than 16cm, etc.), and the slope is large (more than 40°) and there are sharp objects on the ground or in the periphery.
- Hand may be pinched at the motion joints, such as at the knee joint, please be careful.
Daily Care and Maintenance
Cleaning: After using Go2, if there are stains on the surface, please clean the surface of the body in time. Before wiping the body, please switch off the power, use a dry and clean soft cloth to wipe the body, pay special attention to the camera and radar whether to wipe clean.
Storage: Go2 is not dustproof or waterproof, it should be stored in a dry and cool room, avoiding sunlight and rain, so as not to shorten the service life of the parts due to water ingress and rust corrosion. Routine inspections before and after use can significantly improve product reliability, reduce potential hazards and extend service life.
Uncharged Checklist
| Type | Main Points |
| Appearance |
|
| Structure |
|
| Foot end parts | Check whether there is obvious foot pad damage. |
| Battery packs |
|
| Companion Remote control | Check whether each key of the remote control is lagged. |
Charged checklist
| Type | Main points |
| Remote control |
|
| Battery | Confirm whether the current power is sufficient. |
Battery pack maintenance
- Never charge the battery pack in an environment where the temperature is too high or too low
- Never store the battery pack at room temperatures above 40°C.
- Do not overcharge the battery pack as this will cause damage to the cells.
- If you do not use the battery for a longer period of time, please check the remaining battery power regularly, if the power is less than 30%, please charge the battery to 70% before continuing to store. So as not to over-discharge the battery and damage the battery.

- Go2 can use 5Gwifi band1 channel, 5150-5250MHz indoor use only.
- When using, please control the robot within sight, keep a certain safe distance from the robot, and do not touch the robot with your hands after the robot is powered on.
- When the battery power is only one block left, please stop and turn off the robot dog in time, take out the battery to charge to avoid the damage of falling when the battery is low.
- Go2 is a purely electric quadruped robot with certain anti-jamming, but the energy density of the motor is much lower than the hydraulic pressure. Do not push the robot suddenly and vigorously, nor to kick the robot, so if the robot falls and is damaged due to a sudden and strong push or kick, it will not be covered by the warranty.
- To reduce the risk of electric shock and possible radiation hazards, do not disassemble or modify this product without authorization. This product does not include user-repairable parts. If after-sales service is needed, please contact Unitree.
- Go2 LiDAR meets the safety requirements of Class 1 laser products (IEC /EN 60825-1:2014) and can be safely used under normal conditions.
- In situations of low air visibility (such as haze, heavy rain, etc.), the effective detection range of Go2 LiDAR will decrease. Please be extra careful when using.
- Do not touch the optical window of the Go2 LiDAR with your hands. If there are any stains or dust on the LiDAR window, please clean it with a lens cleaning cloth (refer to the specific cleaning method in " Daily Maintenance") to avoid affecting the performance of the product.
- The robot is not waterproof, please do not run on the ground with water, rain or snow or humid environment. The robot is not dustproof. Do not run on gravel or dusty environment.
- Please do not run the robot in an electromagnetic interference environment. Sources of electromagnetic interference include but are not limited to: high-voltage power lines, high-voltage transmission stations, mobile phone base stations, and television broadcast towers.
- Please do not run the robot in the Wi-Fi signal interference environment. Wi-Fi signal interference is usually caused by co-channel interference. In case of interference, be sure to turn off some or all Wi-Fi signal sources of other wireless devices before using the remote control to operate the robot.
- Please keep it under control in the users' view when using the robot and keep the robot maintain a safe distance of at least 2 meters from obstacles, complex ground, crowds, water, and other objects.
- Operate in a good weather environment at 5°C -35°C. Do not operate in bad weather, such as fog, snow, rain, lightning, sandstorms, storms, tornadoes, etc.
- The legged robot has certain requirements for the ground on which it walks. Do not use the robot on very low friction ground, such as ice. Do not use the robot on soft ground, such as thick spongy ground. If the robot is used on smooth ground, such as glass and ceramic tile, the users need to control the robot for movement carefully and smoothly, avoid violent movement, and reduce the walking speed of the robot to prevent the robot foot from slipping and falling.
Documents / Resources
References
Download manual
Here you can download full pdf version of manual, it may contain additional safety instructions, warranty information, FCC rules, etc.
Advertisement


Need help?
Do you have a question about the Go2 and is the answer not in the manual?
Questions and answers