Advertisement
Quick Links
Advertisement

Related Manuals for Unitree A1


Summary of Contents for Unitree A1
- Page 1 Quick Start Guide V1.0 Unitree...
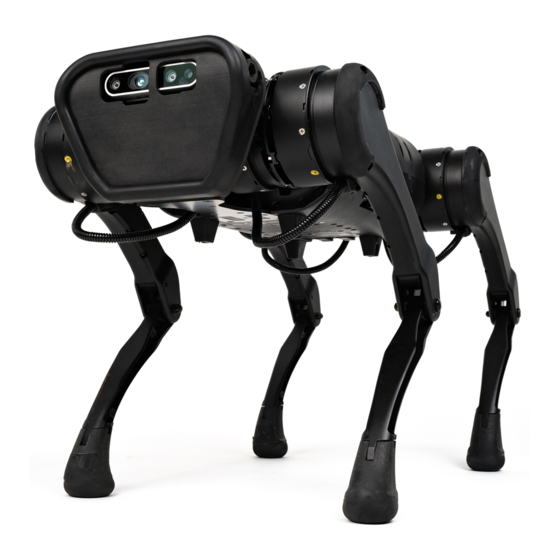
- Page 2 In Sport mode, the maximum joint speed of 21rad/s allows A1 to speed up to 3.3m/s in an instant, possess excellent balance ability; and the torque of 33.5NM allows A1 to easily achieve backflip;...
-
Page 3: Remote Controller
Remote Controller The joystick can control the robot to realize the 3-axis attitude and the 3-axis position control when standing. It can also control the robot to realize the forward and backward, the left and right side shift, the in-situ turn and the certain rule walking on the leveling ground. -
Page 4: Specifications
Specifications Machine Weight(with battery) 12 kg Dimensions(Stand) 500×300×400 mm(L×W×H) Dimensions(Folded) 450×300×150 mm(L×W×H) Maximum Walking Speed 3.3 m/s Operating Time 1-2.5 h Real-time HD Video Transmission 0.1-0.2 s delay Payload DOFS Joint Torque 33.5 NM Joint Maximum Speed 21 rad/s Foot Force Sensors Protection Mode Emergency stop, Fall protection, Overheat Warning System... -
Page 5: Charge The Batteries
1. Check the Battery Levels Press once to check the battery level. Press once, then again and hold to turn on/off. 2. Charge the Batteries Power Outlet Charge Time: 100~240 V ~2 hours Power Outlet 100~240 V Charge Time: ~1.5 hours... -
Page 6: Control The Robot
Power on the robot Launch the Unitree App remote controller A1 supports remote control and Wi-Fi control of mobile devices, the robot control mode can be switched through the App. 5. Control the Robot Joystick control method for basic operation in Sport mode. - Page 7 7. Actions not recommended in Sport and SLAM mode. Parts 1 to 6 are actions that allow the operator to use them, which are sufficient to express the superior athletic performance of the robot. When using the actions involved in sections 1 through 6, be sure to follow the instructions in the “Disclaimer and Safe Use Guidelines”section.
- Page 8 1.Basic Action under “Sport Mode” (3-Axis Attitude and 3-Axis Position Control when Standing) The Position of Stick or Operation Diagram Robot Schematic Remarks Button on Joystick L1 Button START Button L1 Button START Button When the robot dog is turned on and standing , after holding down the L2 button, single-click the B button, the robot dog squats and lies on the ground, enters the damping mode;...
- Page 9 2.Combined Action and Special Action under “Sport Mode” The Position of Stick or Operation Diagram Robot Schematic Remarks Button on Joystick Left Stick Left Stick When the robot dog is standing in Sport mode, the left Stick is used to control the robot's jaw and the body is twisted.
- Page 10 2.Combined Action and Special Action under “A Mode” The Position of Stick or Operation Diagram Robot Schematic Remarks Button on Joystick When the robot dog is standing in Sport mode, when L2 Button L2 Button the robot is lying on its back, hold down the L2 key Right Button-“X”Button Right Button-“X”Button and press the X key to roll the robot 180°...
- Page 11 3.Basic Action under “Sport mode” (walking) The Position of Stick or Operation Robot Schematic Remarks Button on Joystick Diagram START Key START Key When the robot dog is in Sport mode, the START button is used to switch between the two states of the robot in step and stationary. Press the START button to turn on the step function and the robot enters the W mode.
- Page 12 4.Combined Action and Special Action under “Sport Mode” (walking) The Position of Stick or Operation Diagram Robot Schematic Remarks Button on Joystick Left Stick Left Stick The left Stick is used to control the arc (circle) of the robot. In Sport mode, push stick in the upper right direction, the robot will go to the right front arc.
- Page 13 5.Basic Action Under “Sport Mode”(fast-running) The Position of Stick or Operation Diagram Robot Schematic Remarks Button on Joystick L1 Button START Button L1 Button START Button In the sport mode (When the robot steps), after holding down the L2 key, click the START key once, the robot enters the fast running state.
- Page 14 6.Basic Action Under “SLAM Mode” The Position of Stick or Operation Diagram Robot Schematic Remarks Button on Joystick L1 Button+L2 Button L1 Button+L2 Button START Button START Button In the Sport mode, after holding down the L2 key, single-click the B key to enter the noiseless damping mode;...
- Page 15 7.Actions that are not recommended under “Sport” and “SLAM” mode The Position of Stick or Operation Diagram Robot Schematic Remarks Button on Joystick Left Button Left Button The left button is used to control the body lift and squat when stepping. In Sport and SLAM mode, press the up button, the robot body will lift up.
- Page 16 7.Actions that are not recommended under “W” and “Sport ” mode The Position of Stick or Operation Diagram Robot Schematic Remarks Button on Joystick Left Button Left Stick Left Button Left Stick Left button and left Stick linkage is used to control the robot crept to walk arc (circle) In W and Sport mode, press the down button, robot will squat.
- Page 17 6. APP APP Interface Introduction UnitreeRobotics is an application tailored for quadruped robots of Unitree. Use of Android and IOS system platforms; It supports touch screen and special joysticks, this section takes UnitreeRobotics APP as an example to explain, the specific interface is subject to the corresponding platform display.
- Page 18 Vision Click the machine vision button to enter the following operation interface: Image mode shows the robot perspective; depth mode shows the distance between the object and the robot, the closer the distance, the darker the color. [1] Image mode [2] Depth mode [3] Body recognition [4] Robot...
- Page 19 Simulator Click to enter the simulation operation interface. When the robot is not connected, you can learn the handle keys and functions through simulation control. For operation, refer to "Remote Control Module-Handle Operation". The simulator only supports basic actions, and combined actions are still being improved. SLAM When the robot is in W mode, click to enter SLAM.
- Page 20 [2] [3] [1] Stop robot [2] Clear all points [3] Clear a single point [4] Send selected information to the robot [5] Exit [6] Restart SLAM [7] Clear all points note: 1. When there are obstacles around the robot, please clear the obstacles before setting the target point, otherwise you cannot navigate;...
- Page 21 www.unitree.cc...
Need help?
Do you have a question about the A1 and is the answer not in the manual?
Questions and answers