Advertisement
PRESENTATION
Intended Use:
The sharpener is intended for sharpening straight blades within its capacity.
Not Intended Use:
- Do not use for grinding or cutting wood, plastic or non-ferrous metals with normal disks.
- Do not use sharpener for abrasive cutting.
- Do not use sharpener for sharpening serrated blades.
Residual Risks
Even when the tool is used as prescribed it is not possible to eliminate all residual risk factors.
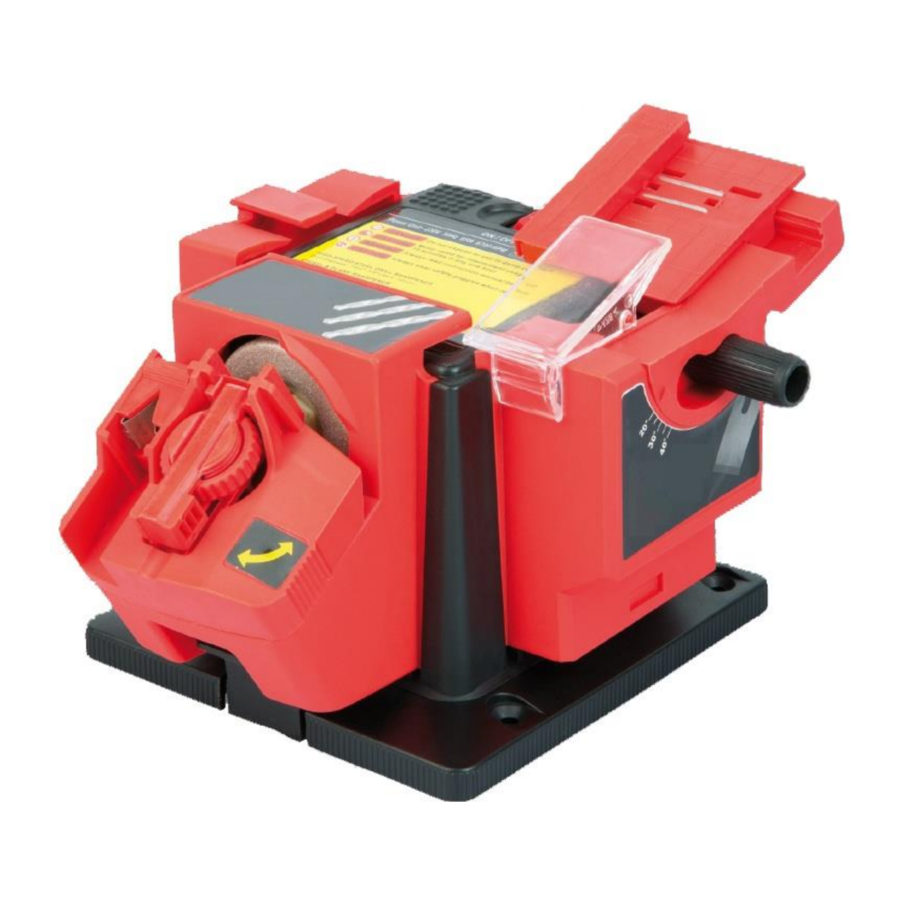
Parts List
See Fig.1

- Main unit
- Attachment for cutting tool blades
- Attachment for drill bits
- Attachment for knives and scissors
- Sharpening wheel
- Locking tab
- Slide in slots
- Switch
- Screw holes
- Power cord with plug
CHARACTERISTICS
| Description | Multi-tool Sharpener |
| Reference | PRS30 / 310106 |
| Model / Type | 2004 |
| Power | 230V ~ 50Hz |
| Motor | 65W |
| Protection Class | II |
| No load speed no | 6700 min-1 |
| Service Operation time Rest time | S3: 15% TF: 90s R: 510s |
| Grinding wheel dimensions |  48 mm 48 mm |
| Table adjustment angles | 15o t 50o |
| Sound pressure level (LPA) | 74 dB(A) (K=3dB(A)) |
| Sound power level (LWA) | 87 dB(A) (K=3dB(A)) |
| Net weight (approx.) | 1,50 kg |
Symbols
 | Caution! Risk of injury and/or damage and/or deterioration of product in case of non compliance to safety requirements |
 | Read the instructions manual. |
 | Class II protection product |
 | Wear appropriate personal protective equipment. Ear protection, goggles or face shield protection Wear respiratory protection (e.g. face mask) |
 | Wear protective gloves. |
 | Do not expose to weather conditions (ex.: storm, rain, snow...) or moisture. Do not use in damp or wet areas. |
 | Keep all your body parts away from moving parts and especially from grinding wheel. |
 | Keep persons (esp. children) and animals away from product and working area |
 | Disconnect product from its power source before maintenance, cleaning or any intervention on product; or when you do not use product. Disconnect product from its main power source, if product, power cable, or extension cord is damaged or cut during operation. Unplug product by pulling the plug. Do not pull the cable. |
 | Do not dispose of this product with household rubbish. Dispose of this product in the nearest recycle centre. Please contact your local authority or local recycle centre for further information for its safe disposal. |
SAFETY INSTRUCTIONS
General power tool safety warnings

Read all safety warnings and all instructions.
Failure to follow the warnings and instructions may result in electric shock, fire and/or serious injury.
Save all warnings and instructions for future reference.
The term "power tool" in the warnings refers to your mains-operated (corded) power tool or battery-operated (cordless) power tool.
- Work area safety
- Keep work area clean and well lit. Cluttered or dark areas invite accidents.
- Do not operate power tools in explosive atmospheres, such as in the presence of flammable liquids, gases or dust. Power tools create sparks which may ignite the dust or fumes.
- Keep children and bystanders away while operating a power tool. Distractions can cause you to lose control.
- Electrical safety
- Power tool plugs must match the outlet. Never modify the plug in any way. Do not use any adapter plugs with earthed (grounded) power tools. Unmodified plugs and matching outlets will reduce risk of electric shock.
- Avoid body contact with earthed or grounded surfaces, such as pipes, radiators, ranges and refrigerators. There is an increased risk of electric shock if your body is earthed or grounded.
- Do not expose power tools to rain or wet conditions. Water entering a power tool will increase the risk of electric shock.
- Do not abuse the cord. Never use the cord for carrying, pulling or unplugging the power tool. Keep cord away from heat, oil, sharp edges or moving parts. Damaged or entangled cords increase the risk of electric shock.
- When operating a power tool outdoors, use an extension cord suitable for outdoor use. Use of a cord suitable for outdoor use reduces the risk of electric shock.
- If operating a power tool in a damp location is unavoidable, use a residual current device (RCD) protected supply. Use of an RCD reduces the risk of electric shock.
- Personal safety
- Stay alert, watch what you are doing and use common sense when operating a power tool. Do not use a power tool while you are tired or under the influence of drugs, alcohol or medication. A moment of inattention while operating power tools may result in serious personal injury.
- Use personal protective equipment. Always wear eye protection. Protective equipment such as dust mask, non-skid safety shoes, hard hat, or hearing protection used for appropriate conditions will reduce personal injuries.
- Prevent unintentional starting. Ensure the switch is in the off-position before connecting to power source and/or battery pack, picking up or carrying the tool. Carrying power tools with your finger on the switch or energising power tools that have the switch on invites accidents.
- Remove any adjusting key or wrench before turning the power tool on. A wrench or a key left attached to a rotating part of the power tool may result in personal injury.
- Do not overreach. Keep proper footing and balance at all times. This enables better control of the power tool in unexpected situations.
- Dress properly. Do not wear loose clothing or jewelry. Keep your hair, clothing and gloves away from moving parts. Loose clothes, jewelry or long hair can be caught in moving parts.
- If devices are provided for the connection of dust extraction and collection facilities, ensure these are connected and properly used. Use of dust collection can reduce dust-related hazards.
- Power tool use and care
- Do not force the power tool. Use the correct power tool for your application. The correct power tool will do the job better and safer at the rate for which it was designed.
- Do not use the power tool if the switch does not turn it on and off. Any power tool that cannot be controlled with the switch is dangerous and must be repaired.
- Disconnect the plug from the power source and/or the battery pack from the power tool before making any adjustments, changing accessories, or storing power tools. Such preventive safety measures reduce the risk of starting the power tool accidentally.
- Store idle power tools out of the reach of children and do not allow persons unfamiliar with the power tool or these instructions to operate the power tool. Power tools are dangerous in the hands of untrained users.
- Maintain power tools. Check for misalignment or binding of moving parts, breakage of parts and any other condition that may affect the power tool's operation. If damaged, have the power tool repaired before use. Many accidents are caused by poorly maintained power tools.
- Keep cutting tools sharp and clean. Properly maintained cutting tools with sharp cutting edges are less likely to bind and are easier to control.
- Use the power tool, accessories and tool bits etc. in accordance with these instructions, taking into account the working conditions and the work to be performed. Use of the power tool for operations different from those intended could result in a hazardous situation.
- Service
- Have your power tool serviced by a qualified repair person using only identical replacement parts. This will ensure that the safety of the power tool is maintained.
Additional safety rules for the tool
- Keep work area clear
Cluttered areas and benches invite injuries. - Consider work area environment
- Do not expose tool to rain, moisture or humidity.
- Do not use tools in damp or wet locations. Do not use outdoors under rain.
- Keep work area well lit (natural light or sufficient artificial lighting).
- Keep work area well ventilated.
- Do not use the machine and do not work on it in proximity of inflammable liquids and vapors thereof.
- Guard against electric shock Avoid body contact with earthed or grounded surfaces (e.g. pipes, radiators, ranges, refrigerators).
- Keep other persons away
- Do not let persons, especially children, not involved in the work touch the tool or the extension cord and keep them away from the work area.
- Keep the product away from children or from their environment. Never allow children to operate the tool. Children should be supervised to ensure that they do not play with the tool.
- Store idle tools
When not in use, tools should be stored in a dry locked-up place, out of reach of children. - Do not force the tool
It will do the job better and safer at the rate for which it was intended. - Use the right tool
- Do not force small tools to do the job of a heavy duty tool.
- Do not use tool for purposes not intended or for unsuitable purposes
- Ensure that the dimensions of the disks correspond to those indicated on the characteristics. - Only use the machine for the purposes described in the instruction manual 8. Dress properly – Wear proper working clothing!
- Do not wear loose clothing or jewellery; they can be caught in moving parts.
- Rubber gloves and non-skid footwear are recommended when working outdoors.
- Wear protective hair covering to contain long hair.
- Use protective equipment
To protect your health during grinding job:
- Use safety glasses or goggles
- Use face or dust protection mask if working operations create dust.
The noise level in the working area is above 85 dB(A). Therefore, wear ear protection (to avoid hearing loss hazard)
- Connect dust extraction equipment if the tool is provided for the connection of dust extraction and collecting equipment, ensure these are connected and properly used.
- Do not abuse the power cord
- Do not use the cable for any purpose it has not been designated for.
- Do not use the cable for carrying or hanging of the machine.
- Do not use the cable to pull out the plug from the socket.
- Never yank the cord to disconnect it from the socket.
- Protect the cable from excessive temperatures, oil, and sharp edges.
- Protect the power cable from any damage the cable may be damaged by oil or acid
- Secure work piece
Where possible use clamps or a vice to hold the work. It is safer than using your hand. - Do not overreach
Avoid any abnormal posture. Keep proper footing and balance at all times. - Maintain tools with care
- Abide by the maintenance and grinding disk replacement regulations - Keep cutting tools sharp and clean for better and safer performance.
- Follow instructions for lubricating and changing accessories.
- Inspect tool cord periodically and if damaged have it repaired by an authorized service facility.
- Inspect extension cord periodically and replace if damaged
- Keep handles dry, clean and free from oil and grease.
- It is your own interest to keep your machine clean at any time.
- After you finish a grinding job, check the machine for damage.
- Disconnect tools
When not in use, before servicing and when changing accessories such as attachment, sharpening wheel, disconnect tool from the power supply. - Remove adjusting keys and wrenches
Form the habit of checking to see that keys and adjusting wrenches are removed from the tool before turning it on. - Avoid unintentional starting
Ensure switch is in "off" when plugging in. In case of voltage failure or electrical shortage, place the switch on the OFF position, so as to avoid any danger due to unintentional start of the product after voltage recovery. - Use outdoor extension leads
When the tool is used outdoors, use only extension cords intended for outdoor use and so marked. - Stay alert Watch what you are doing. Use common sense. Do not operate tool when you are tired, under the influence of alcohol, prescription medicines or drugs.
- Check damaged parts
- Before further use or reuse of the tool, tool should be carefully checked to determine that it will operate properly and perform its intended function.
- Check for alignment of moving parts, binding of moving parts, breakage of parts, mounting and any other conditions that may affect its operation.
- Any parts should be installed properly to comply with the conditions of the machine safe operation.
- A guard or other part that is damaged should be properly repaired or replaced by an authorized service centre unless otherwise indicated in this instruction manual.
- Have defective switches replaced by an authorized service centre
- Do not use the tool if the switch does not turn it on and off.
- Never use damaged disks or accessories.
- Regularly check the disks for signs of wear or damage.
![]()
The use of any accessory or attachment, other than one recommended in this instruction manual may present a risk of injury (to persons or animals) and may cause damages.
The user and/or operator are responsible for any damages or injury caused to properties and/or persons.- Have your tool repaired by a qualified person
This electric tool complies with the relevant safety rules. Repairs should only be carried out by qualified persons using original spare parts; otherwise this may result in considerable danger to the user. - Remarks
The safety precautions and instructions given in this manual are unable to cover in detail all the conditions and situations that may arise.
The operator and/or user must use common sense and caution when operating the product especially for any matters that are not referred in the above. - Special safety guidelines
- Check the grinding disk before use for possible damages. Do not use grinding disks that are cracked, torn or damaged
- Check that the rotation speed given on the disk is greater than or equal to the rated speed of the machine
- The grinding disk must be securely installed with the mounting nut.
- The screws on the protective device must be properly screwed on.
- The spark protecting cover must be set in the appropriate position to avoid any hazard to the user.
- A disk that is already damaged or deformed should not be further used.
Use only original grinding wheel, which is delivered or recommended by the manufacturer.
- Handling, transport and storage of grinding disks:
Grinding disks are fragile, as well as sensitive to impact and shocks.
Therefore, special precautions are necessary:
- Do not let the grinding disk fall and avoid impacts effects.
- Do not use a dropped or damaged disks.
- Avoid vibrations or vibrations during application
- Avoid damaging the mounting bore
- Avoid loads on the sharpening surface
- Store grinding disks flat or perpendicularly, keep dry, protected from frost and at a constant and medium temperature.
- Keep the grinding disks in their original packaging or in special containers and on shelves.
Safety warnings regarding the use

Observe any national safety regulations regarding installation, operation and maintenance.
- Become familiar with the controls and the proper use of the equipment.
- The use of this product by children is forbidden.
- Only well-instructed adults should operate the product. This product is not intended for use by persons (including children) with reduced physical, sensory or mental capabilities, or lack of experience and knowledge, unless they have been given supervision or instruction concerning use of the product by a person responsible for their safety.
- Use only accessories with a permissible speed at least as high as the no-load speed of the machine.
- Do not use tool if damaged, eccentric or vibrating.
- Do not use damaged, cracked, eccentric or vibrating disks.
- Never seize or touch the disk during operation
- Position power cable in a way that it is not trodden on or damaged during use.
- If the power cable is damaged, it must be replaced by a special assembly available at the manufacturer's or its after sales service. If the power cable or extension cord is damaged or cut during operation, immediately disconnect plug from its main power source. Do not touch the cable or extension cord before unplugging from main power.
- Grinding may create dust and projection of debris. Wear appropriate protective equipment (dust mask, safety goggles...). Use dust extraction device when available, and ensure that it is properly connected and used.
![warning]() Residual risks
Residual risks
Even when the tool is used as prescribed it is not possible to eliminate all residual risk factors.
 Residual risks
The following hazards may arise in connection with the tool's construction and design:
- Damage to lungs if an effective dust mask is not worn.
- Damage to hearing if effective hearing protection is not worn.
- Bruising hazard if the grinding wheel is touched while in operation.
- Exposure to electricity by using a non-standard defective electrical connection lines.
![]()
This machine produces an electromagnetic field during operation. This field may under some circumstances interfere with active or passive medical implants. To reduce the risk of serious or fatal injury, we recommend persons with medical implants to consult their physician and the medical implant manufacturer before operating this machine.![]()
A certain level of noise emitted from this machine is not avoidable.
Plan noisy work according to local laws and at specific times.
Keep rest periods and if necessary restrict the working hours to a minimum.
For your own personal protection and the protection of bystanders wear suitable hearing protection.
Follow the operating time and rest time of the tool.![]()
Sharpening may create sparks, do not use near flammable materials, liquids or gas. Never use the sharpener WITHOUT an attachment fitted.
GETTING STARTED
Unpacking

- Remove product from its packaging.
- Check that tool and accessories are not damage
Presentation
The sharpener is delivered pre-assembled.
One part consists of the base including the motor unit and the sharpening wheel. The other parts are made of the 3 attachments.
Installation
- The assembly shall be performed with the machine unplugged!
- The tool is intended for horizontal installation. Place tool on a flat, stable and solid surface or a workbench.
- Whenever permanently installing it on a desk or workbench: put the machine on the desk / workbench and screw it to the desk /workbench using the holes (pos.9 Fig.1) in the base (screws and bolts not supplied).
at this stage, sufficient space around the main unit (1) for ease of installation of the attachments.
Inserting and removing an attachment
- This intervention MUST be performed with the machine unplugged and with sharpening wheel at a standstill.
- To insert an attachment
- Take an attachment (for ex in Fig.2, the scissors and knives attachment)
![]()
- Align and insert the two lateral ribs (a) in the grooves (7) of the main unit.
- Make sure to engage the locking tab (6) in the slot (b) at the bottom of the attachment.
- Make sure the attachment is assembled correctly and firmly maintained by the locking tab (6).
- Whenever an attachment is in use, you can store the other two attachments on the other sides of the main unit (see Figure 3)

- Take an attachment (for ex in Fig.2, the scissors and knives attachment)
- To remove an attachment:
- Raise the locking tab (6) from the slot (b) at the bottom of the attachment.
- Slide upwards the attachment grooves (7) until it is detached from the main unit.


Starting and Stopping (ON/OFF switching)
Attention! Do NOT start tool without an attachment assembled.
The switch (8) is located on the top of the machine (see Fig.1).
To start the machine: press the switch to position [I].
To stop the machine: press the switch to position [0].
Before connecting the tool to a power source or in case of voltage failure or shortage, make sure the switch is in the OFF position [0], in order to avoid a hazard.
Sharpening
 Note: Make sure that the sharpener is secured appropriately to avoid slipping out.
Sharpening HSS drill bit (see Fig.4 and Fig.5)
The sharpener is designed to sharpen HSS bits from 3 to 10 mm in diameter.


- Install the attachment for drills (3) on the main unit (1) [ Inserting and removing an attachment].
- Fig.4 - Remove the drill holder (c) from the sharpening slot (b).
- Fig.4 - Loosen the knob (e) in order to obtain a sufficient opening for inserting the drill.
- Fig.4 or Fig.5a - Insert a drill bit in the holder (c).
- Fig.5a - Lightly tighten the knob (e) so as to retain the drill but still allowing it to turn.
- Fig.5b and Fig.4 - Insert the drill holder (c) in the calibration slot (a), using the grooves on both sides to properly guide the insertion.
- 5C - Push the drill bit forward and rotate the bit so that the tip lays in the "V" guide and touches the metal end stop.
- Fig.5d - Tighten the knob (e) so as to firmly hold the drill in place.
- Fig.5e - Remove the drill holder (c) from the calibration slot (a) and insert it into the sharpening slot (b), ng the grooves on both sides to properly guide the insertion.
- Verify that the drill holder (c) is inserted correctly.
Make sure the edges of the bit are in contact with the wheel.
If not, repeat the alignment procedure (items 6-9 above).
The drill is ready for sharpening its edges directed to the appropriate angle. - Switch on the sharpener.
- Fig.5f - When the wheel turns, rotate the base from right to left to sharpen the edge in contact with the wheel.
- Turn off the sharpener. Wait until the wheel stops spinning.
- Fig.5g - Remove the drill holder (c) from the sharpening slot (b) and turn it over. Reinsert the drill holder (c) of the sharpening slot (b).
Start sharpening for that edge. - Fig. 5h and 5i - Check that the cutting edge of both flute are equally sharp as in "5h" and not as an asymmetric sharpening in "5i".
Repeat the sharpening procedure to correct any defects if necessary. - When finished, switch off the tool. Wait until the grinding wheel has stopped spinning. Clean and store the sharpener.
Sharpening knives and scissors
The sharpener is designed to sharpen scissors and household knives with flat and straight blade.

Do not sharpen serrated blade.
- Install the attachment for knives / scissors (4) on the main unit (1) [ Inserting and removing an attachment].
- Switch on the sharpener.
- Knife blade
- Fig.7a + Fig.6 - Insert the blade in the groove (a) until it comes into contact with the grinding wheel. Note: you can install the blade on the support (b).
- Fig.7b - Make a back-and-forth to spend the whole blade on the wheel.
- Fig.7c - Turn the knife and insert the blade into the other slot (a) and repeat the sharpening procedure.
- Start the sharpening process (if necessary) until desired sharpening.
- Scissors blades
- Fig.7d + Fig.6 - Insert the blade into the slot (a) until it comes in contact with the grinding wheel. Note: you can install the blade on the support (d).
- Fig.7e - Make a back-and-forth movement so as to travel the whole blade on the wheel.
- Fig.7f - Turn the scissors and insert the other side of the blade in the slot (a) and repeat the sharpening procedure.
- Repeat the sharpening process (if necessary) until desired sharpening is achieved.
- Note: You can also sharpen scissor blades through the grooves (a).
- When finished, switch off the tool. Wait until the grinding wheel has stopped spinning. Clean and store the sharpener.
Sharpening cutting tools' blade
The sharpener is designed to sharpen chisel or plane or flat and straight blade of cutting tool form 6 to 51mm width. Do not sharpen serrated blade.

Attention! Do not use the tool if the protective shield (a) is missing, cracked or damaged.
- Install the attachment (2) for cutting tool blade on the main unit (1) [ Inserting and removing an attachment].
- Fig. 9a + Fig.8 - Place the blade on the plate rest (c) so that the cutting edge of the blade touches the grinding wheel. The two magnets (e) will help holding the blade in place.
- Fig.9B, 9c + Fig.8 - Setting the sharpening angle. Loosen the knob (b) then adjust the plate angle (c) to the desired angle (adjustable between 15° and 50°). Make sure that the sharpening angle corresponds, at best, to the beveled angle of your blade.
- Switch on the sharpener.
- Fig.9d - Slide the plate (c) back and forth, so that the cutting edge of the blade passes over the wheel. Use light pressure on the blade and conduct regular and uniform motion.
![]()
Never leave the blade stationary, as this would result in an uneven sharpening. - Fig.9e - Gradually adjust the blade down the plate while sharpening. Do not press hard, grind gradually.
- Fig.9f - Remove the blade and verify its sharpening.
- Repeat the sharpening process (if necessary) until desired sharpening is achieved.
- Fig. 9g - For narrow blades, place the small guide (f) on the edge (e) and placing the support plate against the spacer.
- When finished, switch off the tool. Wait until the grinding wheel has stopped spinning. Clean and store the sharpener.
Tips: after sharpening a blade, it is recommended to clean the blade edge and apply oil stone on it.
OPERATION
Intended use
- The product is intended for indoor domestic use.
- The product is intended for sharpening bits and straight blades within the limits of the sharpener.
- This power tool may not be used to do other things outside of the described scope. - Do not use the machine for unsuitable purposes (for ex. for cutting wood, metal, plastic,...)
- The tool is not intended for professional, artisanal or industrial use.
Operation:
- Prepare bit/blade for sharpening (clean it as necessary) and lay it properly on the attachment.
- Adjust settings according to the specifications for your blade or according to your needs.
- Connect tool to a power source (refer to characteristics on product).
- Wear appropriate protective equipment.
- Firmly hold tool. Always maintain a balanced and secure position.
- Press ON switch (I) to start machine.
- Start sharpening (Refer to Sharpening)
- Do not make sudden movements. Do not apply excessive pressure.
- Once work is finished, stop product by pressing OFF switch (0).
Note: do not touch tool until the sharpening wheel has come to a complete stop.
MAINTENANCE AND STORAGE
| | Before any intervention on product, ensure that product is disconnected from its power source. |
Reminder: Make sure to maintain the machine in good working condition, carry out regular maintenance of the machine after each use and before storage. Any breach or default of adequate maintenance reduces the life of the machine and increases the risk of breakdowns and accidents. To preserve the security system throughout the life of the machine, it is important to perform maintenance and proper cleaning, DO NOT use non-compliant replacement parts and do NOT dismantle yourself the machine or change the security features.
Cleansing
Clean plastic parts with a soft and clean cloth
Do not use aggressive cleansers (solvents or abrasive cleansers), or an abrasive sponge.
Do not use any caustic to clean the plastic parts.
Do not put or immerse tool in water or any other liquid, and ensure that no water gets inside the tool.
Clean ventilations holes with a soft brush or with compressed air.
Changing the grinding wheel
This intervention MUST be performed with the machine unplugged and with sharpening wheel at a standstill.
To replace a grinding wheel, proceed as follows:

- Remove the attachment (see Inserting and removing an attachment).
- Unscrew the nut (a) in clockwise direction.
- Remove the clamping nut (a).
- Remove the worn out or damaged wheel (5).
- Insert a new wheel (refer to the dimensional characteristics)
- Insert the nut (a) and screw firmly [without damaging the nut (a) and threading (b)].
- Install an attachment.
- Switch on tool and operate without load to make sure it is properly assembled.
![]()
Do NOT use a grinding wheel that is worn, broken, cracked or damaged.
Use only original grinding wheels or grinding wheels recommended by tool manufacturer.
Service
- Have your tool serviced by a qualified repair person using only identical replacement parts. This will ensure that the safety of the power tool is maintained.
- Have your tool repaired by a qualified person
Unless otherwise indicated in this instruction manual, repairs or replacement of any damaged part in an authorised service centre is recommended.
This electric tool is in accordance with the relevant safety requirements. Repairs should only be carried out by qualified persons using original spare parts; otherwise this may result in considerable danger to the user. - Maintain tool with care
Keep tool clean for better and safer performance. - Storage
- Store product, instructions manual and accessories in its original packaging.
- Product must be stored in a clean, dry location. Always lock up product and keep out of reach of children
Handling, transport and storage of grinding wheels
Discs are fragile and susceptible to shocks and impacts.
Therefore special precautions are necessary:
- Do not drop the disc and avoid impacts.
- Do not use a disc that has fallen down or that is damaged.
- Avoid strong vibrations or vibrations during application.
- Prevent any damage to the bore
- Avoid excessive loads on the grinding surface
- Store discs flat or perpendicularly, keep them dry, protected from frost and at a constant temperature.
- Keep discs in their original packaging or in special packaging and on shelves, out of reach of children.
Documents / ResourcesDownload manual
Here you can download full pdf version of manual, it may contain additional safety instructions, warranty information, FCC rules, etc.
Advertisement


Need help?
Do you have a question about the RIBITECH PRS30 / 310106 and is the answer not in the manual?
Questions and answers