
Related Manuals for Hydac CTM-EF 3 4 Series


Summary of Contents for Hydac CTM-EF 3 4 Series
- Page 1 ContaminationTest Module ContaminationTest Module - Extraction Flushing CTM-EF 3x4x <Platzhalter> Titelbild Operating and maintenance instructions 4646245 / 2024-11...
- Page 2 © 2024 HYDAC Filter Systems GmbH. All rights reserved. ® All product names used may be trademarks or registered trademarks of HYDAC or the particular owner. This manual was prepared to the best of our knowledge. Nevertheless and despite the greatest care, it cannot be excluded that mistakes could have crept in.
-
Page 3: Table Of Contents
TABLE OF CONTENTS Table of contents General ................................Target group of the manual........................Illustrations in the manual ........................1.2.1 Illustration on the title page ...................... 1.2.2 Representation of requirements ....................1.2.3 Representation of procedural instructions................1.2.4 Representation of intermediate results/results ................. 1.2.5 Supplementary symbols ...................... -
Page 4: Tab. 6 Cascading Filter Membranes
TABLE OF CONTENTS Cascading filter membranes / changing filter membranes ..............6.3.1 Cascading filter membranes ....................6.3.2 Operating filter membrane holder .................... Labelling filter membranes ........................Perform extraction..........................6.5.1 Flushing the extraction box ...................... 6.5.2 Determining blank value (according to device manufacturer) ..........6.5.3 .............................. -
Page 5: General
1. GENERAL General 99079192062562827 Before you use this product for the first time, read this manual at least up to the chapter "Operation". If you would like to carry out maintenance or troubleshooting, you can find the procedure in the respective chapters. -
Page 6: Illustration On The Title Page
1. GENERAL 1.2.1 Illustration on the title page 45035996330823051 You will find the following information on the title page of this manual: Short name of the product Product name Operating and maintenance instructions German (Original Instructions) Document no.: 12345678 Fig. 1: Overview / labelling of the title page Short name of the product / product name Document type Language... -
Page 7: Representation Of Requirements
1. GENERAL 1.2.2 Representation of requirements 18014398651027467 These are absolutely required for carrying out a work activity on the product and are marked with a check mark and are in bold in the text. An example for the representation of requirements: ü... -
Page 8: Representation Of Warning/General Safety Information
1. GENERAL Information for handling the product. 1.2.6 Representation of warning/general safety information 27021597818326923 All the warning / general safety information in this manual is highlighted with pictograms and signal words. The pictogram and the signal word give you an indication of the degree of risk of the danger. Warning / safety instructions that precede each action are shown as follows: CAUTION Type and source of the danger... -
Page 9: Signal Words And Their Meaning In The General Safety Information
1. GENERAL 1.2.7 Signal words and their meaning in the general safety information 36028797072026891 In this manual you will find the following signal words: DANGER DANGER – The signal word indicates a hazardous situation with a high level of risk, which, if not avoided, will result in lethal or serious injury. -
Page 10: Exclusion Of Liability/Warranty
99079191859259787 For the warranty provided by us, please refer to our terms of delivery. They are made available to you at the conclusion of the contract at the latest. They can also be found at www.hydac.com -> General Terms Conditions. -
Page 11: Safety Information
2. SAFETY INFORMATION Safety information 54043195680096651 This section gives you important information on the safe handling and use of your product. Intended use 9007204696986251 The ContaminationTest Module CTM-E… is the extraction module that may only be used in conjunction with the CTM-SC… supply module of the same series. The is an extraction device designed to analyse the technical cleanliness of components and systems in accordance with guideline VDA 19 (ISO 16232 ISO 18413). -
Page 12: Personnel Qualifications
2. SAFETY INFORMATION Occupational health and safety ● Creation of own risk assessment and implementation of required measures The owner must determine in their own risk assessment the sources of danger arising from the product being used in their machine or system. On this basis, the owner must independently define appropriate measures for safety of the machine or system and must put together the documentation of their product accordingly. -
Page 13: General Safety Instructions
2. SAFETY INFORMATION General safety instructions 9007204697736459 We develop our products in accordance with the latest technological developments. Nevertheless, it is impossible to design products in a way that eliminates all residual risks. An overview of the potential sources of danger is provided below. 2.4.1 Dangers during the life cycle 9007204697851275... -
Page 14: Safety Signs / Pictograms
2. SAFETY INFORMATION Dangers with solvent cleaner as test fluid WARNING Potentially explosive atmosphere Brush discharge through charge separation u Ground the test specimen. CAUTION Solvent cleaner as test fluid Health hazard u Observe all instructions when handling the test fluid. Details can be found in the safety data sheet of the test fluid. - Page 15 2. SAFETY INFORMATION Fire, naked flames and smoking prohibited Warning signs used These marks can be found for all safety and warning instructions in this manual which indicate particular dangers to persons, property or the environment. Danger point warning Warning about dangerous electrical voltage Signs used for giving orders These symbols can be found for all safety and warning instructions in this manual which indicate particular dangers to persons, property or the environment.
- Page 16 2. SAFETY INFORMATION Used GHS symbols These symbols can be found for all safety and warning instructions in this manual which indicate particular dangers to persons, property or the environment. Hazardous to the environment Others symbols used These marks can be found for all safety and warning instructions in this manual which indicate a particular danger to persons, property or the environment.
-
Page 17: Overview Of Signs
2. SAFETY INFORMATION Overview of signs 36028797185629707 This chapter contains information on the positioning of the safety signs / pictograms on the extraction device. If safety signs / pictograms are damaged or no longer recognisable / legible, replace them with new ones immediately. -
Page 18: Shutdown In An Emergency (Emergency Stop)
2. SAFETY INFORMATION Shutdown in an emergency (EMERGENCY STOP) 71145099 In an emergency, disconnect the extraction device and any modules from the electrical supply system. Switch the extraction device off at the main switch. The extraction device is de-energised from the main switch onward. 2.10 Observing environmental precautions 63050395051134859... -
Page 19: Product And Technical Specifications
Here you will find the scope of supply for the product. ● Check the packaging and the product for damage. Report any damage in transit to the forwarding agent or the HYDAC department in charge. ● Check the scope of supply for completeness. -
Page 20: Technical Data
3. PRODUCT AND TECHNICAL SPECIFICATIONS Technical data 45035996491008651 If you are aware of the technical data of the product, you will be able to use it optimally. This chapter provides the technical data of the product: Depending on the size and design, the CTM-EF will have different technical data. -
Page 21: Achievable Blank Values
Decoding the type label 45035996344003467 Details for identifying the product are found on the name plates on the product as well as their compo- nents. Always mention the part number and the serial number when contacting HYDAC. Fig. 3: Decoding the type label 21 / 52... - Page 22 3. PRODUCT AND TECHNICAL SPECIFICATIONS Item Description -> Name plate of the extraction device Model -> Model code, for details, see ▶Sec. 3.3.1 "Model code" -> Part number -> Serial number Date -> Year / week of manufacture Power -> Supply voltage, mains, power consumption Fluid ->...
-
Page 23: Model Code
3. PRODUCT AND TECHNICAL SPECIFICATIONS 3.3.1 Model code 45035996650986891 The model code is composed of the following: CTM - EF 3 4 4 0 - M - Z - Z / - Type CTM = ContaminationTest Module Series ExtractionFlushing Family Series Volume (storage reservoir) 40 litres (nominal) -
Page 24: Unit Dimensions
3. PRODUCT AND TECHNICAL SPECIFICATIONS Unit dimensions 27021597833463947 The ContaminationTest Module CTM-EF has the following external dimensions: Fig. 5: Dimensions – CTM-EF All dimensions in mm. 24 / 52 4646245 / 2024-11... -
Page 25: Components / Operating Elements
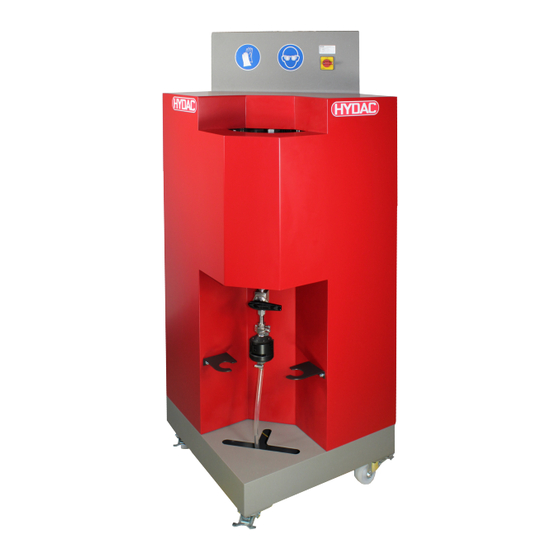
3. PRODUCT AND TECHNICAL SPECIFICATIONS Components / operating elements 27021597916192011 The extraction device is equipped with the following operating controls / components: Fig. 6: Components / operating elements Storage reservoir Protective cover Ball valve Main switch / E-STOP Filter membrane holder Connection cable with mains plug RJ45 interface connector controller Connections (A / B / C / R) -
Page 26: Transporting / Moving / Storing
4. TRANSPORTING / MOVING / STORING Transporting / moving / storing 36028797087639435 You will find the respective notice on the prevention of damage to the product during transport or storage in this chapter. Move the extraction device by pulling or pushing the handle. Proceed as follows to transport / store the extraction device: 1. -
Page 27: Transporting With Forklift Truck
4. TRANSPORTING / MOVING / STORING Transporting with forklift truck 36028797123752075 The extraction device is shipped from the factory in a wooden crate with the appropriate securing devices. Pack the system in this wooden crate for further transport. Alternatively, place the system on a sufficiently large pallet using a forklift truck. -
Page 28: Setting Up/Assembling/Commissioning
5. SETTING UP/ASSEMBLING/COMMISSIONING Setting up/assembling/commissioning 54043195598680203 An optimally assembled and installed product ensures a safe and continuous operation. Setting up extraction device 36028797089228939 To set up the extraction device, observe the following points: ● When using solvent cleaner as a test fluid, ensure that the working environment is adequately venti- lated;... - Page 29 5. SETTING UP/ASSEMBLING/COMMISSIONING ü The power plug is unplugged or not plugged into the connector socket. 1. Before plugging in the power plug, compare the voltage specifications on the type plate of the extraction device with the voltage of the existing power system. 2.
-
Page 30: Operation
6. OPERATION Operation 54043195597807115 The various operating modes with the different parameters are selected via the user interface on the CTM- SC, and started via the release in the user interface or via the foot switch, depending on the setting. Set the required flow rate and the required volume of test fluid for sampling via the user interface on the CTM-SC. -
Page 31: Connecting A Test Object
6. OPERATION Connecting a test object 27021597920918411 Connect the test object (X) to the connections A‘ or C‘ and R‘ using suitable screw connections. Connecting hose Connecting hose Connecting hose Connecting hose A‘ Connecting a test object C‘ Connecting a test object R‘... -
Page 32: Cascading Filter Membranes
6. OPERATION 6.3.1 Cascading filter membranes 18014398579569547 Cascade the filter membranes in the filter membrane holder as shown in the illustration below. The filter membranes in the lower part (8) of the filter membrane holder are pressed against the upper part (4) so that they are functionally sealed. -
Page 33: Operating Filter Membrane Holder
6. OPERATION 6.3.2 Operating filter membrane holder 36028797088950795 Proceed as follows to insert or remove the filter membrane: Insert filter membrane ü Close the ball valve upstream of the filter membrane holder. 1. Hold the holder by the lower part with one hand and release the lock by 90°... - Page 34 6. OPERATION 4. Place a single filter membrane or, for cascading, several membranes with different filter finenesses (1 = coarse, 2 = medium, 3 = fine) on the corresponding support screen of the filter membrane holder. 5. Place the lower part together with the filter membrane horizontally in the upper part.
- Page 35 6. OPERATION 8. When installing three cascades, select the upper grid. 9. Close the filter membrane holder by turning it 90° clockwise. Do not use any tools NOTICE O Insertion of the filter membrane is complete. Remove filter membrane ü Wait until the test fluid has been completely extracted. ü...
- Page 36 6. OPERATION 3. Pull the lower part slightly downwards. Then pull the lower part completely through the opening created. 4. Remove the filter membranes from the cascade and label them as described in chapter ▶Sec. 6.4 "Labelling filter membranes". ð Submit these filter membranes for analysis. 5.
-
Page 37: Labelling Filter Membranes
6. OPERATION Labelling filter membranes 27021597833692939 Label the removed filter membrane according to an understandable logic. For example: xyz-1-A-005. Marking Description Ongoing sample series / ongoing sample batch Number of filter membranes created If several flushing processes are carried out on one test object A, B, C, etc. -
Page 38: Post-Flushing
6. OPERATION Pulsation is permissible for determining the blank value. Make sure that the test fluid does not accumulate in the extraction box. CTM-EF Volume Flow rate Nozzle 344x 10 litre 6 l/min Internal nozzle 364x 14 litre 6 l/min Internal nozzle Tab. 9: Determining blank value parameters 6.5.3... -
Page 39: Rectifying Malfunctions
7. RECTIFYING MALFUNCTIONS Rectifying malfunctions 27021597833626891 The following faults / errors may occur during operation: Fault / error Potential causes Solution To be carried out by The level in the storage The level sensor is Replace the level sensor. reservoir is not displayed defective. -
Page 40: Tab. 11 Rectifying A Malfunction
7. RECTIFYING MALFUNCTIONS Fault / error Potential causes Solution To be carried out by Return pump in the CTM- Check the recirculation pump. SC module is faulty. Valve faulty. Replace the defective valve. Test fluid in the drip tray Leak in the hydraulic Search and rectify the leak. -
Page 41: Carrying Out Maintenance / Inspection
8. CARRYING OUT MAINTENANCE / INSPECTION Carrying out maintenance / inspection 54043195597866763 This chapter contains the description of the required maintenance activities and the qualifications of the staff needed to carry out these tasks. The housing, hood and switch cabinet cover are earthed. Only remove the earth connection for maintenance/repair and install it immediately after completing the work. -
Page 42: Maintenance Table
8. CARRYING OUT MAINTENANCE / INSPECTION Maintenance table 104570763 Cleaning the diffuser on the filter membrane holder Check screw and plug connections Visual inspection of the electrical compo- nents / cables Checking hoses Replacing hoses / plastic pipe Replacing hoses / plastic pipe Operating personnel Specialist personnel –... -
Page 43: Cleaning The Diffuser On The Filter Membrane Holder
8. CARRYING OUT MAINTENANCE / INSPECTION Cleaning the diffuser on the filter membrane holder 27021597833730059 Clean the diffuser on the filter membrane holder at least once a week. ü The test fluid in the extraction room is completely extracted. ü Close the ball valve on the filter membrane holder. -
Page 44: Decommissioning/Disposal
9. DECOMMISSIONING/DISPOSAL Decommissioning/Disposal 99079191859273099 In the following chapters, you will be provided with information regarding temporary shutdown/final decom- missioning and disposal of the product. Temporary shutdown 253902219 If the product is being temporarily shut down, the following measures are adequate: 1. -
Page 45: Annex
ANNEX Annex 45035996330989451 This Annex contains additional information on the product. Finding spare parts/accessories 18014398579128971 Use only original spare parts for a long and defect-free life cycle of the product. When ordering spare parts and accessories make sure to always indicate the exact model code and the serial number. Designation Part no. -
Page 46: Contacting Customer Service
Contact details such as the telephone numbers, e-mail and mailing addresses for the Hotline, product support, Customer Service, branch offices, service partners for maintenance, repair and spare parts can be found on our homepage www.hydac.com. HYDAC SYSTEMS & SERVICES GMBH Friedrichsthaler Str. - Page 47 INDEX OF ILLUSTRATIONS Index of illustrations Fig. 1 Overview / labelling of the title page ....................... Fig. 2 Positioning of the safety signs / pictograms .................... Fig. 3 Decoding the type label........................... Fig. 4 Model code.............................. Fig. 5 Dimensions – CTM-EF ..........................Fig.
-
Page 48: Index Of Tables
Rectifying a malfunction .......................... Tab. 12 Replacement parts list – CTM-EF 3x4x....................Tab. 13 Spare parts filter membrane holder Ø 47 mm, all ................... Tab. 14 Spare parts filter membrane holder Ø 47 mm, CTMH................Tab. 15 HYDAC Service Germany ........................48 / 52 4646245 / 2024-11... -
Page 49: Glossary
VDA 19 guideline. Both sets of rules are absolutely compatible. Terms and Conditions The General Terms and Conditions are available at our home page www.hydac.com ⇨ General Terms and Conditions. Test fluid Test fluid for extracting contaminants. The test fluid permitted for your product can be found in the Technical data chapter. -
Page 50: Index
INDEX Index Ambient temperature range 20 Hotline 46 Humidity 20 HYDAC Branch offices 46 Blank value Product support 46 Achievable 21 Service 46 Determining 37 Service partners 46 Terms And Conditions 10 Terms of delivery 10 Cleaning Diffuser 43 Components 25... - Page 51 4646245 / 2024-11 51 / 52...
- Page 52 HYDAC Filter Systems GmbH Industriegebiet 66280 Sulzbach/Saar Germany Tel. +49 6897 509-01 filtersystems@hydac.com www.hydac.com Further addresses: www.hydac.com/en/contacts...
Need help?
Do you have a question about the CTM-EF 3 4 Series and is the answer not in the manual?
Questions and answers