Advertisement
Quick Links
Advertisement

Subscribe to Our Youtube Channel
Related Manuals for BioLAB BHTP-203


Summary of Contents for BioLAB BHTP-203
- Page 1 OPERATING MANUAL ROTARY MICROTOME BHTP-203 www.biolabscientific.com...
- Page 2 INDEX 1. Information 1.1 Symbol and Meaning 1.2 Instrument Use 2. Instrument Components and Specifications 2.1 Basic Information 2.2 General overview: 3. Technical Parameters 4. Installation 5. Operation 6. Parts adjustment 6.1 Specimen holder and orientation system 6.3 Knife holder 7.
- Page 3 1. Information 1.1 Symbol and Meaning Danger: Indicating an urgent dangerous situation that, if not avoided, will result in death or serious injury. Warning: If you do not avoid this danger, it may result in death or serious injury. Caution: Indicating a potentially hazardous situation that, if not avoided, may result in death or serious injury.
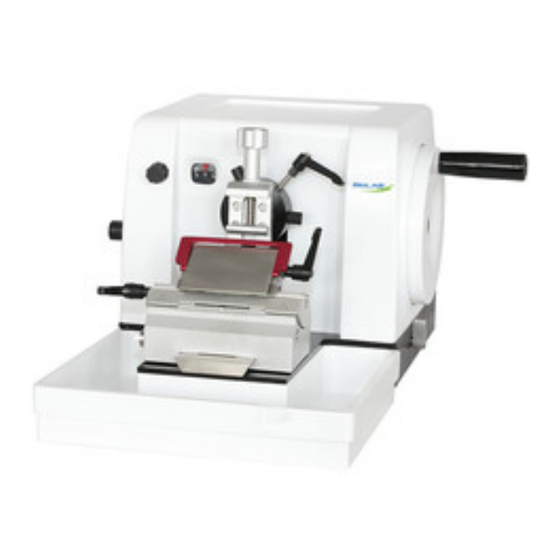
- Page 4 2. Instrument Components and Specifications 2.1 Basic Information Model BHTP-203 is a manually operated microtome by wheel-turning. The guiding-lines for the vertical and horizontal movement of the specimens are seamless and free from maintenance. Specimen is fed by the turning the handwheel. And all the parts of the instrument are covered into the encloser. The handwheel can be smoothly turned for slice cutting.
- Page 5 2.2 General overview: 3. Technical Parameters 3.1 Slice thickness range: 0μm~60μm 3.2 Section thickness setting : 0-2 um in 0.5 um –increments a) 2-10um in 1 um-increments b) 10-20 um in 2 um-increments c) 20-60um in 5 um-increments 3.3 Horizontal specimen stroke :20 mm 3.4 Vertical specimen stroke : 50mm 3.5 Slip precision: ±...
- Page 6 4. Installation 4.1 This instrument is a movable desk top type which can be placed on the experiment stable working table to prevent it receiving quakes from the ground, and don’t install other vibrating equipments round 4.2 Place the instrument with appropriate space around it to ventilate and smoothly rotate the handle. 4.3 After confirming power with grounding wire (three holes socket), connect the instrument and power socket by attaching wires.
- Page 7 4.7.4 Remove the internal filling material 4.7.5 Remove the machine according to the diagram below When moving the instrument, do not exert force on the cover, knife holder, and wax block pliers. It is better to support the base area. 4.8 Installing the instrument:...
- Page 8 4.10 Installment of the hand wheel Make sure the axis of hand wheel is in the axis hole of the hand wheel . then fix the screw with the inner hexagon spanner . 4.11 Safety instruction for operating the instrument: Safety devices www.biolabscientific.com...
- Page 9 The handwheel can be locked in any direction with the locking spanner . The locking spanner can be set on the locked or released position on the right side of the base. Inspection:Push the locking spanner backside until the handwheel be locked and can’t rotate. Release action:Push the locking spanner to the front side, and the handwheel can rotate again.
- Page 10 End the operation ● Lock the handwheel. ● Take out the blade from the holder and put it into the blade-case. ● Take out the specimen from the specimen-clamp. ● Scrub away the wastes and clean up the instrument. specimen tissue and fix it. 6.
- Page 11 6.3 Knife holder - To turn the adjustable lever under knife holder to release and lock knife holder base. - In release conditions you can make the knife holder base do the back and forth movement by hand to choose latched position needed. There is a scale under knife holder for reference by location. - Use hexagon spanner to turn the eccentric rod in the hole on the left side of the knife holder to release and lock the rotator of the knife holder.
- Page 12 7. Normal Troubles Solving Methods There are normal problems in the following table which are likely to happen when the instrument is used. Besides, there are some possible causes that lead to these problems happened and solving methods. Trouble Reason Solving Methods Adjust the angle of cutting until the Inappropriate angle of the...
- Page 13 - Downwardly turn over the cutting edge cover sheet. - Turn the eccentric rod handle in the lateral of the body of revolution and draw it out from sideward. - Push the knife clamp back which have knife clip and shift it out from the rotary unit. - Turn the eccentric rod handle in the lateral of the knife clap and draw it out from sideward.
- Page 14 9.Storage and transportation 9.1 Storage: After packaging, the product can be stored for half a year under the temperature of 0-40℃, no acid, no alkali and no corrosion gas. 9.2 Transportation: The packaged products can be applied to various modes of transportation under the condition of avoiding direct rain and snow.
- Page 15 Biolab Scientific Ltd. 3660 Midland Avenue, Suite 300, Toronto, Ontario M1V 0B8, Canada Email: info@biolabscientific.com | Website: www.biolabscientific.com...
Need help?
Do you have a question about the BHTP-203 and is the answer not in the manual?
Questions and answers