Advertisement
Quick Links
Advertisement

Subscribe to Our Youtube Channel
Related Manuals for Insportline Cable Column CC700


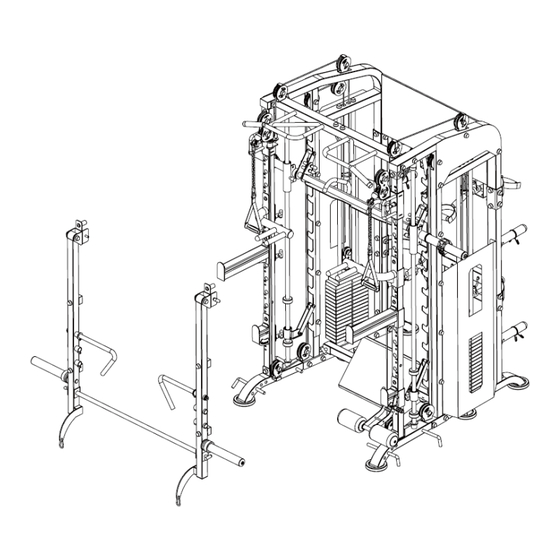
Summary of Contents for Insportline Cable Column CC700
- Page 1 USER MANUAL – EN IN 25846 Power rack inSPORTline Cable Column CC700...
- Page 2 CONTENTS SAFETY INSTRUCTIONS ........................3 IMPORTANT NOTES ..........................3 PARTS LIST ............................4 ASSEMBLY ............................. 7 Step 1 ..............................7 Step 2 ..............................9 Step 3 ..............................11 Step 4 ..............................13 Step 5 ..............................15 Step 6 ..............................18 Step 7 ..............................
- Page 3 SevenSport s.r.o. reserves the right to make any changes and improvements to its product without prior notice. Visit our website www.insportline.eu where you will find the latest version of the manual. SAFETY INSTRUCTIONS • This manual serves for teaching efficient use of the product. Please read this manual carefully before first use and keep it for future reference.
- Page 4 • Be sure to set up the exerciser in a dry and even place and always protect it from humidity. If you wish to protect the place particularly against pressure points, contamination, etc. It is recommended to put a suitable non-slip mat under the exerciser. •...
- Page 5 Left frame post Right frame post Left storage frame Right storage frame Right slider Left slider Barbell Safety sleeve Barbell loading sleeve Hexagonal bolt M10*50 Covers Pulley cover 20*96*T3 Φ25*1850 Guide rod Guide rod holder Left safety bracket Right safety bracket Sliding sleeve Bolt M8*10...
- Page 6 Left holder for trainer Barbell holder Left safety frame Right safety frame Φ10*100 T-shaped pin Left dip bar Right dip bar Pulley handle Footrest Triceps trainer Training bar Ankle strap V trainer Rowing handle Straight handle Lat pull bar Abdominal harness L-shaped pin Hexagonal bolt M10*20...
- Page 7 ASSEMBLY Step 1 Name Specifications Qty. Left frame base Right frame Left frame Right frame base Rear connecting frame Reinforcing plate t4.0*50*140 Reinforcing plate t3.0*50*110 Front frame Hexagonal bolt M10*70...
- Page 8 Φ10 Large washer Hexagonal bolt M10*90 Hexagonal bolt M10*65 Plastic caps Hanging eyelet Φ8 Washer L plate Hexagonal bolt M10*95 Hexagonal bolt M10*75 Connect the left frame (3) and right frame (4) to the left base (1) and right base (2) using bolts (13, 12, 9), large washer (11), reinforcing plates (6), nuts (10) and cover (14).
- Page 9 Step 2 Name Specifications Qty. Hexagonal bolt M10*70 Φ10 Large washer Hexagonal bolt M10*90 Plastic caps Left frame post Right frame post Left storage frame Right storage frame Right slider Left slider...
- Page 10 Hexagonal bolt M10*20 Slide the right (25) and left (26) sliders onto the left (21) and right (22) frame posts. Attach the frame posts (21, 22) to the main structure with bolts (9, 84), large washers (11), and nuts (10). Attach the side frame (23 and 24) to the main frame with bolts (12), large washers (11), and nuts (10).
- Page 11 Step 3 Name Specifications Qty. Barbell Safety sleeve Barbell loading sleeve Φ25*1850 Guide rod Guide rod holder Left safety bracket Right safety bracket Sliding sleeve Bolt M8*10 Φ12 Washer...
- Page 12 Φ12 Flexible washer Flat head bolt M12*40 Φ60*Φ58*Φ26*25 Rubber pad Slide sliding sleeve (37) left safety bracket (35), rubber washer (44), and guide rod holder (34) onto guide rod (33). Attach the prepared guide rod to the frame using bolts (39). Pull the barbell (27) through the sleeves (37).
- Page 13 Step 4 Name Specifications Qty. Φ10 Large washer Plastic caps Weights 90 kg Φ60*Φ26*42 The upper part of the weights Φ25*1660 Guide rod Load selector bar Hexagonal bolt M10*85 Attach the guide rods (48) to the lower frame and slide the rubber washers (47), weight (45), and upper part of the weight (46) onto them.
- Page 14 Note: place the weights from the largest number to the smallest.
- Page 15 Step 5 Name Specifications Qty. Φ10 Large washer Hexagonal bolt M10*90 Plastic caps Hexagonal bolt M10*50 Covers Pulley cover 20*96*T3 Hexagonal bolt M10*85 Φ5*7920 mm Cable Φ95 Pulley...
- Page 16 Φ60 Pulley Hexagonal bolt M10*45 Hexagonal bolt M10*20 Attach pulleys (55) to left and right frames with bolts (56, 30), washers (11), nuts (10), pulley cover (32), and plastic caps (14). Attach the covers (31) to the left and right frames with bolts (84, 12, 50), washers (11), nuts (10), and plastic covers (14).
- Page 18 Step 6 Name Specifications Qty. Hexagonal bolt M10*70 Φ10 Large washer Plastic caps Φ8 Washer Weight cover Weight covers Hook Hexagonal bolt M10*20 Cover Hexagonal bolt M8*20 Safety sleeve Attach hooks (60) to frame (5) using washers (17) and nuts (16).
- Page 19 Attach the covers (58 and 59) to the frame with bolts (84, 9) and covers (14). Attach cover (85) to frames with bolts (86), washers (17), and caps (14).
- Page 20 Step 7 Name Specifications Qty. Φ10 Large washer Hexagonal bolt M10*90 Plastic caps Core trainer Lat trainer Right holder for trainer Left holder for trainer Barbell holder Left safety frame...
- Page 21 Right safety frame Φ10*100 T-shaped pin Left dip bar Right dip bar Pulley handle Attach the barbell holder (67) to the left Frame (1) with the bolts (12), large washer (11), and nut (10). Attach the core trainer (63) to the right frame (4). Attach the handrails (72, 71), safety frames (68, 69) and trainer holders (66, 65) to the left and right frames.
- Page 22 Step 8 Name Specifications Qty. Φ10*85 T-shaped pin Footrest Attach the footrest to the frame with pins (62).
- Page 24 Step 9 Name Specifications Qty. Triceps trainer Training bar Ankle strap V trainer Rowing handle Straight handle Lat pull bar Abdominal harness L-shaped pin Handles Optional accessories (75, 77, 78, 79, 80, 81, 82, 76) can be hung on hooks (60)
- Page 25 Fasten the pins (83) to the frame.
- Page 26 Step 10 Name Specifications Qty. Plastic caps Φ10*85 T-shaped pin Frame Connecting frame Right column Left column Handles Small footrest Φ25*56 Sleeve Hexagonal bolt M12*25 Φ12 Large washer Attach the handles (93) to the posts (91, 92) and then connect the posts with bolts (96), washers (97) and a sleeve (95).
- Page 27 Attach the footrest (94) to the main frame with pins (62). Attach the assembled structure with handles to the main frame. Attach the frame (89) to the posts (92, 91) with pins (62).
- Page 28 Selector rod with plate holder attachment Name Specifications Qty. Selector rod with plate holder Remove weight selector rod (49) and cover (58) and attach the holder (88).
- Page 29 EXERCISE INSTRUCTIONS Exercise is beneficial to your health, improves physical condition, shapes muscles and, in combination with a calorie-balanced diet, leads to weight loss. 1. WARM UP This phase serves to improve the blood circulation of the whole body and to warm up the muscles, to reduce the risk of convulsions and muscle injury.
- Page 30 With improved fitness, you can lengthen and increase exercise intensity. Train regularly, at least three times a week. SHAPING MUSCLES For muscle shaping, it is important to set a high load. The muscles will be more stressed, which may cause that you will not be able to exercise as long as usual. If you are trying to improve your condition at the same time, you need to adjust your training.
- Page 31 The Seller provides the Buyer a 24 months Warranty for Goods Quality, unless otherwise specified in the Certificate of Warranty, Invoice, Bill of Delivery or other documents related to the Goods. The legal warranty period provided to the Consumer is not affected. By the Warranty for Goods Quality, the Seller guarantees that the delivered Goods shall be, for a certain period of time, suitable for regular or contracted use, and that the Goods shall maintain its regular or contracted features.
- Page 32 SEVEN SPORT s.r.o. Stores inSPORTline SK, s.r.o. Strakonická 1151/2c, Praha 5, 150 00, ČR Headquaters, warranty & service center: Električná 6471, Registered Office: Dělnická 957, Vítkov, 749 01 Trenčín 911 01, SK Headquaters: Warranty & Service: Čermenská 486, Vítkov 749 01...
Need help?
Do you have a question about the Cable Column CC700 and is the answer not in the manual?
Questions and answers