Table of Contents
Advertisement
Quick Links
Advertisement
Table of Contents

Related Manuals for Insportline ProfiGym C30


Summary of Contents for Insportline ProfiGym C30
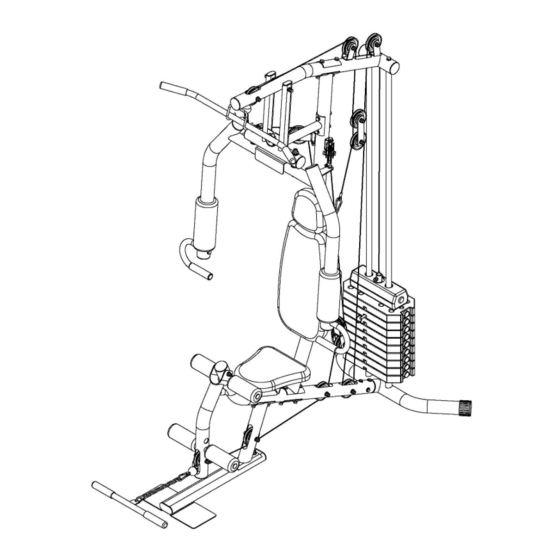
- Page 1 USER MANUAL - EN IN 18407 Home Gym inSPORTline ProfiGym C30...
-
Page 2: Table Of Contents
OBSAH SAFETY INSRUCTIONS ......................... 3 PACKAGE ............................... 3 DISPOSAL ............................... 3 ILLUSTRATED PARTS LIST (1) ......................4 PARTS (1) ............................... 5 ILLUSTRATED PARTS LIST (2) ......................6 PARTS (2) ............................... 7 ASSEMBLY ............................. 8 TRAINING INSTRUCTIONS ......................... 14 EXERCISE ............................. 15 MAINTENANCE AND STORAGE ...................... -
Page 3: Safety Insructions
SAFETY INSRUCTIONS IMPORTANT! • This device is made for home use and the weight of the user should not exceed 120 kg. • Use this product as intended. Improper use of the device can lead to injury. The manufacturer is not responsible for any damage to health or property resulting from improper use of the device. -
Page 4: Illustrated Parts List (1)
ILLUSTRATED PARTS LIST (1) -
Page 5: Parts (1)
PARTS (1) NAME Main frame Rear base Main vertical frame Guide rod Top cross beam Seat support Press bar Right chest support Left chest support Front base Leg extension Foam tube Iron bushing Resist bar Lower handrail Pull bar Handle bar Selector shaft Upright pulley block Parallel pulley block... -
Page 6: Illustrated Parts List (2)
ILLUSTRATED PARTS LIST (2) -
Page 7: Parts (2)
PARTS (2) NAME Backrest cushion Headrest cushion Seat cushion Big foam roller Foam roller Cable with no ball Long cable with one ball Short cable with one ball Rubber donut Hook Chain Bolt m12×165 + washers + lock nuts Bolt m6*16 + washer Bolt m8*16 + bend washer Bolt m8*35 + bend washer Bolt m8×40 + two washers + lock nut... -
Page 8: Assembly
ASSEMBLY STEP 1 1. Attach rear base (B) to main frame (A) with four bolts M8*16 + bend washers (15). 2. Attach seat support (F) to front base (J) with two bolts M10*60 + washers + lock nuts (22). 3. Attach seat support (F) and reinforcement plate (V) to main frame (A) with two bolts M10*80 + bend washers + lock nuts (27). - Page 9 STEP 2 1. Attach main vertical frame (C) and reinforcement plate (V) to main frame (A) with two bolts M10*80 + bend washers + lock nut (27). 2. Attach top cross beam (E) and reinforcement plate (V) to main frame (C) with two bolts M10*80 + bend washers + lock nuts (27).
- Page 10 STEP 3 1. Attach press bar (G) to top cross beam (E) with bolt M12*165 + washers + lock nuts (13). 2. Attach right and left chest support (H&I) to press bar (G) with M12 lock nut + big washer (30). 3....
- Page 11 STEP 4 1. Attach seat cushion (3) to main frame (A) with four bolts M6*16 + washers (14). 2. Attach backrest cushion (1) and headrest cushion (2) to main vertical frame (C) with four bolts M8*80 + bend washers (18). 3.
- Page 12 STEP 5 CABLE ASSEMBLY 1. Assembly the cable with no ball (6) Connect one end of the cable to one of chest support with iron bushing (M) and M8 lock nut (29). Then thread the other end of the cable over pulley U1, down and round pulley S1 on upright pulley block (S), up and over pulley U2, secure cable to chest support with iron bushing (M) and M8 lock nut (29).
- Page 13 Run the end with no ball of the cable (8) through the pulley E1 on top cross beam (E), round the pulley E2 on top cross beam (E), down and under pulley T1 on parallel pulley block (T), up and round pulley E3 on cross beam (E).
-
Page 14: Training Instructions
TRAINING INSTRUCTIONS IMPORTANT: Before beginning your training program, consult your doctor to ensure that are healthy enough to use this training device. Base your program on the result of this medical examination. All following training instructions are suitable for healthy people only. This training device is a versatile multi-functional home training unit for optimum fitness training with special emphasis on muscle- power. -
Page 15: Exercise
EXERCISE CHEST PRESS LEG EXTENSION Mid-point Start/End Start/End Mid-point SEATED MID ROW LEG CURL Start/End Start/End Mid-point Mid-point LOWER HANDRAIL UPRIGHT ROW Start/End Mid-point Mid-point Start/End TRICEPS PUSH DOWN ARM CURL Start/End Mid-point Start/End Mid-point OUTER THIGH INNER THIGH Mid-point Start/End Start/End Mid-point... -
Page 16: Maintenance And Storage
Start/End Mid-point Mid-point Start/End SIDE BEND Start/End Mid-point MAINTENANCE AND STORAGE Contact with organic solvents and aggressive cleaning agents can damage the product. After use, wipe the product with a damp cloth and then wipe dry. Store in a dry and shady place. If you find any defect after purchasing the product, contact the service department. - Page 17 “The Buyer who is not the End Customer” is a Businessman that buys Goods or uses services for the purpose of using the Goods or services for his own business activities. The Buyer conforms to the General Purchase Agreement and business conditions. These Conditions of Warranty and Warranty Claims are an integral part of every Purchase Agreement made between the Seller and the Buyer.
- Page 18 Goods defect, he and the Buyer shall make an agreement about an alternative solution. In case such agreement is not made, the Seller is obliged to provide the Buyer with a financial compensation in the form of a refund.
Need help?
Do you have a question about the ProfiGym C30 and is the answer not in the manual?
Questions and answers