
Subscribe to Our Youtube Channel
Related Manuals for Hollywood Racks CROSSTRACK HR7160


Summary of Contents for Hollywood Racks CROSSTRACK HR7160
- Page 1 HR7160 ASSEMBLY INSTRUCTIONS CROSSTRACK • 1 Bike • Max tire width: 4” • Max wheelbase: 52”/1320mm 1 BIKE • Max Capacity: 66lbs per bike • 1-1/4” or 2” hitch receiver For video assistance INFO@HOLLYWOODRACKS.COM...
- Page 2 SAFETY One bike capacity Max weight per MAX 66 Lbs bike=66 lbs/30 kgs • Follow instructions for proper assembly, installation and use. • Check tightness of all hardware and bikes periodically during transit; at least every 100 miles. • Do not use tarps, bike covers, or wind covers with this product. •...
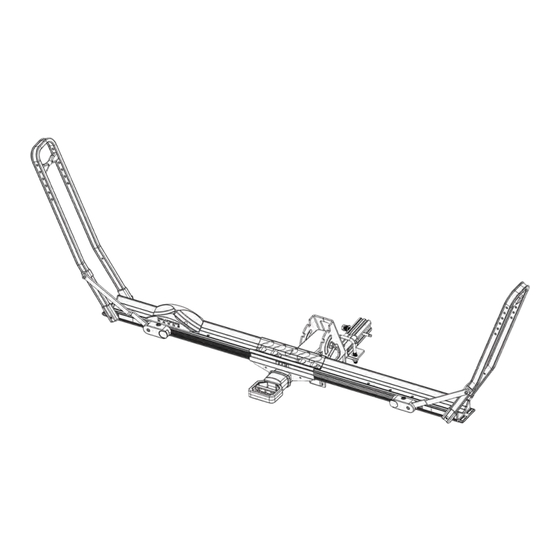
- Page 3 PARTS MAIN FRAME WHEEL TRAY WHEEL TRAY EXTERNAL BRIDGE BRIDGE PLATE X2 INTERNAL BRIDGE BOLTS X4 WASHERS X4 NUTS X4 COMBINATION 14MM/19MM HITCH TIGHTENER WRENCH 4MM, 5MM, 5/32” ALLEN WRENCH SET 5/8” x 3” THREADED LOCKING HITCH PIN REFLECTOR TAPE 13MM, 17MM SOCKET SET WITH 8’...
- Page 4 INSTALLATION Step 1 Measure the inside of your trailer hitch’s receiver tube (it will be either 1 1/4” or 5/32” 2”) if it is 1 1/4”, remove the spacer block using the 3/32” allen wrench. Insert the bike racks hitch tube into the vehicles receiver and align the holes.
- Page 5 INSTALLATION Step 2 Position the U-Bolt over the hitch tube. Follow by Hitch Tightener placing the U-Bolt plate below the receiver tube as shown. Install the hardware on the U-bolt’s threads per Fig 2: Fig 2. Aftert installing the plate, washer &...
- Page 6 INSTALLATION Step 4 Insert the internal bridge (D) into wheel tray (B1). The tab on the bridge should snap into the side of the wheel tray. Repeat for (B2). Repeat the steps for Wheel Tray (B2) Internal Bridge (G) Wheel Tray (B1) * For reference only.
- Page 7 INSTALLATION STEP 5 Once the trays (B1) and (B2) are connected to the internal bridge, place them on the innermost Support Bracket of the mainframe closest to the vehicle. Align the holes of the External Bridge(D) with (B1),(B2) on the Support Bracket. External Bridge (D) Wheel Tray (B2) Wheel Tray (B1)
- Page 8 INSTALLATION Secure the nuts and washers on the bolts. Place the washers and nuts on the bolts and tighten by hand. Washers (I) Washers (I) Nuts (H) Nuts (H) Tilt the bike rack up for easy access to the nuts and tighten securely with the 17mm socket tool.
- Page 9 FOLDING YOUR BIKE RACK UP FOLDING YOUR BIKE RACK UP Fold the arms in by pushing the arms down towards the tray. Make sure all arms are secured properly. Once the arms have been folded Tilt up with both hands down, pull the handle on the mainframe to tilt the bike rack up.
- Page 10 MOUNTING YOUR BIKES Front Wheel Block The Crosstrack comes equipped with a two position Front Wheel Block to help prevent front wheel move- ment while transporting your bike(s). The block is pre- assembled in the forward position which will fit most 24”-29”...
- Page 11 MOUNTING YOUR BIKES 1. Adjust the tire spindle location to your bike’s tire size. 2. Open and extend the wheel arm enough to allow you to mount your bike to the innermost tray. Note that the button must be pressed in while lifting the arm. Maximum recommended angle of arms when loading bikes Note: Arms can be...
- Page 12 MOUNTING YOUR BIKES 4. Press the wheel arms firmly against your bike’s tires. Tire spindle must make contact with the tire in the specified range as shown below. If the tire contact is not within the specified range, adjust the position of the tire spindle, and/ or wheel block. HR7160-V1.
- Page 13 MOUNTING PRECAUTIONS AND SUGGESTIONS Bike must not extend beyond side view mirrors Wheel arms must not be in contact with fenders or racks Wheel arms must be located within the specified range for secure and safe mounting of bikes. HR7160-V1.
- Page 14 MOUNTING PRECAUTIONS AND SUGGESTIONS NOT OK TOO CLOSE TO DISK BRAKE NOT CENTERED ADJUST TIRE SPINDLE LOCATION FOR BOTH WHEELS NOT OK ADJUST TIRE SPINDLE LOCATION FOR BOTH WHEELS NOT CENTERED RE-POSITION FRONT WHEELBLOCK HR7160-V1.
- Page 15 REMOVING BIKES FROM THE RACK To release the wheel tray arms from the tires of your bikes, press the button on the ratcheting triggers and pull the arms back. Maintain pres- sure on the button while pulling the arms down. ACCESSING YOUR CARGO AREA Pull the handle on the mainframe (A).
- Page 16 (at its option) a defective part without charge for labor or parts. Hollywood Racks may elect (at its option) to issue a refund equal to the purchase price paid for the prod- uct.
- Page 17 OPTIONAL ACCESSORIES SOLD SEPERATELY Quick Change Wheel Locks Tire Spindles • Helps prevent theft, • Allows for quickly can be keyed alike adjusting the rack for to your hitch pin and different bikes. cable. • Comes as a set of •...
Need help?
Do you have a question about the CROSSTRACK HR7160 and is the answer not in the manual?
Questions and answers