Table of Contents
Advertisement
Available languages
Available languages
Quick Links
2021 Art.Nr.: H-WSA-NC750X-2021 .......................................................................................................... 2
from 2021 Art.No .: H-WSA-NC750X-2021 ............................................................................................ 11
NC750X année à partir de 2021 Numéro d'article : H-WSA-NC750X-2021............................................ 20
vanaf 2021 Artikelnr .: H-WSA-NC750X-2021 ........................................................................................ 29
2021 Varenr .: H-WSA-NC750X-2021 ..................................................................................................... 38
NC750X anno dal 2021 Articolo n .: H-WSA-NC750X-2021 .................................................................. 47
1
Bertus Verwoerd
BRUUDT CNC Machined Special Parts
Königsfelderstrasse 24
49824 Ringe
Deutschland
Telefon: 05944 599 406
E-Mail: info@BRUUDT.de
Advertisement
Table of Contents

Related Manuals for BRUUDT H-WSA-NC750X-2021


Summary of Contents for BRUUDT H-WSA-NC750X-2021
-
Page 1: Table Of Contents
2021 Art.No .: H-WSA-NC750X-2021 .................... 11 Instructions d'installation/consignes de sécurité Réglage du pare-brise BRUUDT pour Honda NC750X année à partir de 2021 Numéro d'article : H-WSA-NC750X-2021..........20 Montage-/veiligheidsinstructie BRUUDT windschermverstelling voor Honda NC750X bouwjaar vanaf 2021 Artikelnr .: H-WSA-NC750X-2021 ..................29 Monteringsvejledning/sikkerhedsanvisning BRUUDT forrudejustering til Honda NC750X årgang fra... -
Page 2: Anbauanleitung/Sicherheitshinweise Bruudt Windschildverstellung Für Honda Nc750X Bj Ab 2021 Art.nr.: H-Wsa-Nc750X-2021
Produkts an eine Fachwerkstatt. Nichtbeachten der Montageanweisung kann Schäden an Ihrem Fahrzeug verursachen und zum Erlöschen der Gewährleistungsansprüche führen. Für Folgeschäden wird keine Haftung übernommen. Der Hersteller übernimmt keine Haftung für Schäden aufgrund unsachgemäßer Montage dieses BRUUDT-Produkts. Eine nicht sachgemäße Verwendung dieses Produktes kann die Fahrsicherheit beeinträchtigen. Das eigenmächtige Nachbearbeiten und/oder Verändern des Produktes kann zum Versagen der Funktion führen und ist nicht gestattet. - Page 3 Stellen Sie sicher, dass alle Teile der Stückliste vorhanden und nicht Beschädigt sind. Lieferumfang: 1: Ein Satz Versteller: Einer für die linke Seite und einer für die rechte Seite. 2: Vier M5-Sicherheitsmuttern 3: Vier M5x18-Flanschkopfschrauben 4: Vier gestufte Kunststoff-Unterlegscheiben Für die Installation benötigen Sie folgendes Werkzeug: •...
- Page 4 Schritt 2: Montieren Sie die Windschildversteller mit den 4 Originalschrauben ohne Unterlegscheiben wie unten auf dem Bild dargestellt. Verwenden Sie dafür das vom Hersteller des Motorrads angegebene Anzugsdrehmoment. Schritt 3: Nehmen Sie eine mitgelieferte M5-Schraube mit einer mitgelieferten schwarzen Kunststoff-Unterlegscheibe. Stecken Sie jetzt die Schraube durch eines der unteren Löcher des Windschilds.
- Page 6 Schritt 4: Nehmen Sie eine mitgelieferte M5-Schraube mit einer mitgelieferten schwarzen Kunststoff-Unterlegscheibe. Stecken Sie jetzt die Schraube durch eines der oberen Löcher des Windschilds. Auf der Innenseite schieben Sie dann eine der mitgelieferten schwarzen Kunststoff- Unterlegscheiben nicht weiter, wie auf dem Bild dargestellt. Die Scheibe klemmt um die Schraube. Machen Sie das für beide unteren Löcher. Es muss jetzt so aussehen.
- Page 7 Schritt 5: Montieren Sie nun das Windschild am Windschildversteller. Schieben Sie dafür die Mutter in den oberen, breiteren Teil des unteren Langlochs links und rechts. Schieben Sie das Windschild in die untere Position.
- Page 9 Schritt 6: Drücken Sie jetzt die oberen Schrauben in das Langloch. Im Langloch auf der Innenseite eine M5-Sicherungsmutter montieren.
- Page 10 Umweltinformation: Dieser Artikel darf nicht am Ende seiner Lebensdauer mit dem Hausmüll entsorgt werden. Die Entsorgung kann über Firma BRUUDT, Bertus Verwoerd, Königsfelderstrasse 24, 49824 Ringe, Tel.: +49 (0) 5944 599 406; E-Mail: info@bruudt.de oder lokal verfügbare Rückgabe- und Sammelsyteme erfolgen.
-
Page 11: General Information
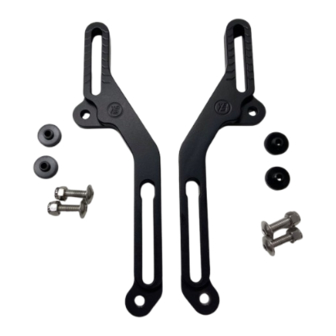
The manufacturer accepts no liability for damage caused by improper installation of this BRUUDT product. Incorrect use of this product can impair driving safety. Unauthorized reworking and/or modification of the product can lead to functional failure and is not permitted. Structural changes to the parts are not permitted and will lead to loss of liability and warranty claims. - Page 12 Make sure that all parts in the parts list are present and not damaged. Scope of delivery: 1: One set of adjusters: one for the left side and one for the right side. 2: Four M5 safety nuts 3: Four M5x18 flange head screws 4: Four stepped plastic washers For installation you need the following tools: •...
- Page 13 Step 2: Mount the windshield adjusters using the 4 original screws without washers as shown in the picture below. Use the tightening torque specified by the motorcycle manufacturer. Step 3: Take a supplied M5 bolt with a supplied black plastic washer. Now put the bolt through one of the lower holes of the windshield. On the inside, then push one of the supplied black plastic washers and immediately screw a supplied M5 lock nut loosely onto the bolt by hand.
- Page 15 Step 4: Take a supplied M5 screw with a supplied black plastic washer. Now put the screw through one of the top holes of the windshield. On the inside then slide one of the supplied black plastic washers no further as shown in the picture. The washer clamps around the screw. Do this for both bottom holes.
- Page 16 Step 5: Now mount the windshield on the windshield adjuster. To do this, push the nut into the upper, wider part of the lower slot on the left and right. Push the windshield into the lower position.
- Page 18 Step 6: Now press the upper screws into the slot . Mount an M5 lock nut in the slot on the inside.
- Page 19 Environmental information: This article must not be disposed of with household waste at the end of its life. Disposal can be made via BRUUDT, Bertus Verwoerd, Königsfelderstrasse 24, 49824 Ringe, Tel.: +49 (0) 5944 599 406; E-mail: info@bruudt.de or locally available...
-
Page 20: Instructions D'installation/Consignes De Sécurité Réglage Du Pare-Brise Bruudt Pour Honda Nc750X Année À Partir De 2021 Numéro D'article : H-Wsa-Nc750X-2021
Aucune responsabilité n'est acceptée pour les dommages consécutifs. Le fabricant n'assume aucune responsabilité pour les dommages dus à une mauvaise installation de ce produit BRUUDT. Une mauvaise utilisation de ce produit peut nuire à la sécurité de conduite. Toute transformation et/ou modification non autorisée du produit peut entraîner une défaillance fonctionnelle et n'est pas autorisée. - Page 21 Assurez-vous que toutes les parties de la liste des pièces sont présentes et non endommagées. Contenu de la livraison : 1 : Un jeu de régleurs : un pour le côté gauche et un pour le côté droit. 2 : Quatre écrous de sécurité M5 3 : Quatre vis à...
- Page 22 Étape 2 : Assemblez les ajusteurs de pare-brise à l'aide des 4 vis d'origine sans rondelles comme indiqué sur l'image ci-dessous. Pour ce faire, utilisez le couple de serrage spécifié par le constructeur de la moto. Étape 3 : Prenez une vis M5 incluse avec une rondelle en plastique noir incluse. Insérez maintenant la vis dans l'un des trous inférieurs du pare-brise. Faites ensuite glisser l'une des rondelles en plastique noir fournies à...
- Page 24 Étape 4 : Prenez une vis M5 incluse avec une rondelle en plastique noir incluse. Insérez maintenant la vis dans l'un des trous supérieurs du pare-brise. A l'intérieur, ne poussez pas plus loin l'une des rondelles en plastique noir fournies, comme indiqué sur la photo. La rondelle est collée autour de la vis.
- Page 25 Étape 5 : Montez maintenant le pare-brise sur le dispositif de réglage du pare-brise. Pour ce faire, poussez l'écrou dans la partie supérieure et plus large de la fente inférieure à gauche et à droite. Faites glisser le pare-brise en position basse.
- Page 27 Étape 6 : Enfoncez maintenant les vis supérieures dans la fente . Installez un contre-écrou M5 dans la fente à l'intérieur.
- Page 28 Informations environnementales : Cet article ne doit pas être jeté avec les ordures ménagères en fin de vie. L'élimination peut être effectuée via BRUUDT, Bertus Verwoerd, Königsfelderstrasse 24, 49824 Ringe, Tél. : +49 (0) 5944 599 406 ; E-mail : info@bruudt.de ou...
-
Page 29: Montage-/Veiligheidsinstructie Bruudt Windschermverstelling Voor Honda Nc750X Bouwjaar Vanaf 2021 Artikelnr .: H-Wsa-Nc750X-2021
Voor gevolgschade wordt geen aansprakelijkheid aanvaard. De fabrikant aanvaardt geen aansprakelijkheid voor schade als gevolg van onjuiste installatie van dit BRUUDT-product. Onjuist gebruik van dit product kan de rijveiligheid in gevaar brengen. Ongeautoriseerde bewerking en/of wijziging van het product kan leiden tot functionele uitval en is niet toegestaan. - Page 30 Zorg ervoor dat alle onderdelen van de onderdelenlijst aanwezig en niet beschadigd zijn. Leveringsomvang: 1: Eén set verstellers: één voor de linkerkant en één voor de rechterkant. 2: Vier M5-veiligheidsmoeren 3: Vier M5x18 flenskopschroeven 4: Vier getrapte kunststof sluitringen Voor de installatie heeft u de volgende gereedschappen nodig: •...
- Page 31 Stap 2: Monteer de windschermverstellers met behulp van de 4 originele schroeven zonder ringen, zoals weergegeven in de onderstaande afbeelding. Gebruik hiervoor het door de motorfietsfabrikant opgegeven aanhaalmoment. Stap 3: Neem een meegeleverde M5-schroef met een meegeleverde zwarte plastic ring. Steek nu de schroef door een van de onderste gaten van de voorruit.
- Page 33 Stap 4: Neem een meegeleverde M5-schroef met een meegeleverde zwarte plastic ring. Steek nu de schroef door een van de bovenste gaten van de voorruit. Duw aan de binnenkant niet één van de meegeleverde zwarte kunststof sluitringen verder, zoals op de afbeelding te zien is. De ring zit vast rond de schroef.
- Page 34 Stap 5: Monteer nu het windscherm op de windschermversteller. Duw hiervoor de moer links en rechts in het bovenste, bredere deel van de onderste gleuf. Schuif de voorruit naar beneden.
- Page 36 Stap 6: Druk nu de bovenste schroeven in de sleuf . Monteer een M5 borgmoer in de gleuf aan de binnenkant.
- Page 37 Milieu-informatie: Dit artikel mag aan het einde van zijn levensduur niet samen met het huishoudelijk afval worden weggegooid. Afvoer kan via BRUUDT, Bertus Verwoerd, Königsfelderstrasse 24, 49824 Ringe, Tel.: +49 (0) 5944 599 406; E-mail: info@bruudt.de of lokaal beschikbare retour- en ophaalsystemen .
-
Page 38: Generel Information
Der påtages intet ansvar for følgeskader. Producenten påtager sig intet ansvar for skader som følge af forkert installation af dette BRUUDT-produkt. Forkert brug af dette produkt kan forringe køresikkerheden. Uautoriseret efterbearbejdning og/eller ændring af produktet kan føre til funktionssvigt og er ikke tilladt. Strukturelle ændringer af delene skal undgås og vil resultere i tab af ansvar og garantikrav. - Page 39 Sørg for, at alle dele af reservedelslisten er til stede og ikke er beskadiget. Leveringsomfang: 1: Et sæt justeringsanordninger: En til venstre side og en til højre side. 2: Fire M5 sikkerhedsmøtrikker 3: Fire M5x18 flangehovedskruer 4: Fire trins plastskiver Til installation skal du bruge følgende værktøjer: fatningssæt med unbrakonøgle •...
- Page 40 Trin 2: Saml forrudejusteringerne med de 4 originale skruer uden spændeskiver som vist på billedet nedenfor. For at gøre dette skal du bruge det tilspændingsmoment, der er angivet af motorcykelproducenten. Trin 3: Tag en medfølgende M5 skrue med en medfølgende sort plastikskive. Indsæt nu skruen gennem et af de nederste huller i forruden. Skub derefter en af de medfølgende sorte plastikskiver ind på...
- Page 42 Trin 4: Tag en medfølgende M5 skrue med en medfølgende sort plastikskive. Indsæt nu skruen gennem et af de øverste huller i forruden. På indersiden må du ikke skubbe en af de medfølgende sorte plastikskiver længere, som vist på billedet. Skiven sidder fast omkring skruen. Gør dette for begge nederste huller.
- Page 43 Trin 5: Monter nu forruden på forrudejusteringen. For at gøre dette skal du skubbe møtrikken ind i den øverste, bredere del af den nederste slids til venstre og højre. Skub forruden ned i positionen.
- Page 45 Trin 6: Tryk nu de øverste skruer ind i slidsen . Installer en M5 låsemøtrik i slidsen på indersiden.
- Page 46 Miljøoplysninger: Denne genstand må ikke bortskaffes sammen med husholdningsaffald, når den er udtjent. Bortskaffelse kan ske via BRUUDT, Bertus Verwoerd, Königsfelderstrasse 24, 49824 Ringe, Tlf.: +49 (0) 5944 599 406; E-mail: info@bruudt.de eller lokalt tilgængelige retur- og afhentningssystemer .
-
Page 47: Istruzioni Di Installazione/Istruzioni Di Sicurezza Regolazione Del Parabrezza Bruudt Per Honda Nc750X Anno Dal 2021 Articolo N .: H-Wsa-Nc750X-2021
Non si accetta alcuna responsabilità per danni consequenziali. Il produttore non si assume alcuna responsabilità per danni dovuti a un'installazione impropria di questo prodotto BRUUDT. L'uso improprio di questo prodotto può compromettere la sicurezza di guida. Rielaborazioni e/o modifiche non autorizzate del prodotto possono causare guasti funzionali e non sono consentite. - Page 48 Assicurarsi che tutte le parti dell'elenco delle parti siano presenti e non danneggiate. Fornitura: 1: Un set di regolatori: uno per il lato sinistro e uno per il lato destro. 2: Quattro dadi di sicurezza M5 3: Quattro viti a testa flangiata M5x18 4: Quattro rondelle di plastica a gradini Per l'installazione sono necessari i seguenti strumenti: •...
- Page 49 Passaggio 2: Montare i regolatori del parabrezza utilizzando le 4 viti originali senza rondelle come mostrato nella figura sotto. A tale scopo utilizzare la coppia di serraggio specificata dal produttore della moto. Passaggio 3: Prendi una vite M5 inclusa con una rondella di plastica nera inclusa. Ora inserisci la vite in uno dei fori inferiori del parabrezza. Quindi far scorrere una delle rondelle di plastica nera in dotazione all'interno e avvitare a mano, senza stringere, un dado di bloccaggio M5 in dotazione sulla vite.
- Page 51 Passaggio 4: Prendi una vite M5 inclusa con una rondella di plastica nera inclusa. Ora inserisci la vite in uno dei fori superiori del parabrezza. All'interno non spingere oltre una delle rondelle in plastica nera in dotazione, come mostrato in figura. La rondella è bloccata attorno alla vite. Fallo per entrambi i fori inferiori.
- Page 52 Passaggio 5: Ora monta il parabrezza sul dispositivo di regolazione del parabrezza. Per fare ciò, spingere il dado nella parte superiore e più larga della fessura inferiore a sinistra e a destra. Far scorrere il parabrezza nella posizione abbassata.
- Page 54 Passaggio 6: ora premere le viti superiori nella fessura . Installare un dado di bloccaggio M5 nella fessura interna.
- Page 55 Informazioni ambientali: questo articolo non deve essere smaltito con i rifiuti domestici al termine della sua vita. Lo smaltimento può essere effettuato tramite BRUUDT, Bertus Verwoerd, Königsfelderstrasse 24, 49824 Ringe, Tel.: +49 (0) 5944 599 406; E-mail: info@bruudt.de o sistemi di restituzione e ritiro disponibili localmente .
Need help?
Do you have a question about the H-WSA-NC750X-2021 and is the answer not in the manual?
Questions and answers