Concept2 SKIERG - Sports Simulator Manual
- Product manual (48 pages) ,
- Use manual (32 pages) ,
- User manual (18 pages)
Advertisement
- 1 BENEFITS OF SKIING
- 2 USING THE CONCEPT2 SKIERG
- 3 SKIING BASICS AND BIOMECHANICS
- 4 HOW TO TEACH THE SKIERG
- 5 DESIGN AND MANAGEMENT OF WORKOUTS
- 6 FUNDAMENTAL 6 WORKOUTS
- 7 MOVEMENT ADAPTATIONS AND MODIFICATIONS
- 8 Documents / Resources
BENEFITS OF SKIING
OBJECTIVES:
- Understand the reasons for skiing and using the SkiErg
WHY SKI?
As a sport, Nordic skiing provides the following benefits:
- Exercises all of the major muscle groups: abdomen, hips, legs, arms, and back.
- Is a closed chain, multi-joint movement.
- Provides aerobic, anaerobic and strength conditioning.
- Provides the ability to train in a standing position.
- Is a high calorie burning exercise.
- Is an exercise of smooth motion, both rhythmic and low-impact.
- Regular use builds lean muscle mass.
- Provides quality cross-training for a variety of other sports.
WHY SKIERG?
The Concept2 SkiErg is a versatile training tool. A broad range of users have found different ways it can be incorporated into their training. It's not just skiers who appreciate the machine! Some like the SkiErg because it provides a standing exercise. Others like it for its closed-chain multi-joint movement, or its ability to improve muscular strength and endurance.
A Complementary Workout to Rowing
If you already use the Concept2 Indoor Rower, you'll find that the SkiErg offers a similar highquality, full-body, impact-free workout — but with movements that complement the rowing motion.
In rowing, you start in a compressed position and open at your hips to an extended position. Initiated by the lower body, the posterior muscles are the main drivers of this movement. Skiing is essentially the opposite — starting in an extended position, then crunching to close the hips and bend the knees to finish in a compressed position. Initiated by the upper body, the anterior muscles are now the main drivers of this movement.
PERFECT FOR ADAPTIVE ATHLETES AND INJURY REHAB
The SkiErg is a low impact exercise that is easy on the knees and ankles. The SkiErg easily accommodates athletes with lower leg injuries or adaptive needs. Athletes can sit or kneel, reducing the amount of leg involvement, while training at normal intensity and duration using just the upper body and core. Meanwhile, should an athlete be restricted to using one arm, a single cord stroke will also generate power.
USING THE CONCEPT2 SKIERG
OBJECTIVES:
- Identify the main components of the Concept2 SkiErg
- Understand the versatility of the SkiErg as a training tool
- Learn how to use the Performance Monitor (PM) and Pace Chart
- Be familiar with the SkiErg maintenance schedule
- Identify basic safety tips

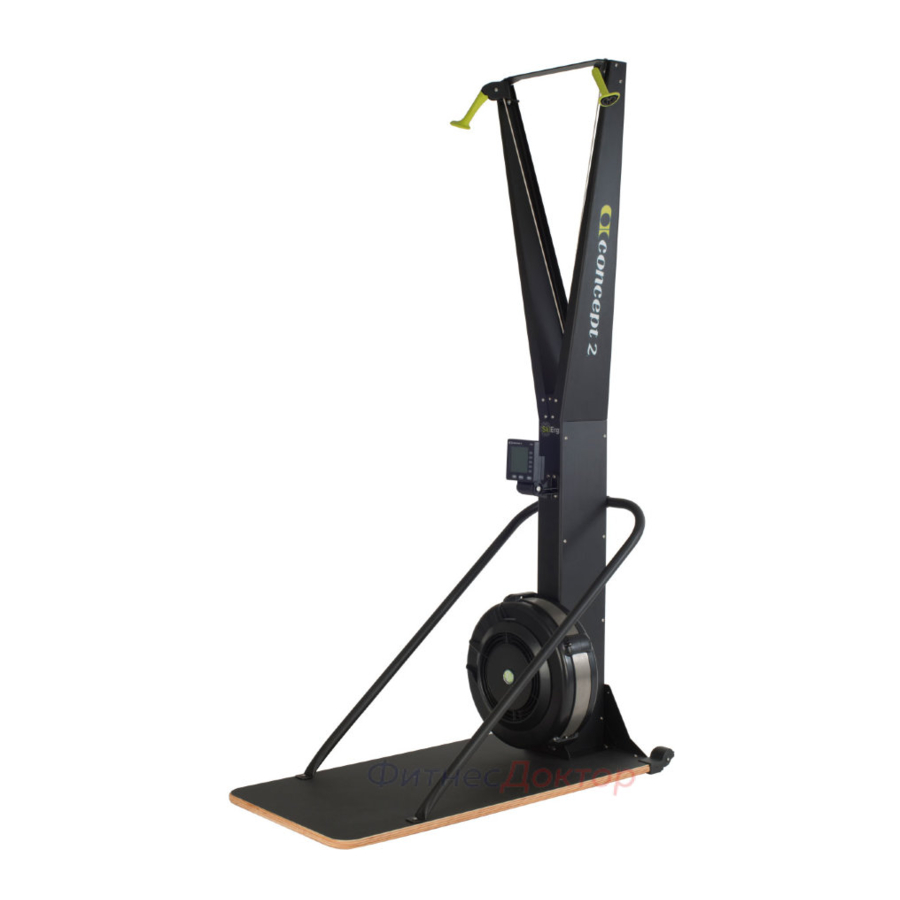
The SkiErg is built with the following key features:
- Flywheel
- Damper
- Strapless Handles
- High strength drive cords
- Performance Monitor (Brief mention)
The PM5 is the brains behind the SkiErg. It displays your workout data in real time, and stores your workouts for later analysis. - Handle Hook (optional)
- Floor Stand (optional)
FLYWHEEL
The Concept2 SkiErg uses air resistance, which is generated by the spinning flywheel. The faster you get the wheel spinning, the more resistance there will be. The harder you pull, the more resistance you will feel.
PERFORMANCE MONITOR
The PM5 is the brains behind the SkiErg. It displays your workout data in real time, and stores your workouts for later analysis.
DAMPER
The SkiErg features a damper with settings from 1 to 10. The damper adjusts the amount of air that gets into the flywheel. The damper setting is like bicycle gearing. It affects the feel of the skiing but does not directly affect the resistance. By changing the damper setting, you can simulate the range of skiing speeds that occur on snow. Higher numbers feel more like skiing in slow conditions or uphill. Lower numbers feel like skiing in faster snow conditions, on flat terrain and downhill. For general fitness and a good aerobic workout, use a damper setting between 1 and 4.

Note: The 1–10 damper setting scale is a handy reference for setting the "gearing." Using the drag factor on the Performance Monitor (PM) is a more accurate way to set gearing.
Visit: https://www.concept2.com/indoor-rowers/training/tips-and-general-info/damper-setting-101
Adjusting the damper provides a variety of environments in which to SkiErg. While higher damper setting may allow you to generate force with a slower stroke, as one becomes more skilled at the skiing motion you will be able to apply your power more quickly and generate high forces even at the lowest numbered damper setting. Skiing at the higher settings (slower pull through and higher forces) can put too much strain on your muscles and cause you to stop your workout (or tire) without getting full aerobic benefits.
STRAPLESS HANDLES
The SkiErg's ergonomic, strapless handles provide for a comfortable, secure grip and won't absorb sweat so they stay dry in high use settings. They are also suitable for all hand sizes as they require no adjustment.
HANDLE HOOK
(OPTIONAL)
The optional handle hook provides a safe, yet accessible place to keep the handles.
FLOOR STAND
(OPTIONAL)
The floor stand provides an alternative method of supporting the SkiErg if wall mounting is not an option. It makes the SkiErg free standing, allowing you to use the SkiErg anywhere. With a steel support and laminated wooden base, the floor stand is tough and well-built, yet has caster wheels to move it easily into and out of place. The anti-skid, wear-resistant surface offers firm footing.
The floor stand is suitable for use with most wheelchairs.
HIGH STRENGTH DRIVE CORDS
The SkiErg relies on high-strength cords in its drive system. Much stronger than steel, the cords are also extremely lightweight, resulting in a system that is responsive, smooth and durable.
UNDERSTAND THE VERSATILITY OF THE SKIERG AS A TRAINING TOOL
You can ski as hard or as easy as you wish. The SkiErg will not force you to ski at any set intensity level. It is up to you. As you put more effort into your skiing, you will go faster, produce more watts, and burn more calories. This makes the SkiErg suitable for users of all levels and abilities. It can provide a max workout for an Olympic skier just as well as it provides basic fitness benefits to novice fitness-seekers. The SkiErg can train a long-distance endurance athlete just as well as a powerful, sprint athlete.
The damper (Drag Factor) can be adjusted from 1 to 10 providing a change to the environment where work is done. Any Nordic skier would appreciate the ability to train similar to the diverse terrain they face in their sport. Fluctuations in terrain occur regularly amidst both short and long race courses. The best skiers are proficient at producing power under all conditions.
As with all Concept2 ergs, the style of workout can range from HIIT to marathon endurance and everything in between. Workouts can be programmed on the PM5 where you can monitor your stroke details in real time as well as display your work results at the end and compare over time.
Keep your goals in mind. For example, if your goal is to build endurance, it may be more important to ski for a long time than to ski hard. If you ski too hard, you won't last as long. Alternatively, the SkiErg can help build short duration, explosive strength. If your goals are along this vein, you may find interval work to be most effective. Match your target stroke rates and damper settings to your goals as well.
Use the pace chart to assist in reading the monitor and pacing a workout.
Sample Display

USING THE PERFORMANCE MONITOR
The Performance Monitor measures the work that a skier does while skiing and provides feedback on performance. You can view your performance in pace, watts and Calories. The PM displays your output in a choice of units and display options. You can choose the units and displays that work best for you, and you can change them at any time during your workout.
Your stroke output is displayed on the Performance Monitor. Watch the time/500m display window of the monitor and you will notice the number changes at the end of each pull. This number shows you the output of the stroke you just finished. Because the monitor self-calibrates with each stroke, this allows you to compare each pull, interval and workout.
The number will seldom be the same from stroke to stroke as it will take time to develop consistent power application.
The PM can display your stroke output in three different units of measure:
- Ski speed as time per 500 meters: The time per 500 meters is to an erger what time per mile is to a runner. Tell any runner that you do sub a 5-minute mile and he will know how fast you run. On the Concept2 SkiErg, erg speed is related to the amount of power you are producing to make the flywheel spin.
- Watts: You can view your effort as units of power in watts. If you ski at 100 watts, you are producing the amount of power it takes to keep a 100-watt light bulb lit. The harder you work, the more watts you produce, and the less time it will take to go 500 meters. When you produce power, your body burns calories.
- Calories per hour: The performance monitor makes an approximation of the rate you are burning Calories based on the amount of power you are producing.
As you do different types of SkiErg workouts, you will use the stroke output number (pace, Calories or watts) as your guide to tailor the effort to the length of intended workout time. For example, the target work level during a 30-minute steady ski will be slower than your target for 2-minute intervals with rest. A seasoned skier will know his or her pace and will monitor their progress based on improvements in the pace he or she can maintain for various workouts.
Cadence (Strokes Per Minute = spm)
Cadence (or tempo) is displayed in strokes per minute (spm) in the upper right corner of the PM.
If you are skiing for general fitness using the double pole technique, aim for a cadence between 35 and 45 spm. Your cadence will probably be lower for long steady workouts, and higher for short intense work intervals. You may vary your cadence to match your poling tempo for the range of conditions that occur on snow.
Your cadence for classic ski technique (alternating arms) will be roughly twice your double-pole cadence.
There are multiple display options:

ADDITIONAL FEATURES OF THE PM5
The PM5's backlit display provides increased visibility. It illuminates automatically when the monitor powers up and stays illuminated during your workout.
Connectivity:
The PM5 supports both ANT+ and Bluetooth, allowing you to connect to a wide range of wireless devices. The PM5 also supports wireless heart rate monitoring if you have a chest belt that supports one of these transmission technologies.
ErgData:
Concept2's free app, ErgData, runs on both iOS and Android. ErgData offers additional data outputs, and enables you to upload your workouts to the Concept2 Online Logbook with the push of a button.
Other Apps:
There is a growing number of other apps that are compatible with the PM5 on Concept2 ergs. They offer a number of functions, from training guidance to data logging to entertainment. You will find a list of apps, with brief descriptions, at concept2.com/apps.
Concept2 SkiErg Pace Chart
Use this chart to predict your final time or distance for the workouts shown.
| Average pace per | Your time will be: | Your distance will be: | |||||
| 500m | 1000m | 2000m | 5000m | 6000m | 10,000m | 30 min. | 60 min. |
| 1:40 | 3:20 | 6:40 | 16:40 | 20:00 | 33:20 | 9000 | 18,000 |
| 1:42 | 3:24 | 6:48 | 17:00 | 20:24 | 34:00 | 8824 | 17,647 |
| 1:44 | 3:28 | 6:56 | 17:20 | 20:48 | 34:40 | 8654 | 17,308 |
| 1:46 | 3:32 | 7:04 | 17:40 | 21:12 | 35:20 | 8491 | 16,981 |
| 1:48 | 3:36 | 7:12 | 18:00 | 21:36 | 36:00 | 8333 | 16,667 |
| 1:50 | 3:40 | 7:20 | 18:20 | 22:00 | 36:40 | 8182 | 16,364 |
| 1:52 | 3:44 | 7:28 | 18:40 | 22:24 | 37:20 | 8036 | 16,071 |
| 1:54 | 3:48 | 7:36 | 19:00 | 22:48 | 38:00 | 7895 | 15,789 |
| 1:56 | 3:52 | 7:44 | 19:20 | 23:12 | 38:40 | 7759 | 15,517 |
| 1:58 | 3:56 | 7:52 | 19:40 | 23:36 | 39:20 | 7627 | 15,254 |
| 2:00 | 4:00 | 8:00 | 20:00 | 24:00 | 40:00 | 7500 | 15,000 |
| 2:02 | 4:04 | 8:08 | 20:20 | 24:24 | 40:40 | 7377 | 14,754 |
| 2:04 | 4:08 | 8:16 | 20:40 | 24:48 | 41:20 | 7258 | 14,516 |
| 2:06 | 4:12 | 8:24 | 21:00 | 25:12 | 42:00 | 7143 | 14,286 |
| 2:08 | 4:16 | 8:32 | 21:20 | 25:36 | 42:40 | 7031 | 14,063 |
| 2:10 | 4:20 | 8:40 | 21:40 | 26:00 | 43:20 | 6923 | 13,846 |
| 2:12 | 4:24 | 8:48 | 22:00 | 26:24 | 44:00 | 6818 | 13,636 |
| 2:14 | 4:28 | 8:56 | 22:20 | 26:48 | 44:40 | 6716 | 13,433 |
| 2:16 | 4:32 | 9:04 | 22:40 | 27:12 | 45:20 | 6618 | 13,235 |
| 2:18 | 4:36 | 9:12 | 23:00 | 27:36 | 46:00 | 6522 | 13,043 |
| 2:20 | 4:40 | 9:20 | 23:20 | 28:00 | 46:40 | 6429 | 12,857 |
| 2:22 | 4:44 | 9:28 | 23:40 | 28:24 | 47:20 | 6338 | 12,676 |
| 2:24 | 4:48 | 9:36 | 24:00 | 28:48 | 48:00 | 6250 | 12,500 |
| 2:26 | 4:52 | 9:44 | 24:20 | 29:12 | 48:40 | 6164 | 12,329 |
| 2:28 | 4:56 | 9:52 | 24:40 | 29:36 | 49:20 | 6081 | 12,162 |
| 2:30 | 5:00 | 10:00 | 25:00 | 30:00 | 50:00 | 6000 | 12,000 |
| 2:32 | 5:04 | 10:08 | 25:20 | 30:24 | 50:40 | 5921 | 11,842 |
| 2:34 | 5:08 | 10:16 | 25:40 | 30:48 | 51:20 | 5844 | 11,688 |
| 2:36 | 5:12 | 10:24 | 26:00 | 31:12 | 52:00 | 5769 | 11,538 |
| 2:38 | 5:16 | 10:32 | 26:20 | 31:36 | 52:40 | 5696 | 11,392 |
| 2:40 | 5:20 | 10:40 | 26:40 | 32:00 | 53:20 | 5625 | 11,250 |
| 2:42 | 5:24 | 10:48 | 27:00 | 32:24 | 54:00 | 5556 | 11,111 |
| 2:44 | 5:28 | 10:56 | 27:20 | 32:48 | 54:40 | 5488 | 10,976 |
| 2:46 | 5:32 | 11:04 | 27:40 | 33:12 | 55:20 | 5422 | 10,843 |
| 2:48 | 5:36 | 11:12 | 28:00 | 33:36 | 56:00 | 5357 | 10,714 |
| 2:50 | 5:40 | 11:20 | 28:20 | 34:00 | 56:40 | 5294 | 10,588 |
| 2:52 | 5:44 | 11:28 | 28:40 | 34:24 | 57:20 | 5233 | 10,465 |
| 2:54 | 5:48 | 11:36 | 29:00 | 34:48 | 58:00 | 5172 | 10,345 |
| 2:56 | 5:52 | 11:44 | 29:20 | 35:12 | 58:40 | 5114 | 10,227 |
| 2:58 | 5:56 | 11:52 | 29:40 | 35:36 | 59:20 | 5056 | 10,112 |
| 3:00 | 6:00 | 12:00 | 30:00 | 36:00 | 60:00 | 5000 | 10,000 |
RECOMMENDED MAINTENANCE SCHEDULE
On a Regular Basis
- Untwist the cords if they appear to be twisted
- Clean grips
Every 500,000 Meters (approximately 50 hours of use)
- Inspect the cords
- Inspect the fasteners
- Inspect the top bracket pulleys
As Needed
- Clean all surfaces including floor stand
- Vacuum flywheel enclosure

SAFETY NOTES
The safety level of the machine can be maintained only if it is examined regularly for damage and wear. Replace defective components immediately to ensure safety and performance or keep machine out of use until repaired.
- Use of this machine with worn or weakened parts (pulleys, cords, spools) may result in injury to the user. When in doubt about the condition of any part, Concept2 strongly advises that it be replaced immediately. Use only genuine Concept2 parts. Use of other parts may result in injury or poor performance of your machine.
- The SkiErg with optional floor stand must be used on a stable, level surface.
- The wall-mounted SkiErg must be securely fixed to the wall at the top and bottom brackets. Be sure that your mounting bolts are going into a solid material such as wood or concrete, and that you are using the proper hardware for the wall material.
- Do not twist or cross cords, and avoid pulling cords all the way out to the point at which they stop.
- Do not release handles when they are in the pulled out position. Bring handles back to the top position before releasing them.
- Perform regular inspection and maintenance as recommended.
- Keep unsupervised children away from the SkiErg.
Other Safety Tips:
- Do not rely on handle cords to hold you up.
- Do not let go of the handles.
- Do not pull the handles to the ends of the handle cord length.
- Perform proper maintenance as described above.
SKIING BASICS AND BIOMECHANICS
OBJECTIVES:
- Learn the basic SkiErg stroke
- Learn the anatomy and biomechanics of skiing
TECHNIQUE
The technique that we teach is based on the traditional sport of Nordic skiing. But the beauty of the SkiErg is that it allows a range of technical variations that can still be safe and effective depending on your goals and what works best for you. Some of the more extreme techniques will likely not give you the best scores, but may still give you a great workout.
Learn the Basic SkiErg Stroke
THE START
As you grasp the handles of the SkiErg, imagine that you are grasping the handles of actual ski poles, with the "poles" extending down to the ground from your hands. At the beginning of the drive, you are planting your poles into the snow at a slight backward angle. Your arms are partially bent to keep the work closer to the large muscles of your core. Your pole handles should start slightly above your eyes.

THE DRIVE
Drive the poles into the snow and backward as you engage your core in a crunch forward, bending your knees to a comfortable extent as you use your body weight to accelerate the handles to your hips. No need to push the handles beyond the hips.

THE FINISH
Finish the drive with knees slightly bent, and arms extended down alongside your thighs.

THE RECOVERY
For the recovery, extend the hips and lift the chest. The hands will rise up last as the handles pass the face and reach to a height just above the head — ready for the next pull.

BIOMECHANICS
Taking a deeper look into the mechanics of the stroke, we can fine tune the body positions and transitions through the movement to find greater efficiency and improve performance. The biomechanics of the technique we teach on the SkiErg follows the basic characteristics of the "double poling" technique of Nordic skiing. While research has shown that the biomechanics of double poling can vary slightly on flat vs. uphill terrain, we find that SkiErg technique in different environments (damper adjustments) varies even less. The spectrum is discussed, but keep in mind the SkiErg technique will broadly simulate — not directly replicate — that of what we see in the actual sport.
FULL STROKE
We will review a full cycle or stroke, which can be defined as the time just before power production begins, through the full applied force, finishing with the return back to the top. The rhythm of the cycle (ratio of power phase to recovery phase) is important as well as the cadence of cycles over a period of time (stroke rate, spm).
Efficiency of movement will require vertical orientation of the handles, a substantial initiation of force sustained over time followed by a longer, in comparison. recovery phase. The lower damper settings will offer an environment that supports a greater (1:3) ratio between the drive phase and the recovery phase. Imagine skiing on a flat stretch of trail where your goal is to get the maximum distance out of each stroke. Higher damper settings will encourage a more equal (1:1) ratio, respectively, to sustain consistent effort. The experience here is much like skiing uphill. The need for a faster recovery allows you to continue moving up the hill rather than slowing down or sliding backwards.
BODY ANGLES

- At the very end of the recovery phase and just before the start of power production, the elbows are flexed at 90 degrees or less, the shoulders are flexed at around 75 degrees and abducted about 45 degrees. The angle of the hips and knees is 160–180 degrees and the ankles are just over 90 degrees with the heels just elevated off the ground.
- Upon initiation of force, every muscle in the body should engage, solidifying the line of action of the handle downward. The muscles around the torso are braced while the ankle, knee and hip angles begin to close. The shoulder and elbow angles initially decrease as well, bringing the hands in closer to the body.
- As the stroke continues, the hip angle continues to close approaching 90 degrees and, when the shoulder angle closes to the point where the elbow is aligned with the side of the torso, the elbow will begin to extend, opening the elbow angle back up to 135 degrees. At the moment the hands achieve alignment with the thigh, the drive ends and the recovery phase is initiated.
- The hips have the furthest range of motion to travel back to the start. The knees and ankles will also open followed by the shoulders. The elbows should already hold the appropriate amount of flexion as the arms reach up.
HOW TO TEACH THE SKIERG
OBJECTIVES:
- Learn helpful cues for teaching the SkiErg technique
- Spot inefficiencies and improve an individual's body positions
- Provide verbal correction and motivation
CUEING FOR GOOD TECHNIQUE
As with any sport, improper technique can result in injury as well as poor performance. Recognizing errors is important, but correcting them is even more critical to your role as an instructor.
Repeat these reminders during various points in the class. The goal is to create muscle memory. Repetition of movement and use of imagery help athletes accomplish physical goals.
Use the following verbal cues while instructing during each phase of the stroke.
PRIMARY MUSCLES
 (red):
These are the muscles that contract to accomplish the desired movement and power; they have high power output.
SECONDARY MUSCLES
 (yellow):
These muscles play a posture supporting and stabilizing role; they have low power output.
Both types of muscles work together in a synchronized fashion to accomplish the movement, but with different levels of involvement and power output.
THE SET/START

- Handles should be raised slightly above the eyes
- Arms should be bent at about a 90 degree angle
- Feet comfortably spaced about hip width apart
- Stand roughly 20" from the frame. (If you have a floor stand, stand about where the floorstand arms connect to the base.)
- Brace through the midsection
DURING THE DRIVE

- Keep arms bent
- Crunch with the abs
- Drive handles toward feet
- Achieve comfortable bend in the legs
AT THE FINISH

- Extend the arms, but not to full extension
- Handles stop near the thighs — no need to go beyond your thighs
THROUGH THE RECOVERY

- Stand back up
- Raise handles to Start position
Stroke should be smooth and continuous with no stopping at any point.
GENERAL SKIING ERRORS AND MODIFICATIONS
When instructing, note any of the following issues that impact form during a workout. Modify as needed, using the tips below.
- Shoulders remain down and relaxed, not up around the skier's ears.
- Avoid tension in the grip; allow the fingers to wrap lightly around the handle. The flare of the handle is oriented towards the wrist.
- Maintain a 90 degree angle in the elbow until the Finish position. The stroke should be smooth and continuous with no stopping at any point.
- Bring hips high and come to the balls of the feet (at the start of the drive)
- Prompt skier to keep the number in the center window of the Performance Monitor as constant as possible. Then, pull harder and watch what happens to the number.
FIVE COMMON ERRORS ON THE SKIERG
- Reaching too high
![]()
- Extending arms too far back
![]()
- Butt too far out
![]()
- Leaving the arms behind
![]()
- Additional bad habits
Bending at the hips with no ankle and knee flexion, butt out and arms straight
![]()
Bottoming out ropes
![]()
Standing too far from machine
![]()


Develop Good Technique with Cueing and Drills
DRILLS DESIGNED TO BRACKET PROPER TECHNIQUE
Alternate Legs/No Legs
This drill will help you understand the value of involving the legs in your drive.
- Begin with 10 pulls of normal full-body skiing. Take note of your pace, displayed in the center of display on the PM. Switch to 10 pulls where you keep your legs totally straight. Again, check your pace. Then take 10 pulls with legs, and, again, 10 without legs. What did you notice? For most people, the pace is much slower when the legs are not used, and it feels harder to get power into the pull.
One-Legged Skiing
This is a good balance exercise, while also making you appreciate the added power you can produce when using both legs.
- Start skiing for about 10 pulls. Shift your balance to stand on just one leg for the next 10 pulls, then switch to the other leg for 10 pulls, and finally back to regular 2-legged skiing. Repeat the sequence several more times.
Finding Proper Arm Bend
- Take 10 pulls with your arms completely straight.
- Take 10 pulls that start with your arms fully bent so that the handles run right down along the sides of your body as you extend your arms.
- Now, find the perfect position in between those two. Arms should be bent at around 90 degrees in the early part of the drive, before extending down toward the hips.
Getting the Right Amount of Leg Involvement
- Take 10 pulls keeping your legs completely straight.
- Take 10 pulls where you finish in a squat position (deep knee bend).
- Now, find the perfect position in between those two. You should finish the pull with knees comfortably bent.
Using your Core
- Take 10 pulls using your arms and your legs, but keeping your torso upright.
- Take 10 pulls with an overly full bend at the waist.
- Now, take 10 pulls using your core muscles to "crunch" forward as you pull down with your arms and bend your knees.
DRILLS TO WORK THE EXTREMES OF NORMAL TECHNIQUE TO ADD BOTH RANGE OF MOTION AND STRENGTH-BUILDING
Note that these moves are not considered proper technique; this drill is about extreme positions.
High Reach
- Normally, you should start your pull with your arms slightly bent and hands just above your eyes. For this exercise, take 10 pulls where you reach as high as you can before finishing the stroke off normally. Be sure to bring the arms back down to a strong, bent arm position as you prepare to engage the core.
SkiErg Squats
- Start the pull with a normal reach, then finish in a squat position, aiming for horizontal thighs. You may want to set a stool or exercise ball behind you to serve as the target for your squat.
Crunch, Don't Bend
- Try some "abs-only skiing" where you focus on flexion and extension of the spine rather than bowing. Work through a very short range of motion with no arm pull and minimal leg flexion to see how much energy you can produce using only their core.
Climb the Rope
- The "Climb the Rope" cue can be a helpful reminder to attain a better arm position while using the SkiErg. Imagine that you have a rope to climb, and think about where you would hold that rope in relation to your body. With this comparison in mind, you can clearly imagine the difficulty in holding that rope at arm's length and pulling your body weight up, recognizing that by shortening their lever length, you can improve their leverage.
DESIGN AND MANAGEMENT OF WORKOUTS
OBJECTIVES:
- Learn proper pre- and post-workout stretches
- Identify basic elements to set up for successful group skiing
- Learn about additional resources for building workouts
- Learn about motivational programs
Stretches to Use Before and After a SkiErg Workout
These stretches can be done both before and after your workouts. We suggest that you start by trying all of these stretches, and work toward developing a routine using the stretches that work best for you.
BEFORE STRETCHING: It is important that your body be adequately warmed up before you attempt to stretch. We suggest that you ski lightly for 3–5 minutes to increase blood flow and prepare the musculo-skeletal system for the stretching sequence to follow.
PRE-WORKOUT STRETCHES can be held for approximately 10 seconds.
POST-WORKOUT STRETCHES can be held for up to 30 seconds.
ALL STRETCHES
- Should be done in a static, relaxed and patient fashion. NO bouncing or abrupt movements.
- Should include full deep breaths, expanding the diaphragm on inhalation, for maximum results.
- Should be repeated on both sides if a unilateral stretch.
- Can be repeated for 3–5 repetitions.
BICEPS, TRICEPS
Put one arm behind your head as shown, grabbing the elbow with your other hand. Pull gently. Repeat on other side.

HAMSTRINGS, GASTROCNEMIUS, ACHILLES BACK
Push into a bridge with straight legs and arms. Stretch one leg at a time.

QUADRICEPS, HIP FLEXOR
Stand and stretch your quad by bending your leg back until you can grab your foot. Gently pull your leg up against your butt.

HIP FLEXOR
Kneel on your left knee. Place your right foot flat on the floor in front of you, knee bent. Lean forward, stretching both forward. Squeeze your glute; targeting your hip flexor even more.
Hold for 30 seconds to 2 minutes. Switch sides and repeat.

GASTROCNEMIUS, ACHILLES REGION
Stand about three feet from a wall and put each foot in turn as far back as you can while still being able to put your heel flat on the floor. Do NOT bounce and do NOT try too hard. The idea is to gently stretch the muscles in your calf.

THREE POINT PEC STRETCH
Stand in a doorway. In a split stance, the front leg should have a slight knee bend.
Bring the elbows up to shoulder height and position the palm and inside of the arm on the surface of the doorway. Your arm should look like a goal post. Gently press the chest through the open space to feel the stretch. Hold for 30 seconds to 2 minutes.
Bring the elbows down slightly below shoulder height and gently press the chest through the open space again. You may find you can stretch a little deeper with this configuration.
Hold for 30 seconds to 2 minutes.
Lift the elbows up slightly above shoulder height and gently press the chest through the open space. You may find your range of motion through this stretch is more limited. Hold for 30 seconds to 2 minutes.
(Use the edge of a wall working one arm at a time if you do not have a doorway available. Repeat stretches on both arms.)

Basic Elements for Successful Group Skiing
Options for setting up machines:
- In a line or rows facing instructor
- Along a wall, not able to see instructor
- In a semi-circle around and facing instructor
Tips for workout design:
- Use time: When working in a group with a variety of ability and speed levels, use timed workouts to keep everyone together. If you use distance workouts or intervals, people will finish at different times, making it harder to keep the group together. But everyone will finish a 5 minute effort at the same time! This also applies to intervals: set up intervals of set time, with set rest time. This will keep your group together, while allowing each group member to exercise at their appropriate intensity.
- Try synchronization: There's something about a synchronized stroke that makes the whole greater than the sum of the parts. If everyone is driving the handles down at the same time, the alignment of effort makes it seem somehow easier and more compelling. It's worth trying for this added benefit.
Workout Links and Resources for SkiErg
Instagram WODs: @concept2inc
Podcast: https://www.concept2.com/indoor-rowers/training/workout-podcast
Blog: https://www.concept2.com/news/tags/skierg
FUNDAMENTAL 6 WORKOUTS
Once you're comfortable with technique on the SkiErg, gradually begin increasing the duration and intensity of your workouts. Here are workouts to try. We recommend doing them in the order listed.
WORKOUTS
WORKOUT 1
Goal: Get acquainted with the SkiErg.
Notes: Resist the temptation to ski for too long the first time on the machine. We recommend starting with no more than 3–5 minutes at a time. We also recommend starting with the double-pole technique as it uses more muscle groups and gives you a great overall workout.
Warm-Up: This workout is a warm-up in itself.
Setup: None necessary. Use the Just Ski function.
Workout: Start to ski. The PM will start up automatically. Continue easily until the elapsed time reads 3 minutes. Take a break to stretch and walk around. Repeat. If you feel good, do up to four of these short intervals of easy skiing.
WORKOUT 2
Goal: Begin experimenting with cadence and power.
Notes: Cadence is displayed in strokes per minute (spm) in the upper right corner of the Performance Monitor. Power is how hard you are pulling. It is displayed in a choice of units in the central display area: watts, calories, or pace.
Warm-up: Ski easily for at least 5 minutes to warm up.
Setup: Press Select Workout > New Workout > Timed Intervals and use the buttons to set a work time of 3 minutes and a rest time of 1 minute.
Workout: 3 minute intervals of skiing, varying your cadence and pace, as described below. Take one minute of rest (very easy skiing) in between the work intervals.
- 3 minutes at 35 spm, comfortable effort; 1 minute rest
- 3 minutes at 40 spm, harder effort; 1 minute rest
- 3 minutes at 42 spm comfortable; 1 minute rest
- 3 minutes at 44 spm, harder effort; 1 minute rest.
Ski easily for a few minutes, then ski for 10 minutes at a power and stroke rate that you can maintain. Make note of what pace you settle on, because you will use it in your next workout.
WORKOUT 3
Goal: This workout introduces longer skiing with cadence variation.
Notes: Try to ski at a pace that is several seconds faster than your 10 minute pace from Workout 2.
Warm-up: Ski easily for at least 5 minutes to warm up.
Setup: Press Select Workout > New Workout > Timed Intervals and use the buttons to set a work time of 5 minutes and a rest time of 2 minutes.
Workout: Four 5-minute pieces, varying the cadence rate throughout each 5 minute piece as noted below.
- 35 spm for the first 2 minutes
- 40 spm for the next 2 minutes
- 45 spm for the last minute
Then, ski very easily for 2 minutes before starting the next 5 minute piece.
WORKOUT 4
Goal: This workout focuses on longer, steady skiing with consistent cadence.
Notes: Try to go faster than you did in the 10 minute piece in Workout 2.
Warm-up: Row at least 5 minutes easily to warm up.
Setup: Press Select Workout > New Workout > Timed Intervals and use the buttons to set a work time of 10 minutes and a rest time of 3 minutes.
Workout: Do two 10 minute pieces with 3 minutes rest in between. Aim for a stroke rate between 40 and 45 spm.
WORKOUT 5
Goal: This workout features short intense intervals. This is the workout to see how fast a pace you can achieve.
Notes: Take extra time to make sure you are well warmed up before starting this workout.
Warm-up: Ski easily for at least 5 minutes, then begin to add in some 10-stroke accelerations. Just put more effort into your technique and keep an eye on the central display of pace. You should see the pace number drop as you go faster. Alternate 10 faster pulls with 10 slower pulls for a few minutes. Then ski steadily and comfortably until you reach a total of at least 10 minutes.
Setup: Press Select Workout > New Workout > Timed Intervals and use the buttons to set a work time of 1 minute and a rest of 1 minute.
Workout: Ski 1 minute hard, 1 minute easy for a total of 20 minutes. Watch the central display for your pace. Aim for a cadence of 40–45 spm. After the workout, use the PM's recall/memory function to see what your pace was for each interval. Record your best pace!
WORKOUT 6: BENCHMARK PIECE
Goal: Establish a baseline assessment of your fitness. Then you can repeat this benchmark test every few weeks to see how you are progressing.
Notes: If you haven't started keeping a log of your workout data, now would be a great time to start. Concept2 offers a free Online LogBook. Set yours up!
Warm-up: Ski for at least 10 minutes to make sure you are well warmed up for this piece. Include some 10-stroke accelerations as in the warm-up for Workout 5.
Setup: Press Select Workout > New Workout > Single Time and use the buttons to set a workout time of 30 minutes. At the end of the piece, the PM will display your result in total meters.
Workout: Ski a benchmark piece of 30 minutes nonstop. Record your total meters for future reference. Repeat this workout every few weeks to see how you are progressing.
MOVEMENT ADAPTATIONS AND MODIFICATIONS
OBJECTIVES:
Understand the versatility and suitability of the SkiErg for recovery, rehab, adaptive and other modified workouts.
One of the nice things about the SkiErg is that you can involve your legs as much or as little as you want. If you're looking for a full-body workout, be sure to engage your legs. The degree to which you engage them is up to you.
RECOVERY
Did you have a really long hard run yesterday and your legs need some recovery time?
The SkiErg will use your legs some, but will shift some of the workout to your arms and core.
INJURY REHAB
Dealing with a leg injury?
You can get a solid workout on the SkiErg with minimal leg involvement, or even none at all. The SkiErg can be used from a stool or chair, or simply standing on straight legs, putting the focus on arms and core. Then you can gradually add the legs back in as instructed by your PT.
ADAPTIVE TRAINING
In a wheel chair, and looking for a good cardio option?
Pull up your wheelchair (works best with wall-mounted SkiErg.)

A member of the USBiathlon Team, who sustained a broken ankle, is training on the SkiErg, using a physio ball as a seat.
SKIERG TECHNIQUE
https://www.concept2.com/news/skierg-technique
SKIERG: USING THE LEGS, OR NOT
https://www.concept2.com/news/skierg-using-legs-or-not
SKIERG TECHNIQUE: PART ONE
https://www.concept2.com/news/skierg-technique-part-one
SKIERG TECHNIQUE: PART TWO
https://www.concept2.com/news/skierg-technique-part-two
SKIERG TECHNIQUE: PART THREE
https://www.concept2.com/news/skierg-technique-part-three
SKIERG SKILLS AND DRILLS: GETTING MORE CREATIVE
https://www.concept2.com/news/skierg-skills-and-drills-getting-more-creative
SKIERG SKILLS AND DRILLS: BRACKETING GOOD TECHNIQUE
https://www.concept2.com/news/skierg-skills-and-drills-bracketing-good-technique
Documents / Resources
References
What Damper Setting and Drag Factor to Use on the Concept2 RowErg,
Workout Podcast
SkiErg Technique
SkiErg Technique: Part One
SkiErg Technique: Part Two
SkiErg Technique: Part Three
SkiErg Skills and Drills: Getting More Creative
SkiErg Skills and Drills: Bracketing Good Technique
Download manual
Here you can download full pdf version of manual, it may contain additional safety instructions, warranty information, FCC rules, etc.
Advertisement


Need help?
Do you have a question about the SKIERG and is the answer not in the manual?
Questions and answers