Table of Contents

Related Manuals for Charnwood TSV150


Summary of Contents for Charnwood TSV150
- Page 1 TABLE SAW WITH VACUUM EXTRACTOR OPERATORS MANUAL MODEL: TSV150 Charnwood, Cedar Court, Walker Road, Hilltop Industrial Estate, Bardon Hill, Leicestershire, LE67 1TU Tel. 01530 516 926 Fax. 01530 516 929 email: sales@charnwood.net website: www.charnwood.net...
-
Page 2: General Safety Rules
GENERAL SAFETY RULES WARNING: Do not attempt to operate the machine until you have read thoroughly and understood completely all instructions, rules, etc. contained in this manual. Failure to comply may result in accidents involving fire, electric shock, or serious personal injury. Keep this owner's manual and review frequently for continuous safe operation. - Page 3 Risk of Injury! Wear Eye Wear Ear Never reach into Protection Protection the running saw blade. TSV150 Specification Table size 280mm x 405mm Table size with extensions 355mm x 405mm Saw Motor (brush type) 1100W, 240v 150mm (6”) x 20mm x 1.6mm x 60T...
- Page 4 Suitable for income generation. Expected maximum use of 300 hours annually. Unpacking The TSV150 is shipped in one carton. Open the carton, remove the carry bag and the fence. Then lift the saw out of the carton.
- Page 5 Assembly 1) Assemble the TCT sawblade Lift the blade side panel, located on the right hand side of the saw. Using the protruding handle, slide the transparent cover vertically upwards. When the locking lugs are free, remove the transparent cover. Using the spanner provided, remove the blade retaining bolt by turning it anticlockwise.
- Page 6 Align the sawblade so that the centre bore hole fits over the shaft. Refit the large washer, ensuring that the flat sides of the centre hole are aligned with the flat sides of the shaft. Then refit the small washer and the blade retaining bolt and tighten it using the spanner provided.
- Page 7 2) Assemble the blade guard and riving knife. Locate the riving knife retaining bolt. Using a cross head screw driver, remove this bolt. Take the blade guard and riving knife assembly. Feed the bottom end of the riving knife down into the slot, directly behind the blade.
- Page 8 The mitre fence can be adjusted in 2 ways. Angle Adjusting knob The angle of the fence can be adjusted from a straight crosscut by up to 70 degrees in each direction. The current angle can be read from the scale and pointer. Fence Adjusting knob Rotate the locking knob by a half turn (180 degrees) to release the fence.
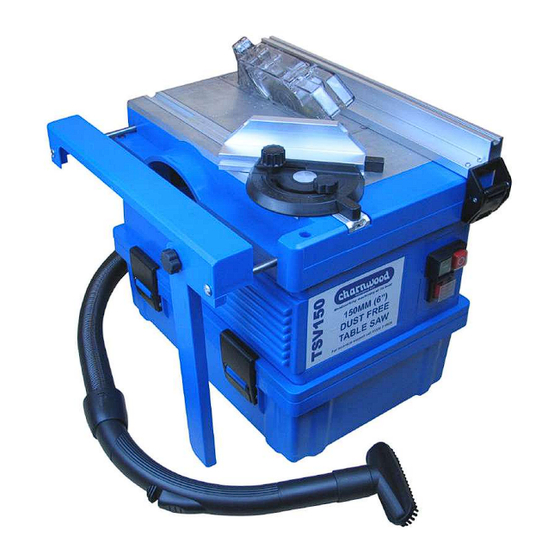
- Page 9 Using the Table Saw Saw Guard Rip Fence Sliding Mitre Fence Extension Table Table Support Leg Saw On/Off Switch Vacuum On/Off Switch Base Clip Vacuum Hose On/Off Switch To turn the saw on, press the green button. Wait for the blade to reach its maximum speed of rotation before commencing with the cut.
- Page 10 Making a cut Ensure there is enough space around the table for the work piece before starting the cut. Position your feet in a stable and balanced stance. When feeding the timber, place your hands on the section of timber being kept. Never hold the waste part of the timber.
- Page 11 When making a rip cut at 45 degrees it is necessary to make an adjustment to the position of the rip fence, due to the altered position of the blade. The table is engraved to show this. When making a bevel cut at 45 degrees add 11mm to the measurement setting of the cutting width.
-
Page 12: Using The Vacuum Cleaner
Extension table When crosscutting longer pieces it may be helpful to use the extension table. Simply pull the extension out from the left hand edge of the table. It extends by 75mm. Undo the support leg locking knob and swing the leg down to the vertical position. -
Page 13: Transporting The Saw
Transporting The Saw The saw is supplied with a canvas carry case. Ideal for transporting to job sites and keeping all the accessories together. The saw can be lifted into the carry case in one piece with the rip fence and mitre fence mounted on the table. -
Page 14: Maintenance
Maintenance Blade Removal and Replacement The instructions for fitting the saw blade are shown earlier in this manual. To remove the sawblade just follow the instructions in reverse, starting by removing the riving knife assembly. A saw blade should be replaced when it has become blunt or if any of the tungsten carbide tips are damaged / missing. -
Page 15: Troubleshooting
Re-set the rip fence blade blade Declaration of Conformity for CE Marking Charnwood Declare that Circular Saw Bench, Model TSV150 Conforms with the following Directives: Machinery Directive 2006/42/EC EMC Directive 2004/108/EC And further conforms to the machinery example for which the EC type examination Certificate No. - Page 16 CHARNWOOD TSV150 PARTS DIAGRAM...
- Page 17 CHARNWOOD TSV150 PARTS LIST T Shaped Channel Rip Fence Assembly Knob Extension Leg Suction Grill Extension Rail 8mm Rod Rod Guide Tilting Gear Lock Bolt & Handle Tilting Indicator Gear Rack Tilting Scale Tilting Plate Tilting Plate Bracket Vacuum Connector...
- Page 18 Charnwood, Cedar Court, Walker Road, Hilltop Industrial Estate, Bardon Hill, Leicestershire, LE67 1TU Tel. 01530 516 926 Fax. 01530 516 929 email: sales@charnwood.net website: www.charnwood.net...
Need help?
Do you have a question about the TSV150 and is the answer not in the manual?
Questions and answers