Table of Contents
Advertisement
Quick Links
Advertisement
Table of Contents

Related Manuals for Charnwood W715


Summary of Contents for Charnwood W715
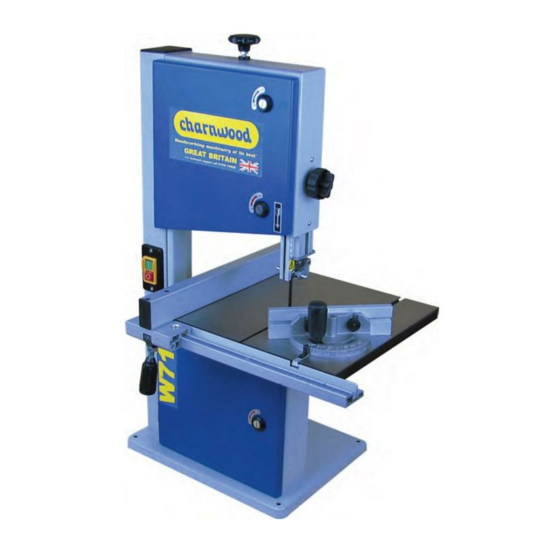
- Page 1 10” BANDSAW OPERATORS MANUAL MODEL: W715 Type I Charnwood Machinery Ltd, Cedar Court, Walker Road, Hilltop Industrial Estate, Bardon Hill, Leicestershire, LE67 1TU Tel. 01530 516 926 Fax. 01530 516 929 email: sales@charnwood.net website: www.charnwood.net...
-
Page 2: General Safety Rules
GENERAL SAFETY RULES WARNING: Do not attempt to operate the machine until you have thoroughly read and understood completely all instructions, rules, etc. contained in this manual. Failure to comply may result in accidents involving fire, electric shock, or serious personal injury. Keep this owner's manual and review frequently for continuous safe operation. - Page 3 Risk of Injury! Wear Eye Wear Ear Never reach into Protection Protection Moving parts W715 Specification Table size 340 x 335 mm Motor 240v / 50Hz 370W (1/2hp) Blade length 1712 mm (67-1/2”) Blade speed (no load) 1400±10% m/min Blade widths 6 to 13 mm (1/4”...
-
Page 4: Assembling The Bandsaw
Unpacking The Bandsaw Cut the strapping and remove the polystyrene insert from the carton. Remove all parts from the packaging, look underneath the packaging too. Layout the parts as shown to check they are all present. Assembling The Bandsaw Place the saw, so that it is lying on its back. - Page 5 Carefully place a steel rule against the side of the blade, between teeth. Twist the table on the trunnion until the rule is aligned with the slot. Tighten the four bolts holding the table to the trunnion. Screw the four hex, headed bolts and washers into the tapped holes on the underside of the table and slide the rip fence carrier on to them.
- Page 6 Check to see if the blade is centred in the table slot. You will probably find it is offset to one side or the other. The lower trunnion is attached to the body of the saw by four hex headed bolts.
- Page 7 Having set the table so that the blade is centred, apply a little tension to the blade and use a set square to position the table at right angles to it. Lock it in position and if necessary, set the adjustable pointer so it aligns with zero.
- Page 8 Setting Up The Bandsaw Blade tensioner adjuster Blade guard adjuster and lock Blade Tracking control adjuster and lock Set the Blade Tension Press the side of the blade here to check the tension. Adjust the tension until the blade can be deflected sideways by 3 to 5mm with finger pressure.
- Page 9 Set the Blade Tracking Unlock the adjuster using the wingnut. By hand, slowly rotate the bandsaw upper wheel clockwise. If the blade starts to move forward or backwards on the wheel adjust the tracking control until the blade is balanced. The blade can sit in the centre of the rubber tyre or with the tips of the teeth projecting over the front end.
- Page 10 Set The Rip Fence Scale Fit the rip fence to the table. Use a ruler to measure the distance between the blade and the fence. Slide the scale left or right to adjust the scale to match the measurement you have taken.
-
Page 11: Making A Cut
Your bandsaw is now ready for use. It is recommended that the saw is bolted to a bench and a suitable dust extractor attached. Making A Cut For every type of cut, the blade guard should be lowered so that the bottom edge of the guard is just above the work piece. -
Page 12: Replacing The Blade
Replacing The Blade When you notice the cutting performance of the bandsaw starts to deteriorate it is time to replace the blade. Bandsaw blades are sharp enough to cause injury even when too blunt to cut wood! It is recommended that protective gloves be worn when handling blades. -
Page 13: Troubleshooting
Declaration of Conformity for CE Marking Charnwood Declare that Woodworking Bandsaw, Model W715 Conforms with the following Directives: Machinery Directive 2006/42/EC EMC Directive 2014/30/EU And further conforms to the machinery example for which the EC type examination Certificate No. BM 50360183 and AE 50341198 have been issued by TUV Rheinland LGA Products GmbH, Tillystrasse 2, 90431, Nurnberg, Germany. - Page 14 W715 Parts Diagram A...
- Page 15 W715 Parts Diagram B W715 10” Bandsaw Parts List Item Description Item Description Slotted Insert Washer Housing Washer Lower Door Housing, with Nut Tongue Ext. Lock Washer 6mm Hex Head Bolt M6 x 10mm Upper Door Saw Blade Retaining Ring...
- Page 16 Motor Mounting Plate Motor Motor Cable Mains Cable Hex Head Bolt Strain Relief Shaft Updated December 2018 Charnwood, Cedar Court, Walker Road, Hilltop Industrial Estate, Bardon Hill, Leicestershire, LE67 1TU Tel. 01530 516 926 Fax. 01530 516 929 email: sales@charnwood.net website: www.charnwood.net...
Need help?
Do you have a question about the W715 and is the answer not in the manual?
Questions and answers