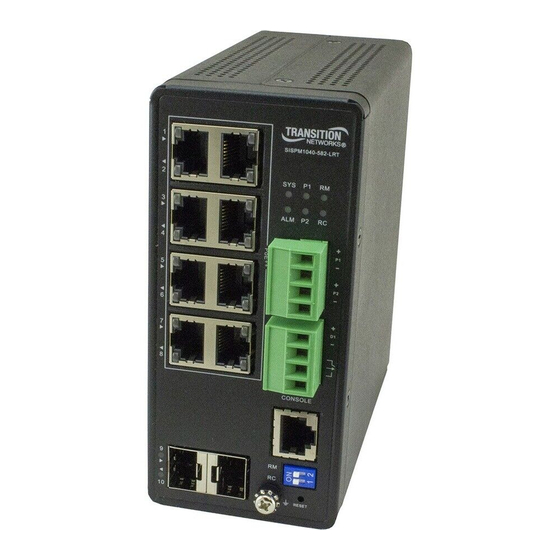
Lantronix SISPM1040-582-LRT Quick Start Manual
Managed hardened poe++ switch 8 10/100/1000base-t poe++ ports + 2 100/1000base-x sfp slot
Hide thumbs
Also See for SISPM1040-582-LRT:
- Manual (272 pages) ,
- Install manual (51 pages) ,
- Quick start manual (2 pages)
Advertisement
Quick Links
SISPM1040-582-LRT Quick Start Guide
SISPM1040-582-LRT
Managed Hardened PoE++ Switch (8) 10/100/1000Base-T PoE++
Ports + (2) 100/1000Base-X SFP Slot
Quick Start Guide
See the Install Guide for important
Cautions
and Warnings, Features,
Specs, Back and Front Panel, LEDs, DIP Switch Settings, RESET button,
Installation, Mounting, Installing SFPs, Connecting Devices, DI/DO Relay,
Grounding, Connecting P1 and P2, Power Supply, Initial Config,
Troubleshooting, Warranty, PoE Modes, Compliance, and Tech Support.
Warning and Caution - Proper Installation and Operation (English): These devices are open-type devices that are to be installed in an
enclosure only accessible with the use of a tool, suitable for the environment. This equipment is suitable for use in Class I, Division 2,
Groups A, B, C, and D or non-hazardous locations only. WARNING – EXPLOSION HAZARD. DO NOT DISCONNECT WHILE THE CIRCUIT IS LIVE
OR UNLESS THE AREA IS FREE OF IGNITIBLE CONCENTRATIONS.
Avertissement et mise en garde - Installation et fonctionnement corrects (français): Ces périphériques sont des périphériques de type
ouvert qui doivent être installés dans un enceinte uniquement accessible à l'aide d'un outil, adapté à environnement.
Cet équipement peut être utilisé dans la classe I, division 2, groupes A, B, C, et D ou des emplacements non dangereux seulement.
AVERTISSEMENT - RISQUE D'EXPLOSION. NE PAS SE DÉCONNECTER LORSQUE LE CIRCUIT EST VIVANT OU À MOINS QUE LA ZONE NE SOIT
LIBRE DE CONCENTRATIONS IGNIFIABLES.
Package
Contents: Verify you received one Switch with a Terminal Block attached, one DB-9 to RJ-45 Cable, four
adhesive rubber feet, this document, and one DIN Rack mount kit.
Front Panel:
The front panel provides the ports, LEDs, Power Input terminal block, DI/DO terminal block, CONSOLE port,
DIP Switch, RESET button, and Ground screw.
LED
Indicators: The front panel LEDs provide switch and Ring status. Power LEDs indicate if the switch is powered up
correctly. System LED: indicates if the system is ready or not ready. Alarm LED indicates if the system is normal or not.
Ring Master LED and Rapid Chain LED indicate if the Rapid Ring is ready. Port Status LEDs indicate the current status of
each port. See the Install Guide for details.
DIP Switch for Ring
Settings: The two-position DIP switch is labeled RC (1) (Rapid Chain) and RM (2) (Ring
Master). The DIP switch lets you avoid having to access the Web UI or CLI to configure a ring. See the
Install Guide for DIP switch setting details.
RESET
Button: To reset the switch press RESET for 2~7 seconds; the SYS LED blinks green; Port status LEDs are Off.
To restore to defaults, press RESET for 7~12 seconds; the SYS LED blinks green; Port status LEDs are all ON.
Installation: Caution: The switch is an indoor device. If used with outdoor devices such as outdoor IP cameras or
outdoor Wi-Fi APs, then it is strongly suggested to install a surge protector or surge suppressor to protect the switch.
Compliant with 802.3at in Environment A when using an isolated power supply. For other apps, see the Install Guide.
These devices are open-type devices that are to be installed in an enclosure only accessible with the use of a tool,
suitable for the environment. This equipment is suitable for use in Class I, Division 2, Groups A, B, C, and D or non-
hazardous locations only. "WARNING – EXPLOSION HAZARD. DO NOT DISCONNECT WHILE THE CIRCUIT IS LIVE OR
UNLESS THE AREA IS FREE OF IGNITIBLE CONCENTRATIONS. Temperature code (T-Code) – T4.
Grounding
Screw: CAUTION: Be sure to disconnect the Switch from the power source before installing and wiring the
device. ATTENTION: This case must be earth grounded. No DC input may be earth grounded. Use Isolated Power Supply.
Caution:
The switch is intended to be grounded to a well-grounded mounting surface such as a metal plate. Install the
grounding wire prior to connecting any other device to the Switch.
Warning:
Turn the power off before connecting or disconnecting modules or wires. The correct power supply voltage is
listed on the product label. Check the voltage of your power source to make sure that you are using the correct voltage.
Do NOT use a voltage greater than what is specified on the product label.
33754 Rev. G
https://www.lantronix.com/
Page 1 of 2
Advertisement

Summary of Contents for Lantronix SISPM1040-582-LRT
- Page 1 SISPM1040-582-LRT Quick Start Guide SISPM1040-582-LRT Managed Hardened PoE++ Switch (8) 10/100/1000Base-T PoE++ Ports + (2) 100/1000Base-X SFP Slot Quick Start Guide See the Install Guide for important Cautions and Warnings, Features, Specs, Back and Front Panel, LEDs, DIP Switch Settings, RESET button,...
- Page 2 SISPM1040-582-LRT Quick Start Guide PoE++ Power Note: The Meanwell 25160 (and other) power supplies are shipped set to 48VDC. If you unbox the PS, plug it into the Switch and then connect 60W cameras to the switch, the cameras may not power up by POE. The SISPM1040- 582-LRT needs 52-57VDC to power all 8 ports.


Need help?
Do you have a question about the SISPM1040-582-LRT and is the answer not in the manual?
Questions and answers