Advertisement
Quick Links
Installation Instructions
Air Sampling Smoke Detection System
VENTUM PRO /a
and VENTUM PRO 2/a
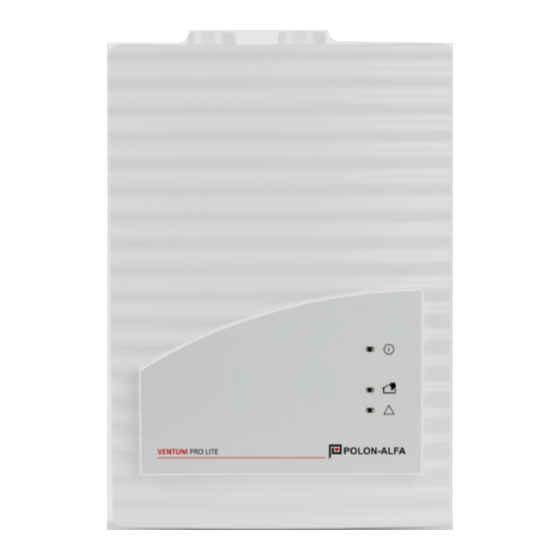
1
Operating indicator light
2
Alarm indicator light for detector
module II
3
Alarm indicator light for detector
module I
4
Indicator light for common fault
5
Prepunched cable entries for
connection to the central fire panel
or power supply (input/output)
6
Connection pipe system I
7
Connection pipe system II
8
Connection for air return
Instrukcja instalacji
Zasysająca czujka dymu
VENTUM PRO /a
i VENTUM PRO 2/a
1
Lampka kontrolna zadziałania
2
Lampka kontrolna alarmu dla modułu
detekcyjnego II
3
Lampka kontrolna alarmu dla modułu
detekcyjnego I
4
Lampka kontrolna dla uszkodzenia
zbiorczego
5
Przepusty kablowe do podłączenia
do centrali systemu sygnalizacji
pożarowej lub zasilania (wejście /
wyjście)
6
Podłączenie rurociągu I
7
Podłączenie rurociągu II
8
Wylot powietrza z czujki zasysającej
(podłączenie rury powrotnej)
II-E391-003
1/9
Advertisement

Subscribe to Our Youtube Channel
Related Manuals for Polon-Alfa VENTUM PRO/a


Summary of Contents for Polon-Alfa VENTUM PRO/a
- Page 1 II-E391-003 Installation Instructions Instrukcja instalacji Air Sampling Smoke Detection System Zasysająca czujka dymu VENTUM PRO /a VENTUM PRO /a and VENTUM PRO 2/a i VENTUM PRO 2/a Operating indicator light Lampka kontrolna zadziałania Alarm indicator light for detector Lampka kontrolna alarmu dla modułu module II detekcyjnego II Alarm indicator light for detector...
- Page 2 II-E391-003 Installation of the Detector Module Instalacja modułu detekcyjnego Please note: Uwaga: Only the detector modules of the type DM-TP- Można instalować tylko moduły detekcyjne 50, DM-TP-10 and DM-TP-01 that have been typu DM-TP-50, DM-TP-10 oraz DM-TP-01, approved by the VdS-certification authority które zostały zaakceptowane przez jednostkę...
- Page 3 II-E391-003 4. If you want to install a second detector 4. Jeśli chcesz zainstalować drugi moduł module you have to recover carefully the detekcyjny, ostrożnie zdejmij osłonę ventilator cover for the second air sampling wentylatora z drugiego kanału wlotowego duct (self-adhesive plastic cover). Take for (samoprzylepna plastikowa osłona).
- Page 4 II-E391-003 Detector Module Settings Ustawienia modułu detekcyjnego In the following tables the programmations of the W poniższych tabelach przedstawiono usta- switch S1 are shown. It has two functions: wienia przełącznika S1. Posiada on dwie funkcje: on = włączony off = wyłączony The standard settings have a grey background.
- Page 5 II-E391-003 Choose number of the detector modules Wybór liczby modułów detekcyjnych The number of the stocked detector modules Liczbę modułów czujek wybiera się za pomocą are chosen with the jumper JU4. The following zworki JU4. Poniższa tabela pokazuje, ustawienia table shows, whether the jumper must be put zworek: or not: X = pin pair bridge...
- Page 6 II-E391-003 Setting the function of the collective fault contact Ustawienie przekazania usterki zbiorczej The contact type (break contact or make contact) of Typ styku (N/O lub N/C) dla usterki zbiorczej the collective fault is set using the jumper JU 2 and ustawia się...
- Page 7 II-E391-003 The air outlet of the device must not be obiektami, które mogą blokować odpływ blocked. (The distance between the air powietrza (np. obudową zasilacza) powinna outlet and adjacent objects (e.g. wall) is to wynosić co najmniej 10 cm. be at least 10 cm.) Zasysającą...
- Page 8 II-E391-003 Connection Przyłącza X6, 1 contact of the first alarm X6, 1 zestyk 1 przekaźnika alarmowego relay (make contact) (styk N/O) X6, 2 center tap of first alarm X6, 2 wspólny zestyk przekażnika relay alarmu 1 stopnia X6, 3 contact of the first alarm X6, 3 zetyk 1 przekaźnika alarmowego relay (break contact)
- Page 9 II-E391-003 Commissioning Uruchomienie 1. Make sure first that the device has been in 1. Przede wszystkim należy bezwzględnie operation for at least 30 minutes prior to upewnić się, że urządzenie działało przez co the air flow initialization in order to reach najmniej 30 minut przed przystąpieniem do the operating temperature.
Need help?
Do you have a question about the VENTUM PRO/a and is the answer not in the manual?
Questions and answers