Advertisement
Quick Links
Ashbery
Area Light
Installation Guide
Included components
Pole mount,
8ft
10ft
12ft
14ft
16ft
Pole with base plate
8X - Set
2X - Socket hd
screw for
Cap screw for
Tenon mt
Cup mt
Tools Required
• Safety glasses
• Wrenches, 1-1/8"
• Wiring tools and connectors
• Proper personnel, crane or lift for hoisting unit onto anchors
• Level
• Dimming control, if required
• Hex keys, 5mm, 3mm (for base cover option), 8mm (for double arm option), 5/32"
for nut covers
• Twist lock photo eye control, if required
• Phillips screwdriver
Landscape Forms is not responsible for site preparation and footings. Refer to the
installation guide for the Ashbery light anchor kit for installing the anchor bolts.
AP100
AP100
AP200/AP300
Pole mount,
Pole mount,
Single
Double
Double
luminaire
luminaire
luminaire
Twist lock
Shorting cap for
receptacle,
Twist lock,
optional
optional
Nut cover with 1/4-20
Base cover half
x 5/8" button head
(optional)
cap screw
CAUTION! This unit is heavy. To avoid injury or damage to the finish, we recommend using
a crane or lift for hoisting the unit onto the anchors.
WARNING! Pole mounted luminaires must be attached either before or immediately after
pole installation. Failure to do so may cause vibration damage to the pole and will void the
pole warranty.
WARNING! Installer must provide strain relief to line-in wires where they connect to light
AP200/AP300
fixture wires. Failure to do so may cause electrical failure and will void warranty.
Pole mount,
Single
WARNING!: LED cartridge and driver are not rated for connection or disconnection while
luminaire
energized. Doing so may damage LEDs and will void the warranty. Disconnect incoming
power before making or breaking any electrical connections.
INSTALLATION PROCEDURE FOR LIGHT POLE:
Note: The 4in diameter pole is for use with the single luminaire. The AP102 double luminaire
uses a 4in diameter pole. The 5in diameter pole is for use with the double arm bracket and
Double arm
two AP202/AP302/AP304 luminaires.
bracket
1.
Lift the light pole into position over the installed anchors (refer to Ashbery anchor kit
installation guide) as shown in Fig. 2. Ensure that the base plate is resting on all four
washers.
2.
Install washer, lock washer and hex nut as shown in Fig. 2.
3.
Plumb and level the pole and tighten all anchors
For single luminaire mount:
Note: When ordered with Twist-Lock Receptacle, the receptacle is pre-wired into the top of the
luminaire.
1.
Connect line-in voltage wiring to the wires exiting the bottom of the luminaire hub. Refer
to wiring diagrams.
2.
For units with twist-lock receptacle, replace supplied shorting cap with photo-control
(supplied by others).
3.
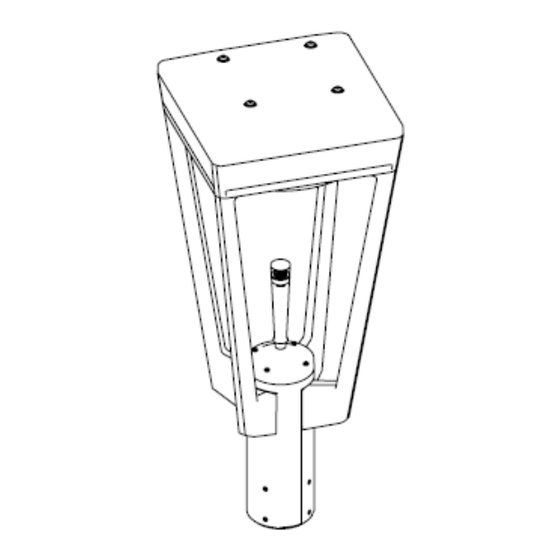
Install single luminaire over tenon mount on pole. Using 5mm hex key, install and tighten
all 8 set screws to secure luminaire to tenon, see Fig. 3, level as required. For asymmetric
light distribution luminaires, one arm of the luminaire will be clearly marked as 'Front'.
For double luminaire mount:
Note: When ordered with Twist-Lock Receptacle, the receptacle is pre-wired into the top of the
double arm bracket.
1.
Connect line-in voltage wiring to the wires exiting the bottom of the double arm bracket.
2.
Install double arm bracket on pole. Using 5mm hex key, install and tighten all 8 set screws
to secure arm to pole, see Fig. 4. Level as required.
3.
Connect wiring harnesses in the first luminaire to those in the cup mount of the bracket.
Tuck excess wire into the bracket.
4.
Install luminaire on cup mount, see Fig. 5. Front is labeled on asymmetric units.
5.
Repeat steps 3 & 4 for the second luminaire.
6.
For units with twist-lock receptacle, replace supplied shorting cap with photo-control
(supplied by others).
Date: August 16, 2023
www.landscapeforms.com
Ph: 800.521.2546
.
Page 1 of 6
Advertisement

Related Manuals for Landscape Forms Ashbery AP100


Summary of Contents for Landscape Forms Ashbery AP100
- Page 1 Fig. 4. Level as required. Connect wiring harnesses in the first luminaire to those in the cup mount of the bracket. Landscape Forms is not responsible for site preparation and footings. Refer to the Tuck excess wire into the bracket.
- Page 2 Ashbery Area Light Date: August 16, 2023 Installation Guide www.landscapeforms.com Ph: 800.521.2546 ASSEMBLE WITH CARE! Pangard II Polyester Powdercoat is a strong, long-lasting finish. To protect this finish during assembly, place unwrapped powdercoated parts on packaging foam or other non-marring surface. Do not place or slide powdercoated parts on concrete or other hard or textured surface –...
- Page 3 Ashbery Area Light Date: August 16, 2023 Installation Guide www.landscapeforms.com Ph: 800.521.2546 INSTALLATION PROCEDURE FOR NUT COVERS OR BASE COVER: Note: The base covers for a 4in diameter pole and 5in diameter have a different size opening when the two halves are joined together. Base covers for a 4in dia pole will not fit on a 5in dia pole.
- Page 4 Ashbery Area Light Date: August 16, 2023 Installation Guide www.landscapeforms.com Ph: 800.521.2546 PROCEDURE FOR WIRING ASHBERY: The Ashbery luminaire is assembled at the factory. The light cartridge is mounted into the head of the luminaire and will not need to be removed during installation. The LED cartridge is wired to the driver (located in the base of the luminaire) at the factory.
- Page 5 Ashbery Area Light Date: August 16, 2023 Installation Guide www.landscapeforms.com Ph: 800.521.2546 WIRING DIAGRAM: No twist lock: AP201/AP202 Type 5, AP303/304 WIRING DIAGRAM: With twist lock: AP201/AP202 Type 5, AP303/304 Page 5 of 6...
- Page 6 Ashbery Area Light Date: August 16, 2023 Installation Guide www.landscapeforms.com Ph: 800.521.2546 WIRING DIAGRAM: double arm bracket, no twist lock receptacle, wiring harness WIRING DIAGRAM: double arm bracket, WITH twist lock receptacle, wiring harness Page 6 of 6...
- Page 7 Refer to the product data sheet available at www.landscapeforms.com recommendations for light pole spacing. Landscape Forms is not responsible for site preparation and footings. Refer to pole drawings for pole calculations required for footing design. WARNING! Pole mounted luminaires must be attached either before or immediately 4”...
Need help?
Do you have a question about the Ashbery AP100 and is the answer not in the manual?
Questions and answers