Table of Contents
Advertisement
Available languages
Available languages
Quick Links
Advertisement
Chapters
Table of Contents

Related Manuals for NOVI Baby Morris Go


Summary of Contents for NOVI Baby Morris Go
- Page 1 GEBRUIKSAANWIJZING Morris Go Autostoel groep 1/2/3 Geschikt voor kinderen met een gewicht van 9 tot 36 Kg van Asten BabySuperstore Ringbaan Zuid 5 5021 AA Tilburg BELANGRIJK. LEES DEZE GEBRUIKSAANWIJZING GOED DOOR VOORDAT U DIT PRODUCT GEBRUIKT EN BEWAAR DIT DOCUMENT...
-
Page 2: Table Of Contents
Inhoudsopgave: 1. Belangrijke opmerkingen – voor gebruik lezen a.u.b......4 2. Veiligheidsinstructies ................5 3. Belangrijke onderdelen en bevestigingsmaterialen.......6 4. Toepassing....................7 5. Monteren voor gebruik .................7 6. Afstellen van de schoudergordel – hoogte (Groep-I)......9 7. Verstellen hoogte hoofdsteun...............10 8. Gebruik van de veiligheidssluiting ............10 9. - Page 3 Mededeling Let bij gebruik als kinderbeveiliging van de categorie universeel op onderstaande informatie: 1. D it is een “universeel” kinderbeveiligingssysteem, het is goedgekeurd volgens Europees voorschriftnr. 44, 04 serie amendementen, voor algemeen gebruik in voertuigen en past op de meeste, maar niet alle, autozittingen. 2.
-
Page 4: Belangrijke Opmerkingen. Voor Gebruik Lezen A.u.b
1. Belangrijke opmerkingen. Voor gebruik lezen a.u.b. Lees voor gebruik van de autostoel de instructies zorgvuldig door en bewaar deze gebruikershandleiding als naslagwerk. Het niet opvolgen van de instructies kan gevolgen hebben voor de veiligheid van je kind. 1. De ISOFIT grijphaken van deze autostoel zijn secundaire bevestigingen die altijd samen met de veiligheidsgordels van het voertuig moeten worden gebruikt en geïnstalleerd. -
Page 5: Veiligheidsinstructies
16. Deze autostoel is ontworpen voor kinderen met een gewicht van 9-36 kg (Groep I: 9-18 kg; Groep II/III: 15-36 kg). Zorg ervoor dat de stoel niet wordt overbelast met een voorwerp of kind dat meer weegt dan de overeenkomsti- ge gewichtsbeperking. -
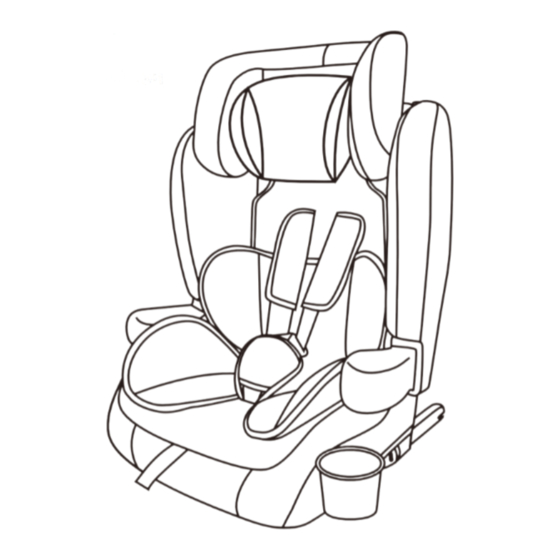
Page 6: Belangrijke Onderdelen En Bevestigingsmaterialen
Let op! Bij te ver uittreken van de veiligheidsgor- del van de auto wordt het kinderbevei- ligingssysteem mogelijk niet stabiel en stevig genoeg vastgezet. Dit brengt het kind in groot gevaar. Raadpleeg bij twijfel de fabrikant van het kinderbeveiligingssysteem. Correcte positie Verkeerde positie De autostoel mag niet in een voorzitting worden geplaatst als er een airbag is geïnstalleerd. -
Page 7: Toepassing
4. Toepassing Groep I: naar voren Toepasselijk gewicht: 9-18 kg gerichte installatie Toepasselijke leeftijdsgroep: ca. 9 maanden - 4 jaar Installatie autostoel methode I Installatie autostoel methode II 3-punts veiligheidsgordel 3-punts veiligheidsgordel + ISOFIT Kinderbeveiligingsmethode: Kinderbeveiligingsmethode: 5-punts veiligheidsgordel 5-punts veiligheidsgordel Groep II, III: naar voren Toepasselijk gewicht: 15-36 kg gerichte installatie... - Page 8 Opmerking 2 Controleer of de rugleuning stevig op het onderstel is vastgezet door de stoel te bewegen, of controleer dit op een andere manier. Stap 2: duw beide zijkanten van de hoofdsteun zijwaarts naar buiten, tot je een klik hoort (A4). Stap 3: draai de armleuningen aan beide kanten zijwaarts naar buiten, tot je een klik hoort (A5).
-
Page 9: Afstellen Van De Schoudergordel - Hoogte (Groep-I)
6. Afstellen van de schoudergordel – hoogte (Groep I) Te laag Te hoog Zorg ervoor dat de schoudergordels zich op de juiste hoogte bevinden (de bovenkant van de gordelgleuven moeten op gelijke hoogte zijn met de schouders van het kind). Afstellen van de schoudergordel –... -
Page 10: Verstellen Hoogte Hoofdsteun
Stap 4: voer de diagonale gordels door de daarvoor bestemde gleuven (B4). Stap 5: trek de diagonale gordels uit de achterkant van de stoel en steek ze in de grijp haken (B5). Opmerking: zorg ervoor dat de diagonale gordels volledig vastzitten in de grijphaken zonder dat ze van vorm veranderen. -
Page 11: Plaatsing Van De Autostoel
Ontgrendelingsmechanisme Ontgrendelingsmechanisme: Druk de rode knop op de sluiting naar beneden om het harnas los te maken. 9. Plaatsen van de autostoel Opmerking Plaats voor de veiligheid het kinderbeveiligingssysteem op de achterzitting van de auto en zorg ervoor dat het tegen de rugleuning van de zitting wordt gedrukt. - Page 12 Stap 2: zoek de twee ISOFIX verankeringspunten tussen de rugleuning en de zitting van de achterbank (D3). Stap 3: plaats de stoelgeleider in de verankeringspunten (D4). Stap 4: breng de twee ISOFIT grijphaken aan de achterkant van het onderstel op een lijn met de stoelgeleiders en duw de zitting naar voren totdat deze stevig vastklikt (D5, D6).
- Page 13 Stap 7: trek de veiligheidsgordel aan tot de autostoel stevig vast zit (D11). Stap 8: ontgrendel de diagonale gordel (D12). Stap 9: maak de veiligheidssluiting los (D13).
-
Page 14: Lnstalleren Van Een Groep Ii / Iii Autostoel
Stap 10: plaats het kind op de stoel en maak de veiligheidsgordel vast. Controleer of de gordel niet is gedraaid (D14). 11. Installeren van een Groep II/III autostoel Opmerking 1. Groep II/III is geschikt voor kinderen met een gewicht van 15-36 kg, in de leeftijd van 4-12 jaar. - Page 15 Stap 3: plaats de stoelgeleider in de verankeringspunten (E4). Stap 4: breng de twee ISOFIT grijphaken aan de achterkant van het onderstel op één lijn met de stoelgeleiders en duw de zitting naar voren totdat deze stevig vastklikt (E5, E6). Opmerking: controleer of de ISOFIT vergrendelingsindicator groen wordt (E6) (Groen: vergrendeld, Rood: ontgrendeld).
- Page 16 Stap 6: zorg ervoor dat de autostoel stevig op de zitting en tegen de rugleuning van de autozitting (E8) gedrukt staat. Stap 7: span de gordel over de voorkant van de autostoel in de volgorde 1, 2, 3, (E9) Opmerking: zorg dat de autostoel altijd stevig is vastgemaakt, ook wanneer hij niet wordt gebruikt.
-
Page 17: Isofit Ontgrendelingsmechanisme
Stap 9: stel de hoogte van de hoofdsteun af op de hoogte van het hoofd van het kind. Zo voorkom je dat de veiligheidsgordel op de nek van het kind drukt omdat de hoofdsteun te hoog of te laag is (E11, E12). Stap 10: trek de veiligheidsgordel aan om stabiel en stevig aan te sluiten (E13). - Page 18 Stap 1: ontgrendel de diagonale gordels (G1). Stap 2: maak de veiligheidssluiting open (G2). Stap 3: haal aan de achterkant van de autostoel de diagonale gordels uit de verbindings- stukken (G3). Stap 4: trek de diagonale gordels uit de stoel (G4). Stap 5: draai de autostoel om en verwijder de diagonale gordels uit de onderste gleuven (G5).
- Page 19 Stap 6: verwijder het katoenen stootkussen en andere hulpstukken. Bewaar ze goed (G6). Stap 7: druk op de knop onder de armleuning om deze te verwijderen (G7). Stap 8: draai de stoel om en maak de gesp los die de stoffen stoelhoes op zijn plaats houdt (G8).
-
Page 20: Inklappen Van De Autostoel
14. Opvouwen van de autostoel Stap 1: maak het harnas los (H1). Indrukken Stap 2: druk beide knoppen tegelijkertijd in en klap de hoofdsteun naar binnen (H2). -
Page 21: Installeren Van De Bekerhouder
Stap 3: druk de knop onder de armleuning in om de armleuning te verwijderen (H3). Stap 4: druk tegelijkertijd de twee opvouwknoppen aan de achterkant van de autostoel in en duw de rugleuning naar voren om de stoel op te vouwen (H4, H5). 15. -
Page 22: Verzorging, Onderhoud En Reiniging
16. Verzorging, onderhoud en schoonmaken Dagelijks onderhoud 1. Controleer regelmatig (tijdens het dagelijks gebruik) de integriteit van de autostoel. Gebruik de autostoel niet meer als je beschadigde onderdelen aantreft. 2. Wordt de autostoel niet gebruikt, bewaar de stoel dan op een droge en goed geven- tileerde plaats om blootstelling aan schimmelvorming te voorkomen. - Page 23 Table of Contents 1. lmportant Notes - Read Before Use.............25 2. Safety Instructions ................26 3. lmportant Parts and Fittings ..............27 4. Scope of Application ................28 5. Assembly Before Use ................28 6. Fitting the Shoulder Strap - Height (Group-I)........30 7. Headrest Height Adjustment..............31 8.
- Page 24 NOTICE When using as universal category,please notice below information: 1. This is a “universal “ child restraint, it is approved to Regulation No. 44,04 series of amendments,for general use in vehicles and it will fit most but not all,car seats. 2.
-
Page 25: Lmportant Notes - Read Before Use
1. Important Notes- Read Before Use For your child’s safety, please read the following instructions carefully before using and keep this manual for future refer-ence. Failure to follow the instructions in this manual could result in serious injury to your child. 1. -
Page 26: Safety Instructions
16. This safety seat is designed for children weighing 9 - 36 kg (Group-I: 9-1 Bkg; Group-I I / ill: 15-36 kg). Never overload the seat with any object or child that weighs over the corresponding weight limitation.systeem mag niet worden gebruikt zonder de stoelhoes. 17. -
Page 27: Lmportant Parts And Fittings
Attention! If the seat belt of the car extends too far, it may not securely hold the child restraint system and may put the child in great danger. In case of any doubt, please consult the manu-factu- rer of the child restraint system. Correct positioning Wrong positioning The car seat should not be fitted in a front seat that... -
Page 28: Scope Of Application
4. Scope of Application Group-I forward Applicable weight: 9-18 kg facing installation Applicable age group:Approx. 9 months - 4 years Safety seat installation method I Safety seat installation method Three point safety belt IIThree point safety belt + ISOFIT Child restraint method: Child restraint method: Five-point safety belt Five-point safety belt... - Page 29 Note2 Make sure that the backrest is securely connected with the base by shaking the seat or other means of inspection. Step 2: Push both side flaps of the headrest to the outside until you hear a clicking sound (A4). Step 3:Tum the armrests on both sides until you hear a clicking sound (A5).
-
Page 30: Fitting The Shoulder Strap - Height (Group-I)
6. Fitting the Shoulder Strap - Height ( Group-I) Too low Too high Make sure the shoulder straps are at the correct height (the upper end of the belt slots should be flush with the child’s shoulders). Fitting the Shoulder Strap - Height Step 1: Push the adjuster on the front of the seat and at the same time pull the diagonal belts forward to make them loose (B1). -
Page 31: Headrest Height Adjustment
Step 4:Thread the diagonal belts through the appropriate slots (B4 ). Step 5: Pull the diagonal belts out from the back of the seat and insert them into the connecters (B5). Note: Make sure that the diagonal belts are fully secured within the connectors without deforming. -
Page 32: Placement Of The Safety Seat
Unlocking mechanism Unlocking mechanism: To release the harness, press the red button on the buckle downwards. 9. Placement of the Safety Seat Note To ensure safety, place the restraint system on the rear seat of the car and make sure it is pressed against the seat backrest. - Page 33 Step 2: Find the two ISOFIX anchor points on the vehicle seat (D3). Step 3: Insert the seat slot guide into the anchor points (D4) . Step 4: Align the two ISOFIT connectors of the seat base with the seat slot guide and push the seat forward until it firmly clicks into place (D5, D6).
- Page 34 Step 7: Tighten the seat belt until the safety seat feels secure (D11 ). Step 8: Release the diagonal belt (D12). Step 9: Unlock the safety buckle (D13).
-
Page 35: Lnstallation Of Group- Ii/ Ill Safety Seat
Step 10: Place the child on the seat and fasten the seat belt. Checks the belt has not twisted (D14). 11. Installation of Group II/III Safety Seat Note 1. Group-II/ III is suitable for children weighing 15-36 kg, aged 4-12 years. 2. - Page 36 Step 3: Insert the seat slot guides into the anchor points (E4). Step 4: Align the two ISOFIT connectors of the seat base with the seat slot guides and push the seat forward until it firmly clicks into place. (E5, E6). Note: Check if the ISOFIT lock indicator turns green (E6).
- Page 37 Step 6: Make sure the child safety seat is firmly pressed against the vehicle seat and backrest (E8) Step 7: Thread the seat belt through the front of the safety seat in the order of 1,2,3 (E9) Opmerking: zorg dat de autostoel altijd stevig is vastgemaakt, ook wanneer hij niet wordt gebruikt.
-
Page 38: Isofit Unlocking Mechanism
Step 9: Adjust the height of the headrest according to the child’s head height, so as to avoid the seat belt from pressing down on the child’s neck because the headrest is too high or too low (E11, E12). Step 10: Tighten the seat belt until it feels really secure (E13). - Page 39 Step1: Release the diagonal belts (G1 ). Step2: Unlock the safety buckle (G2). Step3: Turn to the back of the seat and remove the diagonal belts from the connecting pieces (G3). Step4: Pull out the diagonal belts (G4). Step 5: Tum over the safety seat and remo- ve the diagonal belts from the bottom slots (G5).
- Page 40 Step 6: Remove the cotton pad and other fittings; make sure they are properly kept (G6). Step 7: Press down the button under the armrest to remove it (G?). Step 8: Tum the seat to the back and unclip the buckle holding the fabric cover (GS). Step 9: Pull the fabric cover in the direction of the arrow to remove it (G9).
-
Page 41: Seat Folding Method
14. Seat Folding Method Step 1 : Loosen the harness (H 1 ). Press Step 2: Press down both buttons at the same time and fold the headrest inward (H2). -
Page 42: Cup Holder Installation
Step 3: Press down the button under the armrest to remove it (H3). Step 4: Press down the two folding switches on the back of the seat at the same time and push the backrest forward to fold the seat (H4, H5). 15. -
Page 43: Care, Maintenance And Cleaning
16. Care, Maintenance and Cleaning Daily Maintenance 1. Periodically check the integrity of the child safety seat during daily use and stop using if you find any parts damaged; 2. When not in use, please place the seat in a dry and ventilated place to prevent ex- posure to mildew inducing moisture;... - Page 44 Dit product wordt geïmporteerd door: This product is imported by: van Asten BabySuperstore Ringbaan Zuid 5 Geproduceerd volgens en voldoet aan: ECE R44 5021 AA Tilburg Produced according and complies with ECE R44...
Need help?
Do you have a question about the Morris Go and is the answer not in the manual?
Questions and answers