Table of Contents
Advertisement
Quick Links
Advertisement
Table of Contents

Related Manuals for ColorKey SCORPIUS FX


Summary of Contents for ColorKey SCORPIUS FX
- Page 1 SCORPIUS FX CKU-1074 USER MANUAL...
-
Page 2: Table Of Contents
PASSCODE PROTECTED ADJUSTMENTS ......................18 MAINTENANCE ............................19 TECHNICAL INFORMATION .......................... 20 Please read these instructions carefully before use. Operating this fixture according to these instructions is important to avoid any possible damage or accidents caused by misuse. Scorpius FX User Manual – V1... -
Page 3: Introduction
Warning! To avoid electrical shock, be sure to disconnect power before any service or when moving or setting up the fixture. Service & Support Your ColorKey product includes a 2-year warranty. For technical support or to register your product, please visit https://www.colorkeyled.com/support/ You can also reach us by phone Monday thru Friday, 8:30am –5pm PST at (818) 578-4030. -
Page 4: Product Overview
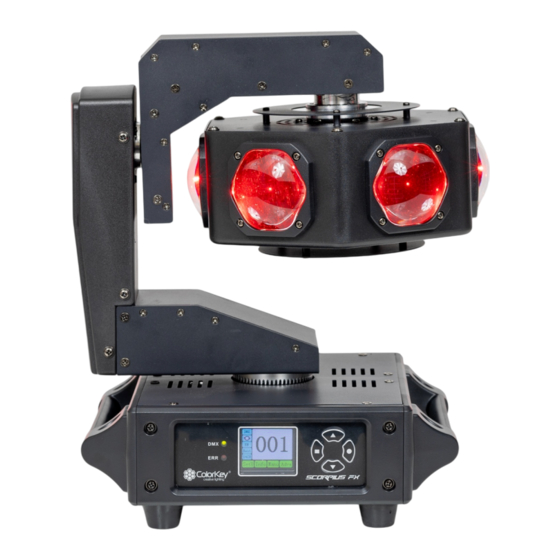
Product Overview Front 1. Moving Head 5. DMX LED Indicator 2. Yoke 6. Error LED Indicator 3. Arm 7. LCD Display 4. Carrying Handle 8. Menu Guide Buttons Scorpius FX User Manual – V1... - Page 5 Back 1. Moving Head 6. DMX Output 2. Yoke 7. On / Off Switch 3. Arm 8. Fuse 4. Carrying Handle 9. Locking Power In 5. DMX Input 10. Locking Power Out Scorpius FX User Manual – V1...
-
Page 6: Mounting
Power Linking Power Linking Scorpius FX provides power linking via the outlet located on the back of the product. Up to 4 Scorpius FX units can be power linked. Powering your product • Always Connect the product to a protected circuit (a circuit breaker or fuse). -
Page 7: Display Operation
Access the menu/Scroll through menu options CIRCLE: Return to previous menu option Scroll through menu selection or parameter increase DOWN: Scroll through menu selection or parameter decrease DMX: Lit when receiving DMX signal ERR: Lit when error has occurred Scorpius FX User Manual – V1... -
Page 8: Menu Guide
7. SetU: See table below Sub-MENU Description Run Mode DMX/Auto/Soud/Manu Current Operating Mode mode DMX Address 001-512 DMX Address Channel Mode 14CH/16CH DMX Channel Sensitivity 001-100 Sound sensitivity DimmerCurve Linea/Squar/InSqu/S-Cur Dimmer Curve Shape DimmerSpeed Fast/Smoot Dimmer Speed Scorpius FX User Manual – V1... - Page 9 Language selection Motor Reset OK/Back All motors reset Restore to factory set Note: Please do not perform the Load Default OK/Back operation when the motor rotates at high speed Back Back to Home Page Scorpius FX User Manual – V1...
-
Page 10: Dmx Values
Automatic 128-191 Clockwise rotate from fast to slow Counter-Clockwise rotate 192-255 from slow to fast NA 0-31; 0-100% linear dimmer from Dimmer dark to brighter 32-255 1-20Hz strobe from slow to 0-255 Strobe fast Scorpius FX User Manual – V1... - Page 11 Color gradual change LED Macro Function 11-20 Color pulse change Static Color Presets 21-212 63 available colors 213-255 Color jump change LED Macro Function 0-255 Speed from slow to fast Speed 0-15 Macro Function No Function Scorpius FX User Manual – V1...
- Page 12 0-255 Pan 0°-540° Move 0-255 Pan Fine Pan Fine 0-255 Tilt Tilt 0°-320° Move 0-255 Tilt Fine Tilt Fine 0-255 P/T Speed Speed from fast to slow 0°-360° Manual Head 0-127 rotation 128-191 Automatic Scorpius FX User Manual – V1...
- Page 13 0-255 Blue 0-100% linear NA 0-31; Blue dimmer from dark to brighter 0-255 NA 0-31; White 0-100% linear White dimmer from dark to brighter 0-255 LED Macro Function No Function Scorpius FX User Manual – V1...
- Page 14 213-255 Color jump change LED Macro Function 0-255 Speed from slow to fast Speed 0-15 No Function 16-127 Macro Function Auto Running 128-255 Sound Control 0-249 No Function Reset 250-255 All reset after 5s Scorpius FX User Manual – V1...
-
Page 15: Stand Alone Settings
Stand Alone Settings To use your Scorpius FX without a DMX Controller, use one of the various standalone modes below. *Please note, we do not recommend using products in standalone mode that are connected to a DMX string and controller. Standalone mode may transmit DMX signals that could interfere with DMX signals from the controller. - Page 16 7. Press (Square) to exit and return to Home Menu Swap Pan and Tilt To set swap the Pan and Tilt orientation on the Scorpius FX, do the following: 1. Press (Down) repeatedly to highlight SetU 2. Press (Circle) to enter SetU menu 3.
- Page 17 6. Press (Circle) to save value 7. Press (Square) to exit and return to Home Menu Screen Reverse To set the display orientation on the Scorpius FX, follow the instructions below: 1. Press (Down) repeatedly to highlight SetU 2. Press (Circle) to enter SetU menu 3.
-
Page 18: Passcode Protected Adjustments
Passcode Protected Adjustments Scorpius FX has a passcode protected mode that allows the user to calibrate and adjust several of the products operating parameters. In order to access this mode, do the following: 1. Press (Down) repeatedly to highlight Adva 2. -
Page 19: Maintenance
5. Apply the solution directly to a soft, lint free cotton cloth or a lens cleaning tissue. 6. Softly drag any dirt or grime to the outside of the transparent surface. 7. Gently polish the transparent surfaces until they are free of haze and lint. Scorpius FX User Manual – V1... -
Page 20: Technical Information
Please note: As we continue to work towards improving our products and your experience as a user, we recommend that you check our website periodically for updates to user manuals and specifications at www.ColorKeyLED.com or you may contact us directly at info@colorkeyled.com. Scorpius FX User Manual – V1...
Need help?
Do you have a question about the SCORPIUS FX and is the answer not in the manual?
Questions and answers