Table of Contents
Advertisement
Quick Links
Advertisement
Table of Contents

Related Manuals for Sensaphone 1400


Summary of Contents for Sensaphone 1400
- Page 1 SENSAPHONE ® Sensaphone 1400 User’s Manual www.sensaphone.com LIT-0110...
- Page 3 SENSAPHONE ® 1400 Environmental Monitoring System User’s Manual Version 2.0...
- Page 4 Phonetics, Inc. also cannot guarantee that changes in equipment made by other manufacturers, and referred to in this manual, will not affect the applicability of the information in this manual. Copyright © 2005 by Phonetics, Inc., dba SENSAPHONE ® First Edition, version 2.0, January 2017 Written and produced by Phonetics, Inc.
-
Page 5: Important Safety Instructions
Do not place on or near a heat source, such as a radiator or heat register. • Do not use your Sensaphone 1400 near water, or spill liquid of any kind into • Be certain that your power source matches the rating listed on the AC power transformer. - Page 6 • Do not use the telephone to report a gas leak in the vicinity of the leak. CAUTION: To reduce the risk of fire or injury to persons, read and follow these instructions: 1. Replace the battery only with the same or equivalent type recommended by the manufacturer.
-
Page 7: Fcc Requirements
FCC Requirements Part 68: The Sensaphone 1400 complies with 47 CFR, Part 68 of the rules. On the back of the unit there is a label that contains, among other information, the Certification Number and the Ringer Equivalence Number (REN) for this equipment. - Page 8 If the equipment is causing harm to the telephone network, the telephone company may ask that you disconnect this equipment from the network until the problem has been corrected or until you are sure that the equipment is not malfunctioning. Part 15: This equipment has been tested and found to comply with the limits for a Class A digital device, pursuant to Part 15 of the FCC Rules.
-
Page 9: Canadian Department Of Communications Statement
The termination on a loop may consist of any combination of devices subject only to the requirement that the total of the Ringer Equivalent Numbers of all the devices does not exceed 5.0. For Sensaphone 1400, the AC Ringer Equivalent Number is 0.6B. - Page 10 viii...
-
Page 11: Year Limited Warranty
THIS LIMITED WARRANTY CONTAINS SENSAPHONE’S STANDARD TERMS AND CONDITIONS. WHERE PERMITTED BY THE APPLICABLE LAW, BY KEEPING YOUR SENSAPHONE PRODUCT BEYOND THIRTY (30) DAYS AFTER THE DATE OF DELIVERY, YOU FULLY ACCEPT THE TERMS AND CONDITIONS SET FORTH IN THIS LIMITED WARRANTY. - Page 12 UNDER THIS WARRANTY IS LIMITED TO REPAIR OR REPLACEMENT OF THE PRODUCT, AT THE WARRANTOR’S OPTION AS TO REPAIR OR REPLACEMENT. IN NO EVENT SHALL WARRANTORS BE LIABLE OR RESPONSIBLE FOR PAYMENT OF ANY INCIDENTAL, CONSEQUENTIAL, SPECIAL AND/OR PUNITIVE DAMAGES OF ANY KIND, INCLUDING BUT NOT LIMITED TO ANY LABOR COSTS, PRODUCT COSTS, LOST REVENUE, BUSINESS INTERRUTPION LOSSES, LOST PROFITS, LOSS OF BUSINESS, LOSS OF DATA...
- Page 13 TO REPORT A GIVEN EVENT OR CONDITION, WHETHER OR NOT CAUSED BY WARRANTORS’ NEGLIGENCE. YOU AGREE TO RELEASE, WAIVE, DISCHARGE AND COVENANT NOT TO SUE WARRANTORS, THEIR OWNERS, DIRECTORS, OFFICERS, EMPLOYEES, AGENTS, SUPPLIERS OR AFFILIATED COMPANIES, FOR ANY AND ALL LIABILITIES POTENTIALLY ARISING FROM ANY CLAIM, DEMAND OR ACTION BASED UPON ANY LOSSES, LIABILITIES, DAMAGES OR COSTS, INCLUDING BUT NOT LIMITED TO DAMAGES THAT ARE DIRECT OR INDIRECT, INCIDENTAL, SPECIAL OR...
- Page 14 State of Delaware, without regard to the principles of conflicts of law. Effective date 08/01/2005 PHONETICS, INC. d.b.a. SENSAPHONE 901 Tryens Road Aston, PA 19014 Phone: 610.558.2700 Fax: 610.558.0222...
-
Page 15: Table Of Contents
TURNING THE 1400 ON . . . . . . . . . . . . . . . . . . - Page 16 Sensaphone 1400 Manual CHAPTER 4: ZONE PROGRAMMING . . . . . . . 31 AUTOMATIC ZONE CONFIGURATION . . . . . . . . . . . . . . 31 MANUAL ZONE CONFIGURATION .
- Page 17 Table of Contents TONE OR PULSE DIALING . . . . . . . . . . . . . . . . . . . . . . . 72 RINGS UNTIL ANSWER .
- Page 18 APPENDIX A: Checking Your Sensaphone 1400 for Proper Operation . . . . . . . . . . . . . 101 APPENDIX B: Replacing the Back-up Battery .
-
Page 19: Chapter 1: Introduction
The unit comes in a plastic NEMA-4 enclosure with tabs for wall or panel mounting. Terminal connections for Zones, outputs and power are easily accessible from the front of the unit. The 1400 is powered by a plug-in adapter and has a 6V 1.3AH rechargeable backup... -
Page 20: Features
The unit also includes built-in Line Seizure capability to ensure that the telephone line is available when necesssary. FEATURES The Sensaphone 1400 Includes the following features: Four Zones configurable as temperature, 4–20mA, or dry contact Scaleable Range for 4–20mA Zones... -
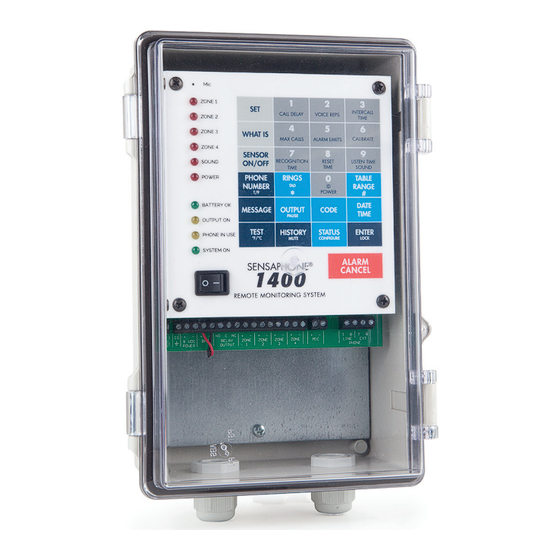
Page 21: Layout
STATUS ENTER PHONE IN USE °F/°C MUTE CONFIGURE LOCK SYSTEM ON Figure 1: 1400 diagram 1. Programming Keypad 8. External Mic Terminals 2. Grounding Terminal 9. Built-in Condenser Mic 3. 9-12 Power Terminals 10. System On LED 4. N.O./N.C. Relay Output 11. - Page 22 Sensaphone 1400 Manual TECHNICAL SUPPORT Reading this instruction manual will help you install and program the 1400 easily. Programming and voice recording are performed locally using the built-in keypad. Some programming can also be accessed via touch-tone phone. If there are any questions or problems that arise upon installation or...
-
Page 23: Chapter 2: Installation
Chapter 2: Installation CHAPTER 2: INSTALLATION OPERATING ENVIRONMENT The Sensaphone 1400 should be mounted and operated in a clean, dry environment. The unit is microprocessor-controlled and as a result it should not be installed near devices that generate strong electromagnetic fields. Such interference is typically generated by power switching equipment such as relays or contactors. -
Page 24: Locking The Enclosure
Sensaphone 1400 Manual Locking the Enclosure The 1400 enclosure can be locked by installing a small luggage-style padlock through the loop on the front door of the enclosure. See Figure below. Figure 2: Locking the Enclosure Grounding Connect a heavy gauge (#14AWG) copper wire to the earth ground terminal on the left end of the panel and connect the other end to a ground rod or metal cold water pipe (See Figure 3). -
Page 25: Wiring Connectors
(or open-up) the compression washer. Insert all cables through the two connectors. When finished turn them clockwise to secure and seal the 1400 from the outside environment. If you don't have enough cables to obtain a snug fit you can insert a small piece of soft PVC insulation or rubber tubing to take up the extra space. -
Page 26: Turning The 1400 On
See Appendix B for battery replacement instructions. The 1400 also includes a 3V lithium battery to retain the date and time when main power is off. The lithium battery should provide 8-10 years of service life. -
Page 27: Line Seizure
For example, if an emergency occurs which puts the 1400 in alarm mode, the unit will be able to dial out even if a telephone has been left off the hook. To the right of the LINE terminals is another set of terminals labeled EXT. - Page 28 DC power supply. Connect the negative terminal of the transducer to a Zone terminal on the Sensaphone 1400. Connect the negative terminal from your power supply to the adjacent ground terminal on the 1400.
-
Page 29: External Microphone
Time, and Sound Level Sensitivity (calibration). Wiring Recommendations The 1400 will work fine in indoor environments using unshielded cable. When wiring will be subject to long lengths (>250') or if run outdoors, it is highly recommended that shielded cable be used and that the shield be connected to an earth ground. -
Page 30: Led Indicators
Sensaphone 1400 Manual When preparing wire for connection to the terminal blocks, strip 4" of insulation from the conductor (see figure below). .25" Figure 6: Wire stripped for connection LED INDICATORS The LEDs provide on-site alarm and status information. Listed below are descriptions of how the LEDs work. -
Page 31: Chapter 3: Quick Start Guide
ERROR MESSAGES When programming parameters in the 1400 you may get an error message if you inadvertently enter an incorrect value. If the unit says “Error 1,” it means that you entered a value that is out of range... -
Page 32: Acknowledging A False Alarm
Sensaphone 1400 Manual Code is enabled (see Chapter Five), and you enter the incorrect security code, the unit will answer with “Error 2” and offer you a second chance to enter the correct code. ACKNOWLEDGING A FALSE ALARM While programming the unit you may inadvertently set off an alarm. -
Page 33: Chapter 4: Zone Programming
Sound Level Recognition Time Sound Level Calibration AUTOMATIC ZONE CONFIGURATION The 1400 is compatible with normally open, normally closed, 2.8K thermistor (temperature), 10K thermistor (temperature), and 4-20mA type sensors. All of the Zones are configured simultaneously by keying in a simple key sequence after connecting all of your sensors. -
Page 34: Manual Zone Configuration
CONFIGURE The 1400 will prompt, “Enter 0 for automatic configuration, enter zone number for manual configuration.” If you press “0”, the 1400 will scan each Zone input and determine the input type. The Zones are now considered normal. If a normally closed Zone becomes open, an alarm will occur. - Page 35 4. Press the key which corresponds to the type of Zone according to the table below: 1: NO Dry Contact 2: NC Dry Contact 3: 2.8K Thermistor (temperature sensor) 4: 10K Thermistor (temperature sensor) 5: 4–20mA 5. Press ENTER. ENTER LOCK The 1400 will recite the programmed Zone input configuration.
-
Page 36: Enable/Disable Zone Alarms
Disabling sound will prevent a sound alarm dialout. The default setting is enabled (on). 1. Press the SENSOR ON/OFF key. SENSOR ON/OFF 2. Press the Sound Alarm key (9). 1400 will say “Sound Alarm... -
Page 37: Enable/Disable Power
The default setting is enabled (on). 1. Press the SENSOR ON/OFF key. SENSOR ON/OFF 2. Press the power key (0) to enable/disable. 1400 will say “Power Alarm On/Off ” to indicate enabled/disabled. POWER 3. Repeat the steps to change. -
Page 38: Configure Table Range For 4-20Ma Sensors
Table Low value of 0 and a Table High value of 15 and the 1400 will scale the Zone to read between 0 and 15. The low and high table range can be set from -10,000 to +10,000 [Defaults: low=0, high=100]. - Page 39 TIME RINGS POWER The 1400 will say “OK.” 1. Press the WHAT IS key. WHAT IS 2. Press the TABLE RANGE key. 1400 will say “Enter Zone Number.” TABLE RANGE 3) Press the corresponding Zone number (1–4). INTERCALL CALL DELAY...
-
Page 40: Alarm Recognition Time
Sensaphone 1400 Manual The 1400 will say “Low” and speak the low table value, then it will say “High” and speak the high table value. ALARM RECOGNITION TIME The Alarm Recognition Time is the length of time an alert condition must be present before a valid alarm exists and dial-out is activated. - Page 41 ALARM LIMITS LOCK RECOGNITION RESET LISTEN TIME TIME SOUND TIME POWER The 1400 will say “OK, enter seconds.” 5. Using the number keys, enter seconds. Then press ENTER. INTERCALL CALL DELAY VOICE REPS TIME CALIBRATE MAX CALLS ALARM LIMITS ENTER...
-
Page 42: Alarm Limits
LISTEN TIME TIME SOUND TIME POWER The 1400 will recite the programmed recognition time for that Zone. ALARM LIMITS The Alarm Limits determine the level at which a temperature or 4–20mA Zone has reached the alarm threshold. The input value must exceed the Alarm Limit to trip an alarm. - Page 43 The 1400 will say “Enter Zone Number.” 3. Press the corresponding Zone key (1–4)). INTERCALL CALL DELAY VOICE REPS TIME MAX CALLS The 1400 will say “Enter Low Alarm Limit.” 4. Using the number keys, enter a value. Then press ENTER. VOICE INTERCALL CALL REPS TIME...
-
Page 44: Reset Time
Sensaphone 1400 Manual To check the alarm limits: 1. Press the WHAT IS key. WHAT IS 2. Press the ALARM LIMITS key. 1400 will say “Enter Zone Number. ” ALARM LIMITS 3. Press the corresponding Zone key (1–4). 1400 will say the programmed value. - Page 45 Chapter 4: Zone Programming 1. Press the SET key. 2. Press the RESET TIME key. RESET TIME The 1400 will say “Enter Zone Number.” 3. Press the corresponding Zone key (1-4), Power (0), or Sound (9). INTERCALL CALL DELAY VOICE REPS...
-
Page 46: Zone Calibration
VOICE REPS TIME MAX CALLS The 1400 will recite the programmed Reset Time for that Zone. If the Reset Time is set to 0 minutes the 1800 will say “Disabled”. ZONE CALIBRATION Due to tolerance variations or other factors, you may need to program an offset to calibrate the sensor. -
Page 47: Sound Level Calibration
SOUND LEVEL CALIBRATION This feature allows you to program the level of sound that will cause the 1400 to respond to an alarm and dial out. NOTE: This applies only to the (optional) external microphone. It may be useful to desensitize the 1400 to sound if installed in an area with a... - Page 48 VOICE REPS TIME ENTER CALIBRATE MAX CALLS ALARM LIMITS LOCK The 1400 will say, “OK.” RECOGNITION RESET LISTEN TIME TIME SOUND TIME 1. Press the WHAT IS key. POWER WHAT IS 2. Press the CALIBRATE key. 1400 will say “Enter Zone...
-
Page 49: Designating A Zone As Unused
3. Press the SOUND key. LISTEN TIME SOUND The 1400 will recite the programmed sound sensitivity level. DESIGNATING A ZONE AS UNUSED This feature allows you to mark selected Zones, Power, or Sound as unused, which will prohibit them from going into alarm and will also leave them out of the status report. -
Page 50: Exit Delay
Sensaphone 1400 Manual The 1400 will respond by saying Zone 1–4, Power, or Sound “Off/ On.” Repeat the key sequence to place the Zone back in use. EXIT DELAY The Exit Delay feature is useful when you are using your 1400 for security monitoring. -
Page 51: Temperature-Only Status Report
Chapter 4: Zone Programming The 1400 recites the full Status Report; during this time, you are able to exit the monitored area without tripping an alarm. TEMPERATURE-ONLY STATUS REPORT You can receive a limited status report that only includes inputs configured as temperature. -
Page 52: Chapter 5: Communication
Sensaphone 1400 Manual CHAPTER 5: COMMUNICATION PROGRAMMING This chapter explains the keyboard commands for programming the communications functions of the 400. This includes programming, interrogating and/or resetting of: Date and Time Voice Messages ID Number Alarm Dial-out Telephone Numbers Special Dialing Options... -
Page 53: Date And Time
Chapter 5: Communication Programming DATE and TIME The 1400 has an internal clock/calendar that is used to time-stamp events and maintain alarm history. To program the date and time: 1. Press SET, followed by the DATE/TIME key. DATE TIME 2. The unit will say “Enter the date.” Enter the date in month/day/ year (mm/dd/yy) format using two digits for each. -
Page 54: Voice Messages
The 1400’s digital speech recording feature allows you to record custom messages for each of the four Zones and an ID Message. This means that when the 1400 calls you during an alarm, you will hear a personalized Voice Message identifying the unit and telling you exactly what alarm condition exists. - Page 55 To program the Voice Message for a Zone: 1. Locate the condenser mic. CALL DELAY 2. Press the SET key. 3. Press the MESSAGE key. The 1400 will say, “Enter Message Number.” MESSAGE...
- Page 56 3. Press the corresponding Zone number key. INTERCALL CALL DELAY VOICE REPS TIME MAX CALLS The 1400 will play back your recorded message. To erase a Zone or ID message: 1. Press the SENSOR ON/OFF key. SENSOR ON/OFF 2. Press the MESSAGE key.
- Page 57 Chapter 5: Communication Programming 3. Press the Zone Number or ID key. INTERCALL CALL DELAY VOICE REPS POWER TIME MAX CALLS The 1400 will say, “Message erased.”...
-
Page 58: Id Number
The ID Number can be up to 16 digits long. When the 1400 is called from a remote location, it always begins its message with the identification number: “Hello, this is (ID Number).”... - Page 59 1. Press the WHAT IS key. WHAT IS 2. Press the ID key (number 0 key). POWER The 1400 will recite the ID Number. To erase the ID Number: 1. Press the SET key. 2. Press the ID key (number 0 key).
-
Page 60: Alarm Dial-Out Telephone Numbers
Sensaphone 1400 Manual ALARM DIAL-OUT TELEPHONE NUMBERS The Sensaphone 1400 will dial up to eight 48-digit phone numbers to report alarm conditions. These are the numbers that will be called during an alarm dial-out. The unit can deliver an alarm message via voice telephone call or numeric page. - Page 61 VOICE REPS TIME CALIBRATE MAX CALLS ALARM LIMITS RECOGNITION RESET TIME TIME The 1400 will recite the number programmed. If there is no number programmed, 1400 will say “No number.” To erase a dial-out telephone number: 1. Press the SET key.
-
Page 62: Numeric Pager Dialout
RECOGNITION RESET TIME TIME The 1400 will say “Number (1–8) erased.” Numeric Pager Dialout When programming the 1400 to dial a Numeric pager there are two methods that can be used: mode and mode. Automatic Manual The only difference is that in Automatic mode the 1400 will automatically try to sense when the call has been answered and then send the ID Number and zone numbers. - Page 63 MAX CALLS ALARM LIMITS RECOGNITION RESET TIME TIME 4. Press CODE 1 (This tells 1400 this is a Numeric Pager call). CODE CALL DELAY The 1400 will say “Pager.” 5. Enter the pager number using the number keys. Then press ENTER.
- Page 64 MAX CALLS ALARM LIMITS RECOGNITION RESET TIME TIME 4. Press CODE 1 (This tells 1400 this is a Numeric pager call). CODE CALL DELAY The 1400 will say “Pager.” 5. Enter the pager telephone number using the number keys. INTERCALL...
- Page 65 2. Press the PHONE NUMBER key PHONE NUMBER 3. Select the programmed Phone Number from the number keys (keys 1–8). The 1400 will recite the type of call, “pager,” followed by the pager number assigned to that key. INTERCALL CALL DELAY...
-
Page 66: Special Dialing Options
PAUSE key. OUTPUT PAUSE The 1400 can be instructed to wait for the call to be answered before dialing additional digits. This is useful if you need to call a company’s main number and then dial additional digits to go to a specific extension (Example: 888-555-1200—wait for answer—227). -
Page 67: Change To Touch-Tone Dialing
In a situation where you must use pulse dialing, pressing CODE 3 will change all following digits to Touch-Tone. CODE INTERCALL TIME Special Dialing Code Summary Special Dialing Codes for the 1400 are: Code 1: Numeric pager type Code 2: Wait for answer Code 3: Change to Touch-Tone... -
Page 68: Dial-Out Test Mode
Sensaphone 1400 Manual DIAL-OUT TEST MODE The 1400 allows you to test your telephone programming by simulating an alarm dialout to any programmed telephone number. This can be a valuable tool for insuring that your programming is correct and also for troubleshooting dialing problems. In this mode all signals on the telephone line are audible through the local speaker. - Page 69 °F/°C The 1400 will say “Enter number.” 3. Press 0, then ENTER to enter manual dialing mode. The 1400 will go off-hook and you should hear a dial tone through the speaker. Press any number keys to dial a telephone number.
-
Page 70: Alarm Acknowledgment Codes
Sensaphone 1400 Manual ALARM ACKNOWLEDGMENT CODES When the 1400 detects an alarm, it starts dialing each telephone number until it receives acknowledgment or reaches the maximum number of calls. There are two acknowledgment modes: The default, Single-User mode is for users who are not concerned with knowing who responds to and acknowledges the alarm. - Page 71 VOICE REPS TIME CALIBRATE MAX CALLS ALARM LIMITS RECOGNITION RESET TIME TIME The 1400 will recite the Acknowledgment Code for the selected telephone number entry. Note: In default Single-User mode, the unit will announce “555” immediately after pressing the CODE key.
-
Page 72: To Erase An Acknowledgment Code
Sensaphone 1400 Manual To erase an Acknowledgment Code: 1. Press the SET key. 2. Press the CODE key. CODE The 1400 will say “Enter Code Number.” 3. Press an assigned user number, 1–8. INTERCALL CALL DELAY VOICE REPS TIME CALIBRATE... -
Page 73: Alarm History
Chapter 5: Communication Programming ALARM HISTORY The 1400 will retain historical information on the last 10 alarms. The information retained includes: Zone number, the time/date that the alarm occurred, and the User number that acknowledged the alarm. To hear the Alarm History: 1. -
Page 74: Tone Or Pulse Dialing
Sensaphone 1400 Manual TONE OR PULSE DIALING The 1400 can dial out in pulse or touch-tones. All numbers will be called using the chosen dialing method. The default is TONE. To program as either Tone or Pulse: 1. Press the SENSOR ON/OFF key. -
Page 75: Rings Until Answer
Chapter 5: Communication Programming RINGS UNTIL ANSWER The Rings Until Answer is the number of rings that must occur before 1400 answers the phone. This value can be from 1 to 15. The default value is 4. To program Rings Until Answer: 1. -
Page 76: Call Delay Time
Sensaphone 1400 Manual CALL DELAY TIME The call delay time is the length of time the 1400 will announce an alarm before it starts the dial-out sequence. This only applies to the first call. To set delay time between calls, see INTERCALL TIME. - Page 77 LISTEN TIME TIME SOUND TIME POWER The 1400 will say “OK.” To play back the call delay time: 1. Press the WHAT IS key WHAT IS 2. Press the CALL DELAY key CALL DELAY The 1400 will recite the programmed time.
-
Page 78: Intercall Time
Sensaphone 1400 Manual INTERCALL TIME The Intercall Time is the programmable period of time the 1400 waits between making alarm phone calls. Intercall Time is activated only after alarm dial-out to the first telephone number fails to be acknowledged. This period can be programmed from 10 seconds to 60 minutes. - Page 79 LISTEN TIME TIME SOUND TIME POWER The 1400 will say “OK.” To play back the Intercall Time: 1. Press the WHAT IS key WHAT IS 2. Press the INTERCALL TIME key INTERCALL TIME The 1400 will recite the programmed time.
-
Page 80: Call Progress
Sensaphone 1400 Manual CALL PROGRESS The 1400 monitors call progress when it dials out for an alarm. If 1400 encounters a busy signal or receives no answer after ten rings, the unit hangs up, waits the programmed intercall time and then dials the next phone number. -
Page 81: Voice Repetitions
Chapter 5: Communication Programming VOICE REPETITIONS The voice repetitions is the number of times the 1400 will recite the alarm message per phone call when it dials out. This can be programmed from 1 to 10 repetitions. The default value is 3 repetitions. -
Page 82: Max Calls
Sensaphone 1400 Manual MAX CALLS The 1400 has the ability to acknowledge itself by using the Max Calls function. The unit keeps a count of the number of phone calls it makes for a particular alarm. Once the number of calls made reaches Max Calls, the 1400 will acknowledge the alarm and stop the dialout process. - Page 83 Chapter 5: Communication Programming To play back Max Calls: 1. Press the WHAT IS key. WHAT IS 2. Press the MAX CALLS key MAX CALLS The 1400 will recite the value of max calls.
-
Page 84: Compatibility
ON/OFF 3. Press the TAD key. RINGS The 1400 will say “TAD On.” (If the 1400 says “TAD Off ” repeat steps 2 and 3.) 4. Once TAD is on, allow the phone to ring once when you call the unit and then hang up. The 1400 recognizes that a call was made and activates a 30 second internal timer. -
Page 85: Listen-In Time
LISTEN TIME TIME SOUND TIME POWER The 1400 will say “OK.” To play back the Listen-in Time: 1. Press the WHAT IS key. WHAT IS 2. Press the LISTEN TIME key LISTEN TIME SOUND The 1400 will recite the time programmed. -
Page 86: Remote Programming Security Code (Lock)
1400 by entering the four-digit lock/unlock code. If you enter the correct code, you will gain access to the 1400 to use the phone commands. If you enter the incorrect code, the 1400 will say “Error 2”... - Page 87 To play back the security code: 1. Press the WHAT IS key. WHAT IS 2. Press the LOCK key. ENTER LOCK The 1400 will recite the security code. To remove the security code: 1. Press the SET key. 2. Press the LOCK key. ENTER LOCK The 1400 will say “Enter security code.”...
-
Page 88: Speaker Mute
2. Press the MUTE key HISTORY MUTE The 1400 will say “Mute On” to indicate that the speaker mute is on. It will say “Mute Off ” to indicate when the speaker mute is off. 3. Repeat key sequence to change. -
Page 89: Callback Acknowledgment
10 times, and the unit will answer and say “...Alarm Acknowledged.” NOTE: If TAD is also enabled, then you must call the 1400, let it ring once, hang up, and then call the unit back within 30 seconds. -
Page 90: Chapter 6: Controlling The Output
Sensaphone 1400 Manual CHAPTER 6: CONTROLLING THE OUTPUT The 1400 includes a relay output that can be used to control a light, siren, or other device. The output is a Form-C Normally Open/ Normally Closed mechanical relay and is rated for up to 120VAC 2A. -
Page 91: Manual Mode
SENSOR ON/OFF + OUTPUT. SENSOR OUTPUT ON/OFF PAUSE The 1400 will respond “ON” or “OFF” to indicate the state of the output. Note: If the 1400 says “Error,” the output is not programmed for manual mode. To program the Output Mode: 1. - Page 92 4. Press the ENTER key. ENTER LOCK The 1400 will say “OK” and recite a description of the mode selected, such as “Automatic on Zone 1” or “Manual.” Note that when is selected, the 1400 will simply say “Automatic on Mode 7 Alarm,”...
-
Page 93: Chapter 7: Operation
1400 begins the alarm notification sequence. Alarm Notification The 1400 can make two types of phone calls: Voice and Numeric Pager. Dialout Note: Call Progress The 1400 monitors call progress when dialing out. If the 1400 dials... -
Page 94: Alarm Dialout-Pager
Sensaphone 1400 Manual Below is an example of what the 1400 might say during a typical “voice” dialout: “Hello, this is 555-2278, ‘Acme Medical Laboratory,’ Zone One, ‘Temperature in Refrigerator One,’ a high temperature alarm exists, it is now 50 degrees Fahrenheit, too high. Listen to sound for ten seconds.”... -
Page 95: Alarm Acknowledgment
Chapter 7: Operation ALARM ACKNOWLEDGMENT Alarm Acknowledgment—Voice Dialout Repeated below is the same example of what the 1400 might say during a typical “voice” dialout: “Hello, this is 555-2278, ‘Acme Medical Laboratory,’ Zone One, ‘Temperature in Refrigerator One,’ a high temperature alarm exists, it is now 50 degrees Fahrenheit, too high. -
Page 96: Alarm Acknowledgment-Numeric Pager Dialout
(rotary) telephone unless the Callback Acknowledgment feature is enabled. Below is an example of what the 1400 will say when you call it back to acknowledge a typical alarm: “Hello, this is 555-2278, ‘Acme Medical Laboratory,’ Zone One, ‘Temperature in Refrigerator One,’... -
Page 97: Alarm Acknowledgment-Automatic (Max Calls)
Alarm Acknowledgment—Automatic (Max Calls) The 1400 has the ability to acknowledge itself by using the Max Calls function. The unit keeps a count of the number of phone calls it makes for a particular alarm. Once the number of calls made reaches Max Calls, the 1400 will acknowledge the alarm and stop the dialout process. -
Page 98: Call-In Status
CALL-IN STATUS You can also call into the 1400 using a Touch-Tone telephone to obtain a status report. After answering, the 1400 will recite a status report. Immediately following the status report, the 1400 allows you to use Touch-Tone commands to enable/disable zones, change limits, control the output, etc. -
Page 99: Remote Commands Via Touch-Tone Phone
Chapter 7: Operation REMOTE COMMANDS VIA TOUCH-TONE PHONE You can issue a number of commands to the 1400 remotely using a Touch-Tone telephone. This command mode can be entered at any time during the status report. Simply press a Touch-Tone and the unit will halt the report and respond with “OK.”... - Page 100 Sensaphone 1400 Manual The tables below list all of the touch-tone commands that are supported. Commands are listed in both character and numeric formats. The # key is used as an ENTER key. Use the * key to represent a negative sign or to represent the [CODE] key when programming telephone numbers.
- Page 101 Chapter 7: Operation Special Dialing Codes Summary Code 1: Numeric pager type Code 2: Wait for answer Code 3: Change to Touch-Tone Code 4: Pause Code 5: * Code 6: # Description Touch-Tone Command Setting a phone number S(7) + T(8) + (entry 1–8) + (telephone number) + # Description Touch-Tone Command...
- Page 102 The following command will recite the alarm history. Description Touch-Tone Command Recite alarm history H(4) + I(4) + S(7) Hang-up The following command will make the 1400 hang up the telephone line. Description Touch-Tone Command Hang-up the phone line B(2) + Y(9) + E(3) NOTE: If a security code is enabled, the 1400 will prompt you with “Enter security code.”...
- Page 103 • NO/NC Contacts: Open or close the contact. Allow the unit to contact all programmed telephone numbers. This will make sure that the 1400 is programmed properly. It will also prepare personnel to respond appropriately when they receive a call...
- Page 104 Sensaphone 1400 Manual 3. Test the batteries by unplugging the AC adapter and making sure that the 1400 continues to function. Check that the BATTERY OK LED remains on steady. Press WHAT IS, then STATUS on the keypad, and listen to the status report. Make sure the report states that “power is off ”...
- Page 105 After 5 years (or when back- up time is insufficient) the battery should be replaced. Replacement batteries can be ordered from Sensaphone (Part number BAT-0020). To replace the battery, follow the instructions below: WARNING: When removing and replacing the bat- tery, be careful not to short out the battery terminals on the bracket or back panel.
- Page 106 Sensaphone 1400 Manual 11. Readjust the cables through the compression connectors and secure the fittings. 12. Plug the power transformer into the outlet and turn on the power switch. Figure 1: Back-up Battery placement...
-
Page 107: Appendix C: Troubleshooting The 1400
In the event that a problem is encountered, this section will assist you in determining the cause so you can return the unit to its normal monitoring routine with minimal interruption. Most problems with the 1400 are easy to identify and quickly corrected. See the information under the following general headings: •... - Page 108 Tone or pulse (the current dialing Switch from the current setting: from method) is not compatible with the tone to pulse, or from pulse to tone. telephone line on which the 1400 is Refer to Chapter 5. installed. c) Recognition Time is too long. An Reprogram Recognition Time.
- Page 109 Appendix C: Troubleshooting Problem 2 The 1400 will not answer the telephone when called for a Status Report or alarm acknowledgment. Cause Solution a) Rings Until Answer is incorrectly Recheck programming of Rings Until programmed. Answer. Refer to Chapter 5.
-
Page 110: Communications/Dial-Out
Sensaphone 1400 Manual COMMUNICATIONS/DIAL-OUT (continued) Problem 4 The 1400 recites the alarm message or Status Report over the telephone, but is silent at the installation site. Cause Solution The local voice mute feature is in Deactivate local voice mute. Refer to effect. -
Page 111: Temperature Monitoring
Appendix C: Troubleshooting TEMPERATURE MONITORING: Problem 1 Can’t program temperature limits; or the unit won’t read the temperature sensor. Cause Solution The zone isn’t configured to read a Press SET and CONFIGURE to temperature sensor. program the zone. For 10K thermistor, you must manually configure. - Page 112 Sensaphone 1400 Manual TEMPERATURE MONITORING (continued) Problem 4 Temperature reading is inaccurate. Cause Solution a) The zone is configured for the Manually configure the zone as wrong type of thermistor (i.e., 2.8k described in Chapter 4. vs. 10k) b) Temperature sensing may be...
-
Page 113: 4-20Ma Monitoring
Multiple devices connected in loop. The 1400’s zone is single-ended and terminates to ground. Because of this, the 1400 must be the last device in the loop, and in some cases the ONLY device. For certain installations, it may be necessary to... -
Page 114: Sound Level Monitoring
Sensaphone 1400 Manual SOUND LEVEL MONITORING: Problem 1 False high sound alarms occur frequently. Cause Solution a) The programmed sound sensitivity Reprogram the sound sensitivity results in over-sensitivity to non- (calibration). Refer to Chapter 4. alarm sound as well as alarm sound. -
Page 115: Other Monitoring
To avoid frequent, false alarms, increase the power Recognition Time. Refer to Chapter 4. Problem 3 The 1400 does not recognize power failure. Cause Solution a) Battery is either incorrectly To verify proper battery function, installed or drained. - Page 116 If the solutions offered above do not appear to correct the problem, apply the following steps, in the order shown. • Turn the power switch off. • Wait one minute for the 1400 to completely power down. • Turn the power switch on. • Reconfigure the zones. Refer to Chapter 4.
-
Page 117: Tables
Appendix D: Thermistor Tables APPENDIX D: 2 .8 and 10K Thermistor Tables 2 .8K Thermistor Data Degrees Celsius Resistance (Ohms) 187,625 94,206 49,549 27,180 15,491 9,142 5,572 3,498 2,256 1,491 1,009... - Page 118 Sensaphone 1400 Manual 10K Thermistor Data Degrees Celsius Resistance (Ohms) 135.2K 78.91K 47.54 29.49K 18.79K 12.25K 8,194 5,592 3,893 2,760 1,990...
-
Page 119: Appendix E: 1400 Technical
Appendix E: Technical Specifications APPENDIX E: 1400 Technical Specifications Environmental Inputs Number of Zones: 4 Zone Connector: terminal block Zone Types: N.O./N.C. contact, 2.8K (-109° to 115° F; -85° to 57° C), and 10K thermistor (-87° to 168° F; -66° to 76° C), and 4–20mA (-10,000 to 10,000) -
Page 120: Specifications
Sensaphone 1400 Manual Power Supply Power Supply: 120VAC/12VDC 60Hz 6W wall plug-in transformer (230VAC/12VDC 50/60Hz power supply optional) Power Consumption: 5 Watts Power Protection: Metal Oxide Varistor Battery Backup: 6V 1.3 AH sealed gel cell, provides up to 24 hours... -
Page 121: Appendix F: 1400 Quick Reference
Number of calls until unit self-acknowledges [SET] or [WHAT IS] + [MAX CALLS] Min: 0 calls, Max: 255 calls Default=100 calls (TAD) Answering Device Allows 1400 to bypass answering devices on the same line Compatibility [SENSOR ON/OFF] + [RINGS/TAD/*] On or Off, Default=Off... - Page 122 Sensaphone 1400 Manual Callback Acknowledgment Allows alarm acknowledgment with 10 rings [SENSOR ON/OFF] + [CODE] On or Off Default=Disabled (off) Tone or Pulse Dialing Dialing method—touch-tone or pulse [SENSOR ON/OFF] + [PHONE NUMBER T/P] Tone or Pulse Default=Tone Alarm Programming...
- Page 123 Appendix F: Key Sequence Reference Reset Time Length of time until an alarm resets [SET] or [WHAT IS] + [RESET TIME] + [Zone #] 0=(disabled) Min:30, Max:1440, Default = 0 Power Alarm Enable/Disable Turns power alarm detection on or off [SENSOR ON/OFF] + [POWER] On or Off Default=Enabled (on) Sound Alarm Enable/Disable Turns high sound level alarm detection on or off...
- Page 124 Sensaphone 1400 Manual Output Mode Program relay output as manual or automatic for specific zone [SET] or [WHAT IS] + [OUTPUT] + [mode number] Default=none Remote Security Prohibits programming changes via telephone [SET] or [WHAT IS] + [ENTER/LOCK] + [4 digit code] Default=unlocked Press [ENTER] after all Key Sequences starting with [SET].
-
Page 125: Appendix G: Accessories
Other dry contact sensors or 4–20mA transducers, designed for more specialized applications, may also be used. Commercial or industrial electrical supply houses can provide devices to monitor virtually any condition. For further information, contact a Sensaphone Sales Associate toll-free at 1-877-373-2700. PART SENSOR/ NUMBER... -
Page 126: Appendix H: Returning Your 1400
Sensaphone 1400 Manual APPENDIX H: Returning Your 1400 for Repair In the event that the 1400 does not function properly, we suggest that you do the following: 1. Record your observations regarding the 1400’s malfunction. 2. Call Sensaphone Technical Support toll-free at 1-877-373-2700 or e-mail support@sensaphone.com prior to sending the unit... - Page 127 Remote Commands via Touch-Tone Phone 98–101 Returning for Repair 125 Technical Specifications 118–119 Telephone Line 24–25 Line Seizure 25 Troubleshooting 106–115 Turning the 1400 On 24 Backup Battery 24 Wiring Sensors and Transducers 25–27 Wiring Recommendations 27 Back-up Battery Replacing 104–105 Communication Programming 51–88...
- Page 128 Sensaphone 1400 Manual Voice Dialout 59–60 Alarm History 72 Callback Acknowledgment 88 Call Delay Time 74–75 Call Progress 79 Date and Time 52 Dial-Out Test Mode 67–68 ID Number 57–58 Intercall Time 77–78 Listen-In Time 84 Max Calls 81–82 Remote Programming Security Code 85–86 Speaker Mute 87 Special Dialing Options 65–68...
- Page 129 Appendix I: Index Technical Support 20 Test Log 129–130 Thermistor Tables 2.8K 116 10K 117 Wiring Sensors and Transducers 25–27 Zone Programming 31–50 Alarm Limits 41–43 Alarm Recognition Time 38–40 Calibration 44–45 Configure Range for 4-20mA sensors 35–37 Configure Temperature Scale 35 Designating a Zone as Unused 48–49 Enable/Disable Power 35 Enable/Disable Sound Level Alarm 34–35...
-
Page 130: Test Log
Sensaphone 1400 Manual Test Log...
Need help?
Do you have a question about the 1400 and is the answer not in the manual?
Questions and answers